Quantcast
Channel: How To
Viewing all 453 articles
Browse latest View live

How to Install and use Lsyncd on CentOS 7 & RHEL 7

$
0
0

Lsyncd stands for “Live Syncing Daemon“, as the name suggest lsyncd is used to sync or replicate files & directories locally and remotely after a specific time of interval. It uses Rsync & ssh in the backend.

Lsyncd works on Master and Slave architecture where it monitors the directory on the master server, if any changes or modification are done then lsyncd will replicate the same on its slave servers after specific interval of time.

In this article we will discuss how to install and use lsyncd on CentOS 7 & RHEL 7.

Scenario : Suppose want to sync the folder “/var/www/html” from Master server to Slave server

  • Master Server’s IP = 192.168.1.14
  • Slave Server’s IP = 192.168.1.15
  • Directory to be Sync = /var/www/html
First Enable Key based authentication between Master and Slave Server.

Login to Master server & generate the public and Private keys using ssh-keygen command.

lsyncd-ssh-keygen

Now Copy the public key using ssh-copy-id command to slave server

[root@linuxtechi ~]# ssh-copy-id -i /root/.ssh/id_rsa.pub root@192.168.1.15
Step:1 Login to Master Server and Install Lsyncd Package

Install the lsyncd dependency packages using below yum command.

[root@linuxtechi ~]# yum install lua lua-devel pkgconfig gcc asciidoc

To install lsyncd package using yum command , first enable the EPEL repo as lsyncd rpm is not available in the default repos.

[root@linuxtechi ~]# rpm -iUvh http://dl.fedoraproject.org/pub/epel/7/x86_64/e/epel-release-7-5.noarch.rpm
[root@linuxtechi ~]# yum install lsyncd
Step:2 Set up Configuration File of Lsyncd

Copy the sample Configuration to /etc/lsyncd.conf

[root@linuxtechi ~]# cp /usr/share/doc/lsyncd-2.1.5/examples/lrsync.lua /etc/lsyncd.conf

Add the following Lines to the config file.

[root@linuxtechi ~]# cat /etc/lsyncd.conf 
----
-- User configuration file for lsyncd.
--
-- Simple example for default rsync.
--
settings = {
 logfile = "/var/log/lsyncd.log",
 statusFile = "/var/log/lsyncd.stat",
 statusInterval = 2,
}
sync{
 default.rsync,
 source="/var/www/html",
 target="192.168.1.15:/var/www/html",
 rsync={rsh ="/usr/bin/ssh -l root -i /root/.ssh/id_rsa",}
}
[root@linuxtechi ~]#

lsyncd-conf

Step:3 Start the Service and enable it at reboot
[root@linuxtechi ~]# systemctl start lsyncd
[root@linuxtechi ~]# systemctl enable lsyncd
ln -s '/usr/lib/systemd/system/lsyncd.service' '/etc/systemd/system/multi-user.target.wants/lsyncd.service'
Step:4 Analyze the Replication and Logs Report.

As we can see that we are using “root” user for syncing data , as per your requirement you can change the user name.

In the log File we can see the status of replication whether the replication is completed or Not.

[root@linuxtechi ~]# tail -10 /var/log/lsyncd.log
Sun Jul 26 12:53:04 2015 Normal: recursive startup rsync: /var/www/html/ -> 192.168.1.15:/var/www/html/
Sun Jul 26 12:53:56 2015 Normal: Startup of "/var/www/html/" finished.
[root@linuxtechi ~]#

Using Stat file we view the lsyncd status Report. Sample Example is shown below

[root@linuxtechi ~]# more /var/log/lsyncd.stat 

Lsyncd status report at Sun Jul 26 12:53:58 2015
Sync1 source=/var/www/html/
There are 0 delays
Excluding:
 nothing.

Inotify watching 849 directories
 1: /var/www/html/
 2: /var/www/html/catalog/
 3: /var/www/html/catalog/controller/
 4: /var/www/html/catalog/controller/module/
 5: /var/www/html/catalog/controller/checkout/
 6: /var/www/html/catalog/controller/api/
 7: /var/www/html/catalog/controller/payment/
 8: /var/www/html/catalog/controller/tool/
 9: /var/www/html/catalog/controller/product/
 ---------------------
 848: /var/www/html/system/library/db/
 849: /var/www/html/system/modification/
[root@linuxtechi ~]#


Installation Steps of VirtualBox on OpenSUSE 13.1 & 13.2

$
0
0

VirtualBox is the virtualization software used at desktop level in linux like operating system .It allows us to install and run multiple Virtual Machines ( VM) at the same time. In this article we will install VirtualBox-4.3 on OpenSUSE 13.1 / 13.2.

Step:1 Enable VirtualBox Repository

Open the terminal and enable the virtualbox repository because its packages are not available in the default opensuse repository

linux-xa3t:~ # cd /etc/zypp/repos.d/
linux-xa3t:/etc/zypp/repos.d # wget http://download.virtualbox.org/virtualbox/rpm/opensuse/12.3/virtualbox.repo
Step:2 Refresh the repository using below Command
linux-xa3t:~ # zypper refresh

Before starting installation , please make sure following packages are install , if not then use the below command :

linux-xa3t:~ # zypper install gcc make automake autoconf kernel-source kernel-syms
Step:3 Install Virtualbox-4.3 using below zypper command
linux-xa3t:~ # zypper install VirtualBox-4.3

Apart from the Zypper Command We can also install Virtualbox package using Yast2 , example is shown below :

linux-xa3t:~ # yast2

Install-virtualbox-using-YaST2

Select VirtualBox-4.3 and mark for installation.

yast2-virtualbox

Click on Apply

Step:4 Now Access the VirtualBox

virtualbox-opensuse

Click on the Virtualbox Icon.

OpenSUSE-VirtualBox-Manager

Troubleshooting : In my case when i started Virtualbox, i was getting below error message :

virtualbox-error

To resolve this problem i have upgraded my Current Kernel version and then execute below command :

linux-xa3t:~ # /etc/init.d/vboxdrv setup
Stopping VirtualBox kernel modules          done
Recompiling VirtualBox kernel modules       done
Starting VirtualBox kernel modules          done
linux-xa3t:~ #

Install & Configure VNC Server in CentOS 7 and RHEL 7

$
0
0

VNC (Virtual Network Computing) Server allows the remote Desktop sharing using remote VNC clients like VNC viewer. In CentOS 7 & RHEL 7 package named “tigervnc-server” needs to be installed in order to setup the VNC server.

In this article we will go through the installation and configuration of VNC Server on CentOS 7 / RHEL 7.

Step:1 Make Sure the Desktop Packages are installed

In order to setup VNC server first we make sure that Desktop is installed ,in My case i am using Gnome Desktop. If Gnome Desktop is not installed on your Linux machine then use the below command to install.

 [root@linuxtechi ~]# yum groupinstall "GNOME Desktop"
Step:2 Install Tigervnc and other dependency Package.

 [root@linuxtechi ~]# yum install tigervnc-server xorg-x11-fonts-Type1
Step:3 Setup VNC Server Configuration File.

Copy the VNC config file “/lib/systemd/system/vncserver@.service” to the “/etc/systemd/system/vncserver@:<Port_Number>.service”.

While Copying the VNC config file we can mention the port number on which we want VNC service to be listen. In my case i am using port 3 , it means VNC will listen on “5903”. So while Connecting to the VNC server We can specify port number as <IP_Address_VNC_Server:3> or <IP_Address_VNC_Server:5903>

 [root@linuxtechi ~]# cp /lib/systemd/system/vncserver@.service /etc/systemd/system/vncserver@:3.service

Step:4 Update the User’s Information in the Config File

[root@linuxtechi ~]# vi /etc/systemd/system/vncserver@:3.service

vnc-server-config-file

Replace the “linuxtechi” user as per your requirement. In my case linuxtechi user will able to control and manage its desktop session using remote VNC clients.

Set the Firewall Rule if firewall is enabled on your linux box.

[root@linuxtechi ~]# firewall-cmd --permanent --zone=public --add-port=5903/tcp
success
[root@linuxtechi ~]# firewall-cmd --reload
success
[root@linuxtechi ~]#

Step:5 Set the VNC password for the User.

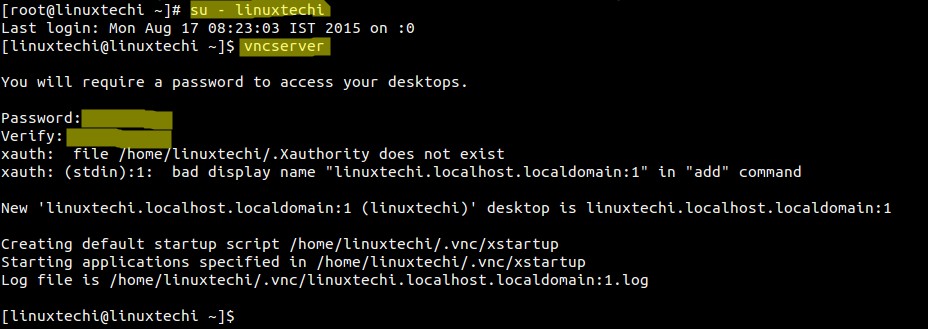
Switch to the user (linuxtechi) and run vncserver command to set the password as shown below :

vncserver-passwd

Start and Enable the VNC Service at boot.

Execute below commands as root only.

[root@linuxtechi ~]# systemctl daemon-reload
[root@linuxtechi ~]# systemctl start vncserver@:3.service
[root@linuxtechi ~]# systemctl enable vncserver@:3.service
ln -s '/etc/systemd/system/vncserver@:3.service' '/etc/systemd/system/multi-user.target.wants/vncserver@:3.service'
[root@linuxtechi ~]#
Step:6 Access Remote Desktop Session.

From Ubuntu Machine :

ubuntu@localhost:~$ vncviewer 192.168.1.15:3

Enter the VNC password that we have set in above step, after validating the authentication Remote Desktop session will start.

From Windows Machine Using VNC Viewer

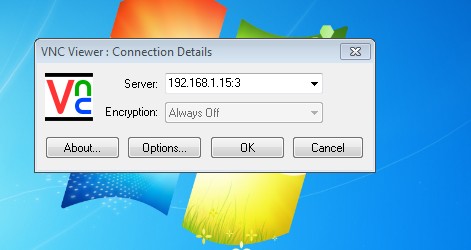
Enter the VNC Server IP Address and Port Number and then Click on OK

vncviewer

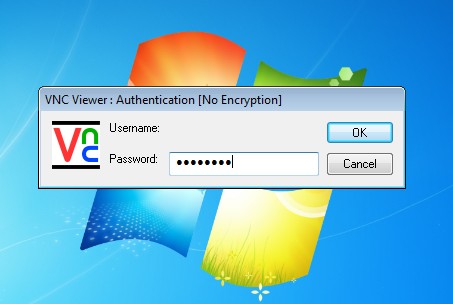
Enter the VNC Password & then click on OK.

vnc-password

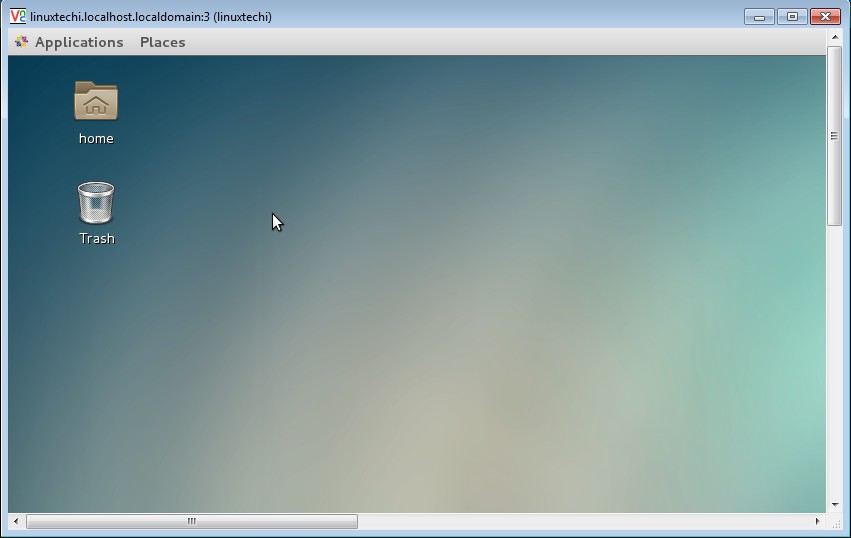
Desktop Session Will start after authentication.

remote-desktop-vncviewer

Installation Steps of VirtualBox 5.0 on Ubuntu 15.04 & 14.04

$
0
0

VirtualBox is a virtualization tool used at desktop level in Microsoft Windows and Linux.VirtualBox is developed and maintained by Oracle Inc. New version of Virtualbox ‘5.0’ is released and some of the features are listed below :

  • VirtualBox 5.0 provides support for Para Virtualization features for gust VM ( virtual Machine )
  • Guest VM can now directly mount & use USB 3.0 devices.
  • Improvement in CPU utilization by allowing OS & application to directly communicate with Hardware.
  • Drop & Drag facility between Virtual Machines.
  • Data on the Virtual disk can be encrypted using AES Algo.

In this post we will see how to install VirtualBox 5.0 on Ubuntu-15.04 and 14.04

Step:1 Download the VirtualBox 5.0 Debian Package

Virtualbox-5.0 is not available in the default ubuntu repositories so we have add to download it from url (download.virtualbox.org/virtualbox/5.0.2) using wget command.

For 64-bit System

linuxtechi@Linux-world:~$ wget http://download.virtualbox.org/virtualbox/5.0.2/virtualbox-5.0_5.0.2-102096~Ubuntu~trusty_amd64.deb

For 32-bit System

linuxtechi@Linux-world:~$ wget http://download.virtualbox.org/virtualbox/5.0.2/virtualbox-5.0_5.0.2-102096~Ubuntu~trusty_i386.deb
Step:2 Install downloaded Package using dpkg command

As  i am using 64-bit system so i will install 64-bit virtualBox Debian package.

linuxtechi@Linux-world:~$ sudo dpkg -i virtualbox-5.0_5.0.2-102096~Ubuntu~trusty_amd64.deb

install-virtualbox-5-0

Note : In case if you are facing any broken dependency issue while installing virtualbox package, then run the below command to fix it.

linuxtechi@Linux-world:~$ sudo apt-get install -f
Step:3 Start VirtualBox

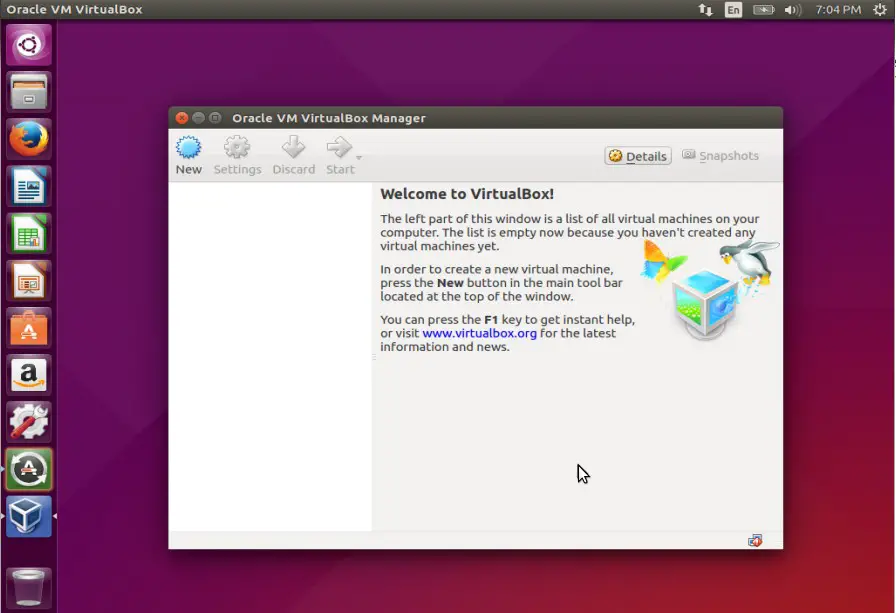
start-virtualbox-5

Alternate way to Start Virtualbox is from the terminal , type the below command.

linuxtechi@Linux-world:~$ virtualbox

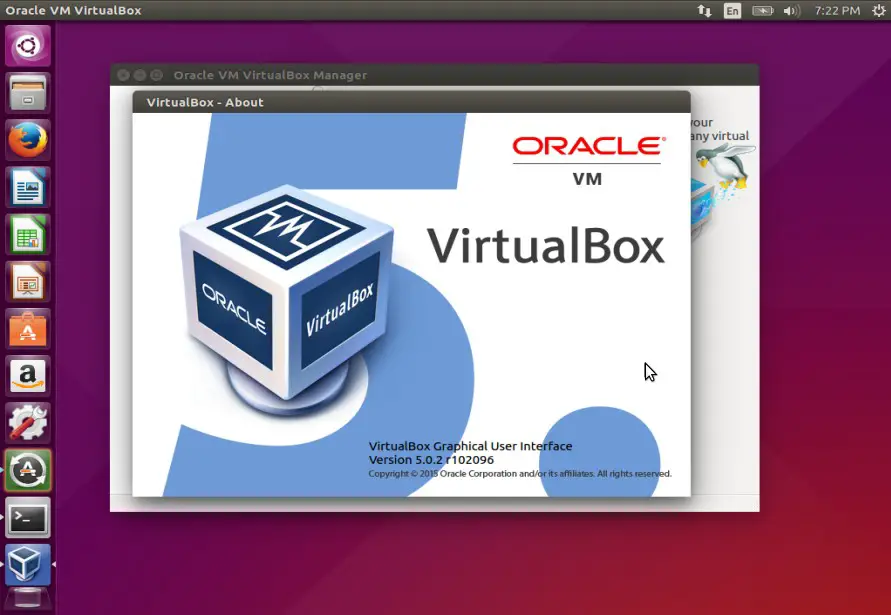
virtualbox-5-ubuntu

virtualbox-5-ubuntu-15-04

VirtualBox 5.0 installation is completed , now start creating Virtual machines and have fun :)

Configure NIC(Network Interface Card) bonding in CentOS 7 / RHEL 7

$
0
0

NIC(Network Interface Card) bonding is also known as Network bonding. It can be defined as the aggregation or combination of multiple NIC  into a single bond interface. It’s main purpose is to provide high availability and redundancy.

In this article we will learn how to configure nic or netwok bonding in CentOS 7 & RHEL 7. In my case i have two interface cards (enp0s3 & enp0s8) and will form a bond interface (bond0).

Prerequisite :

If bonding module is not loaded on your linux box then use the below command to load.

[root@openstack ~]# modprobe bonding

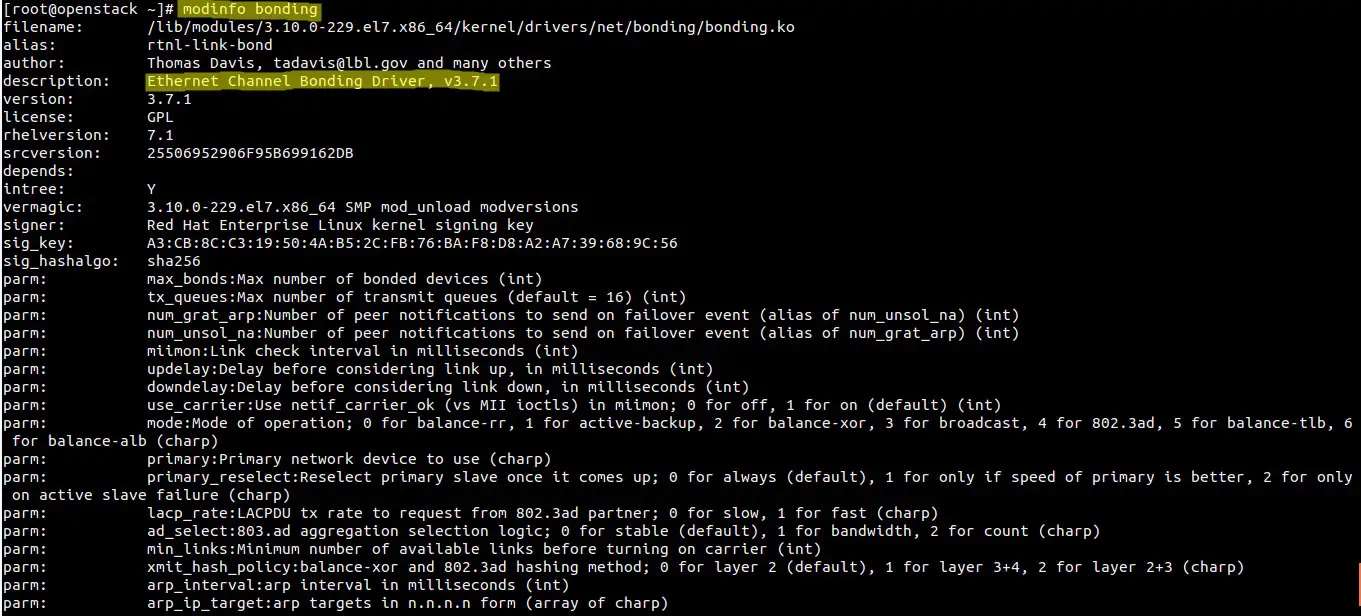
To list the bonding module info, use following command.

[root@openstack ~]# modinfo bonding

Output will be something like below

modinfo-bonding

Step:1 Create Bond Interface File

Create a bond interface file (ifcfg-bond0) under the folder “/etc/sysconfig/network-scripts/

[root@openstack network-scripts]# vi ifcfg-bond0
DEVICE=bond0
TYPE=Bond
NAME=bond0
BONDING_MASTER=yes
BOOTPROTO=none
ONBOOT=yes
IPADDR=192.168.1.70
NETMASK=255.255.255.0
GATEWAY=192.168.1.1
BONDING_OPTS="mode=5 miimon=100"

Save & exit the file.

Specify the IP address, Netmask & bonding modes as per your requirement. In my example i am using ‘mode=5′ which is used to provide fault tolerance and load balancing.

Please refer this for Different Modes in NIC bonding

Step:2 Edit the NIC interface files

For ifcfg-enp0s3

[root@openstack ~]# vi /etc/sysconfig/network-scripts/ifcfg-enp0s3
TYPE=Ethernet
BOOTPROTO=none
DEVICE=enp0s3
ONBOOT=yes
HWADDR="08:00:27:69:60:c9"
MASTER=bond0
SLAVE=yes

For ifcfg-enp0s8

[root@openstack ~]# cat /etc/sysconfig/network-scripts/ifcfg-enp0s8
TYPE=Ethernet
BOOTPROTO=none
DEVICE=enp0s8
ONBOOT=yes
HWADDR="08:00:27:ea:71:8d"
MASTER=bond0
SLAVE=yes
Step:3 Restart the Network Service

Below command will restart the network service and will bring above changes into the effect.

[root@openstack ~]# systemctl restart network.service

Step:4 Test & Verify bond interface.

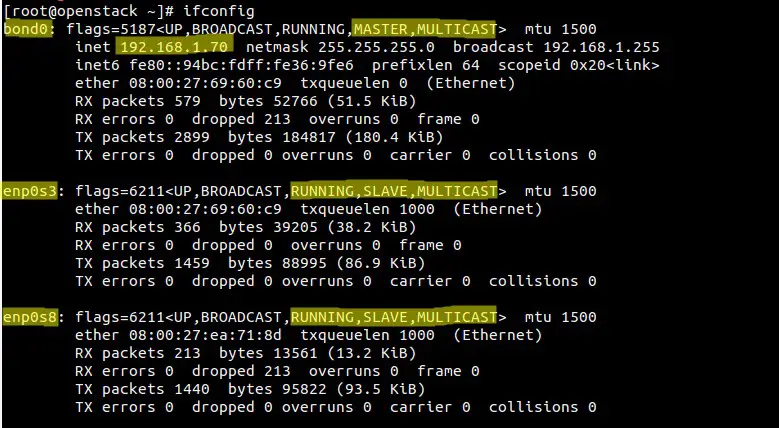
Use ‘ifconfig‘ & ‘ip add‘ command to check bond interface along with its slave interfaces.

ifconfig-bond

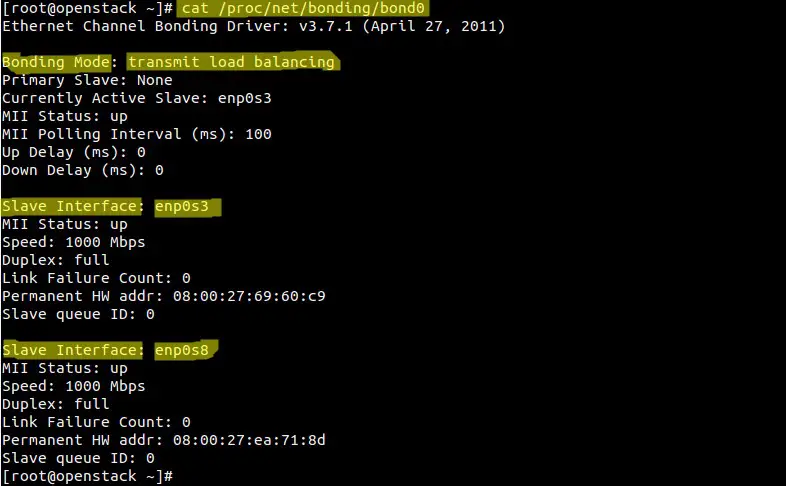
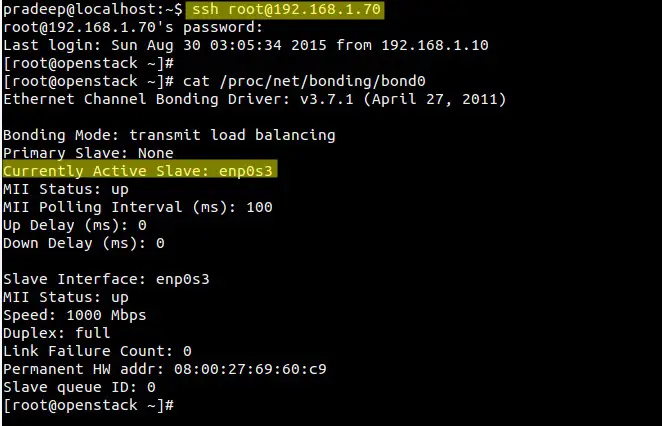
Use following command to view bond interface settings like bonding mode & slave interface.

[root@openstack ~]# cat /proc/net/bonding/bond0

bonding-settings

Step:5 Fault tolerance testing

To test the fault tolerance we can down one interface and check whether you are still able access the server.

[root@openstack ~]# ifdown enp0s8
Device 'enp0s8' successfully disconnected.
[root@openstack ~]#

fault-tolerance-bonding

Login to Single user mode in SUSE Linux (SLES / openSUSE)

$
0
0

For troubleshooting point of view sometime we have to login in single user mode in Linux to execute commands like reseting root password in case if system admin forget the root password and run fsck command if the file system got corrupted.

In this tutorial we will demonstrate how to login in single user mode in SUSE Linux ( SLES / openSUSE )

For SLES 11.x

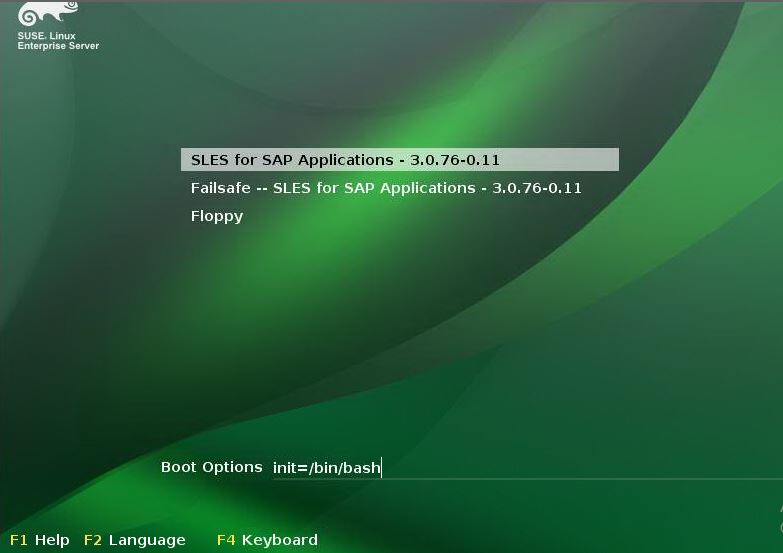
Go to the Boot loader Screen, type below command in the boot instruction option :

init=/bin/bash

SLES-11-bootload-screen

Press enter to boot. This will boot the ‘SUSE Linux Enterprise Server 11.x‘ in the Single user mode. In this mode there is no file system system which is mounted, so we will use mount command to remount the file system in read & write mode.

single-user-mode-sles-11

(none):/ # mount -o remount,rw /
(none):/ # mount -o remount,rw /usr ( if the /usr file system is on the separate partition)

Now try to run commands like resetting the root password.

(none):/ # passwd root

To reboot the machine type “exit” two times.

For openSUSE 13.1 / 13.2

Go to Boot loader screen , press e

bootloader-opensuse-13

Go to the Kernel Line and append the command “init=/bin/bash”

opensuse-kernel-line

Press Ctrl-x or F10 to boot.

single-user-mode-opensuse-13

Run the mount command to mount the file system in rw mode and then try to reset root password.

Install and use Ansible (Automation Tool) in CentOS 7

$
0
0

Ansible is a free & open source Configuration and automation tool for UNIX like operating system. It is written in python and similar to Chef or Puppet but there is one difference and advantage of Ansible is that we don’t need to install any agent on the nodes. It uses SSH for making communication to its nodes.

In this article we will install and configure Ansible in CentOS 7 and will try to manage its two nodes.

Ansible Server – ansible.linuxtechi.com ( 192.168.1.15 )
  Nodes                – 192.168.1.9 , 192.168.1.10

Step :1 Set EPEL repository

Ansible package is not available in the default yum repositories, so we will enable epel repository for CentOS 7 using below commands

[root@ansible ~]# rpm -iUvh http://dl.fedoraproject.org/pub/epel/7/x86_64/e/epel-release-7-5.noarch.rpm

Step:2 Install Anisble using yum command

[root@ansible ~]# yum install ansible

Once the installation is completed, check the ansible version :

[root@ansible ~]# ansible --version

ansible-version

Step:3 Setup keys based SSH authentication with Nodes.

Generate keys on the Ansible server and copy public key to the nodes.

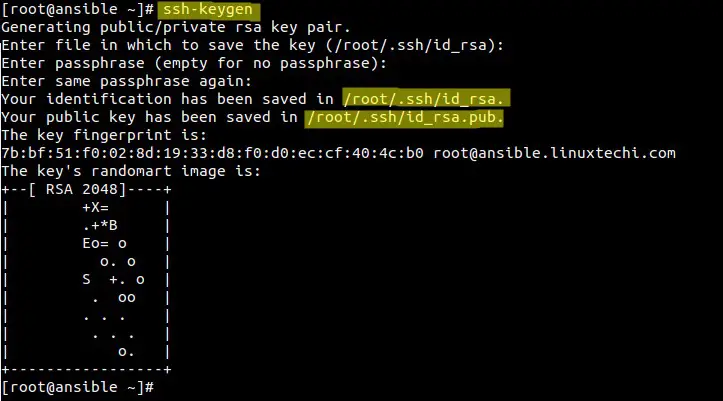
root@ansible ~]# ssh-keygen

ssh-keygen

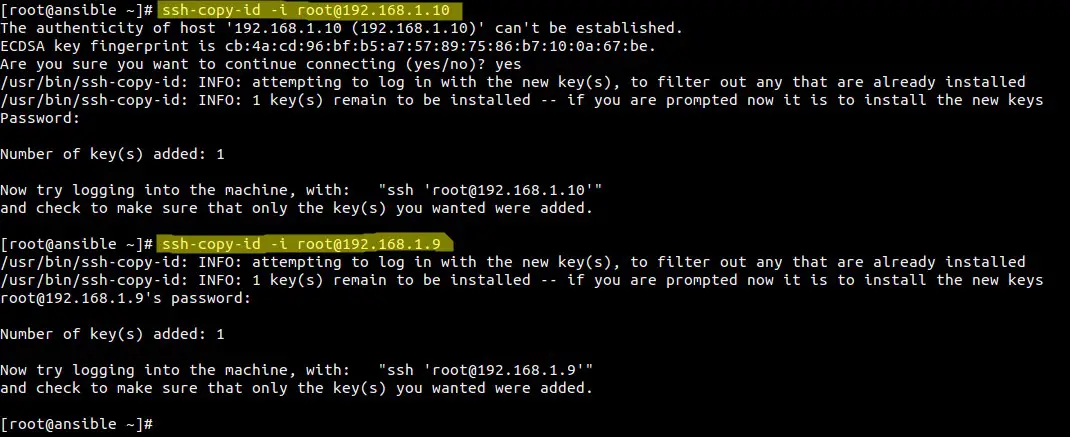
Use ssh-copy-id command to copy public key of Ansible server to its nodes.

ssh-copy-id-command

Step:4 Define the nodes or inventory of servers for Ansible.

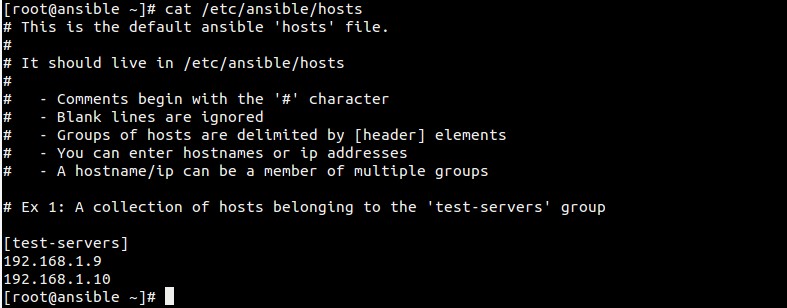
File ‘/etc/ansible/hosts‘ maintains the inventory of servers for Ansible.

[root@ansible ~]# vi /etc/ansible/hosts
[test-servers]
192.168.1.9
192.168.1.10

Save and exit the file.

Sample output of hosts file.

ansible-host

Step:5 Now try to run the Commands from Ansible Server.

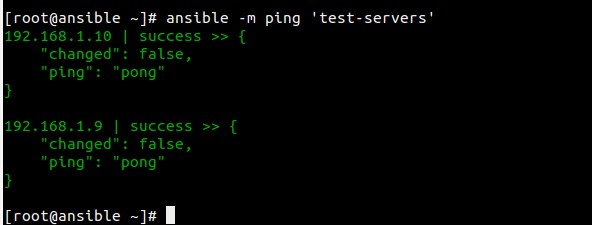
Check the connectivity of ‘test-servers’ or ansible nodes using ping

[root@ansible ~]# ansible -m ping 'test-servers'

ansible-ping

Executing Shell commands :

Example :1 Check the uptime of Ansible nodes

[root@ansible ~]# ansible -m command -a "uptime" 'test-servers'

ansible-uptime

Example:2 Check Kernel Version of nodes

[root@ansible ~]# ansible -m command -a "uname -r" 'test-servers'

kernel-version-ansible

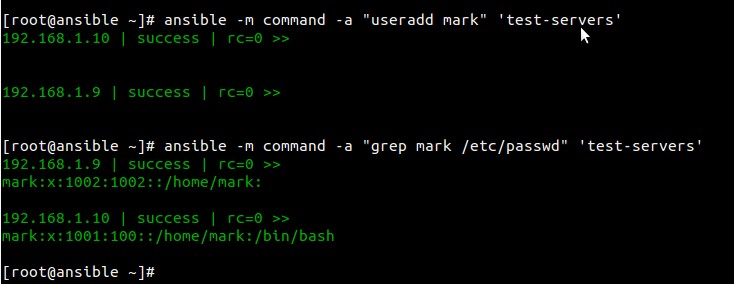
Example:3 Adding a user to the nodes

[root@ansible ~]# ansible -m command -a "useradd mark" 'test-servers'
[root@ansible ~]# ansible -m command -a "grep mark /etc/passwd" 'test-servers'

useradd-ansible

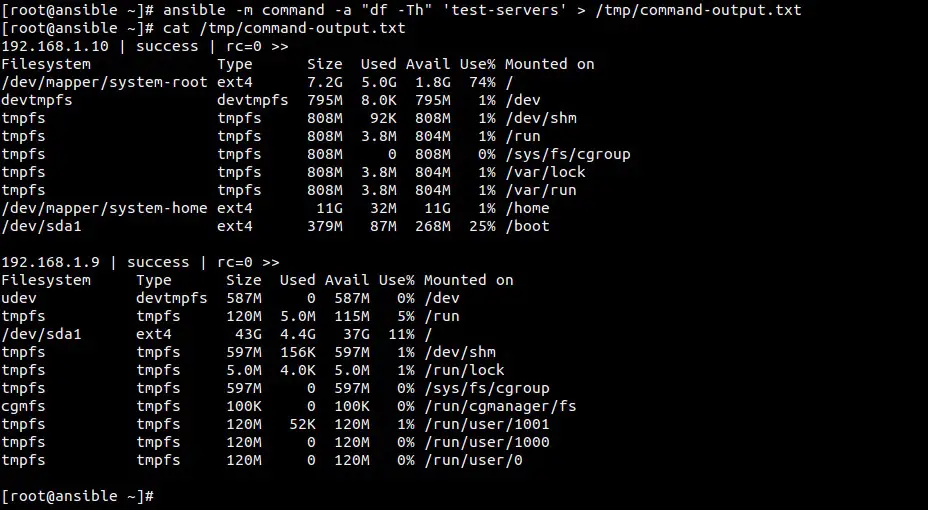
Example:4 Redirecting the output of command to a file

[root@ansible ~]# ansible -m command -a "df -Th" 'test-servers' > /tmp/command-output.txt

redirecting-output-ansible

Install WebSVN for Apache Subversion(SVN) on CentOS 7 & RHEL 7

$
0
0

As the name suggest WebSVN provides a Graphical User Interface (GUI) for managing Apache Subversion (SVN) repositories. Using WebSVN we can compare the revision of files & can view the logs of files & directories. WenSVN comes under GNU General Public License( GPL).

Some Key features of WebSVN are listed below :
  • WebSVN provides GUI for managing SVN repositories.
  • It supports multiple local & remote repositories
  • Using this we can view & search logs.
  • Comparing revisions of file & directory.
  • It allows us to download files & folder.
  • Multiple language support.
  • It provides option to use customize templates.
  • It also provide RSS Feed facility

In this tutorial i will install WebSVN on the same server on which SVN is already installed, in case SVN is not install then refer the URL :  Install SVN or Apache Subversion on CentOS 7

Step:1 Install PHP using yum command.

For installing WebSVN on CentOS 7 & RHEL 7 first we need to install PHP if it is not installed.

[root@localhost linuxproject]# yum install php -y

Step:2 Download WebSVN ‘tar.gz’ file using wget command.

[root@localhost ~]# cd /var/www/html/
[root@localhost html]# wget http://websvn.tigris.org/files/documents/1380/49056/websvn-2.3.3.tar.gz

Step:3 Extract the Downloaded ‘tar.gz’ file

[root@localhost html]# tar -zxpvf websvn-2.3.3.tar.gz

Now rename the extracted folder ‘websvn-2.3.3‘ to ‘websvn

[root@localhost html]# mv websvn-2.3.3 websvn

Step:4 Modify WebSVN Configuration File

[root@localhost ~]# cd /var/www/html/websvn/include
[root@localhost include]# mv distconfig.php config.php

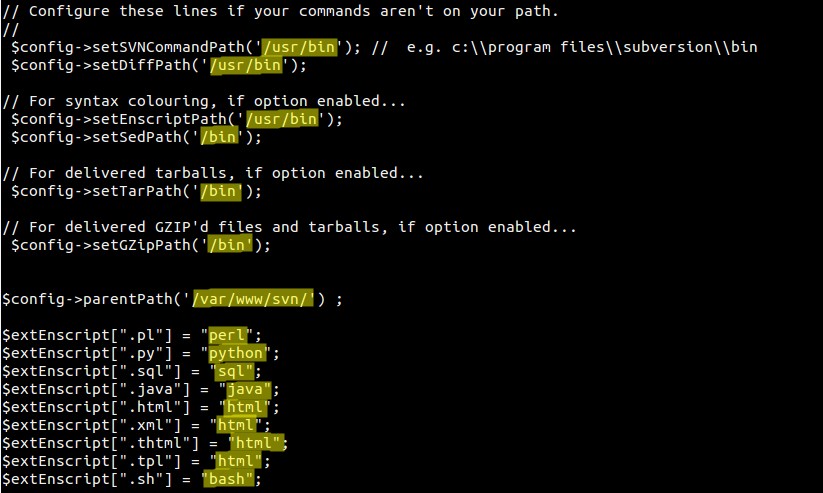
Modify and add the following lines in config.php

[root@localhost include]# vi config.php

websvn-config-file

Restart the Apache service
[root@localhost include]# systemctl restart httpd.service

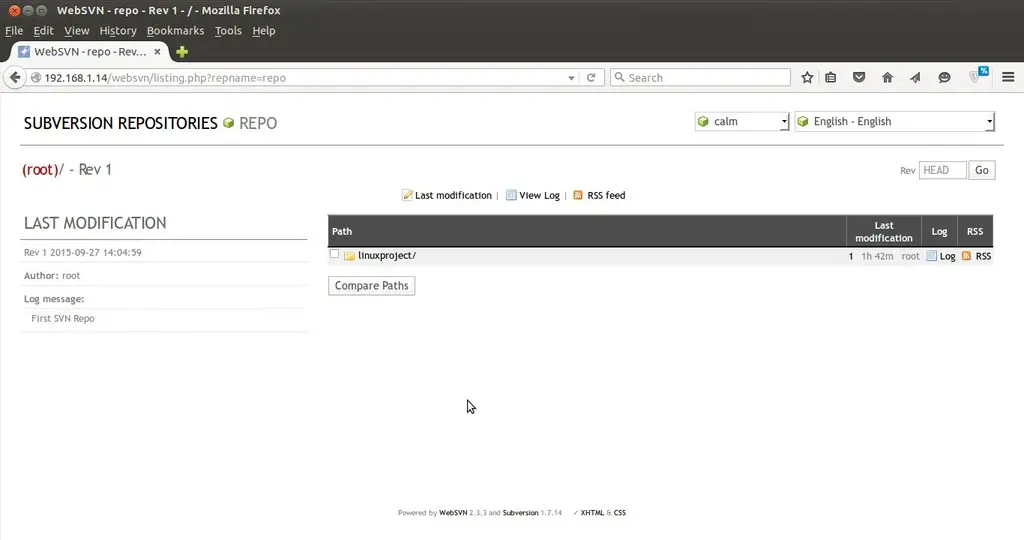
Step:5 Now Access the WebSVN from browser.

http://<Server’s_ip>/websvn

WebSVN-repo-Rev

WebSVN installation is completed, now explore it and have fun :)


Install PAC Manager on Linux Mint, Ubuntu & OpenSUSE

$
0
0

PAC (Perl Auto Connector) Manager is a open source tool in Linux like operating system, which provides GUI (graphical user interface) to manage ssh,telnet, sftp, rdesktop, vnc,remote-tty & ftp sessions. In other words we can say that PAC Manager is alternate tool of Window’s Secure CRT & Putty in Linux.

Some of its Key Features are listed below :

pac-manager-features

In this article we will install latest version of PAC Manager on Linux Mint, Ubuntu & OpenSUSE.

Installation Steps of PAC Manager on Linux Mint & Ubuntu

As Linux Mint & Ubuntu both are the Debian based operating system. So we will first download PAC manager debian Package and then install it using dpkg command. Below steps are applicable for both Linux Mint & Ubuntu.

linuxtechi@linuxmint ~ $ wget http://sourceforge.net/projects/pacmanager/files/pac-4.0/pac-4.5.5.5-all.deb
linuxtechi@linuxmint ~ $ sudo dpkg -i pac-4.5.5.5-all.deb

In case if you are getting dependencies problem as shown below while executing above command .

pac-manager-dependecy-error

Use below apt-get command to resolve dependency issues.

linuxtechi@linuxmint ~ $ sudo apt-get install -f

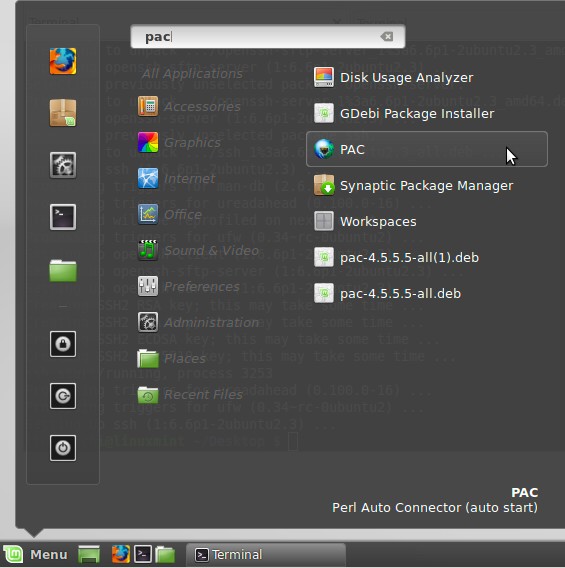
Once the installation is finished, try to access PAC

access-pac-linuxmint

Click On PAC

PAC-LinuxMint

Installation Steps of PAC Manager on OpenSUSE 13.1 & 13.2

Download PAC RPM package depending your System’s Architecture.

linuxtechi@opensuse:~> wget http://sourceforge.net/projects/pacmanager/files/pac-4.0/pac-4.5.5.5-2.x86_64.rpm
Add the Perl repository that will provide dependency packages.
linuxtechi@opensuse:~> cd /etc/zypp/repos.d/
linuxtechi@opensuse:/etc/zypp/repos.d> sudo vi perl.repo
[devel_languages_perl]
name=perl modules (openSUSE_13.1)
type=rpm-md
baseurl=http://download.opensuse.org/repositories/devel:/languages:/perl/openSUSE_13.1/
gpgcheck=1
gpgkey=http://download.opensuse.org/repositories/devel:/languages:/perl/openSUSE_13.1//repodata/repomd.xml.key
enabled=1

Note : Above repository is for OpenSUSE 13.1 and for OpenSUSE 13.2 just replace 13.1 with 13.2 and rest of things will be same .

Refresh the Repository using below Command :
linuxtechi@opensuse:~> sudo zypper ref
Now install the Download PAC rpm package using zypper
linuxtechi@opensuse:~> sudo zypper install pac-4.5.5.5-2.x86_64.rpm
Access PAC :

Access-PAC-OpenSUSE

Click on PAC

PAC-OpenSUSE

Ubuntu 15.10 Desktop Installation Guide

$
0
0

Ubuntu has released its latest version Ubuntu 15.10 code name as “Wily Werewolf” on 22nd Oct 2015. As this version is not LTS, so support will be provided only for 9 months.

Some of its newly improved features are listed below :

  • New Kernel 4.2 is included in this release.
  • Libreoffice 5.0.2 brings lot of improvements
  • Firefox is updated to its latest version Firefox 41
  • Chromium 45
  • Nautilus 3.14.2
  • Fixed small fixes of Unity 7.3.3 in this release.
  • New version of OpenStack “Liberty” is also introduced in this version

In this post we discuss how to install Ubuntu 15.10 on our laptop or desktop.

Step:1 Download Ubuntu 15.10 ISO file from its Official Site.

To download Ubuntu 15.10 go to its office site “http://www.ubuntu.com/download/desktop” and download as per your system architecture.

download-ubuntu-15-10

Now make a bootable drive either on USB or CD-ROM / DVD

Step:2 Boot the system with bootable drive.

When we boot the machine with bootable drive, following windows will appear.

ubuntu-15-10-installation-image

Step:3 Click on “Install Ubuntu”

click-on-install-ubuntu-15-10

In the nextstep it will check whether system has enough free space, connected to Internet & power is plugged in.

check-for-enough-free-space

Click on “Continue”

Step:4 Now partition your disk, for that there are two ways

( 1) Let the Operating System to create the partition – OS will be automatically created partition depending on the disk size.

( 2) Create your own partition.

creation-own-partition-ubuntu-15-10

In my case i am creating own partition , i am using around 62 GB disk.

EFI Partition – 650 MB (only if you use UEFI)

  • /(root) – 30 GB ( Formatted as EXT4 journaling file system )
  •  /var – 10 GB ( Formatted as EXT4 journaling file system )
  •  Swap Partition – double of RAM ( 2 GB in my case )
  •  /home – 20 GB – ( Formatted as EXT4 journaling file system )

Note : These partition will subjected to change according to your disk size.

os-disk-space-ubuntu-15-10

Click On “New Partition Table…” it will display the Warning Message as shown above.

create-partition-ubuntu15-10

Click on “+” symbol and create the partitions.

root-partition-ubuntu-15-10

Click on OK, and repeat the same step for /var and /home partition.

Create Swap Partition :

swap-partition-ubuntu-15-10

Our Final Partition Scheme will look like below:

final-partition-scheme

Click On “Install Now

warning-messsage-partition-scheme

Click on Continue…

Step:5 Set the time zone for the Clock.

time-zone-clock

Click on Continue….

Step:6 Define the language as per your setup.

select-laguage-for-ubuntu-installation

Click on Continue…

Step:7 In this step we will define the followings :

  • Define the System’s Hostname
  • Define the Name of user that will be used after installation
  • Define the password for the user.
  • Set the option “Require my password on Log in”

define-system-hostname

Click on Continue….

Step:8 Installation is in Progress as shown below

When we click on Continue in above step then installation will start.

ubuntu-15-10-installation-progress

When the Installation is completed, we need to take reboot.

Step:9 Reboot the System

reboot-installation-after-15-10

Step:10 Now Login to the System using the credentials that we set in above steps.

login-to-system-using-crendential

installation-completed-ubuntu-15-10

Installation of Ubuntu 15.10 is completed, enjoy and explore it.

Use Git to take Backup of Configuration files on Linux

$
0
0

Sometimes while working on Linux servers we need to take backup of config files, traditional way of taking backup is to copy the same file with different name or insert some characters at end that file.

But using Git we can easily manage the backup of configuration files. In this post we will demonstrate how this can be achieved using Git. I have done below testings on CentOS 7 & RHEL 7.

Step:1 Install Git, if it is not installed.

[root@localhost ~]# yum install git

Check the Git version

[root@localhost ~]# git --version
git version 1.8.3.1
[root@localhost ~]#

Set the below Parameters to avoid commit errors.

[root@localhost network-scripts]# git config --global user.name "Pradeep"
[root@localhost network-scripts]# git config --global user.email "pradeep@linuxtechi.com"

You can replace the user name as per your environment.

Step:2 Now initialize the git database.

As i am going to take backup of network configuration file, for that i have to initialize the Git database in network configuration directory only.

[root@localhost ~]# cd /etc/sysconfig/network-scripts
[root@localhost network-scripts]# git init
Initialized empty Git repository in /etc/sysconfig/network-scripts/.git/
[root@localhost network-scripts]#

As we can see that “.git” directory is created in the folder.

Step:3 Take the backup using below commands

[root@localhost network-scripts]# git add ifcfg-enp0s3
[root@localhost network-scripts]#
[root@localhost network-scripts]# git commit ifcfg-enp0s3
[master (root-commit) 1269758] Changes on 26 Oct 2015
1 file changed, 16 insertions(+)
create mode 100644 ifcfg-enp0s3
[root@localhost network-scripts]#

When we execute the second command it will ask you to put some comments like “Changes on 26 Oct 2015” and save the file.

Use below command to view the git logs.

[root@localhost network-scripts]# git log
commit 1269758e5f5b2fa3e0ad1fe507abaf73b646a33d
Author: Pradeep <pradeep@linuxtechi.com>
Date: Mon Oct 26 00:03:08 2015 -0400
Changes on 26 Oct 2015
[root@localhost network-scripts]#

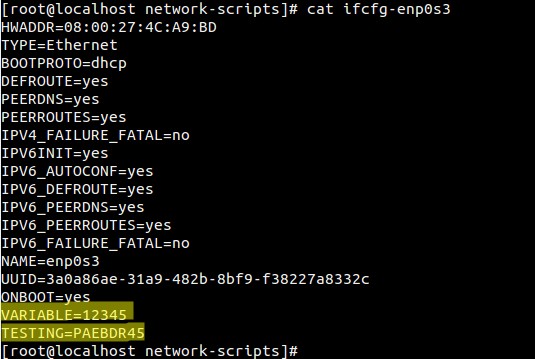
Note: Try inserting some junk characters inside the file “ifcfg-enp0s3

wrong-network-config-file

Step:4 Now Restore network config file from git database

[root@localhost network-scripts]# git reset --hard 1269758e5f5b2fa3e0ad1fe507abaf73b646a33d
HEAD is now at 1269758 Changes on 26 Oct 2015
[root@localhost network-scripts]#

Use the same git id as shown in above. Git id will different for your setup.

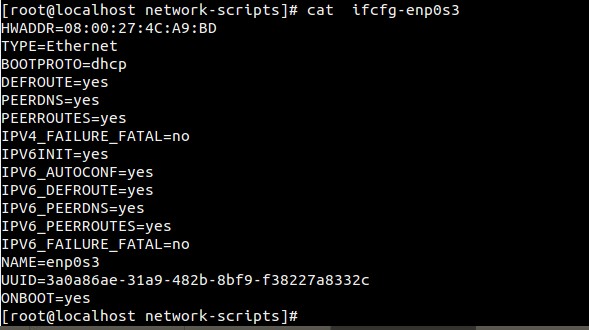
Verify whether the file is correctly restore or not from git database.

correct-network-config-file

Fedora 23 Workstation Installation Steps with Screenshots

$
0
0

Good News for Fedora Users that “Fedora 23” has been released recently. Fedora 23 released in three different editions :

  • Fedora Workstation – Used at Desktop Level
  • Fedora Server – Used for Server Installation and Management
  • Fedora Cloud – Fedora Cloud images can be used in OpenStack & EC2 and can be directly launched.

In this article we will discuss Fedora 23 Workstation Installation steps with Screenshots. Below are few new features that are introduced in this release.

  • New Kernel 4.2
  • Gnome 3.18
  • Improved Wayland – It is a GUI Server that will replace X org in Fedora 24.
  • New Calender & To Do application
  • LibreOffice 5
  • Firmware Updates – Firmware update service is included in Software application , which will notify us when there is new firmware update is available for your hardware.

Step:1 Download the Fedora 23 Workstation ISO file.

Download ISO file as per your system architecture( 32-bit & 64-bit) from Fedora Official site “https://getfedora.org/en/workstation/download/”

download-fedora-23-iso

Burn the downloaded ISO file into DVD or in USB flash drive and boot your system with bootable DVD or USB.

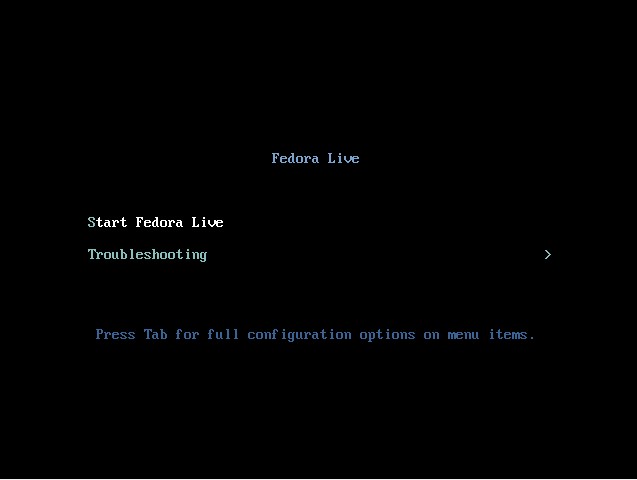
Step:2 Fedora 23 Installation Screen.

fedora-23-installation-screen

Select “Start Fedora Live” and press Enter.

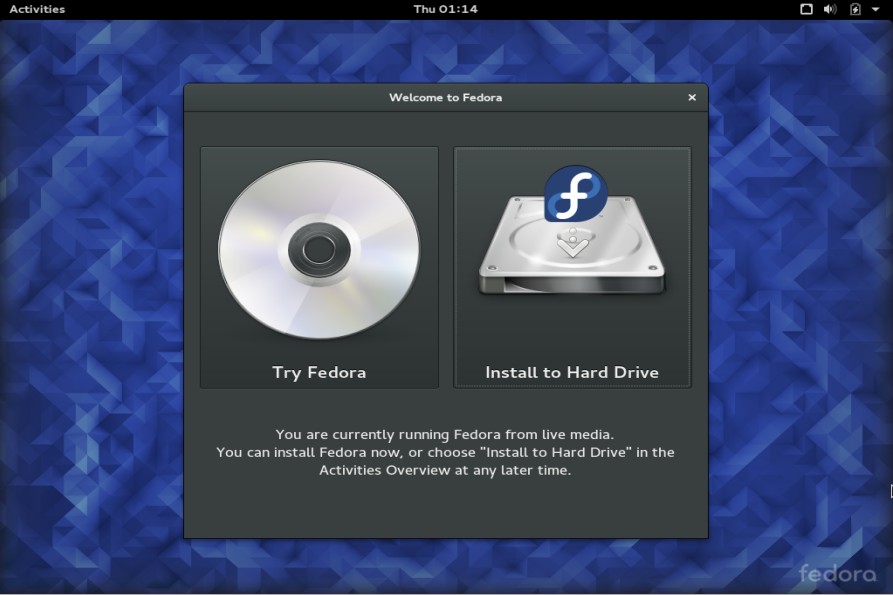
Step:3 Select “Install to Hard Drive” option

install-hard-drive-fedora23

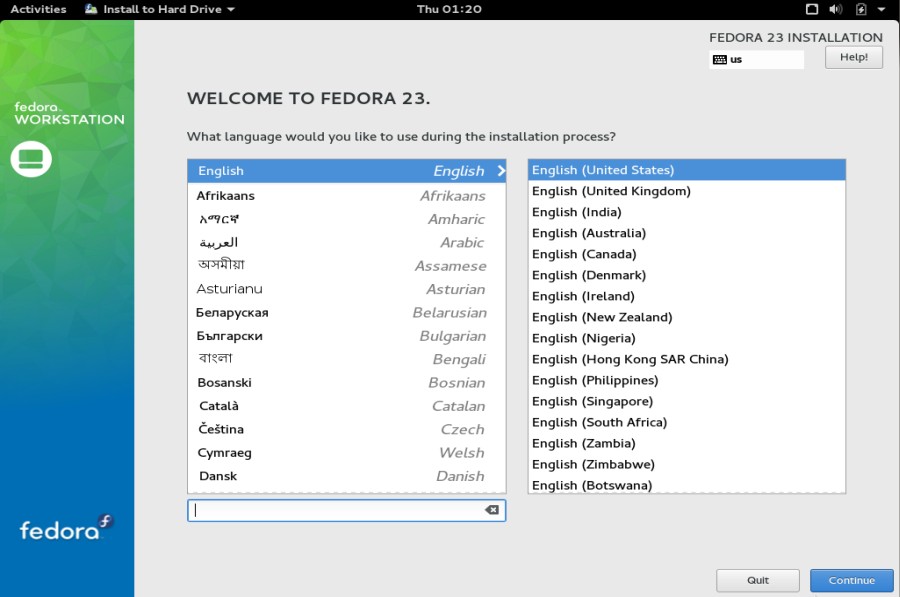
Step:4 Select the Language that will be used during installation

choose-language-fedora23

Click on Continue…

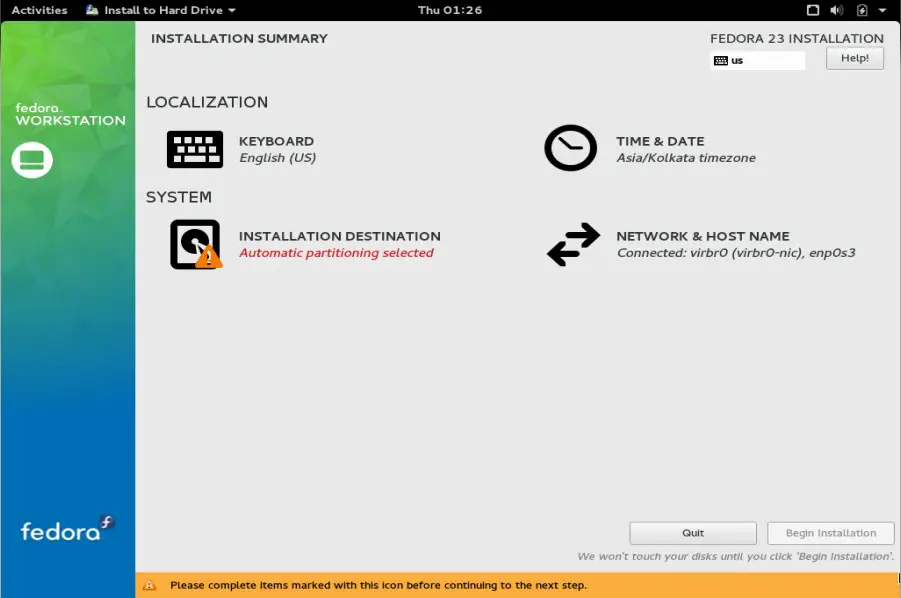
Step:5 When we click on Continue then the following screen appear.

keybord-timezone-fedora23-installation

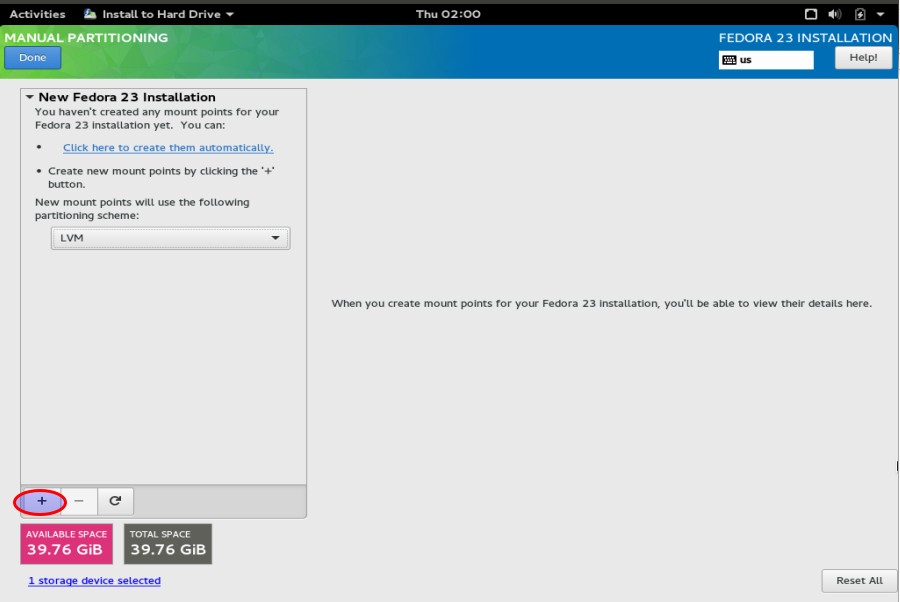
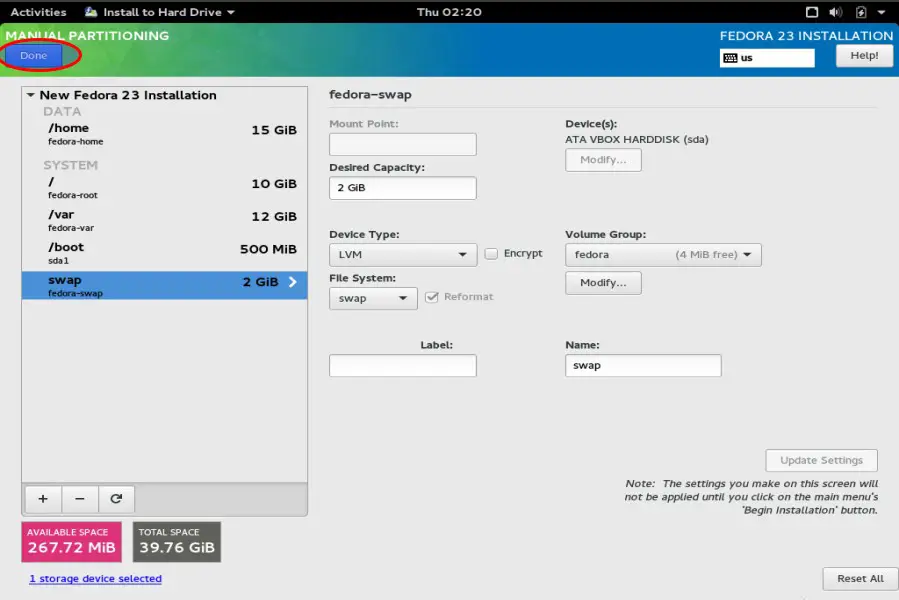
Define the Keyboard Layout , Date & time zone , Network & hostname and Partition scheme by selecting the respective options. In my case i will be using customize partition scheme.

As i have around 40 GB Hard disk and going to create following partitions on it.

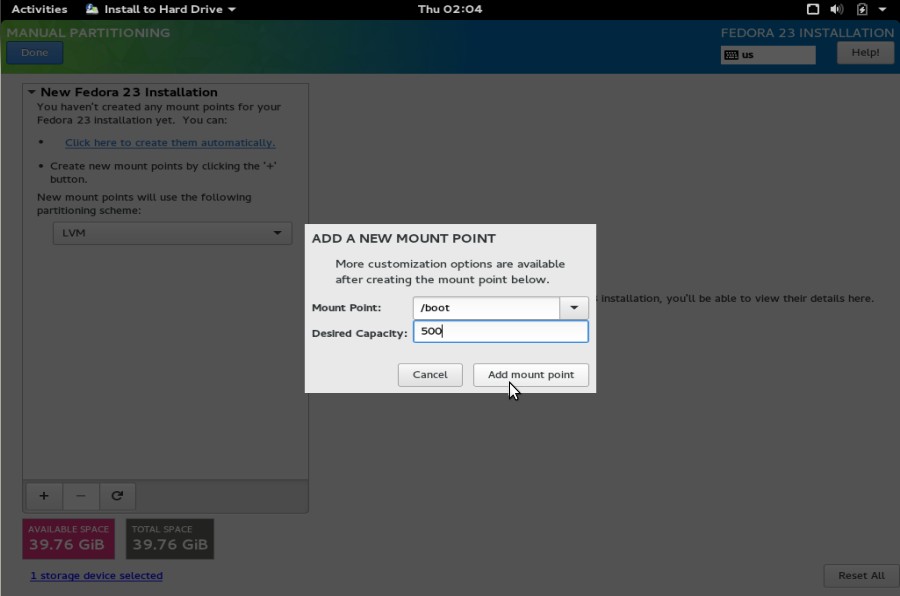
  • /boot – 500 MB ( ext4 File System)
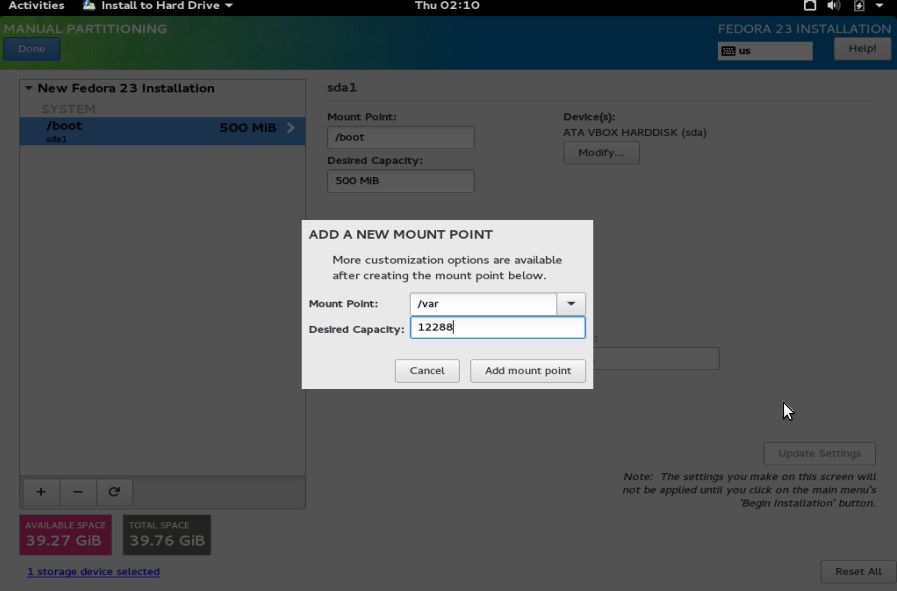
  • /var – 12 GB ( ext4 File System)
  • /home – 15 GB ( ext4 File System)
  • / – 10 GB ( ext4 File System)
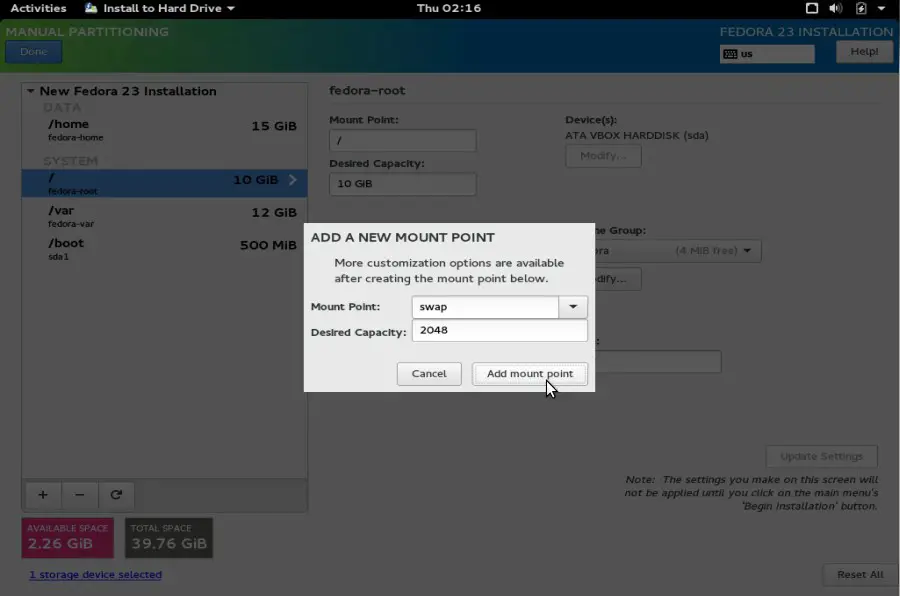
  • swap – Double of Your RAM

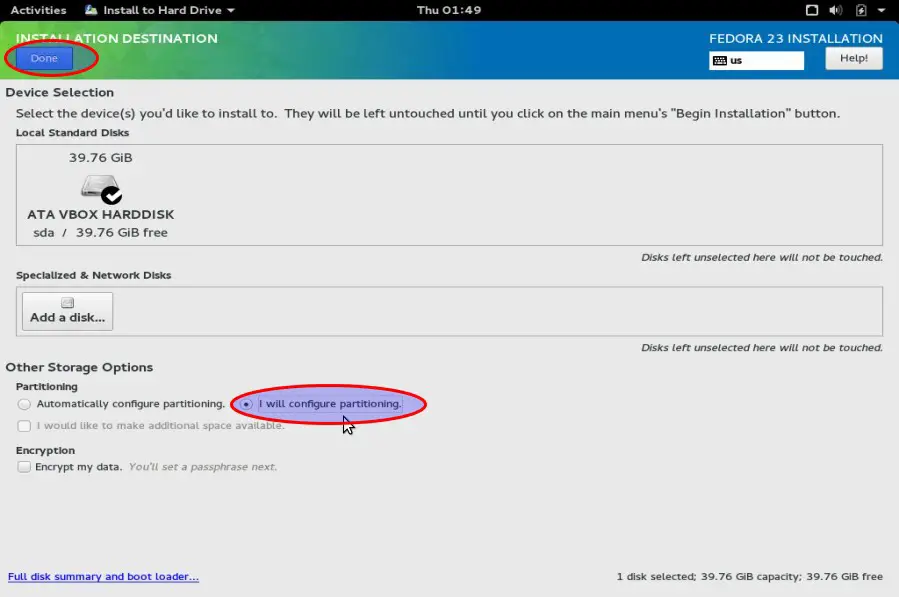
Click on “Installation Destination” then below screen will appear , select “i will configure Partitioning” and then Click on “Done

configure-partitioning

Click on ‘+’ option & Create /boot partition.

click-on-plus-fedora23

boot-mount-fedora-23

Click on Add mount point.

Create /var partition

var-partition-fedora23

Click on Add mount point.

Similarly Create other two partitions as well with their respective size.( /home & / ).

Create Swap Partition.

swap-partition-fedora23-installtion

Click on Add mount point

Now Click on Done when your done with Partitioning.

done-with-partition-scheme

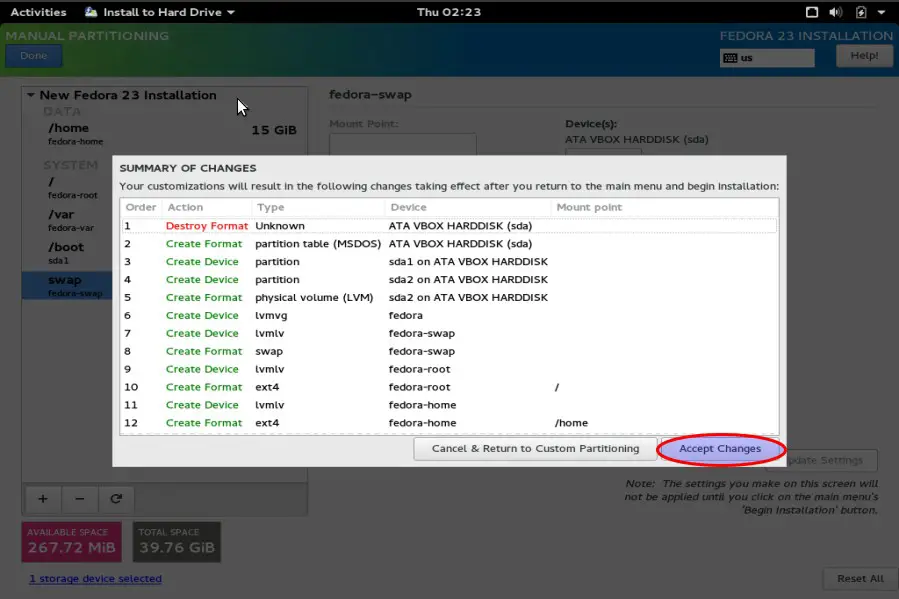
Select “Accept Changes

Accept-changes-for-new-partition-fedora23

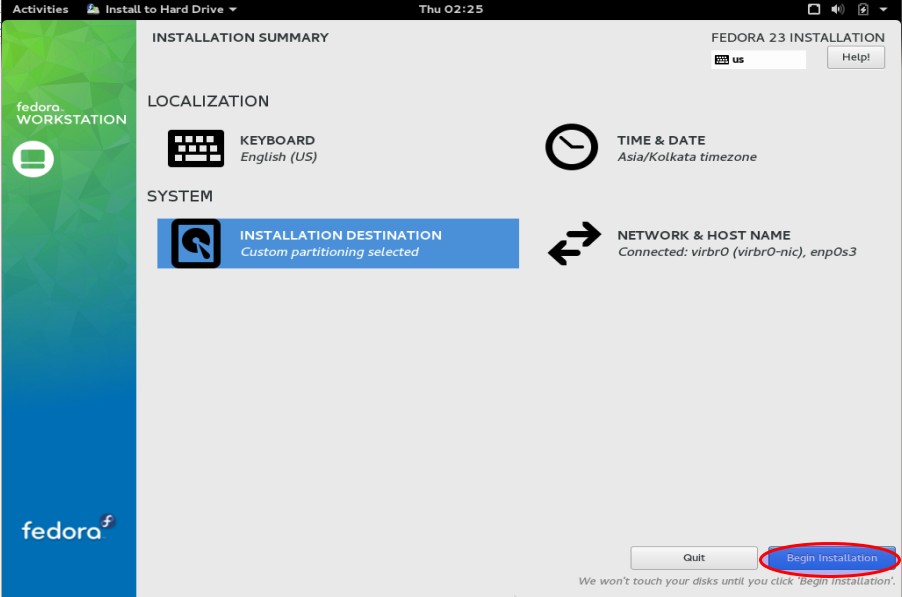
Click on “Begin Installation

Begin-installation-fedora23

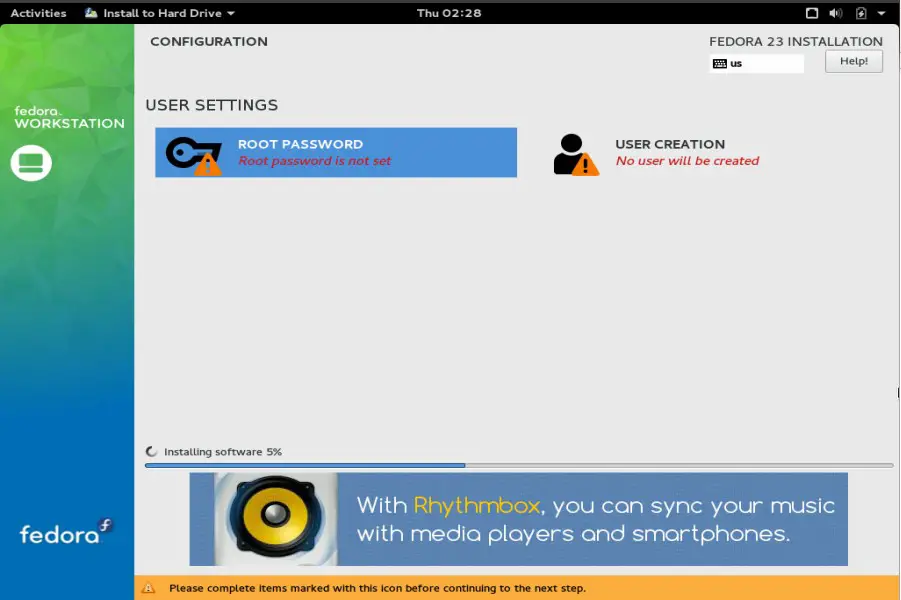
Step:6 Define Root password and Create a New User

root-password-user-creation

Select Root Password Option and set the root password.

set-root-password

Click on Done.

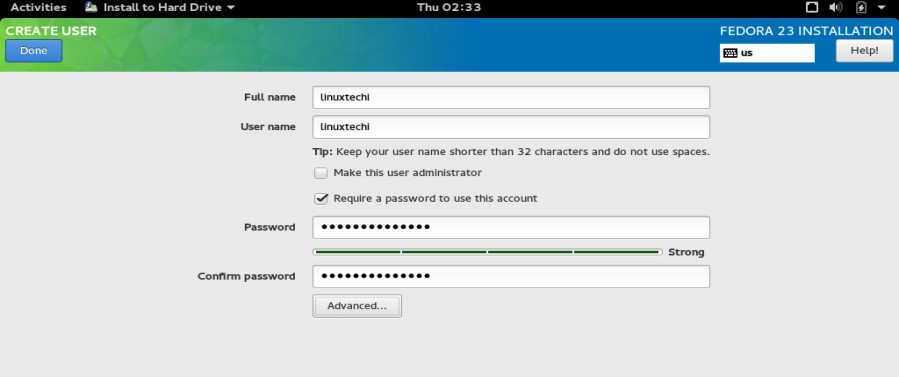
Select User Creation, Create a new user and set its password.

user-creation-during-fedora23-installation

Click on Done.

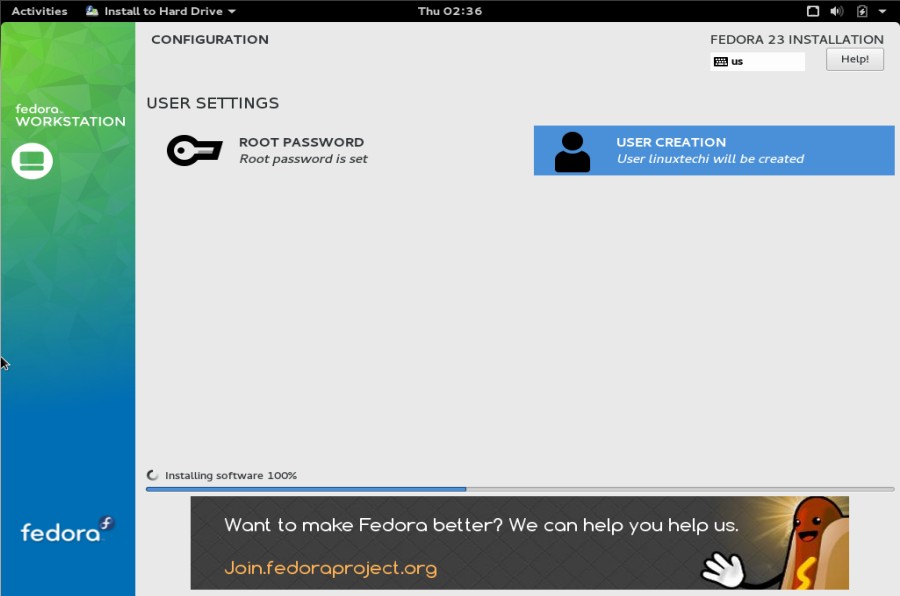
As you we can see now installation is in Progress.

fedora23-installation-progress

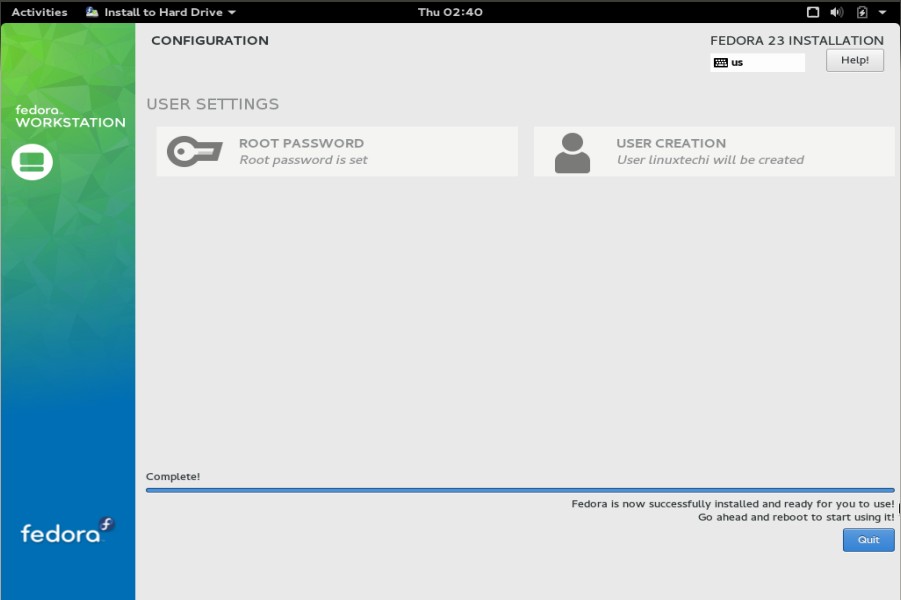
Step:7 Reboot the Machine Once the installation is Completed.

reboot-machine-after-fedora23-installtion

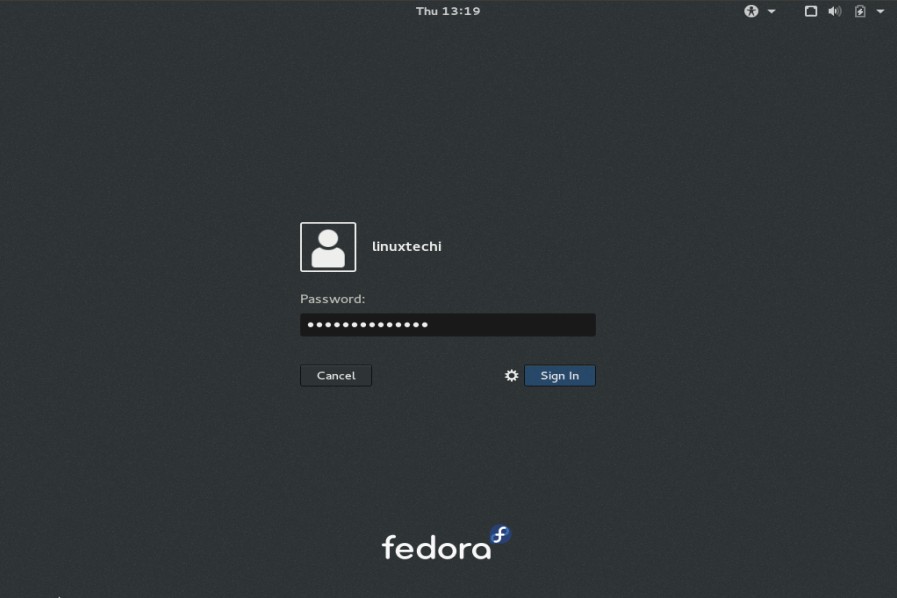
Step:8 Login Screen After Installation

Use the user name (linuxtechi) and its credentials that we have set during the installation.

login-screen-fedora23

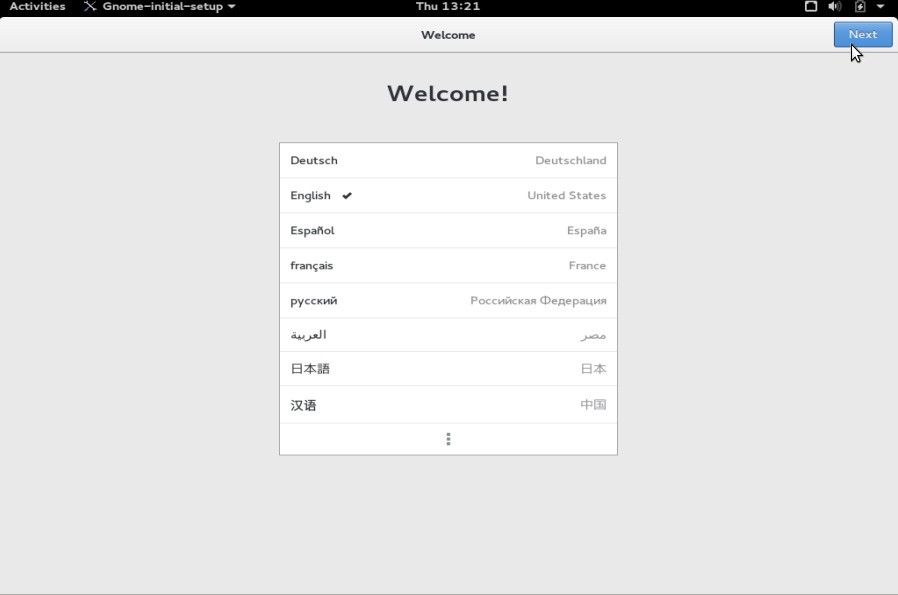
Step:9 Select the Language for your Desktop ( Gnome)

Choose-language-gnome

click on Next.

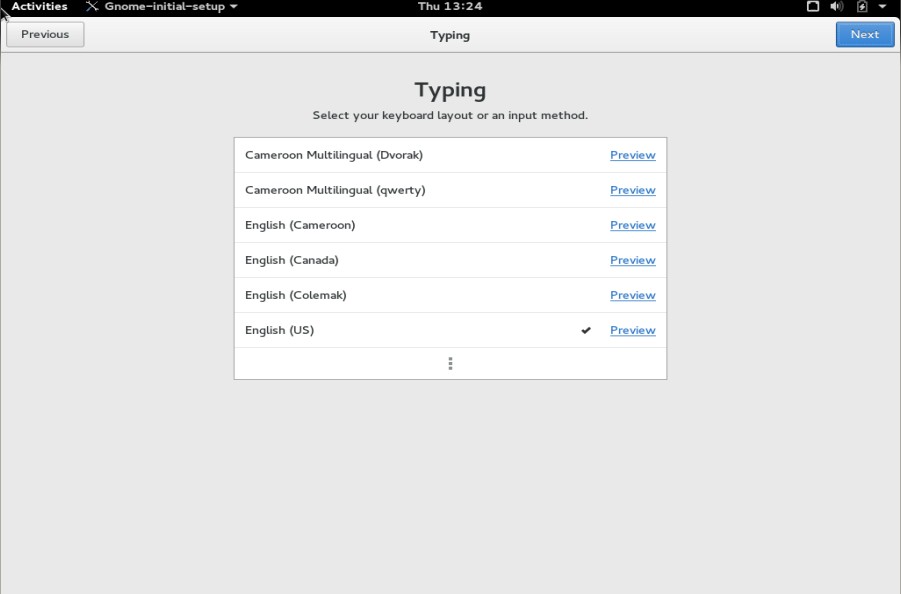
Step:10 Select the Keyboard Layout for your Gnome Desktop

keyboard-layout-gnome

Click on Next

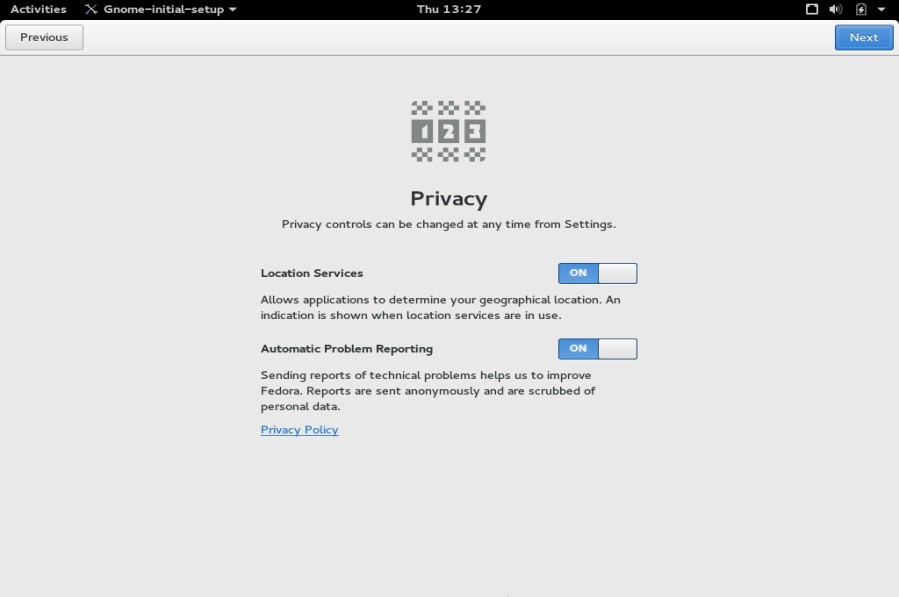
privacy-policy-gnome

click on Next

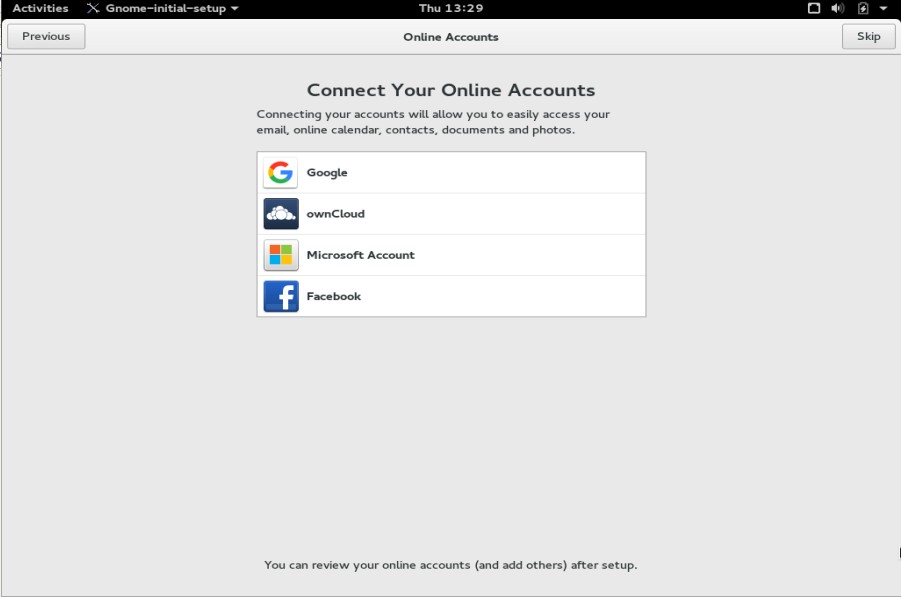
Step: 11 Connect Your Online Accounts or skip this step.

online-account-fedora23

Click on Start Using Fedora

start-using-fedora23

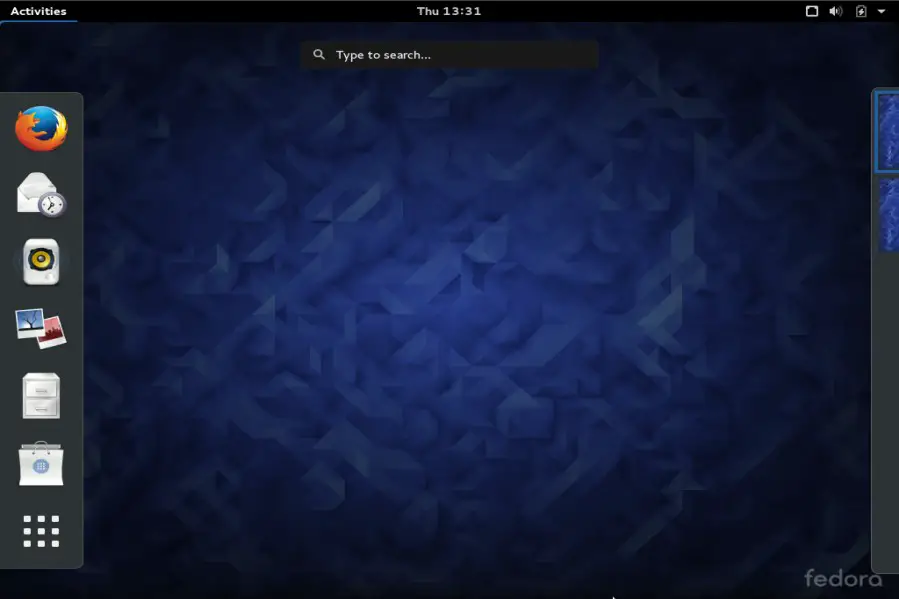
Step:12 Gnome Desktop Screen After login.

gnome-desktop-screen-after-login

Fedora 23 Workstation installation is completed now.

Install OpenSUSE Leap 42.1 Step by Step

$
0
0

OpenSUSE Leap 42.1 has been released on 4th Nov 2015. It is build from source code of SLE (SUSE Linux Enterprise) and can be installed only on 64-bit Machine. Before this release there was no free enterprise distribution of SLE but after this release we can assume that Leap 42.1 is upstream project of SLE 12 SP1

Now we can consider that Leap is to SUSE What CentOS to Redhat & Ubuntu to Canonical. As per the OpenSUSE community this release can be used for production servers. In this article we will demonstrate the installation steps of OpenSUSE Leap 42.1.

Step:1 Download the OpenSUSE Leap 42.1 ISO file.

Download the ISO file from below mentioned openSUSE portal.

http://download.opensuse.org/distribution/leap/42.1/iso/openSUSE-Leap-42.1-DVD-x86_64.iso

Burn the ISO file into an DVD or USB flash drive and boot your system with bootable DVD or USB.

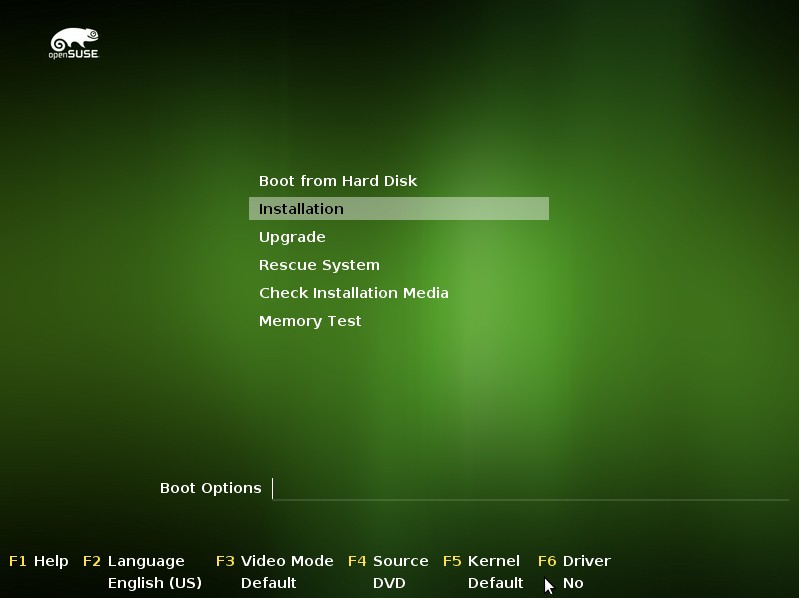
Step:2 Following Screen will appear while booting System with Bootable DVD or USB.

Select Installation option & press enter.

installation-screen-leap-42-1

Step:3 Select Language, Keyboard layout & accept license agreement.

keyboard-layout-license-agreement-leap-42

Click on Next…

Step:4 Installation Options.

In this step we can add additional online repositories & separate media.

In my case i am not going to enable these two option.

Additional-online-repo-leap42

Click on Next…

Step:5 Define the Partition Scheme

By Default installer will created the default partition scheme as per available hard disk. We can also create our customize partition table.

To Create Customize partition table select “Custom Partition Setup“.

To Edit suggested proposal like file system and partitions, Select “Edit Proposal Settings

suggested-partition-table-leap42

In my case i will create custom partition scheme for 40 GB hard disk.

preparing-disk-leap42

Select the disk and Click on Next..

installing-leap42-on-disk

Click on Edit Proposal Settings.

proposal-settings-leap42

Define the Root file system type and select the option if you want separate home partition with its file system type.

Once you are done with Partitions , Click on Next

Step:6 Select the Time Zone with respect to region

timezone-during-installation-leap42

click on Next…

Step:7 Select your Desktop ( GNOME or KDE )

desktop-selection-leap42

click on Next.

Step:8 Create a System User.

create-user-during-installation-leap42

Click On Next.

Step:9 Verify the Changes & click on Install.

verify-changes-install-leap42

Confirm installation

confirm-installation-leap42

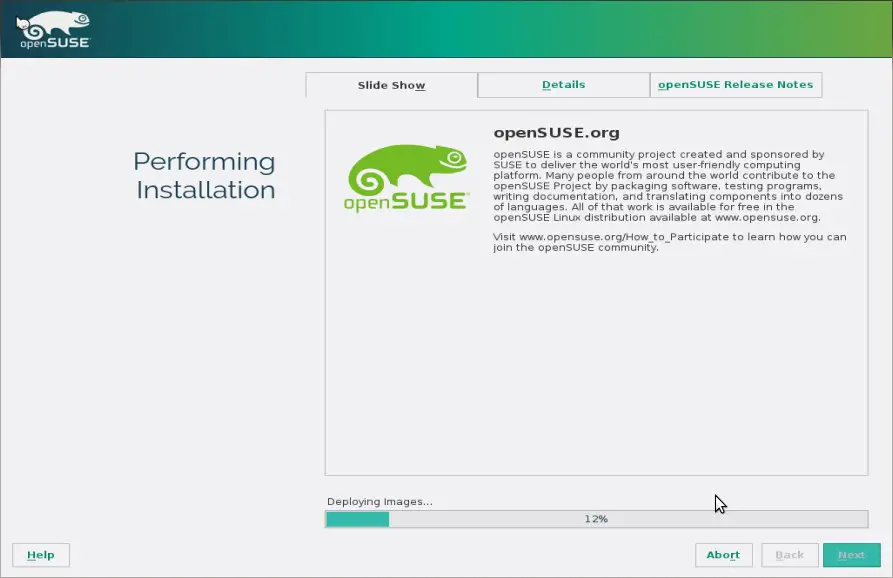
Step:10 When we click on Install , then installation will start.

openSUSE-leap-42

Once the installation is completed , System will be rebooted automatically.

Step:11 Login Screen After Installation

login-screen-after-leap42-installation

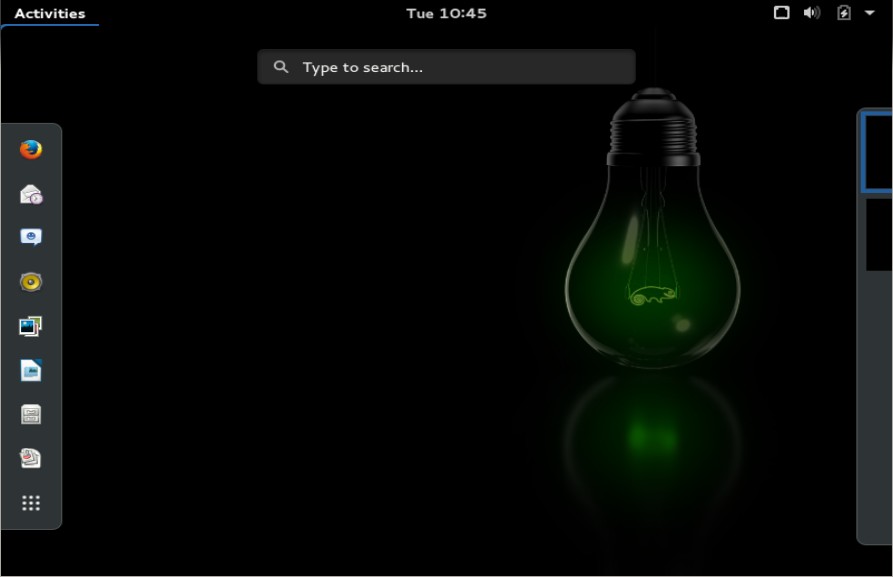
Use the same user and its credentials that we have created during the installation.

gnome-desktop-screen-leap42

Installation of OpenSUSE Leap 42.1 is completed. Hope you like the installation Steps.

Use Fedora 23 Cloud image in Red Hat OpenStack

$
0
0

Fedora 23 Cloud images are available for download. In this post will use fedora 23 cloud image and will launch it from dashboard(Horizon). I am assuming that OpenStack is already up and running.

Step:1 Download the Fedora 23 Cloud image from terminal.

[root@desktop18 ~]# wget https://download.fedoraproject.org/pub/fedora/linux/releases/23/Cloud/x86_64/Images/Fedora-Cloud-Base-23-20151030.x86_64.qcow2

Step:2 Upload the Image from Dashboard.

Login to the dashboard. In my case i am using “Robert” as a User with admin privileges.

Login-OpenStack-Dashboard

Go to Project Tab and select Images option and then Click on create Image,

Images-OpenStack-Dashboard

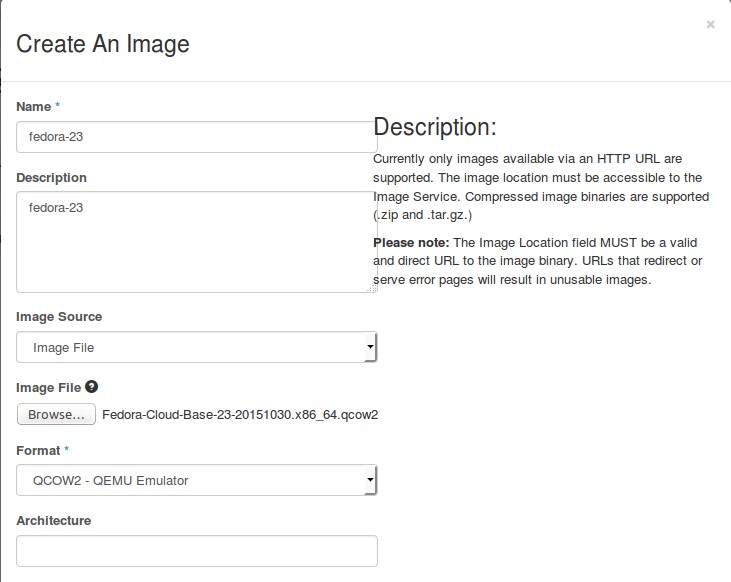
Specify the Image Name, description and image source (image file) & image Type

image-upload-openstack-dashbaord

Click on create Image.

fedora-23-cloud-image-dashboard

As we can see image is created.

Step:3 Launch Instance of Fedora 23

From the Dashboard go to Instance option from the Project Tab. Click on “Launch Instance

Launch-Instances-OpenStack-Dashboard

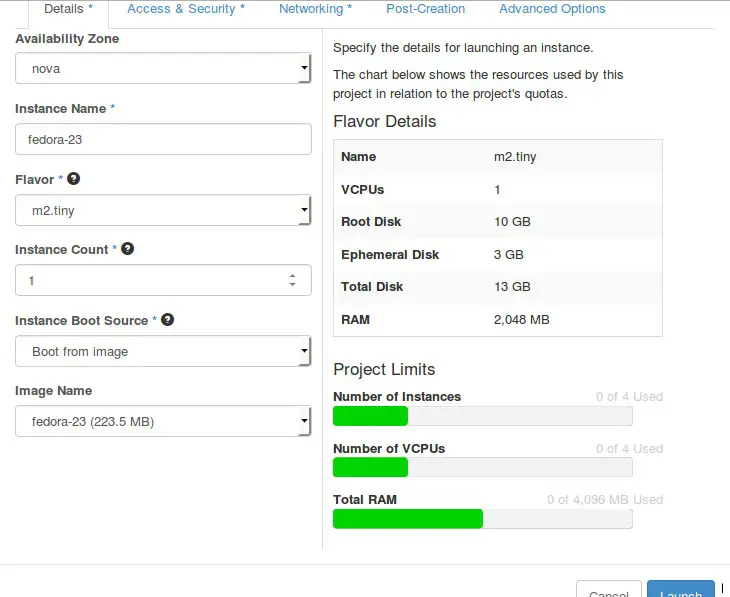
Define the Instance Name, Instance Boot source ( Boot image) and Image Name.

fedora-23-instance-properties-openstack

Select the appropriate Security Group and Networking for the instance and then click on Launch.

select-access-security-group-openstack

network-for-instance-openstack

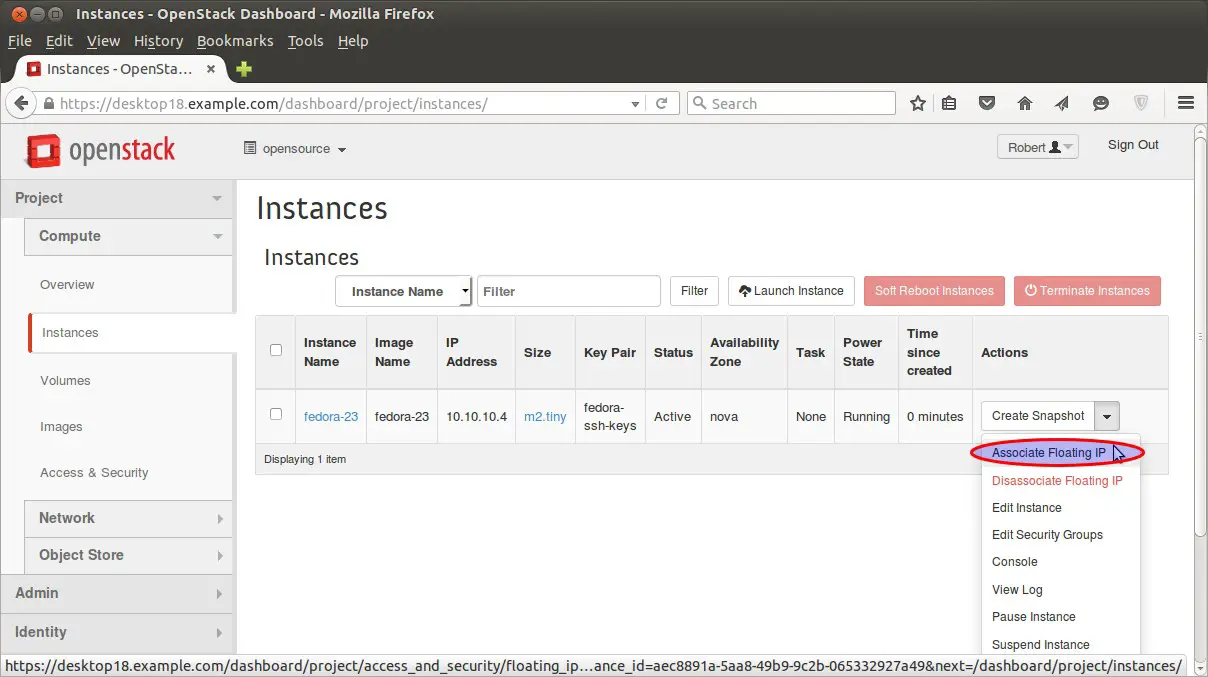
Step:4 Associate Floating or Public ip to the instance.

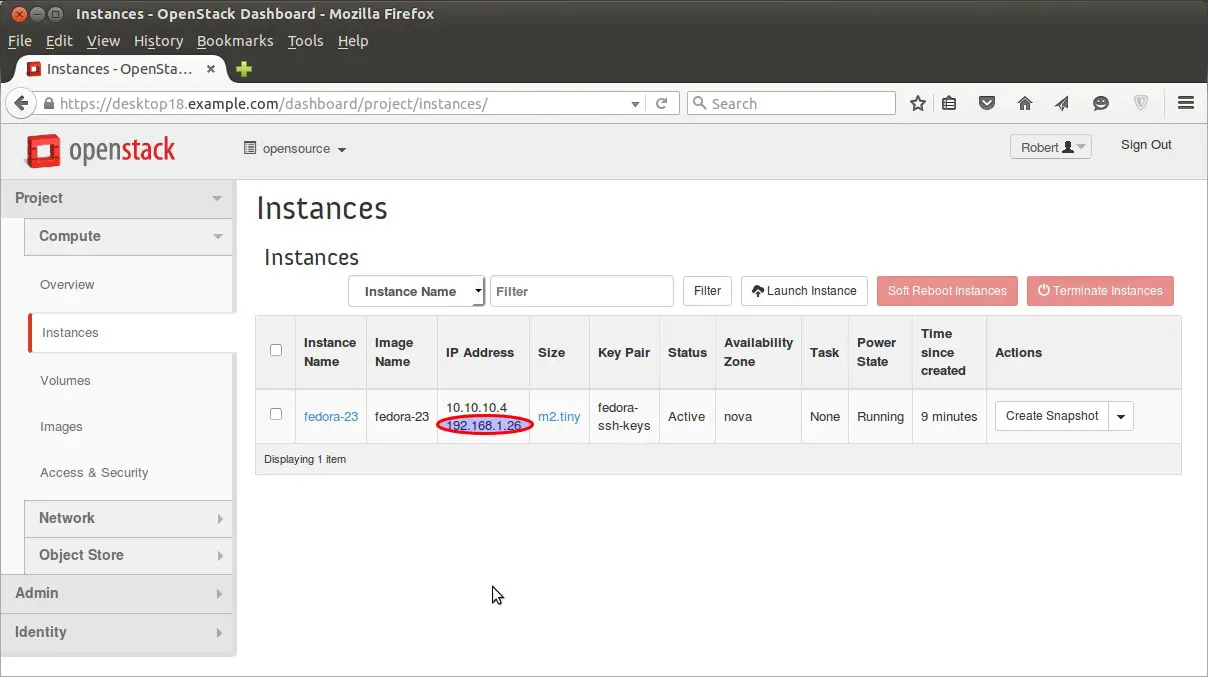
Once the floating ip is associated with instance then we can access the instance from outside.

associate-floating-ip-openstack-instance

Click on “Associate Floating IP

floating-ip-associated-instance

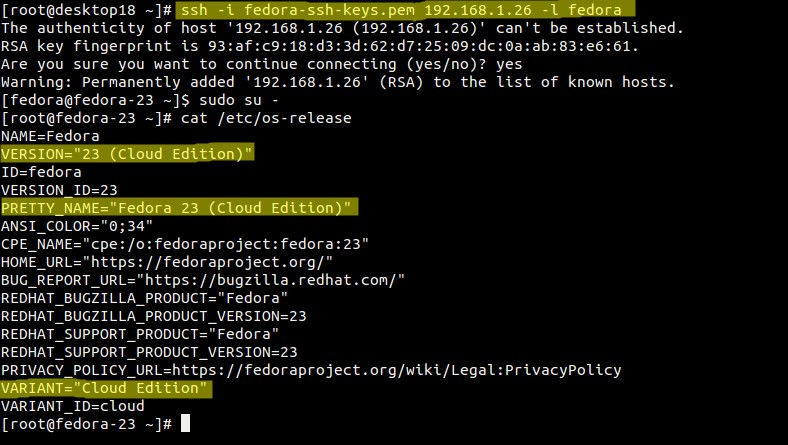
Step:5 Access the Fedora 23 instance

As we know that we don’t know user’s or root password of cloud images. So we will be accessing it using keys. In my case i have already generate the keys with name “fedora-ssh-keys”. Also we need to make sure that permissions of keys should be “600”.

access-fedora-23-cloud-image

Set Password Policies in SLES (SUSE Linux Enterprise Server)

$
0
0

Recently i got the task to implement following password policies on SLES (SUSE Linux Enterprise Server) 11.x

  • Minimum password length should be 10 characters
  • Password should have one UPPERCASE Character
  • Password should have one LOWERCASE Character
  • Password should have one Numeric Character
  • Minimum Passwords to Remember or Password History is 4
  • Accounts should be lockout after 5 attempts.

These password policies can implemented using pam file “/etc/pam.d/common-password

First take the back up of common-password file .

# cd /etc/pam.d/
# cp common-password common-password.bak

Edit the file “/etc/pam.d/common-password” ,comment out the default modules and add the followings lines.

password   required   pam_cracklib.so dcredit=-1 ucredit=-1 lcredit=-1 minlen=10 retry=5
password   required   pam_pwhistory.so use_authtok remember=4 retry=5
password   required   pam_unix2.so nullok use_authtok md5

Save & exit the file.

Now onwards , we can’t use the simple passwords , System will accepts only those passwords which satisfy above parameters.


Configure DomainKeys (OpenDKIM) with Postfix on CentOS 7

$
0
0

OpenDKIM is method to digitally sign & verify emails on the mail servers using public & private keys. In other words opendkim implements the DKIM (DomainKeys Identified Mail) standard for signing and verifying email messages on a per-domain basis. DomainKeys are implemented to reduce the chances of outgoing mails to be marked as SPAM.

In this post we will demonstrate how to install & configure DomainKeys with postfix (MTA) on CentOS 7 , i am assuming Postfix is already installed with following domain and hostname.

Hostname = mail5.freshdaymall.com

Domain = freshdaymall.com

Step:1 Set EPEL Repository using below rpm command

OpenDKIM package is not available in the default yum repositories but available in CentOS 7 EPEL repositories.

[root@mail5 ~]# rpm -Uvh https://dl.fedoraproject.org/pub/epel/epel-release-latest-7.noarch.rpm

Step:2 Install OpenDKIM Package using yum

[root@mail5 ~]# yum install -y opendkim

Step:3 Run below Command to create keys

Execute the below command to create public & private keys under folder “/etc/opendkim/keys

[root@mail5 ~]# opendkim-default-keygen
Generating default DKIM keys:
Default DKIM keys for freshdaymall.com created in /etc/opendkim/keys.
[root@mail5 ~]#
[root@mail5 ~]# cd /etc/opendkim/keys/
[root@mail5 keys]# ll
total 8
-rw-r----- 1 root opendkim 891 Nov 29 08:42 default.private
-rw-r--r-- 1 root opendkim 320 Nov 29 08:42 default.txt
[root@mail5 keys]#

default.private is the private key for the domain and default.txt is public key that we will publish in DNS record (TXT) in the domain. A Selector ( default ) is created while generating keys, a selector can be unique keyword which is associated in keys and included in DKIM signature.

Step:4 Edit the Following Files :

  • /etc/opendkim.conf —- Config file of opendkim
  • /etc/opendkim/KeyTable —- As name suggest it defines the path of private key for the domain
  • /etc/opendkim/SigningTable — This file tells OpenDKIM how to apply the keys.
  • /etc/opendkim/TrustedHosts — This file defines which hosts are allowed to use keys.

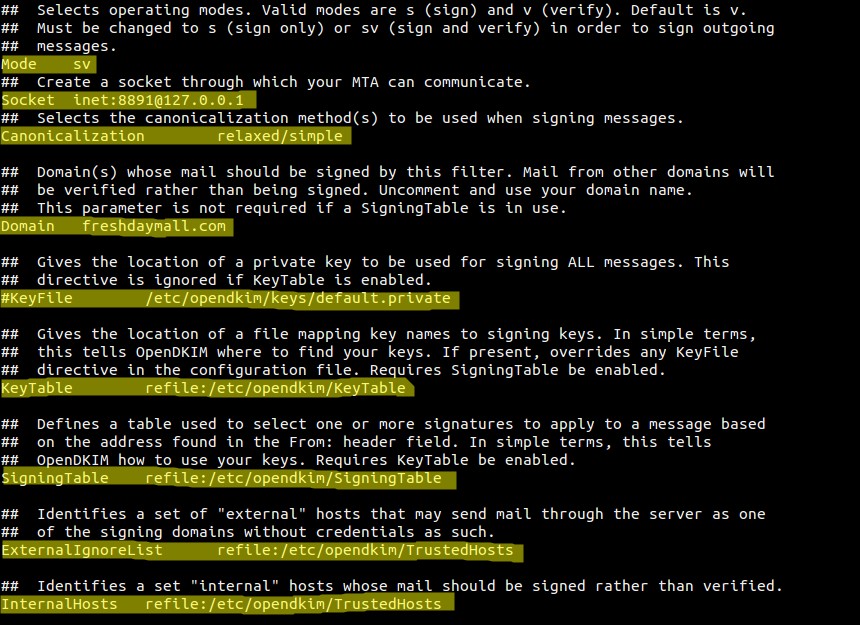
Edit the file “/etc/opendkim.conf” & set the below parameters.

opendkim-conf-file

Edit the KeyTable file and replace the example.com with your domain name.

[root@mail5 ~]# cat /etc/opendkim/KeyTable
# OPENDKIM KEY TABLE
# To use this file, uncomment the #KeyTable option in /etc/opendkim.conf,
# then uncomment the following line and replace example.com with your domain
# name, then restart OpenDKIM. Additional keys may be added on separate lines.

#default._domainkey.example.com example.com:default:/etc/opendkim/keys/default.private
default._domainkey.freshdaymall.com freshdaymall.com:default:/etc/opendkim/keys/default.private
[root@mail5 ~]#

Edit the SigningTable file and define who will sign the outgoing mails.

[root@mail5 ~]# cat /etc/opendkim/SigningTable 
# WILDCARD EXAMPLE
# Enables signing for any address on the listed domain(s), but will work only if
# "refile:/etc/opendkim/SigningTable" is included in /etc/opendkim.conf.
# Create additional lines for additional domains.

*@freshdaymall.com default._domainkey.freshdaymall.com

As i am using * in above parameter which means all the users on domain are allowed to sign the emails.

Edit the TrustedHosts file , add Server’s FQDN and domain name below localhost ip (127.0.0.1)

[root@mail5 ~]# cat /etc/opendkim/TrustedHosts 
# OPENDKIM TRUSTED HOSTS
# To use this file, uncomment the #ExternalIgnoreList and/or the #InternalHosts
# option in /etc/opendkim.conf then restart OpenDKIM. Additional hosts
# may be added on separate lines (IP addresses, hostnames, or CIDR ranges).
# The localhost IP (127.0.0.1) should always be the first entry in this file.

127.0.0.1
mail5.freshdaymall.com
freshdaymall.com
[root@mail5 ~]#

Step:5 Edit Postfix Config File (/etc/postfix/main.cf)

Add the below lines at end of /etc/postfix/main.cf file.

[root@mail5 ~]# vi /etc/postfix/main.cf
smtpd_milters = inet:127.0.0.1:8891
non_smtpd_milters = $smtpd_milters
milter_default_action = accept

Step:6 Start OpenDKIM & postfix Service

[root@mail5 ~]# hash -r
[root@mail5 ~]# systemctl start opendkim ; systemctl enable opendkim ; systemctl restart postfix
ln -s '/usr/lib/systemd/system/opendkim.service' '/etc/systemd/system/multi-user.target.wants/opendkim.service'
[root@mail5 ~]#

Step:7 Update the TXT DNS record of your domain.

Use the output of default.txt and update the DNS Record (TXT) of the Domain.

domain-public-key-opendkim

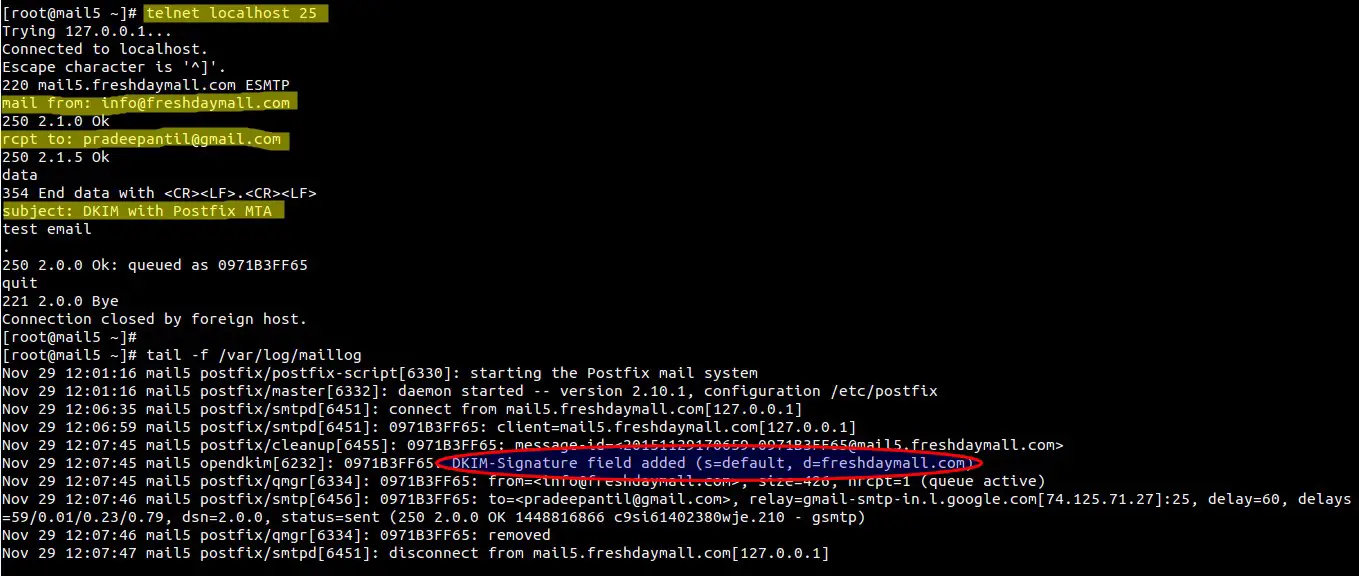
Step:8 Send a Test email and view the logs.

sendmail-with-telnet

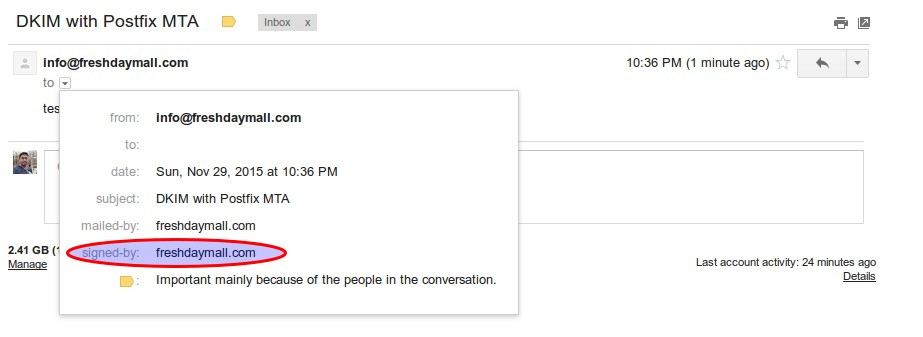
Check whether email is signed or not.

signed-by-email

Wow , Our email is signed and domainKeys configuration task is completed now.

Install latest version of Roundcube (Webmail) on CentOS 7

$
0
0

Roundcube is a web browser based mail client & also known as webmail. It provides a GUI ( Graphical User Interface ) where end users can check their mails, can create & manage folders, can use address book to search email ids and lot of other webmail features.

To install roundcube on CentOS 7 followings are the prerequisite that should be installed.

  • PHP
  • Database ( MariaDB or MySQL )
  • Web Server ( Apache )
  • Any MTA – Postfix , Sendmail & Qmail

In My Case i have already installed Postfix with dovecot on CentOS 7 with

  • Domain name = nsitmail.com
  • Hostname = tec.nsitmail.com

Follow below Steps to install & configure latest versions of Roundcube :

Step:1 Install PHP , Database & Apache using below command :

[root@tec ~]# yum install httpd php php-common php-json php-xml php-mbstring php-imap php-pear-DB php-mysql mysql mariadb-server

Once the above package list is installed , set the time zone value in PHP .

root@tec ~]# vi /etc/php.ini
date.timezone = Asia/Kolkata

Save & exit the file

Step:2 Create & Configure Roundcube Database

Let us first set the Initial settings & root password of Mariadb Server :

[root@tec ~]# systemctl start mariadb
[root@tec ~]# systemctl enable mariadb
ln -s '/usr/lib/systemd/system/mariadb.service' '/etc/systemd/system/multi-user.target.wants/mariadb.service'
[root@tec ~]#
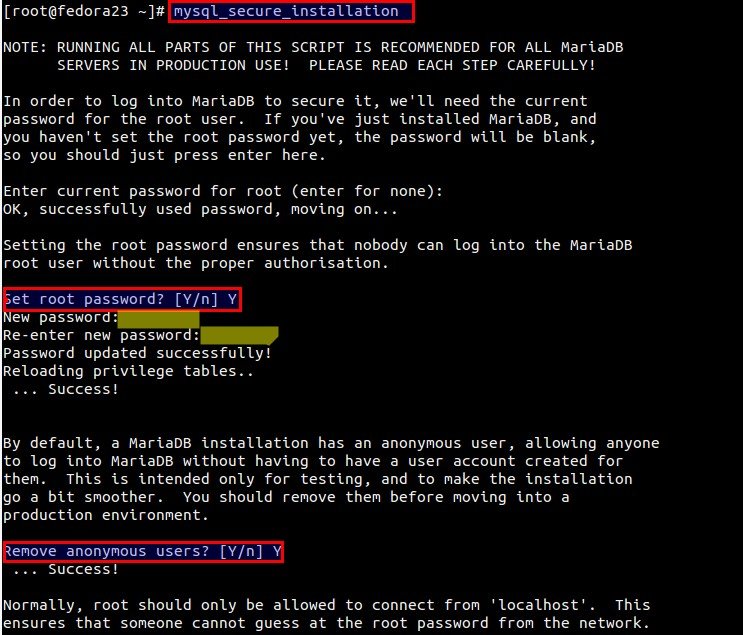
[root@tec ~]# mysql_secure_installation

Above Command “mysql_secure_installation” will allow us to set root password , remove anonymous users , disable remote root login and will remove test database.

Now Create database for Roundube and grant all the permissions to the database

create-database-roundcube

Step:3 Download tar file of Roundcube

Download latest version of Roundcube tar file either from their official site “https://roundcube.net/download/” or we can use below wget command.

[root@tec ~]# wget http://nchc.dl.sourceforge.net/project/roundcubemail/roundcubemail/1.1.3/roundcubemail-1.1.3-complete.tar.gz

Untar the downloaded file in your web server document root.

[root@tec ~]# tar -zxpvf roundcubemail-1.1.3-complete.tar.gz -C /var/www/html/

Rename the extracted file as Roundcube and set the required permissions

[root@tec html]# mv roundcubemail-1.1.3 roundcube
[root@tec html]# chown apache:apache roundcube
[root@tec html]#

Start the Apache service

[root@tec html]# systemctl start httpd
[root@tec html]# systemctl enable httpd
ln -s '/usr/lib/systemd/system/httpd.service' '/etc/systemd/system/multi-user.target.wants/httpd.service'
[root@tec html]#

Step:4 Start Roundcube installation using web browser installer.

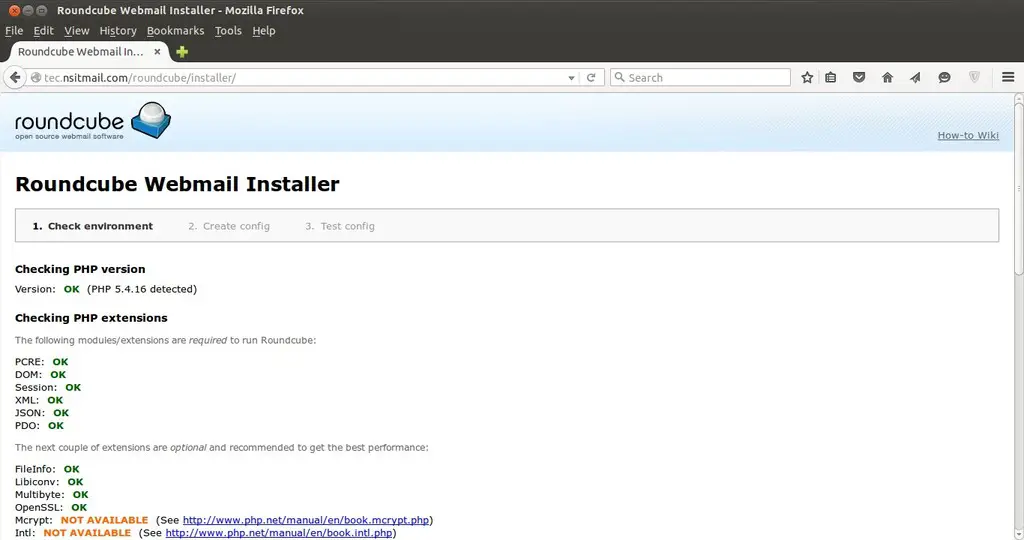
To start the installation of Rouncube , access the below url in the web browser

http://tec.nsitmail.com/roundcube/installer

Roundcube-Webmail-Installer-page

click on Next…

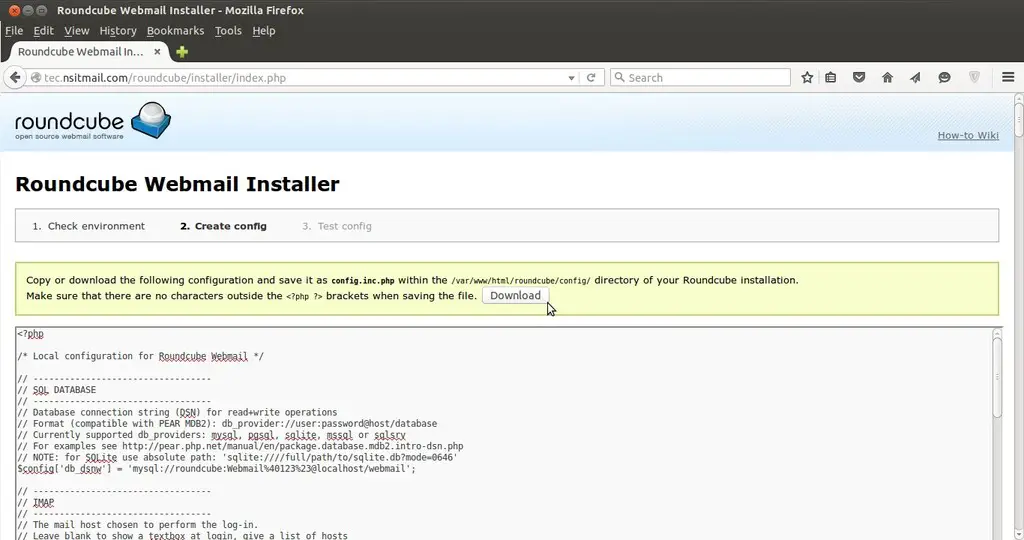
Define the Database, Authentication Mechanism, SMTP & IMAP setting in this step. When We click on Create Config option it will ask us to Copy or download the configuration and save it as config.inc.php within the /var/www/html/roundcube/config/ directory of your Roundcube installation.

In my case i am using http based authentication mechanism , so i create one user on my Linux box and set its password using htpasswd command .

[root@tec ~]# htpasswd -c /home/linuxtechi/.htpasswd linuxtechi
New password:
Re-type new password:
Adding password for user linuxtechi
[root@tec ~]#

Roundcube-config-php-file

Roundcube-test-config-pafe

Remove the installer directory from your web server document root ( /var/www/html/roundcube )

[root@tec ~]# cd /var/www/html/roundcube/
[root@tec roundcube]# rm -rf installer
[root@tec roundcube]#

Step:5 Now access your account using Roundcube

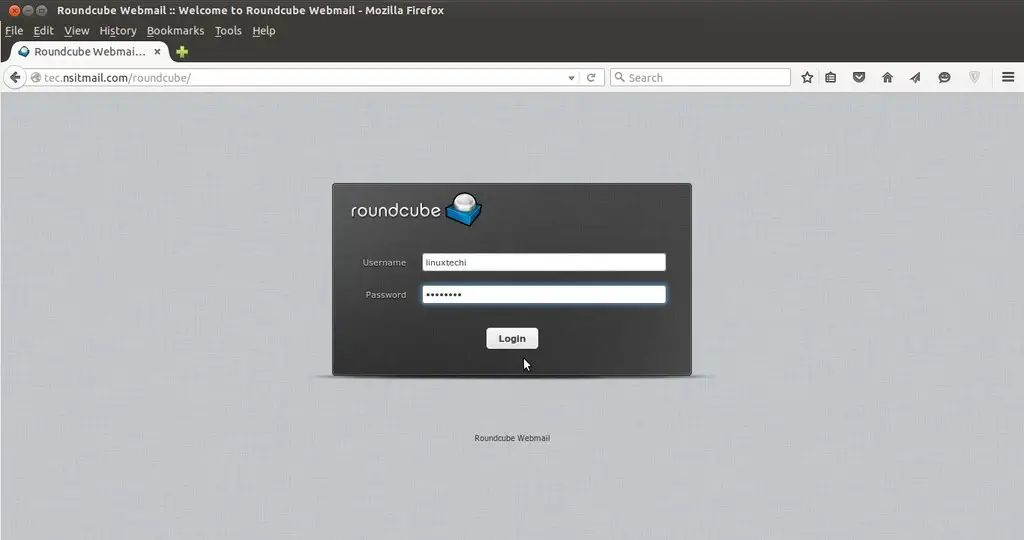
Open the url in the browser “http://tec.nsitmail.com/roundcube/” , use the credentials that we set using htpasswd command.

Roundcube-Webmail-login-page

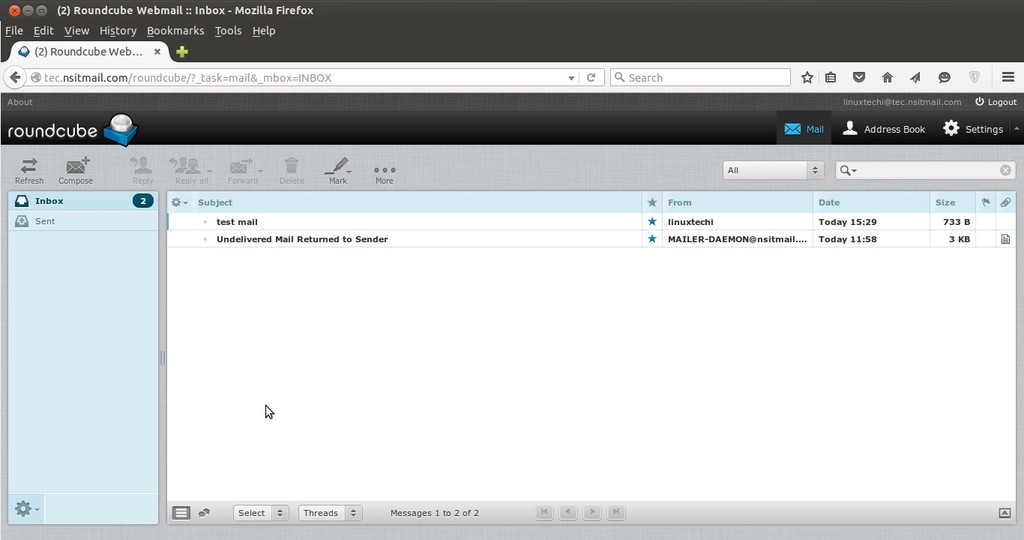
Roundcube-inbox

Roundcube installation is completed, Now explore it and enjoy.

Install Apache, MariaDB and php on Fedora 23 Workstation

$
0
0

Web Server , Database & Scripting Language are the building blocks of web based software like WordPress, Drupal, Joomla and OpenCart. In Fedora linux Apache is the Web Server, Mariadb is the database server & php is the Scripting Language.

In this tutorial we install Apache, Mariadb & php on Fedora 23 workstation ( Desktop).

Install Apache ( Web Server )

dnf command is the advanced version of yum and is a Package Manager for RPM based Linux Distribution. So in Fedora 23 we will installing all the packages using dnf command.

[root@fedora23 ~]# dnf install httpd

install-apache-fedora-23

Use below command to check Apache rpm Version

[root@fedora23 ~]# rpm -q httpd
httpd-2.4.16-1.fc23.x86_64
[root@fedora23 ~]#

Start the Apache Service

[root@fedora23 ~]# systemctl start httpd
[root@fedora23 ~]# systemctl enable httpd
Created symlink from /etc/systemd/system/multi-user.target.wants/httpd.service to /usr/lib/systemd/system/httpd.service.
[root@fedora23 ~]#

Open default 80 port for Apache in case firewall is enable.

[root@fedora23 ~]# firewall-cmd --permanent --add-service=http
success
[root@fedora23 ~]# firewall-cmd --reload
success
[root@fedora23 ~]#

Verify the Installation of Apache :

Use “ip add show” command to verify the ip address of your machine.

command-to-check-ip-fedora23

Open the browser type IP Address or hostname of your machine.

Test-Page-Apache-HTTP-Server-Fedora23

Install MariaDB ( Database Server )

[root@fedora23 ~]# dnf install mariadb-server

install-mariadb-fedora23

Start the mariadb service and enable it across the reboot.

[root@fedora23 ~]# systemctl start mariadb
[root@fedora23 ~]# systemctl enable mariadb
Created symlink from /etc/systemd/system/multi-user.target.wants/mariadb.service to /usr/lib/systemd/system/mariadb.service.
[root@fedora23 ~]#

Configure Initial settings of database server and root password using “mysql_secure_installation

[root@fedora23 ~]# mysql_secure_installation

mysql-secure-installation-1

mysql-secure-installation-2

Install php ( Scripting Language )

Use below dnf command to install php and other important php modules.

[root@fedora23 ~]# dnf install php php-mysql php-pdo php-gd php-mbstring

install-php-fedora23

To test the php installation , create a php file (fedora23.php) in /var/www/html

[root@fedora23 ~]# vi /var/www/html/fedora23.php
<?php
phpinfo()
?>

Restart the Apache Service

[root@fedora23 ~]# systemctl restart httpd
[root@fedora23 ~]#

Now Access the Fedora23.php file in your browser :

http://<IP_Address_Your_Machine>/fedora23.php

phpinfo-fedora23

As we can see php info page , it means php is installed successfully.


How to Install iRedMail (Mail Server) on CentOS 7 & RHEL 7

$
0
0

iRedMail is out of the box open source mail server solution on Linux like operating system. The beauty of iRedMail is that it provides web based admin panel from where mail admin or system admins can do all email related operations task. Some of other features are listed below :

  • Support unlimited email accounts.
  • It provides Roundcube as webmail (MUA )
  • It used Postfix as MTA & Dovecot as MDA
  • It pvoides Calendar service via CalDAV & Contact service via CardDAV
  • It uses SpamAssassin for Spam scan and Amavis & Clamav for Mail virus scan.
  • OpenLDAP, MariaDB and PostgreSQL can be used to save mail accounts

In this article we will demonstrate how to install and configure iRedMail on CentOS 7 & RHEL 7. I am going to use followings for iRedMail setup.

  • OS = CentOS 7 or RHEL 7
  • Domain = nsitmail.com
  • Server Hostname = mail.nsitmail.com

Note : In case if you want mails from your mail server to be delivered in inbox not in spam folder then update the DNS records like A & PTR  before installation and TXT ( SPF & DKIM ) after installation.

Step:1 Set hostname and disable Selinux.

Set the proper hostname using hostnamectl command if it is not set.

[root@mail ~]# hostnamectl set-hostname mail.nsitmail.com
[root@mail ~]# hostname -f
mail.nsitmail.com
[root@mail ~]#

Update the /etc/hosts file

127.0.0.1 mail.nsitmail.com localhost.localdomain localhost

Disable Selinux

[root@mail ~]# setenforce 0

Edit the file /etc/sysconfig/selinux , set the parameter “SELINUX=disabled” , Reboot the server to disable selinux completely.

Step:2 Download the tar file of iRedmail.

Download the latest version of iRedmail from their Official Web Site or use below wget command to download from terminal.

[root@mail ~]# wget https://bitbucket.org/zhb/iredmail/downloads/iRedMail-0.9.3.tar.bz2

Step:3 Extract the tar file & execute installation Script.

[root@mail ~]# ll
total 124
-rw-r--r-- 1 root root 126277 Dec 20 19:12 iRedMail-0.9.3.tar.bz2
[root@mail ~]#
[root@mail ~]# tar -jxvf iRedMail-0.9.3.tar.bz2
[root@mail ~]# cd iRedMail-0.9.3
[root@mail iRedMail-0.9.3]# sh iRedMail.sh

After couple of seconds , below screen will appear , Select yes and press enter.

iRedmail-installation-welcome-message

Define the folder or directory where users mailbox will be stored.

iredmail-users-mailbox-location

Select the web Server for iRedmail. Default is Nginx.

Webserver-for-iRedmail

Select the database of your choice which will store domain names and mail accounts. In my case i am using MariaDB.

mariadb-iredmail

Define the domain name for your mail server. In my case domain name is “nsitmail.com

domain-name-for-iredmail

Set Password for postmaster account.

postmaster-password-iredmail

Select Optional Components of iRedmail installation

Select-optional-components-iredmail

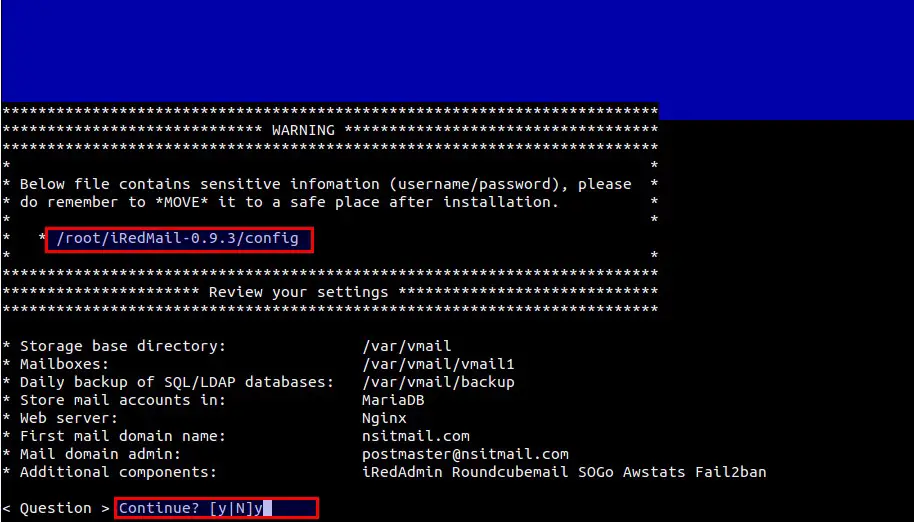
Press “y” to continue installation, Mail Server info & Credentials are kept in the file “/root/iRedMail-0.9.3/config”. Please keep this file in secure place.

iredmail-credentials

iredmail-installation-completed

As per instructions , reboot the server to enable all mail services.

Postfix mail logs and iRedmail logs are stored in “/var/log/maillog” and “/var/log/iredapd/iredapd.log” respectively.

Note : Default administrator name is “postmaster@nsitmail.com”

Following are the Important URLs after the Installation is completed , replace the domain name as per your setup in mentioned URLs.

iRedAdmin – official web-based admin panel:

https://mail.nsitmail.com/iredadmin/

Username: postmaster@nsitmail.com, password: XXXXXXXXXX

Roundcube webmail URL :

http://mail.nsitmail.com/mail/

SOGo Groupware

https://mail.nsitmail.com/SOGo/

Step:4 Create Users & domain from Admin Panel.

To create users first login to admin panel. Use user name as “postmaster@<domain>” and password that we set during installation.

iRedmail-webadmin-panel

Dashboard-iredmail

Click on Add option and then Select Users.

Add-user-under-domain-iredmail

Add a new Domain :

From the admin Panel , Select “Domain & accounts” option and then click on Add domain

Domains-Accounts-iredmail

Define the domain name & Organization Name and then further we can create users on newly created domain.

Add-domain-iredmail

Step:5 Access Roundcube (Webmail).

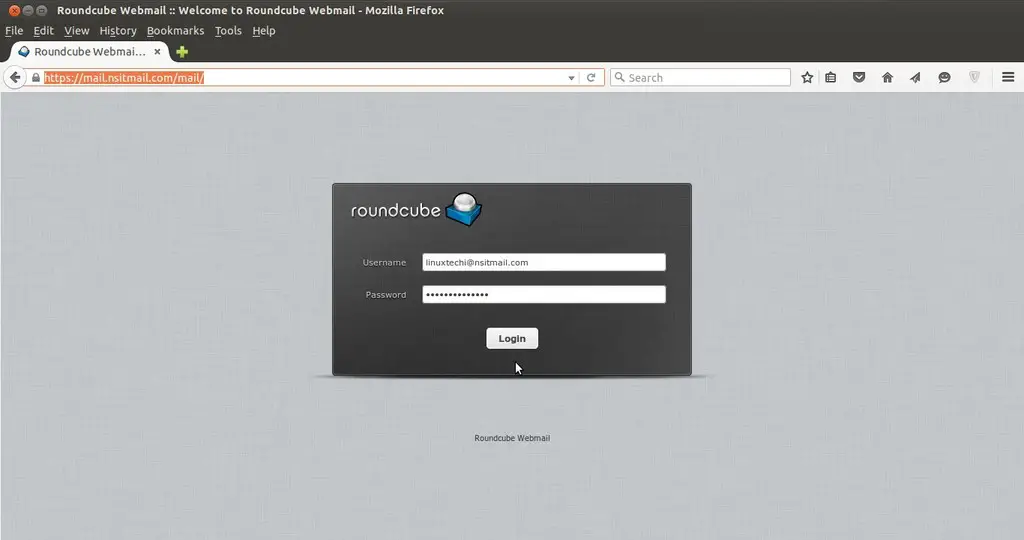
Open the url in the browser “https://mail.nsitmail.com/mail/” , replace the domain name as per your setup.

Roundcube-Webmail-iredmail

Roundcube-Webmail-Inbox

Send a test mail to verify the functionality.

compose-mail-roundcube-iredmail

mail-from iredmail-on-gmail

As we see that i got the mail from iRedmail mail server, so we can say the iRedmail is successfully installed and configured.

Single Node OpenStack (Liberty) Installation Steps on CentOS 7

$
0
0

OpenStack is a Cloud Software that manage large pool of compute (hypervisors), storage ( block & swift ) and network resources of a data center. It provides a Dashboard where admins can create and manage Projects (Tenants ) and give appropriate access to the project members , further on Project members can create VMs (Virtual Machine).

In this article we will install latest version of OpenStack ‘Liberty’ on CentOS 7 using rdo repositories. As per my setup i am using followings on my CentOS 7 Machine

  • Hostname = openstack.example.com
  • IP address = 192.168.1.3
  • netmask = 255.255.255.0
  • Gateway = 192.168.1.1
  • DNS = 192.168.1.254

Step:1 Set the hostname using hostnamectl command .

[root@localhost ~]# hostnamectl set-hostname "openstack.example.com"
[root@localhost ~]#

Step:2 Set the Selinux in Permissive Mode

[root@localhost ~]# setenforce 0

Edit the selinux config file ( /etc/sysconfig/selinux ) and set “SELINUX=permissive

[root@localhost ~]# grep permissive /etc/sysconfig/selinux
SELINUX=permissive
[root@localhost ~]#

Step:3 Disable firewalld & NetworkManager Service

[root@openstack ~]# systemctl stop firewalld
[root@openstack ~]# systemctl disable firewalld
Removed symlink /etc/systemd/system/dbus-org.fedoraproject.FirewallD1.service.
Removed symlink /etc/systemd/system/basic.target.wants/firewalld.service.
[root@openstack ~]#
[root@openstack ~]# systemctl stop NetworkManager
[root@openstack ~]# systemctl disable NetworkManager
Removed symlink /etc/systemd/system/multi-user.target.wants/NetworkManager.service.
Removed symlink /etc/systemd/system/dbus-org.freedesktop.NetworkManager.service.
Removed symlink /etc/systemd/system/dbus-org.freedesktop.nm-dispatcher.service.
[root@openstack ~]#

Step:4 Enable rdo repository for liberty packages.

Use below commands to update the system and enable rdo repository

[root@openstack ~]# yum update -y
[root@openstack ~]# yum install -y https://www.rdoproject.org/repos/rdo-release.rpm

Step:5 Install OpenStack PackStack Package

[root@openstack ~]# yum install -y openstack-packstack

Generate the answer file using below command.

[root@openstack ~]# packstack --gen-answer-file=/root/answer.txt
Packstack changed given value to required value /root/.ssh/id_rsa.pub

Edit the answer file “/root/answer.txt” , set the following parameters and leave rest of parameters as it is.

# NTP Server
CONFIG_NTP_SERVERS=<NTP_Server_IP>

# Disable Demo Version
CONFIG_PROVISION_DEMO=n

# Set KeyStone Admin Password or Admin user Password
CONFIG_KEYSTONE_ADMIN_PW=<password>

# Config Horizon over SSL
CONFIG_HORIZON_SSL=y

# Disable Nagios
CONFIG_NAGIOS_INSTALL=n

Note : In case if you don’t have NTP server in your setup then you can leave NTP parameter as it is.

Step:6 Start OpenStack installation using answer file.

[root@openstack ~]# packstack --answer-file /root/answer.txt

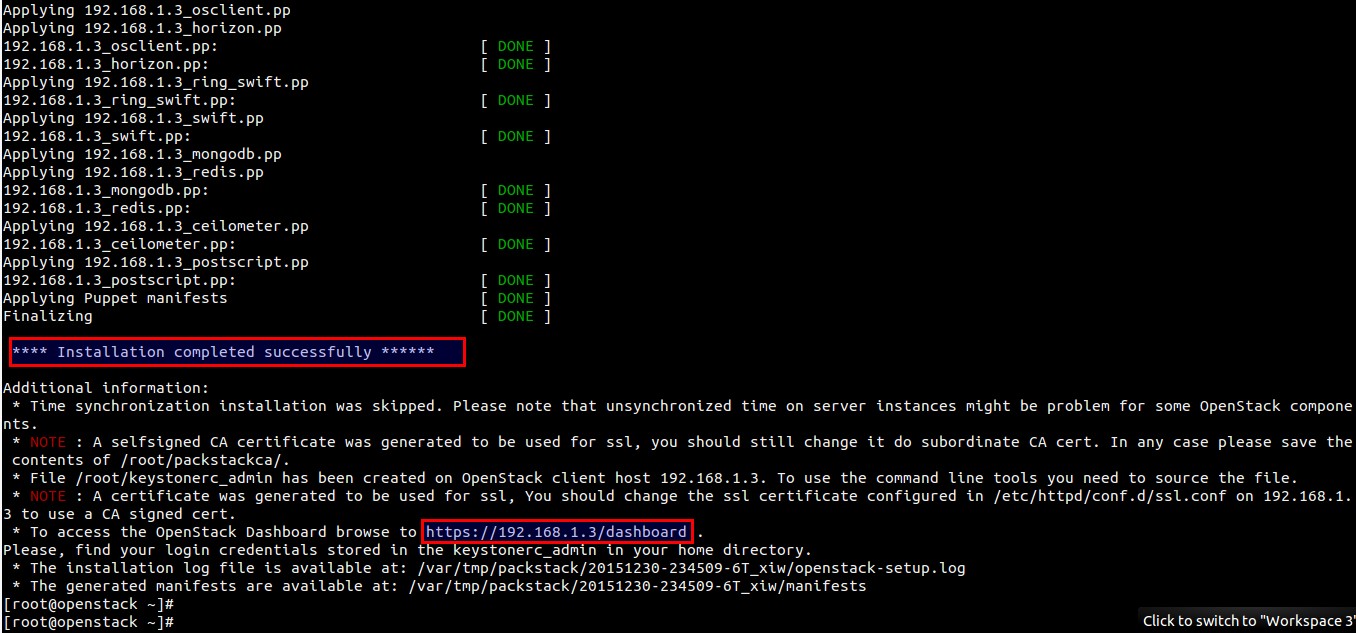
Once the installation is completed , we will get below message.

openstack-installation-packstack

After the installation a new interface “br-ex” will be created and assign the IP addess of eth0 or enp0s3 to br-ex .

[root@openstack ~]# cd /etc/sysconfig/network-scripts/
[root@openstack network-scripts]# cp ifcfg-enp0s3 ifcfg-br-ex
[root@openstack network-scripts]# vi ifcfg-enp0s3
DEVICE=enp0s3
HWADDR="08:00:27:8E:EA:56"
TYPE=OVSPort
DEVICETYPE=ovs
OVS_BRIDGE=br-ex
ONBOOT=yes

[root@openstack network-scripts]# vi ifcfg-br-ex
DEVICE=br-ex
DEVICETYPE=ovs
TYPE=OVSBridge
BOOTPROTO=static
IPADDR=192.168.1.3
NETMASK=255.255.255.0
GATEWAY=192.168.1.1
DNS1=192.168.1.254
ONBOOT=yes

In above files please change the IP details, Hardware address and Device name as per your setup.

When we restart the network service , it will add “enp0s3” as a port in br-ex OVS bridge.

[root@openstack network-scripts]# systemctl restart network
[root@openstack network-scripts]#

Please take a reboot and check whether settings are persistent or not.

Step:7 Now Access OpenStack Dashboard.

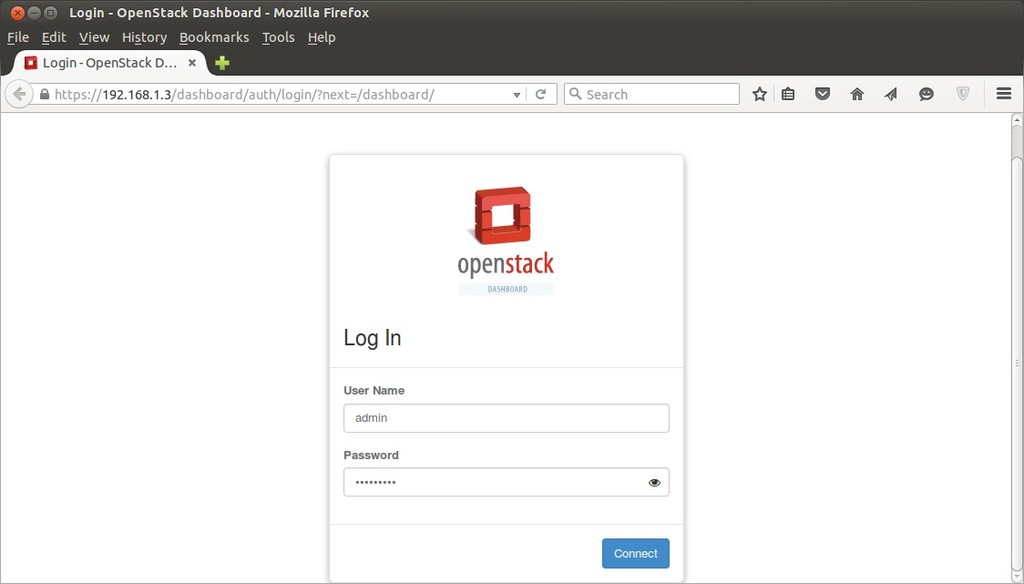
When the installation is completed a dashboard link was provided on the screen , in My Case it is “https://192.168.1.3/dashboard”

Liberty-OpenStack-Dashboard jpg

Use the user name as “admin” and password that we set for keystone admin user in answer file.

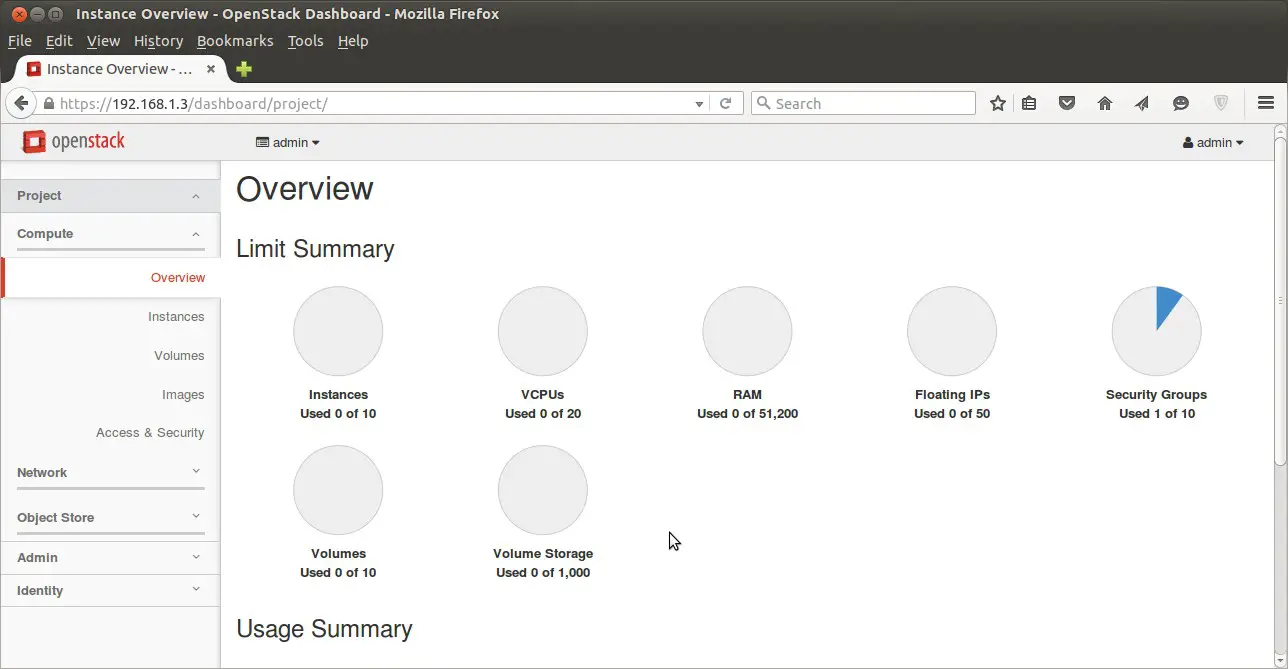
Instance-Overview- OpenStack-Dashboard

As we are able to login in Dashboard , so OpenStack installation part is completed. Now our next task is to “Launch an Instance from OpenStack Dashboard

Viewing all 453 articles
Browse latest View live