Quantcast
Channel: How To
Viewing all 455 articles
Browse latest View live

Launch an Instance from OpenStack (Liberty) Dashboard

$
0
0

To Launch an instance from OpenStack dashboard, first we need to finish following steps :

  • Create a Project and add a member to the Project.
  • Create a Image and Flavor
  • Create a Network and Router for a Project.

In my Case i will use Project Name as “Innovation” and linuxtechi as Project Member of Innovation.

  • Internal Network = 10.10.10.0/24
  • External Network or Floating IP Network = 192.168.1.0/24
  • Gateway of External Network = 192.168.1.1

Create a Project and add a member to the Project.

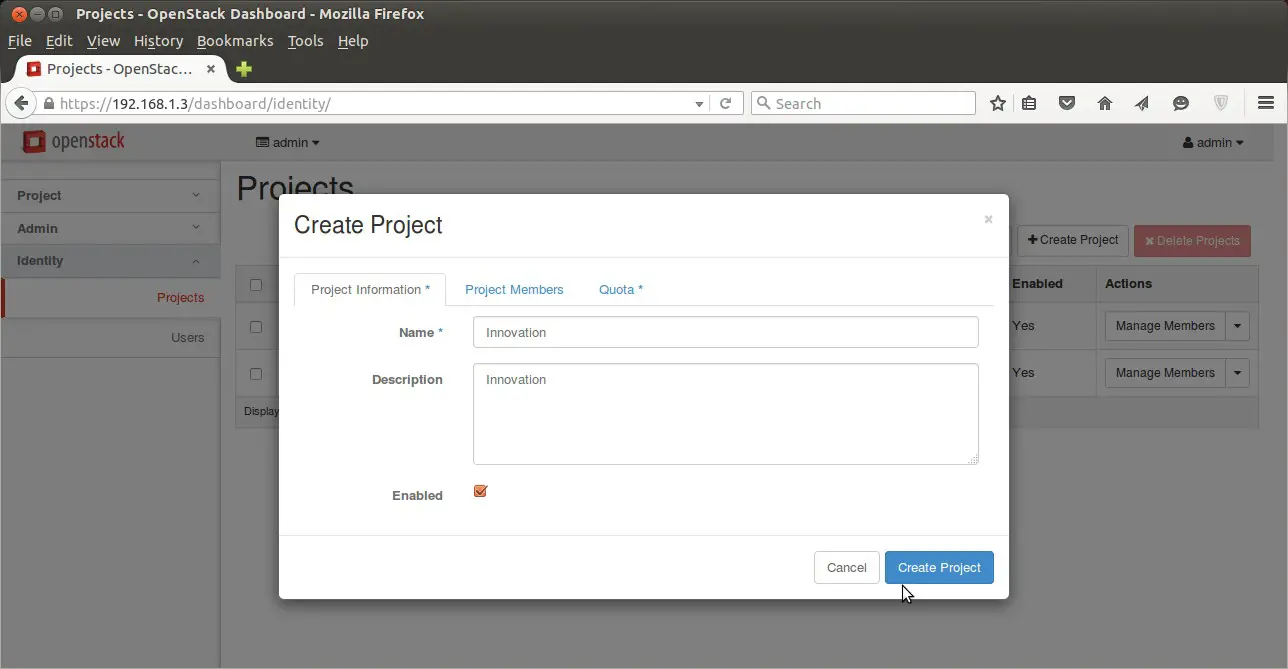
Login to the dashboard using Admin credentials and Go to Identity Tab –> Projects and Click on Create Project.

Create-Projects-OpenStack-Dashboard

Click on “Create Project” , We can also set the Quota for the project from Quota Tab.

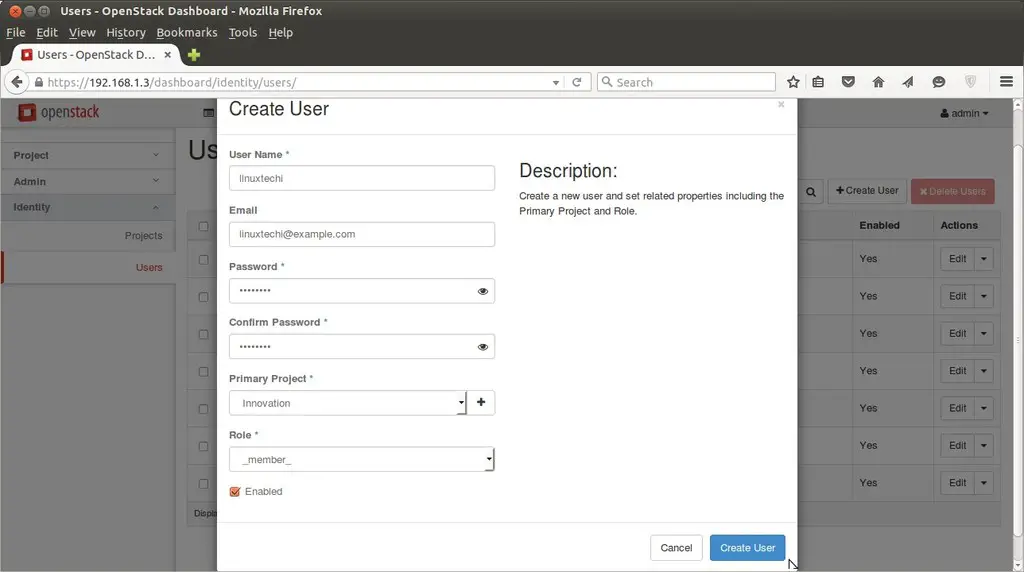
To create Users , Go to Identify Tab–> Users–> Click on ‘Create User’

In my case i have specify the followings :

  • User Name = linuxtechi
  • email = linuxtechi@example.com
  • password = xxxxxx
  • Primary Project = innovation
  • Role = member

Create-Users-OpenStack-Dashboard

Create a flavor and image :

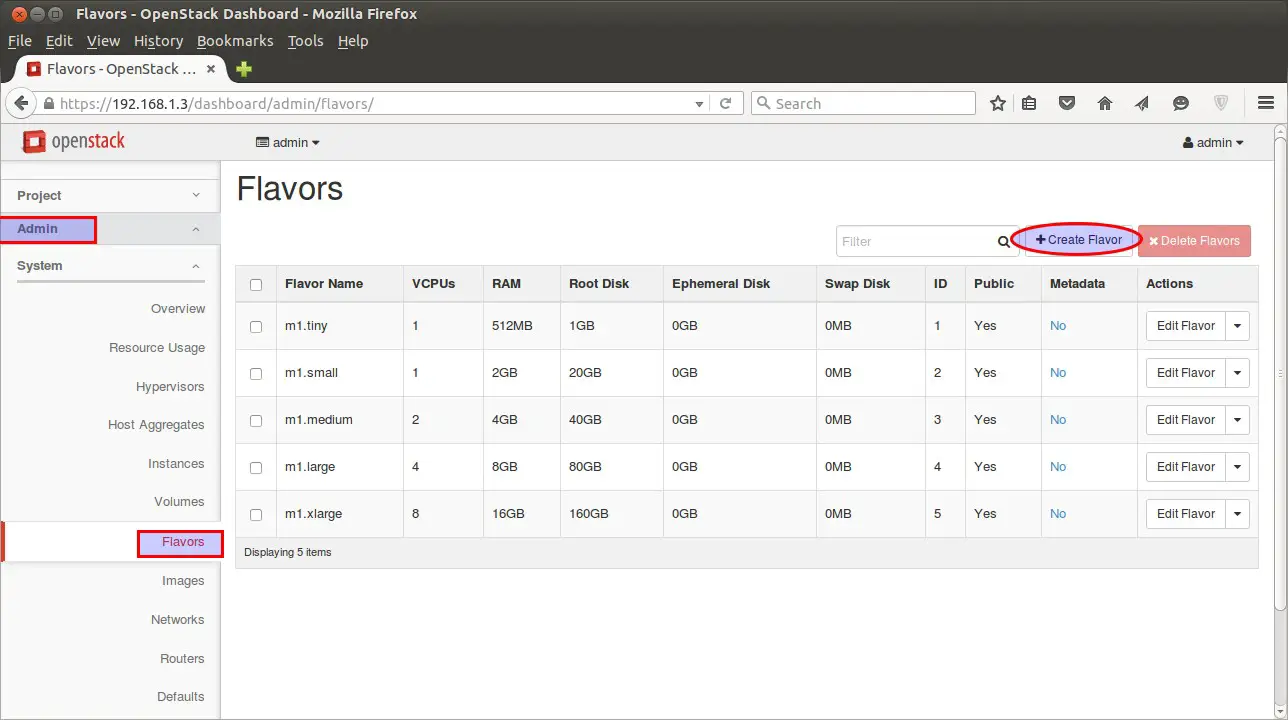
To create a flavor login in dashboard using admin credentials , Go to Admin Tab –> Flavors –> Click on create Flavor.

Flavors-OpenStack-Dashboard

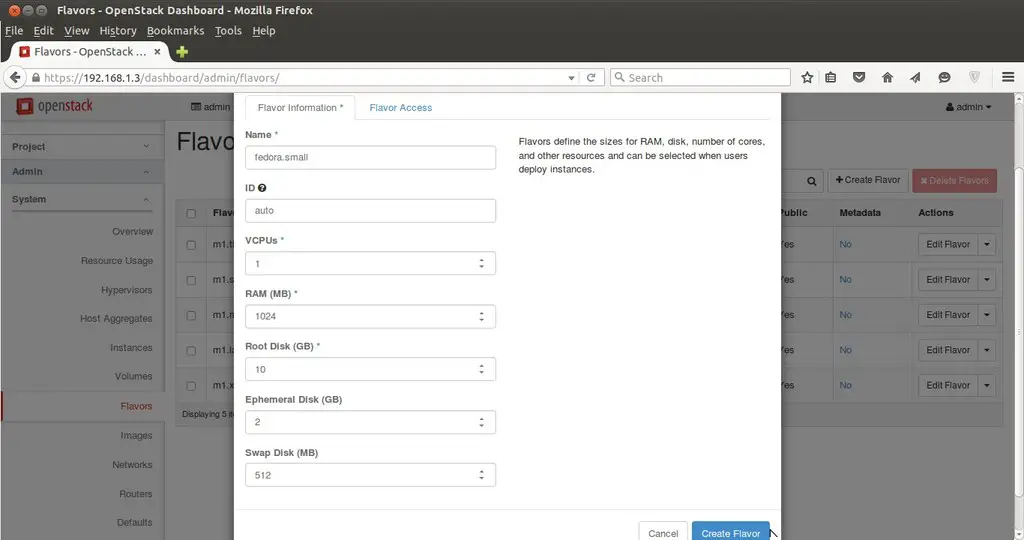
Specify the Flavor Name (fedora.small) , VCPU , Root Disk , Ephemeral Disk & Swap disk.

Create-Flavors-OpenStack-Dashboard

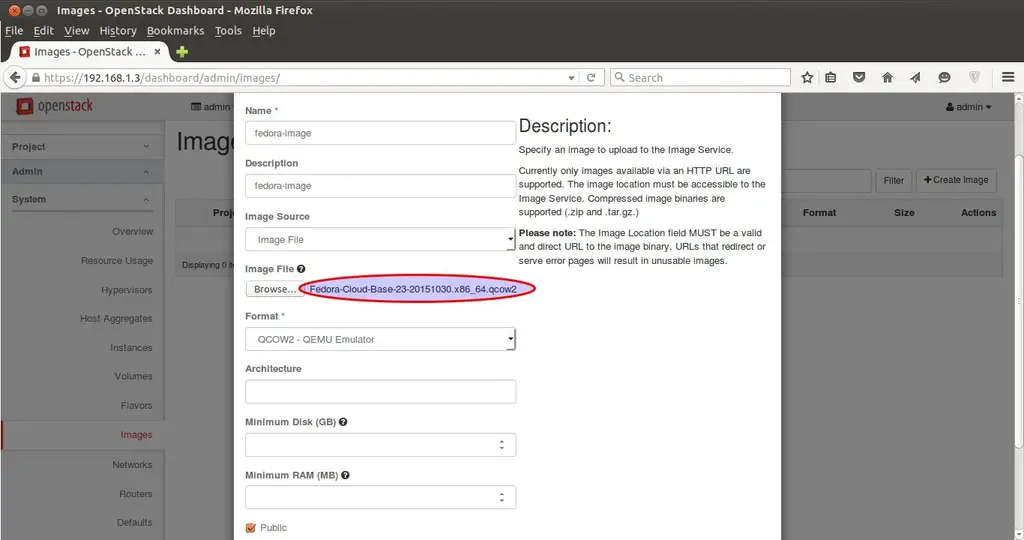
To Create Image , Go to Admin Tab –> Images—> Click on Create Image.

Specify the Image Name , Description, Image Soure ( in my case i am using Image File as i have already downloaded the Fedora 23 Cloud Image ) , Format QCOW2

Create-Images-OpenStack Dashboard

Create Network and Router for Project Innovation.

To create Network and router for Innovation project sign out of admin user and login as “linuxtechi” user in dashboard.

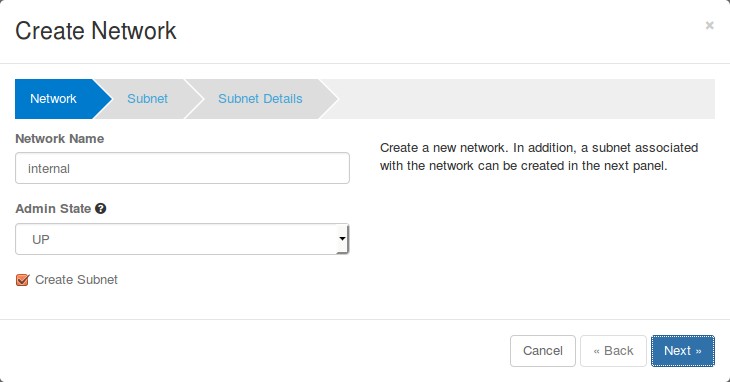
Go to the Network Tab —> Click on Networks —> then Click on Create Network

Specify the Network Name as Internal

internal-network-name-openstack

click on Next..

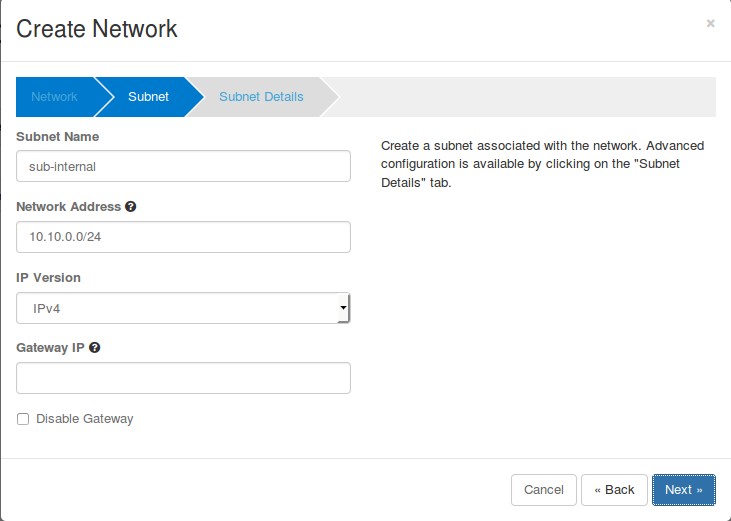
Specify the Subnet name (sub-internal) and Network Address (10.10.0.0/24)

internal-subnet-name-openstack

Click on Next..

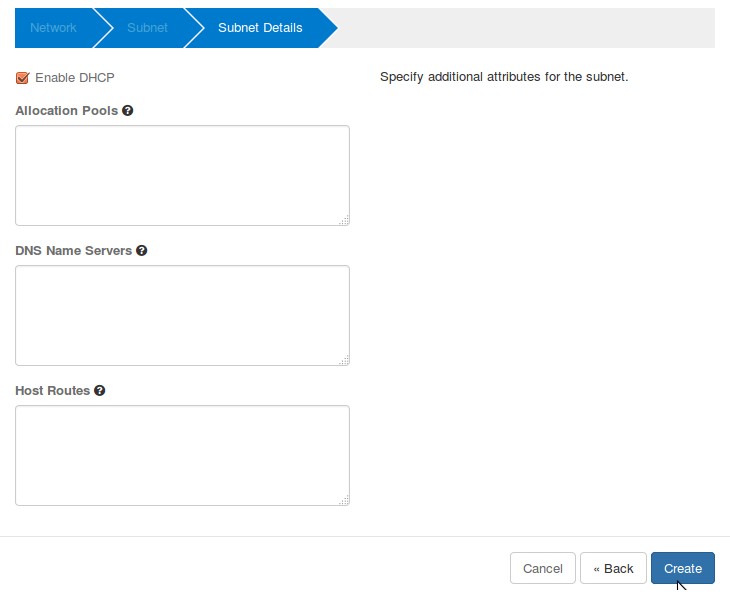
click-create-internal-network-openstack

VMs will be getting internal ip from DHCP Server because we enable DHCP option for internal network.

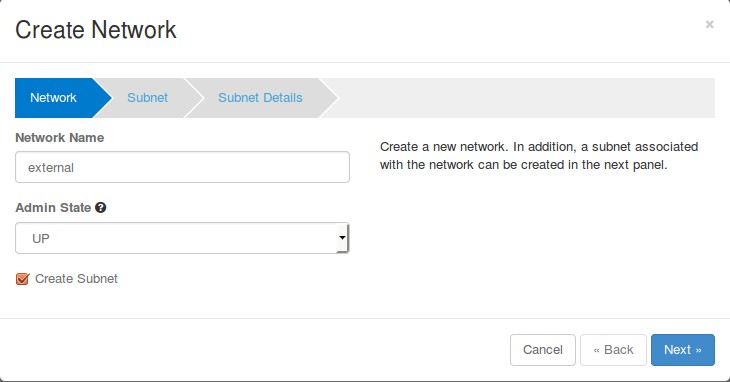
Now Create External Network . Click on “Create Network” again , Specify Network Name as “external

external-network-openstack-dashboard

Click on Next…

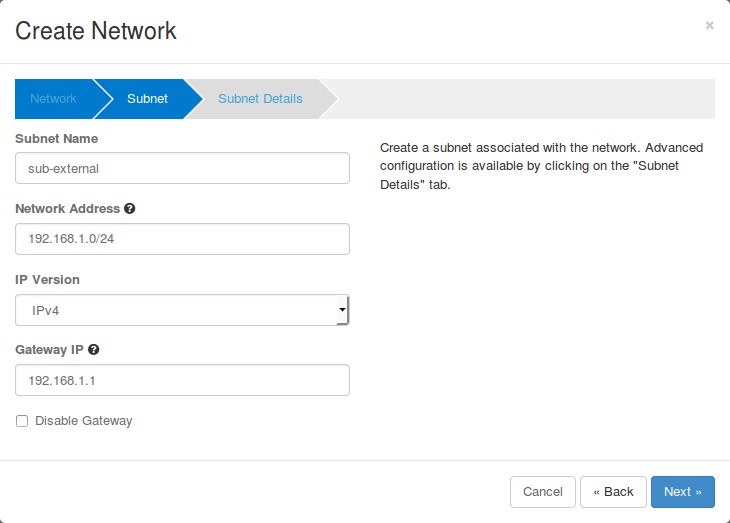
Specify subnet Name as “sub-external” & Network Address as “192.168.1.0/24

subnet-name-external-name-openstack

Click on Next

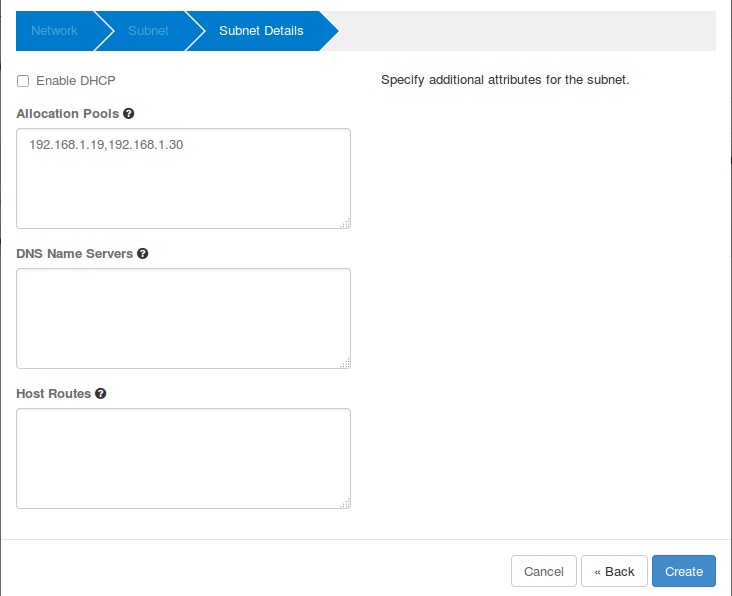
Untick  “Enable DHCP” option and Specify the ip address pool for external network.

ipaddress-pool-external-network-openstack

Click on Create.

Now time to create a Router.

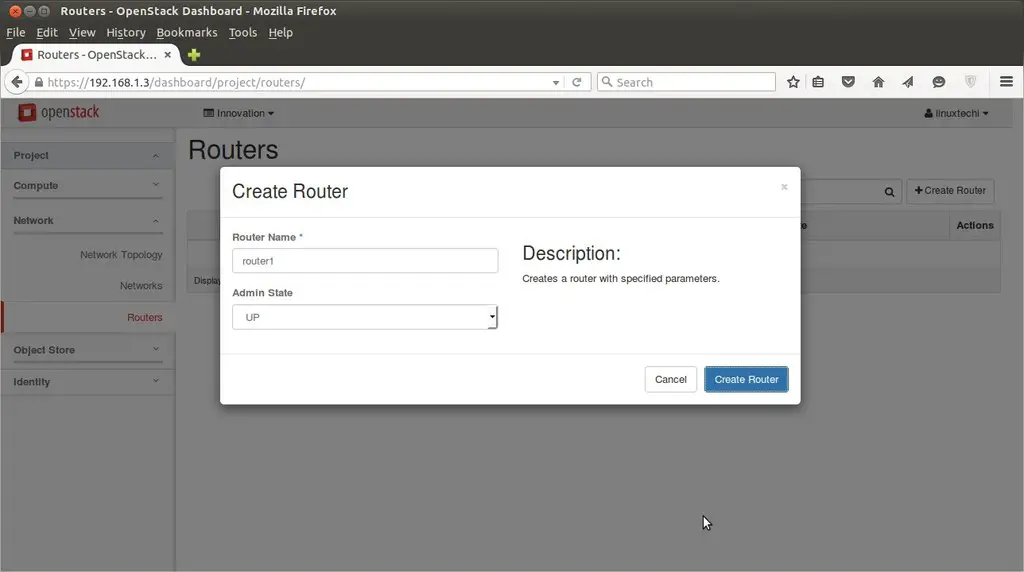
Go To Network Tab –> Routers –> Click on ‘+ Create Router’

create-router-openstack

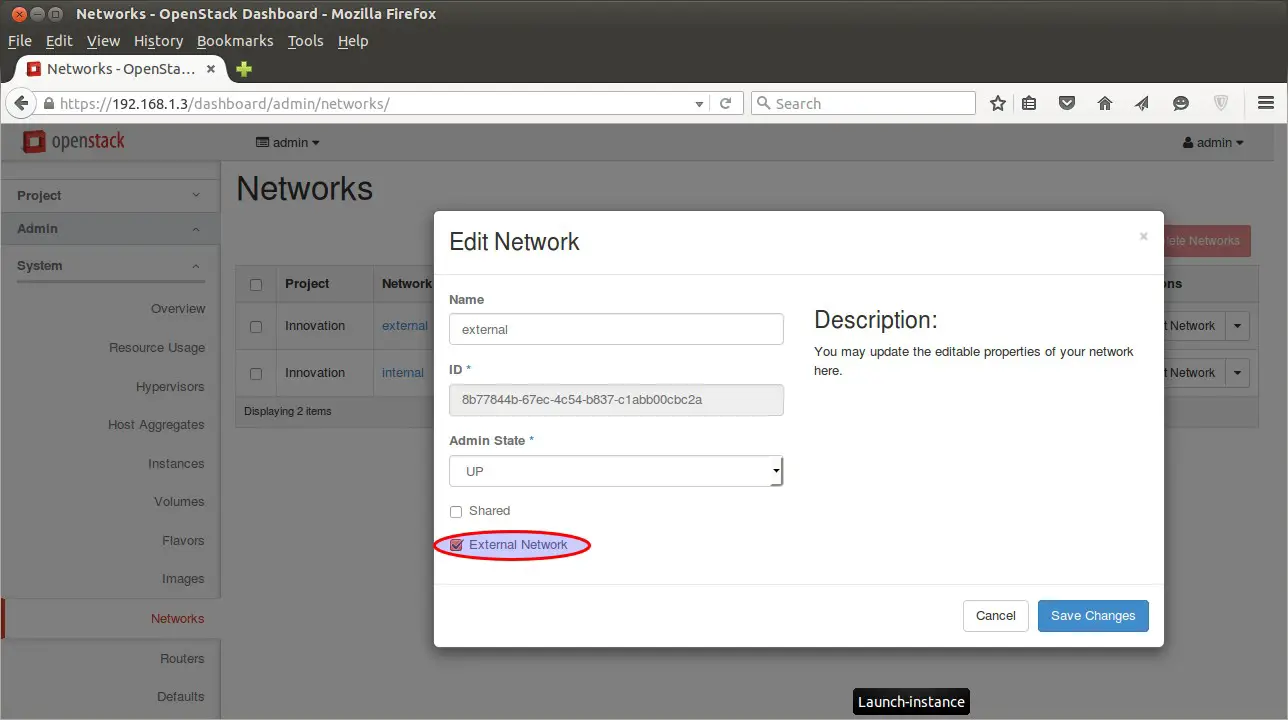
Now Mark External network as “External” , this task can be completed only from admin user , so logout from linuxtechi user and login as admin.

Go to Admin Tab —> Networks–> Click on Edit Network for “External”

Set-External-Networks-OpenStack-Dashboard

Click on Save Changes

Now Logout from admin user and login as linuxtechi user.

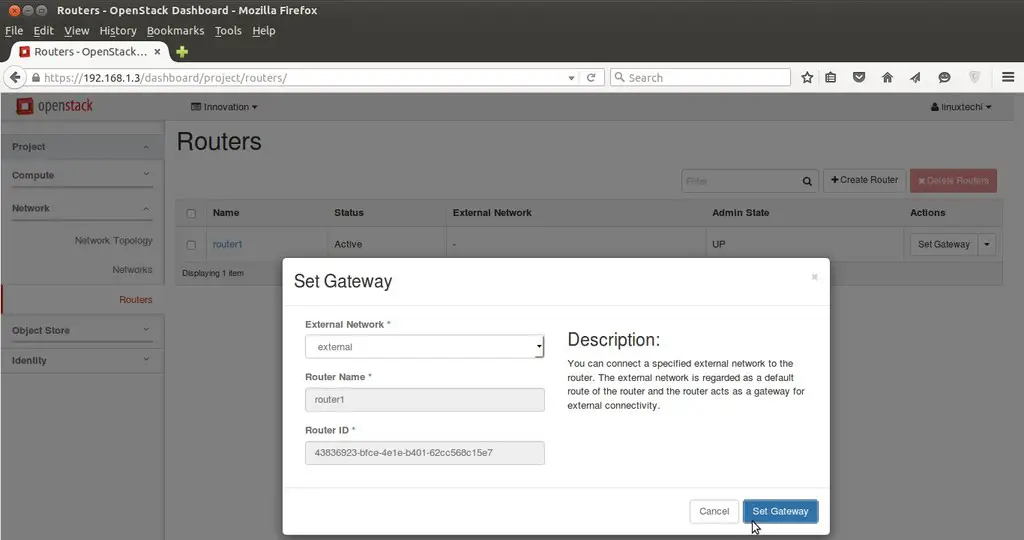
Go to Network Tab —> Routers –> for Router1 click on “Set Gateway”

Set-Gateway-Router-OpenStack-Dashboard

Click on “Set Gateway” , this will add a interface on router and will assign the first ip of external subnet (192.168.1.0/24).

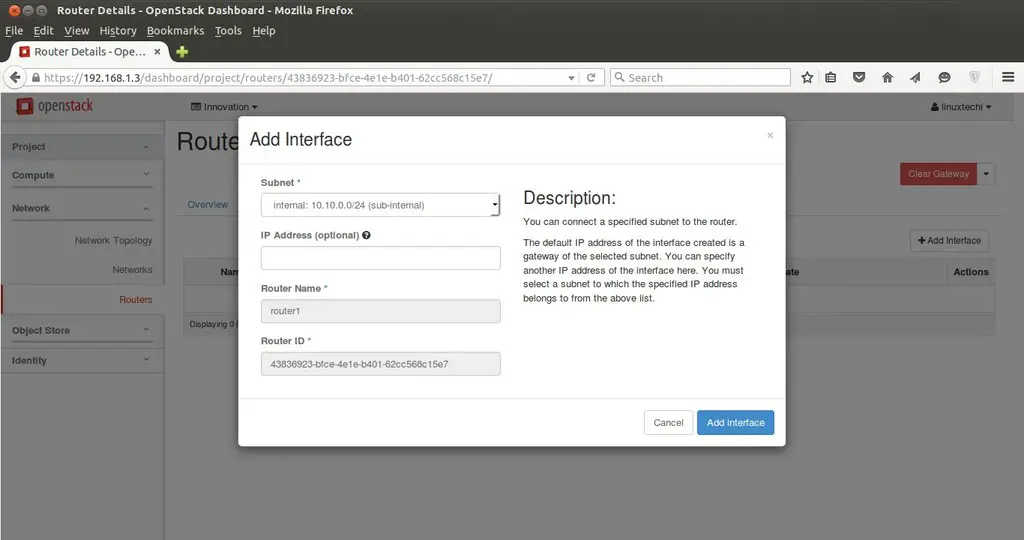
Add internal interface to router as well , Click on the “router1″ and select on “interfaces” and then click on “Add interface”

Add-internal-interface-router-OpenStack-Dashboard

Click on Add interface.

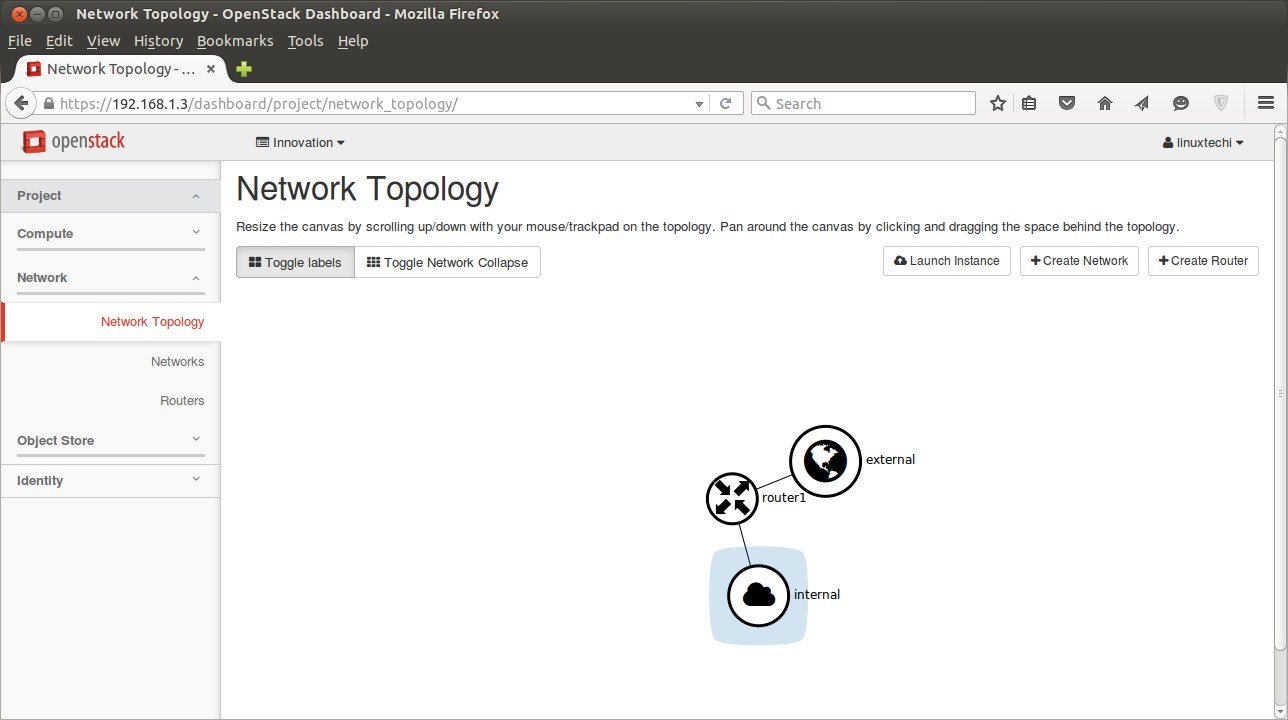
Network Part is completed Now & we can view Network Topology from “Network Topology” Tab

Network-Topology-OpenStack-Dashboard

Now Create a key pair that will be used for accessing the VM and define the Security firewall rules.

For creating a key pair

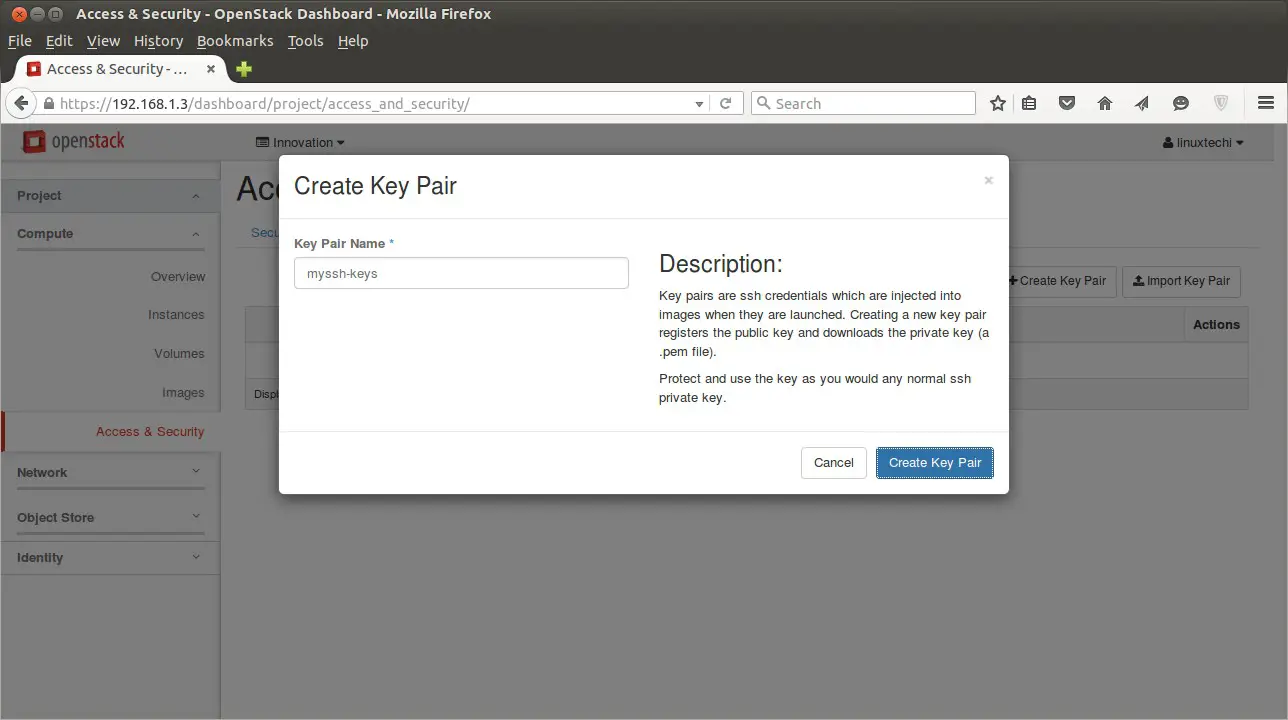
Go to ‘Access & Security’  Tab —> Click on Key Pairs –> then click on ‘Create Key Pair

Access-security-OpenStack-Dashboard

It will create a Key pair with name “myssh-keys.pem

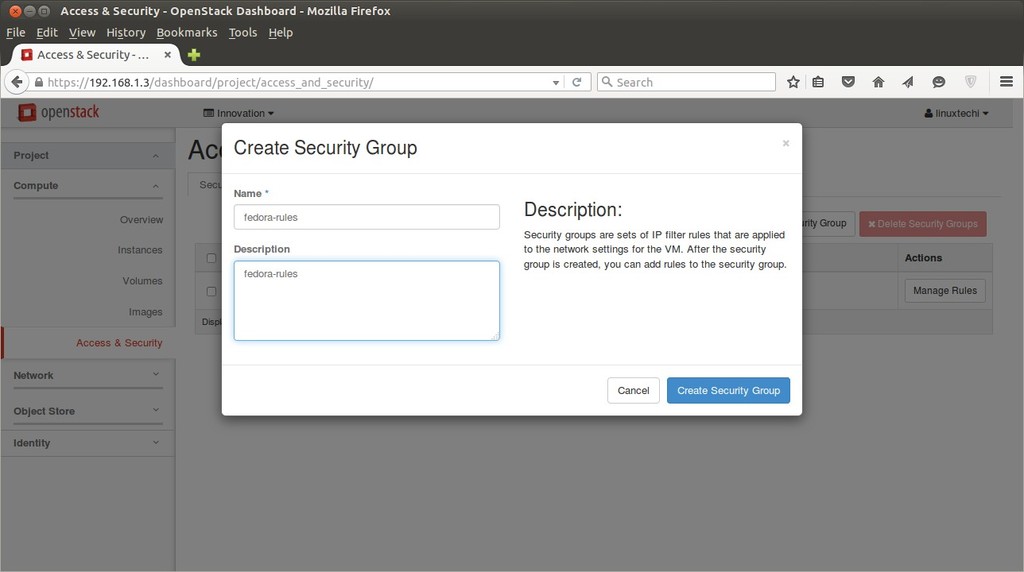
Add a new Security Group with name ‘fedora-rules’ from Access & Security Tab. Allow 22 and ICMP from Internet ( 0.0.0.0 ).

Security-Group-OpenStack-Dashboard

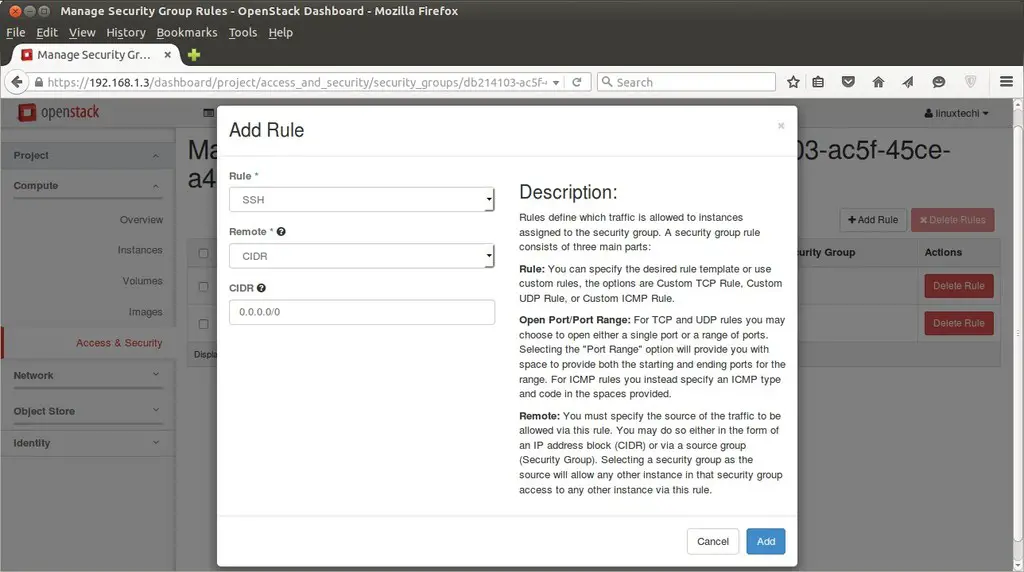
Once the Security Group ‘fedora-rules’ created , click on Manage Rules and allow 22 & ICMP ping.

Manage-Security-Group-Rules-OpenStack Dashboard

Click on Add , Similarly add a rule for ICMP.

Now Finally it’s time to Launch an instance.

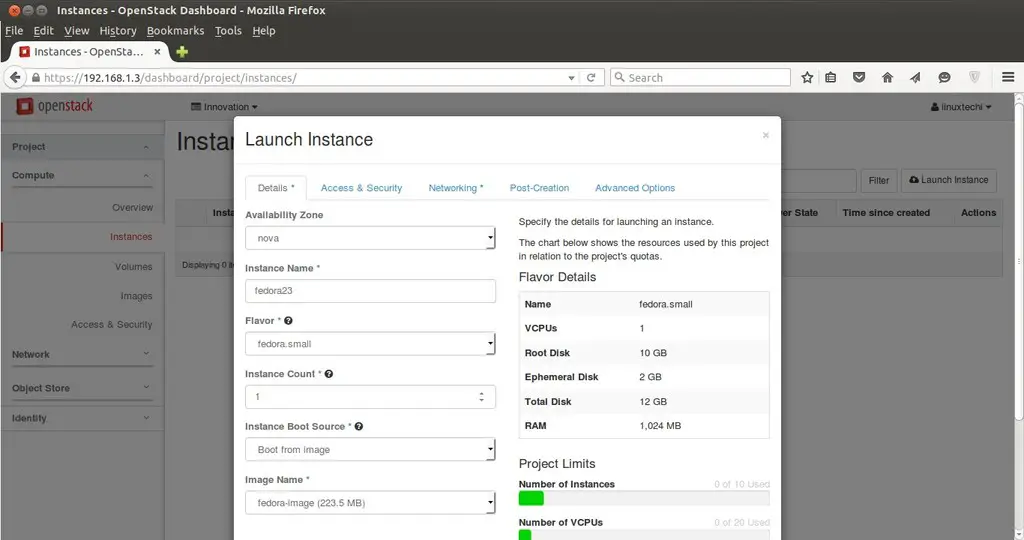
Go to Compute Tab –> Click on Instances –> then click on ‘Launch Instance’

Instances-Details-OpenStack-Dashboard

Specify the Instance Name , Flavor that we created in above steps and ‘Boot from image’ from Instance Boot Source option and Select Image Name ‘fedora-image’.

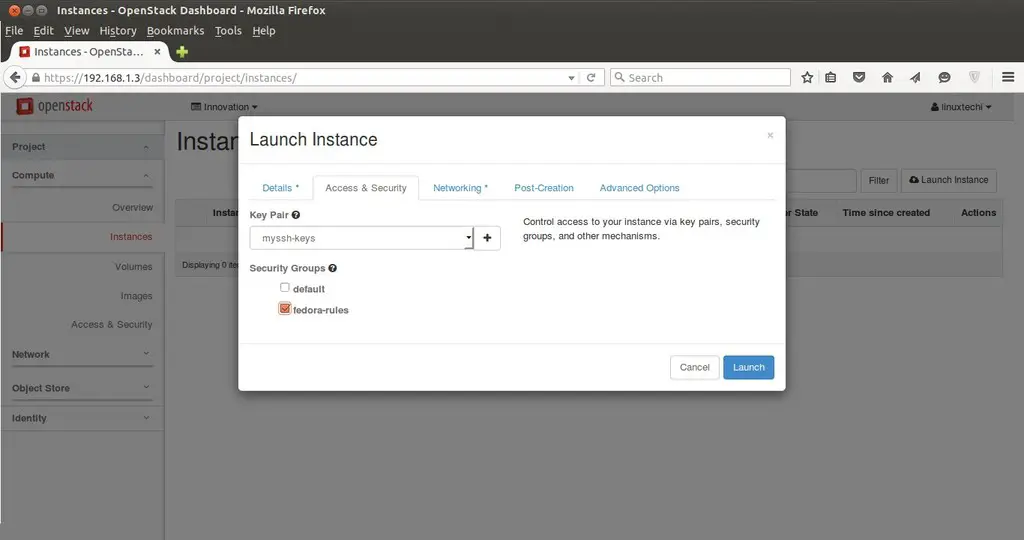
Click on ‘Access & Security’ and Select the Security Group ‘fedora-rules’ & Key Pair ”myssh-keys

Instances-Security-group-keypair-OpenStack-Dashboard

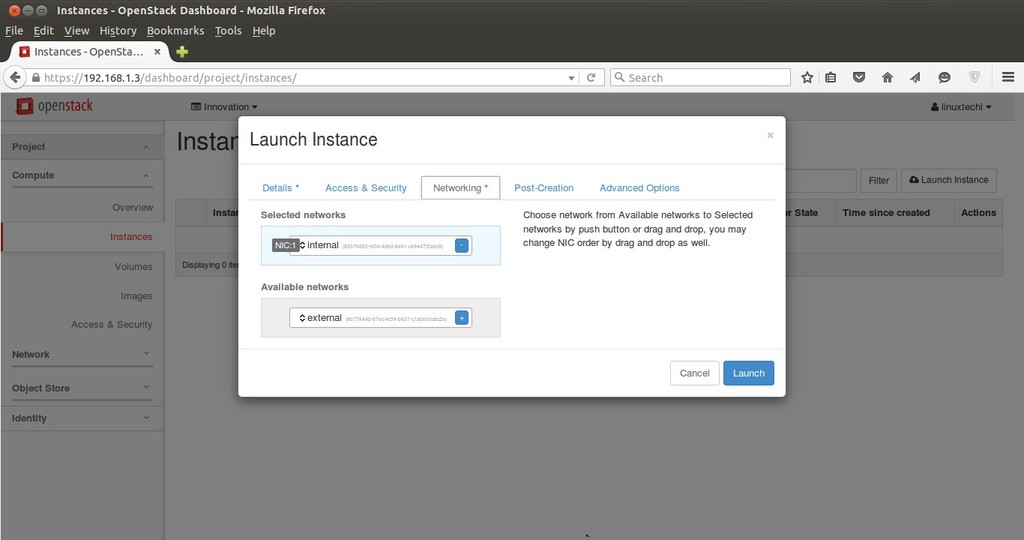
Now Select Networking and add ‘Internal’ Network and the Click on Launch ….

Instances-Network-OpenStack-Dashboard

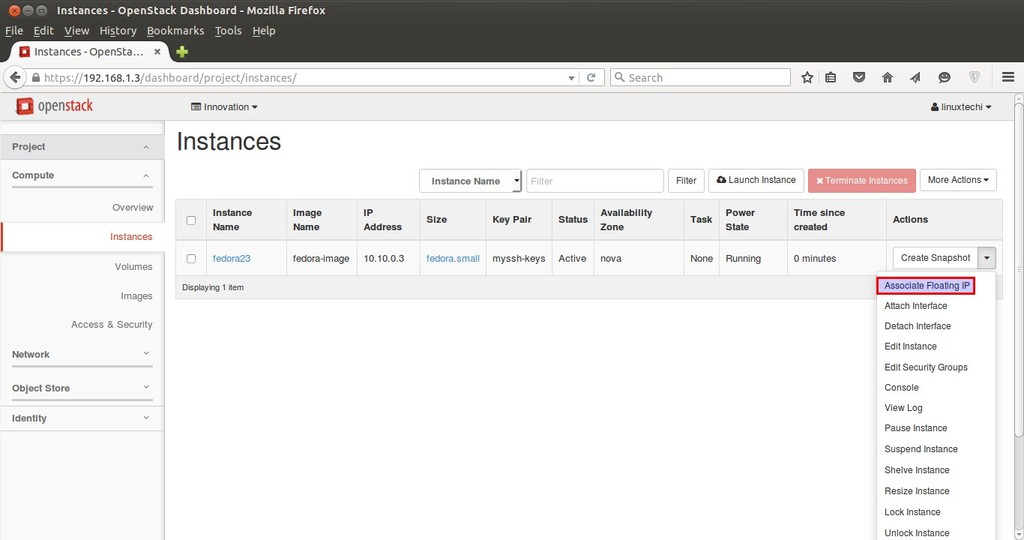
Once the VM is launched , Associate a floating ip so that we can access the VM.

Associate-floating-ip-Instances-OpenStack-Dashboard

Click on ‘Associate Floating IP

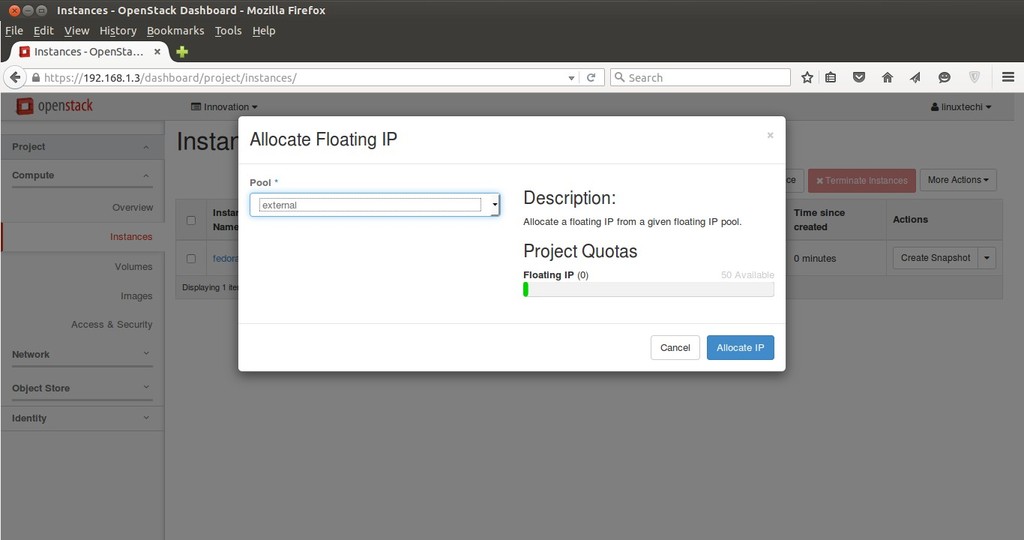
Allocating-floating-OpenStack Dashboard

Click on Allocate IP.

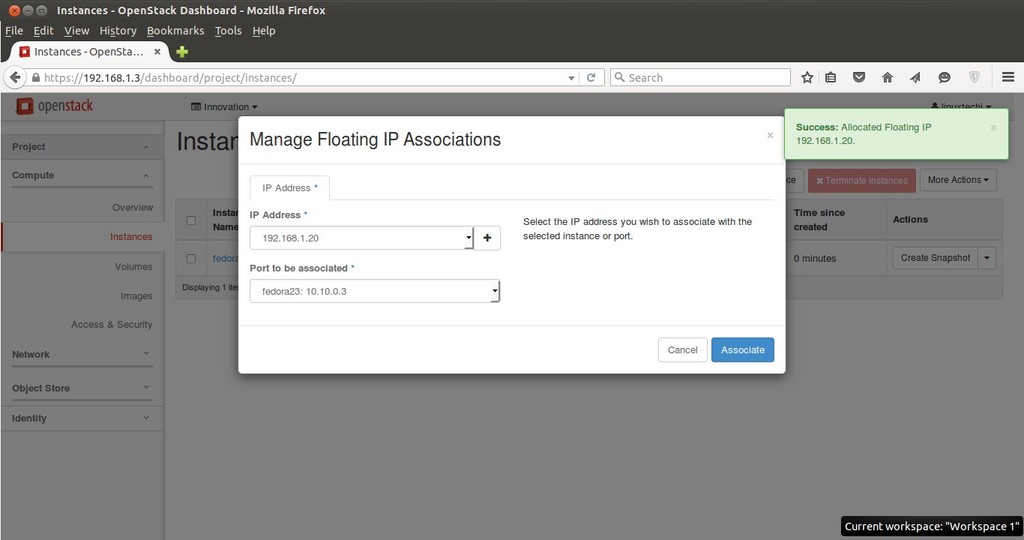
Associate-floating-ip-instance-OpenStack-Dashboard

Click on Associate

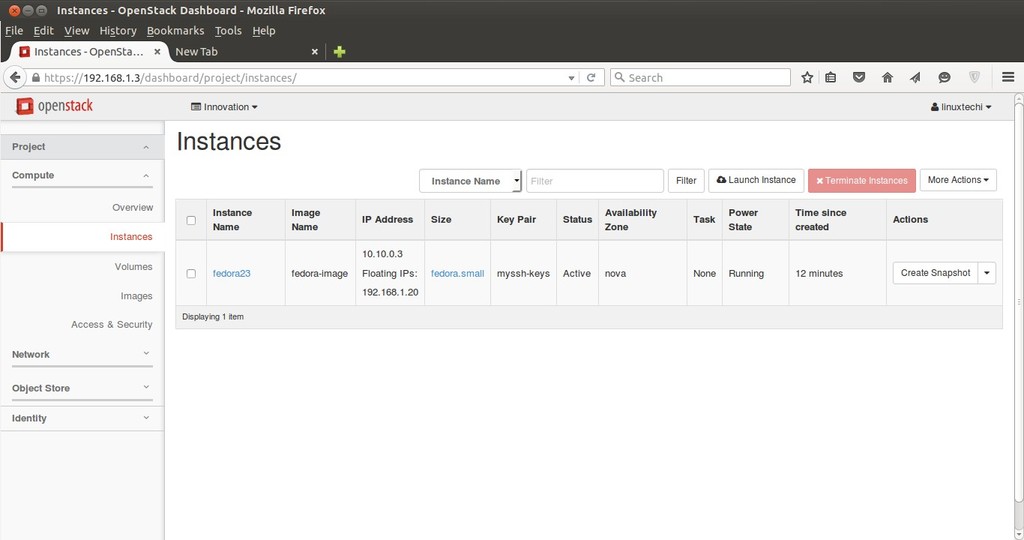
Instances-internal-floating-OpenStack-Dashboard

Now try to access the VM with floating IP ( 192.168.1.20) using keys.

Access-openstack-instance-using-keys

As we can see above that we are able to access the VM using keys. Our task of launching a VM from Dashboard is Completed Now.

Hope you like steps and do not hesitate to share this article.


Create & Restore VM Snapshot in VirtualBox on Ubuntu Linux

$
0
0

VM Snapshot a method to create a copy of Virtual Machine (VM) at specific point of time and in other words in we can say VM snapshot is used to preserve a particular state of a VM.

In this article we discuss how to create and restore VM snapshot in VirtualBox on Ubuntu Linux, I am assuming VirtualBox is already installed on Ubuntu Linux and couple of VM s are running on it.

Create VM Snapshot :

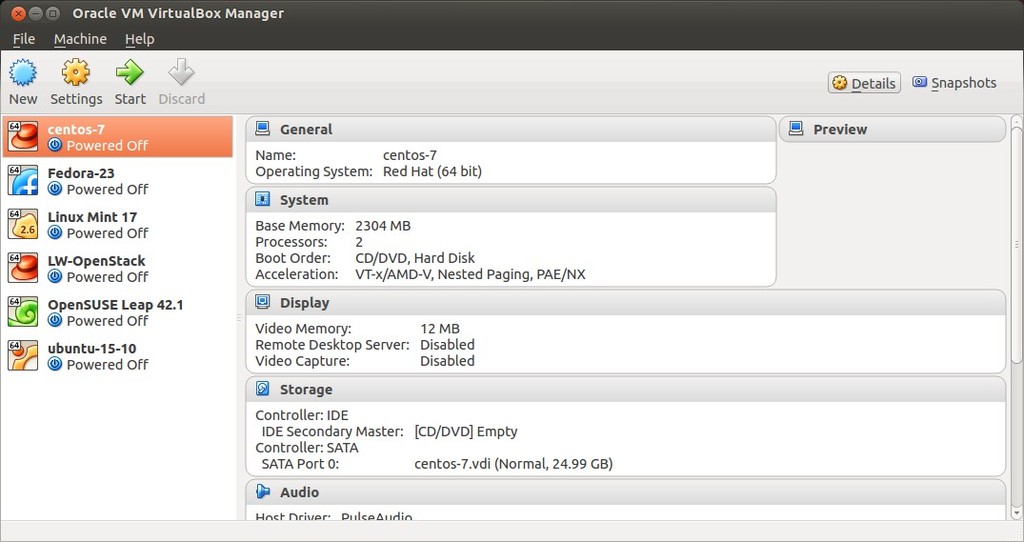
Step:1  Start the VirtualBox

Ubuntu-Oracle-VM-VirtualBox-Manager

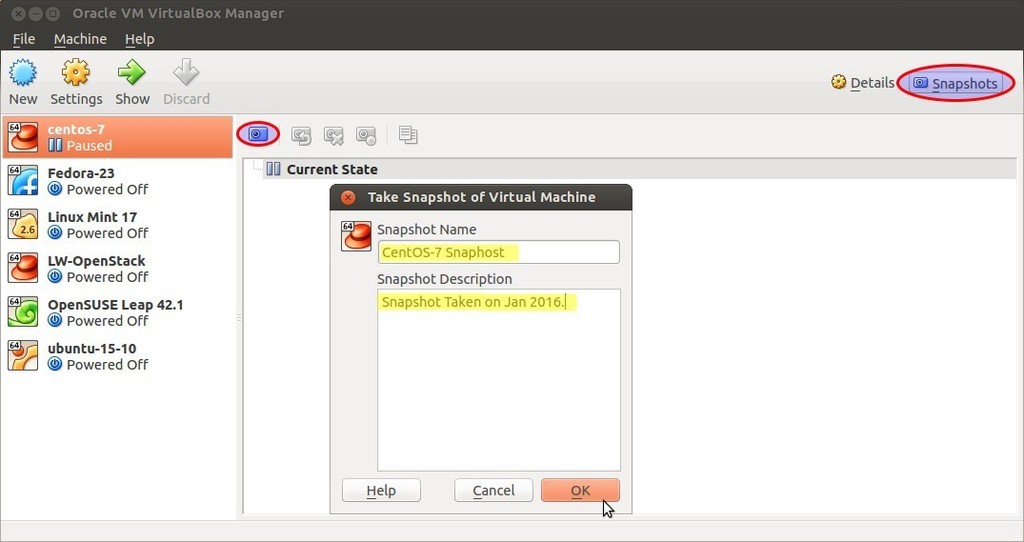
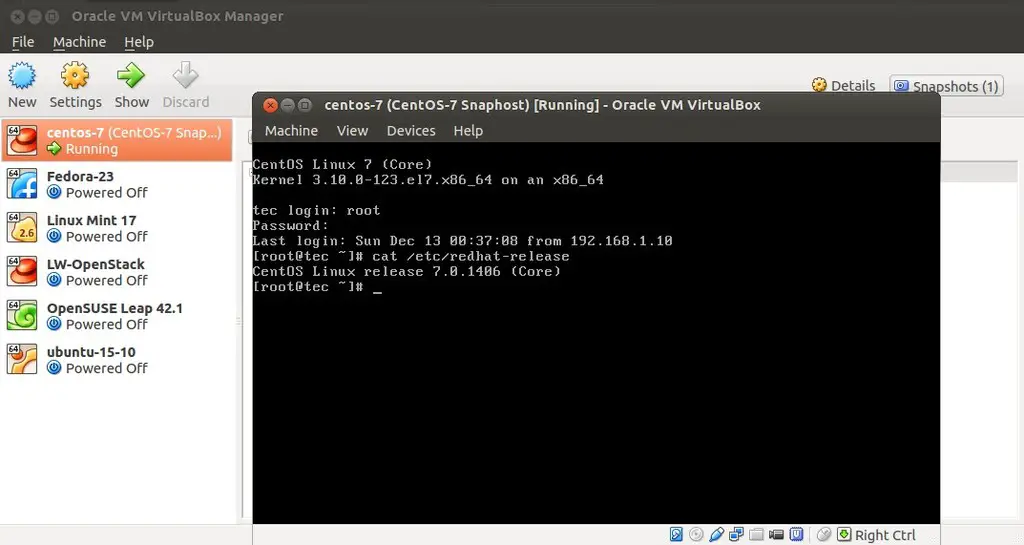
Step:2 Select the virtual machine for snapshot and then click on ‘Snapshots‘ option,  in my case i am going to create a snapshot of CentOS 7 VM.

VM-SnapShot-VirtualBox

Specify the Snapshot Name and Description and then Click on ‘OK

vm-snaphsot-state-virtualbox

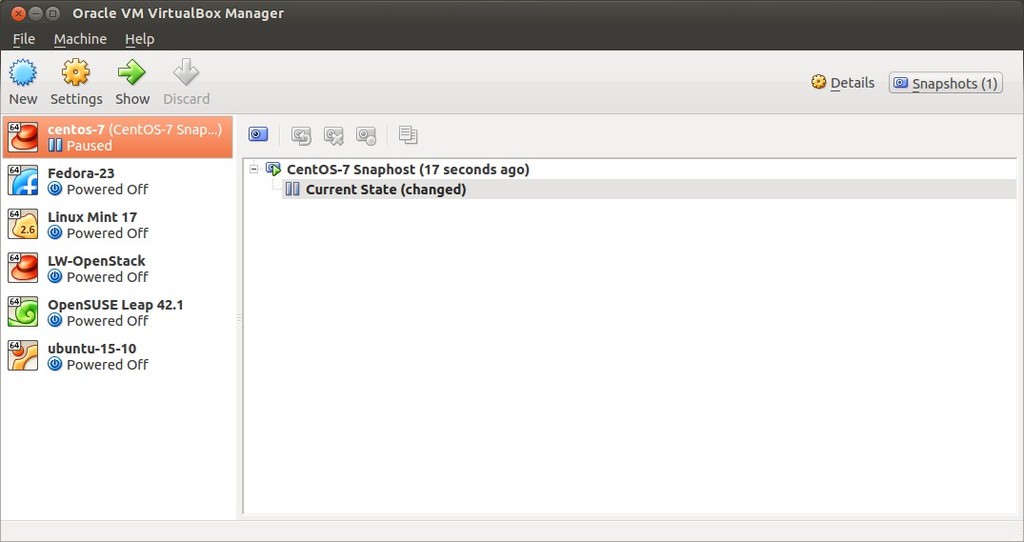
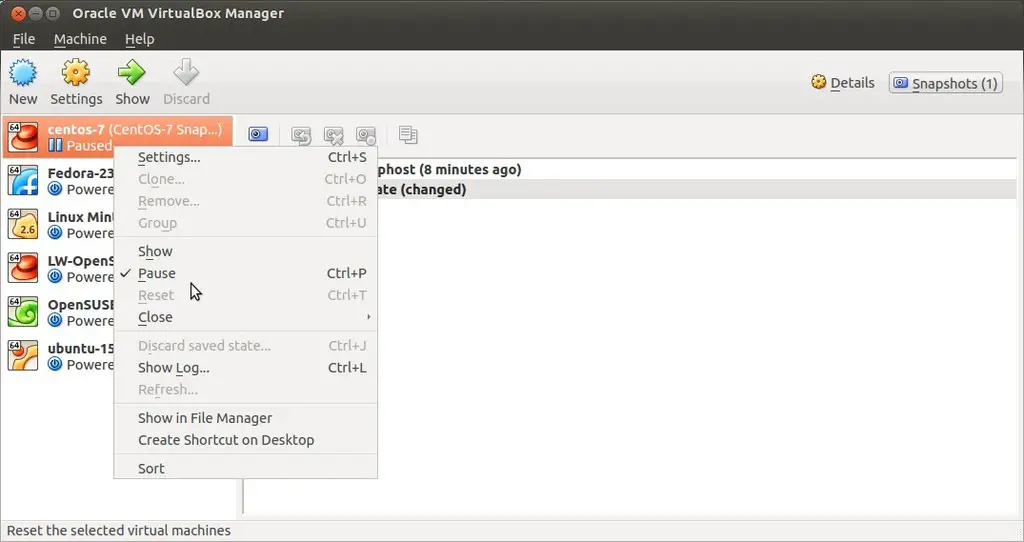
Note : When we try to take snapshot of running VM then Virtualbox manager will put that VM in Paused state , so once the snapshot task is completed then we can move the VM’s state from Paused to Running.

paused-state-VM-virtualbox

Restore VM Snapshot :

Step:1 Power off the Virtual Machine.

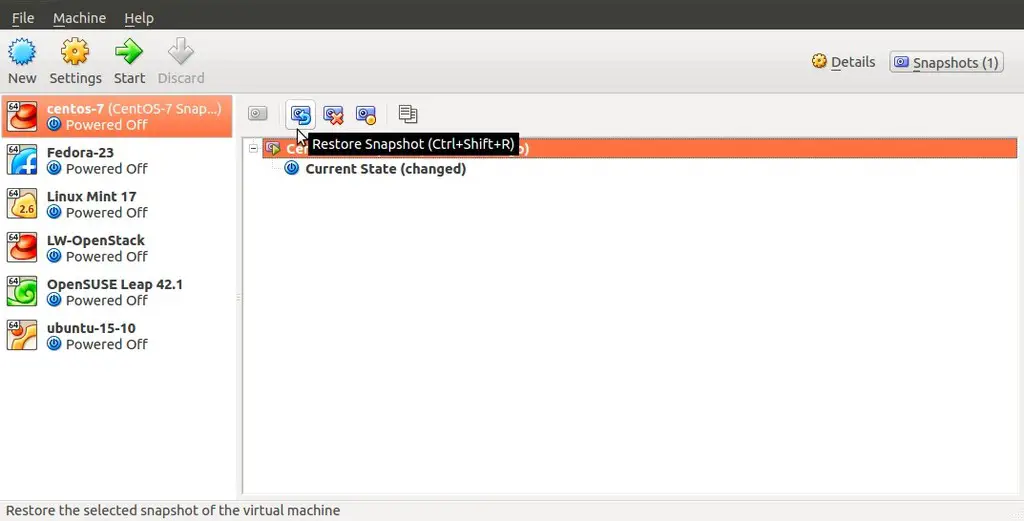
Step:2 Select the VM and Go to ‘Snapshots‘ option and then click on “Restore Snapshot option

restore-vmsnaphsot-option-virtaulbox

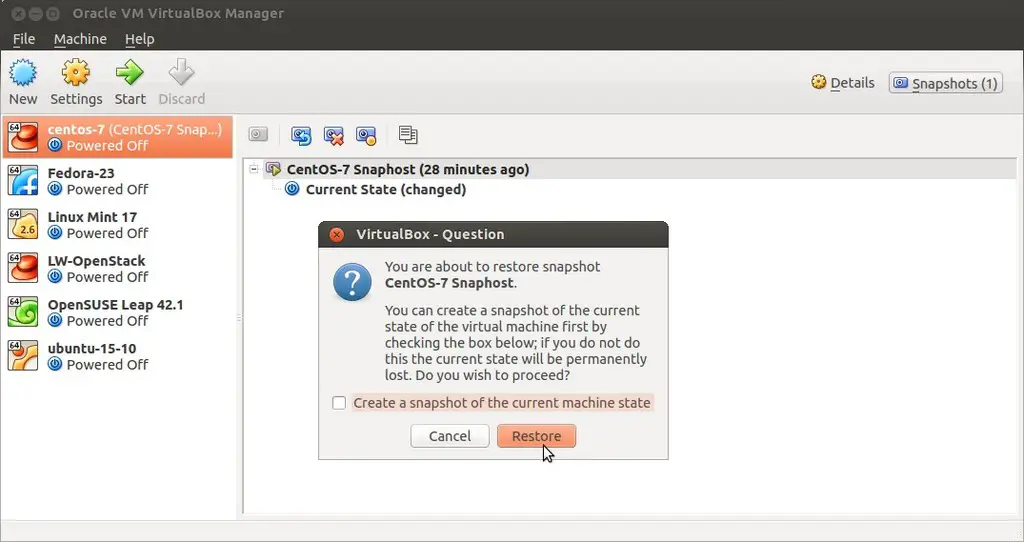
When we click on “Restore Snapshot” option , it will give us an option to create snapshot of current sate of the VM and if you don’t want the current state snapshot then untick the option ( Current state will be deleted permanently ).

restore-snapshot-virtualbox

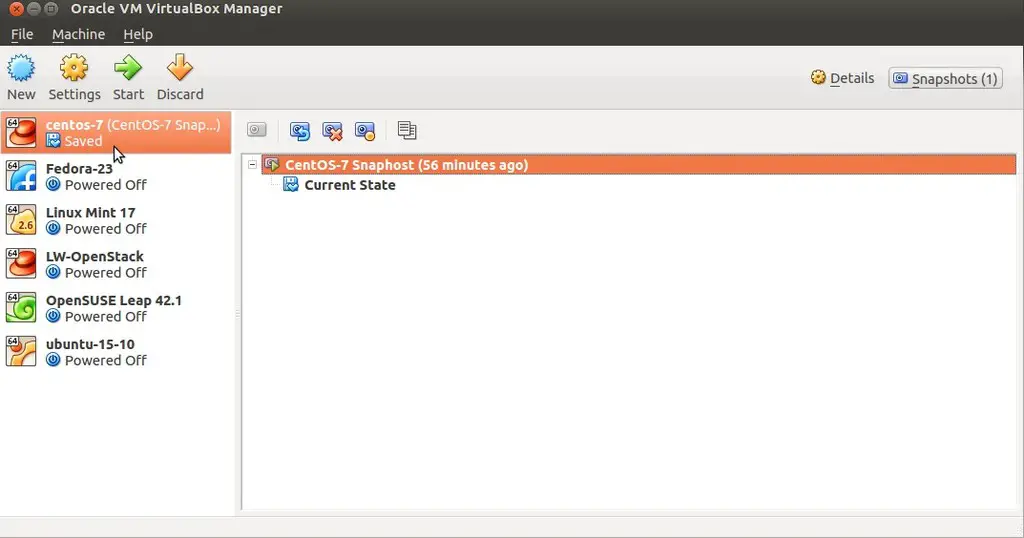
Click on “Restore” option to Restore the snapshot.

saved-state-after-snapshot-restore-virtualbox

Now Click on Start option to start the VM

start-vm-after-snapshot-restoration

How to Install Drupal 8 On CentOS 7

$
0
0

Drupal is an Open Source Content Management Software which allows us to build & create web sites without doing any coding. Drupal’s code is written in PHP and comes under GNU GPL (General Public License ).

In this article we will demonstrate how to install Drupal 8 on CentOS 7.  Hostname and IP of my machine on which i will install Drupal 8

  • Hostname = drupal.example.com
  • IP Address = 192.168.1.11

Step:1 Install Apache Web Server (httpd) & PHP 5.5

Drupal 8 require at least PHP 5.5 or above, But php 5.5 is not available in the default yum repository so we will set the following repositories so that we can install php 5.5 using yum command.

[root@drupal ~]# rpm -Uvh https://dl.fedoraproject.org/pub/epel/epel-release-latest-7.noarch.rpm
[root@drupal ~]# rpm -Uvh https://mirror.webtatic.com/yum/el7/webtatic-release.rpm

Use below command to install web server ( httpd), PHP5.5 & other required php dependencies.

[root@drupal ~]# yum install httpd php55w php55w-opcache php55w-mbstring php55w-gd php55w-xml php55w-pear php55w-fpm php55w-mysql

Start the Web Server Service

[root@drupal ~]# systemctl start httpd
[root@drupal ~]# systemctl enable httpd
ln -s '/usr/lib/systemd/system/httpd.service' '/etc/systemd/system/multi-user.target.wants/httpd.service'
[root@drupal ~]#

In case firewall is running on the Server then use below commands to open 80 & 443 port.

[root@drupal ~]# firewall-cmd --permanent --zone=public --add-service=http
success
[root@drupal ~]# firewall-cmd --permanent --zone=public --add-service=https
success
[root@drupal ~]# firewall-cmd --reload
success
[root@drupal ~]#

Step:2 Install Database Server ( MariaDB )

In CentOS 7 mariadb is default database server. Use below command to install mariadb .

[root@drupal ~]# yum install mariadb-server mariadb

Start the Database service using below command

[root@drupal ~]# systemctl start mariadb
[root@drupal ~]# systemctl enable mariadb
ln -s '/usr/lib/systemd/system/mariadb.service' '/etc/systemd/system/multi-user.target.wants/mariadb.service'
[root@drupal ~]#

Set the “root password”, “Remove anonymous users” and “disable remote root login” and other parameters using below “mysql_secure_installation” command.

[root@drupal ~]# mysql_secure_installation

Create the database for drupal

[root@drupal ~]# mysql -u root -p

MariaDB [(none)]> create database drupal_db;
Query OK, 1 row affected (0.00 sec)
MariaDB [(none)]>

Create a user for database (drupal_db) and grant all privileges to the user on the database ‘drupal_db

MariaDB [(none)]> CREATE USER db_user@localhost IDENTIFIED BY 'Durpal@123#';
Query OK, 0 rows affected (0.01 sec)

MariaDB [(none)]> GRANT ALL PRIVILEGES ON drupal_db.* TO db_user@localhost;
Query OK, 0 rows affected (0.00 sec)

MariaDB [(none)]> FLUSH PRIVILEGES;
Query OK, 0 rows affected (0.00 sec)

MariaDB [(none)]> exit
Bye
[root@drupal ~]#

Restart the DB service

[root@drupal ~]# systemctl restart mariadb
[root@drupal ~]#

Step:3 Download Drupal 8 using wget command.

Download the latest version of drupal from from their official site “Download Drupal

We can also use wget command to download drupal from the terminal. In case wget and gzip package is not installed then below command to install wget and gzip command.

[root@drupal ~]# yum install wget gzip
[root@drupal ~]# wget https://ftp.drupal.org/files/projects/drupal-8.0.2.tar.gz

Step:4 Untar the downloaded file and set the required permissions.

Use the below command to untar the downloaded drupal file.

[root@drupal ~]# ls -l drupal-8.0.2.tar.gz
-rw-r--r--. 1 root root 11720487 Jan 6 17:57 drupal-8.0.2.tar.gz
[root@drupal ~]#
[root@drupal ~]# tar -zxpvf drupal-8.0.2.tar.gz

Move the drupal folder to web server’s document root ( /var/www/html ) and set the permissions.

[root@drupal ~]# mv drupal-8.0.2 /var/www/html/drupal
[root@drupal ~]# chown -R apache:apache /var/www/html/drupal/
[root@drupal ~]#

Now create settings file (settings.php ), a default settings file (default.settings.php) is already placed in the folder (/var/www/html/drupal/sites/default).

[root@drupal ~]# cd /var/www/html/drupal/sites/default
[root@drupal default]# cp -p default.settings.php settings.php
[root@drupal default]#

Note : Set the Selinux rule on the folder “/var/www/html/drupal/sites/” in case SElinux is enable on your Linux box.

[root@drupal ~]# chcon -R -t httpd_sys_content_rw_t /var/www/html/drupal/sites/
[root@drupal ~]#

Step:5 Start the Drupal installation

Open the web browser and type “http://<server_ip_address_or_hostname>/drupal

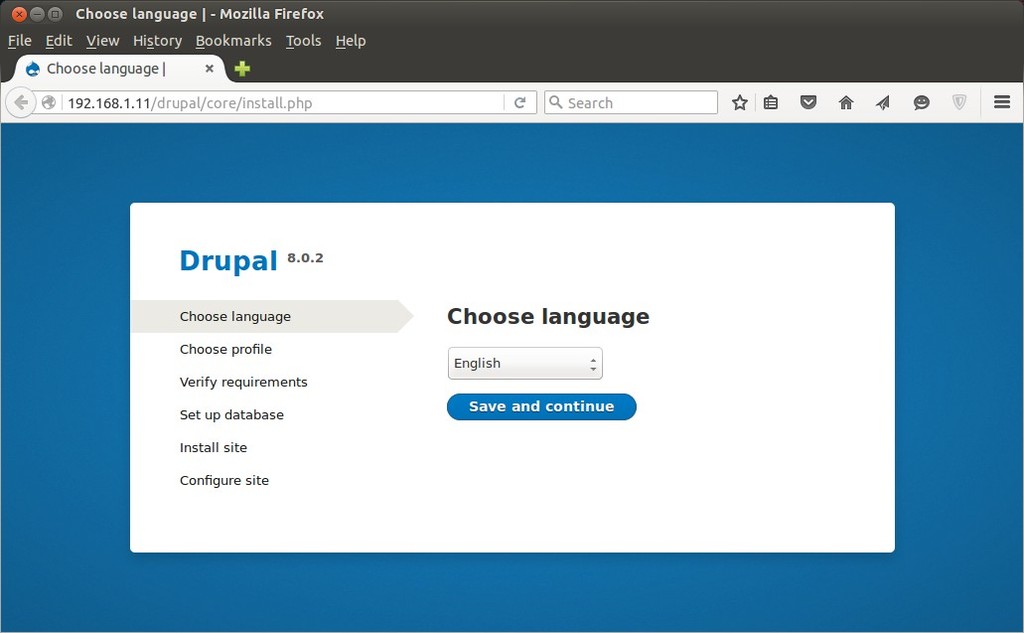
Choose your preferred language.

Choose-language-drupal-installation

Click on “Save and Continue

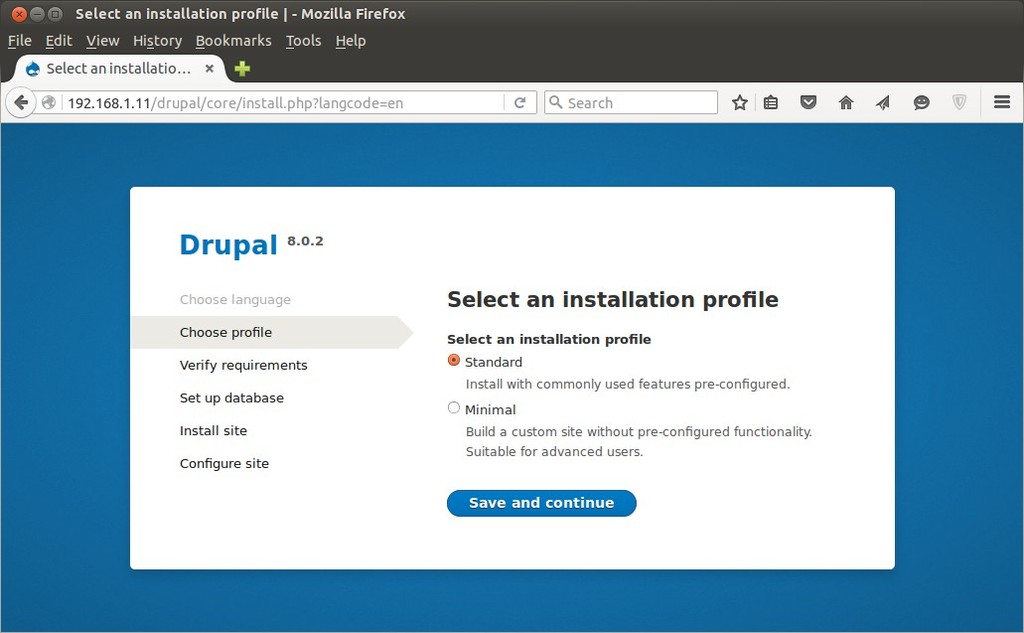
Select the installation Profile.

Select-installation-profile-drupal

Verify Requirements for Drupal Installation :

Drupal-installation-requirements-review

click on “continue anyway

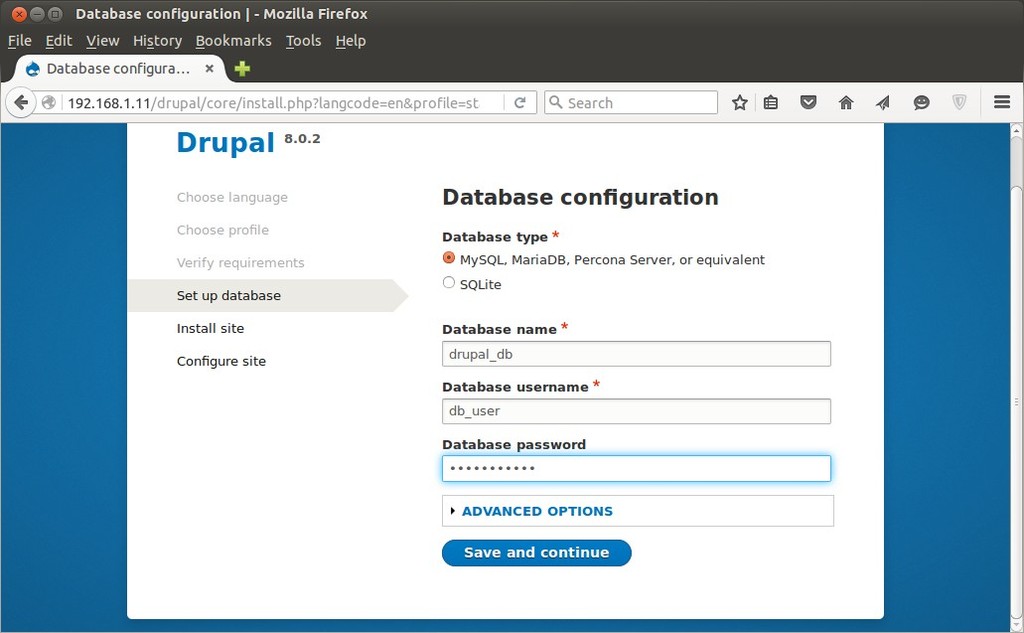
Database Configuration : Use drupal database, user name & its password that we created  in above steps.

Database configuration-drupal-installation

Click on ‘Save and Continue’ and then Installation will start as shown in below.

Installing-Drupal-progress

Specify the Site info :

Please change the below parameters as per your setup and in my case i am using below :

  • Site Name : drupal.example.com
  • Site email address : linuxtechi@example.com
  • User Name for Site Maintenance Account : linuxtechi
  • Password : XXXXX
  • Country : India
  • Default time zone : UTC

configure-site-drupal-install

Save-and-continue-Drupal-installation

Click on ‘Save and Continue’ to finish the installation.

Drupal-installation-completed

Now Add the content to your site, In my case when i click on add Content , i was getting an error “URL /drupal/node/add was not found on this server

404-Not-Found-error-drupal-install

To resolve this issue , i have changed the parameter ‘AllowOverride none’ to ‘AllowOverride all’ in the web server config file ‘/etc/httpd/conf/httpd.conf’ and restart the web server service:

[root@drupal ~]# systemctl restart httpd

Add-content-drupal-sites

Now the Drupal installation is Completed. Add content to your site have fun :)

Install and Configure ProFTPD (FTP Server) on Fedora 23

$
0
0

ProFTPD is an Open Source FTP server in Unix like operating System. ProFTPD stands for “Professional File Transfer Protocol (FTP) daemon” and comes under GPL License. Configuration file of ProFTPD is similar as of ‘Apache HTTPD Server‘ and it can configured as Stand alone server or via Xinetd.

In this article we will Install and Configure ProFTPD on Fedora 23 . Host name & ip address of my machine is :

  • hostname = fedora23.linuxtechi.com
  • ip address = 192.168.1.21

Step:1 Install ProFTPD package using below command.

Use below dnf command to install proftpd and proftpd-utils .

[root@fedora23 ~]# dnf install proftpd proftpd-utils

install-proftpd-uisng-dnf

Step:2 Edit ProFTPD config file.

Configure ProFTPD by making the required changes in config file ‘/etc/proftpd.conf’

Set the below parameters in the config file.

[root@fedora23 ~]# vi /etc/proftpd.conf

ServerName          "fedora23.linuxtechi.com"
ServerIdent          on "FTP Server ready."
ServerAdmin          pradeep@linuxtechi.com
DefaultServer        on
ExtendedLog          /var/log/proftpd/access.log WRITE,READ default
ExtendedLog          /var/log/proftpd/auth.log AUTH auth
DefaultRoot          ~ !adm
AuthPAMConfig        proftpd
AuthOrder            mod_auth_pam.c* mod_auth_unix.c

config-file-proftpd-fedora23

Change the ServerName and ServerAdmin Email address as per your setup.

Note : All the users will be chroot to their home directory means users can’t access the files outside of their home directory .

Start and Enable the ProFTPD service.

[root@fedora23 ~]# systemctl start proftpd
[root@fedora23 ~]# systemctl enable proftpd
Created symlink from /etc/systemd/system/multi-user.target.wants/proftpd.service to /usr/lib/systemd/system/proftpd.service.
[root@fedora23 ~]#

Now Create Group and Users for ProFTPD and set the required permissions on user’s home directory.

[root@fedora23 ~]# groupadd proftp_grp
[root@fedora23 ~]# mkdir /opt/ftp_dir
[root@fedora23 ~]# useradd -G proftp_grp -s /sbin/nologin -d /opt/ftp_dir pradeep
[root@fedora23 ~]#
[root@fedora23 ~]# chmod 1775 /opt/ftp_dir
[root@fedora23 ~]# chgrp proftp_grp /opt/ftp_dir
[root@fedora23 ~]# ls -ld /opt/ftp_dir/
drwxrwxr-t. 2 root proftp_grp 4096 Jan 24 09:55 /opt/ftp_dir/
[root@fedora23 ~]#

Now assign password to the user.

[root@fedora23 ~]# passwd pradeep

Note: In my case i have created a user ‘pradeep’ whose home directory is “/opt/ftp_dir/” and secondary group is “ proftp_grp”. Now using ftp client pradeep can download and upload files from their home directory.

Step:3 Set SELinux & Firewall Rules.

In case SELinux is enable then set the following selinux rules for FTP.

[root@fedora23 ~]# setsebool -P ftp_home_dir=1
[root@fedora23 ~]# setsebool -P allow_ftpd_full_access=1

Open the FTP port in  Operating System (OS) Firewall

[root@fedora23 ~]# firewall-cmd --permanent --add-port=21/tcp
success
[root@fedora23 ~]# firewall-cmd --reload
success
[root@fedora23 ~]#

Step:4 Enable Encryption between ProFTPD Server and FTP Clients

Connection between ProFTPD server and its client is consider less secure , so to make secure communication between Server and its clients we can use SSL certificates.

To generate SSL certificates we will use openssl command , use below command to install openssl if it is not installed.

[root@fedora23 ~]# dnf install openssl

Now Generate SSL certificates

[root@fedora23 ~]# openssl req -x509 -nodes -newkey rsa:2048 -keyout /etc/pki/tls/certs/ftpserver.pem -out /etc/pki/tls/certs/ftpserver.pem

It will prompt you to enter the information associated with the certificate and will create a private key ‘/etc/pki/tls/certs/ftpserver.pem’

openssl-private-key-proftpd

Set the permission on Private Key :

[root@fedora23 ~]# chmod 600 /etc/pki/tls/certs/ftpserver.pem
[root@fedora23 ~]#

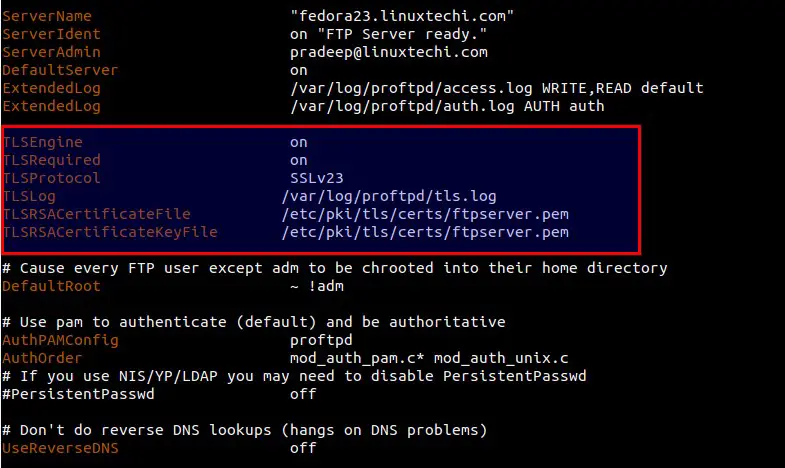
Add the following lines in ‘/etc/proftpd.conf

[root@fedora23 ~]# vi /etc/proftpd.conf
TLSEngine                  on
TLSRequired                on
TLSProtocol                SSLv23
TLSLog                     /var/log/proftpd/tls.log
TLSRSACertificateFile      /etc/pki/tls/certs/ftpserver.pem
TLSRSACertificateKeyFile   /etc/pki/tls/certs/ftpserver.pem

SSL-certificate-proftpd-config

Restart the ProFTPD service.

[root@fedora23 ~]# systemctl restart proftpd
[root@fedora23 ~]#

Open the ports in the OS firewall for TLS.

[root@fedora23 ~]# firewall-cmd --add-port=1024-65534/tcp
success
[root@fedora23 ~]# firewall-cmd --add-port=1024-65534/tcp --permanent
success
[root@fedora23 ~]# firewall-cmd --reload
success

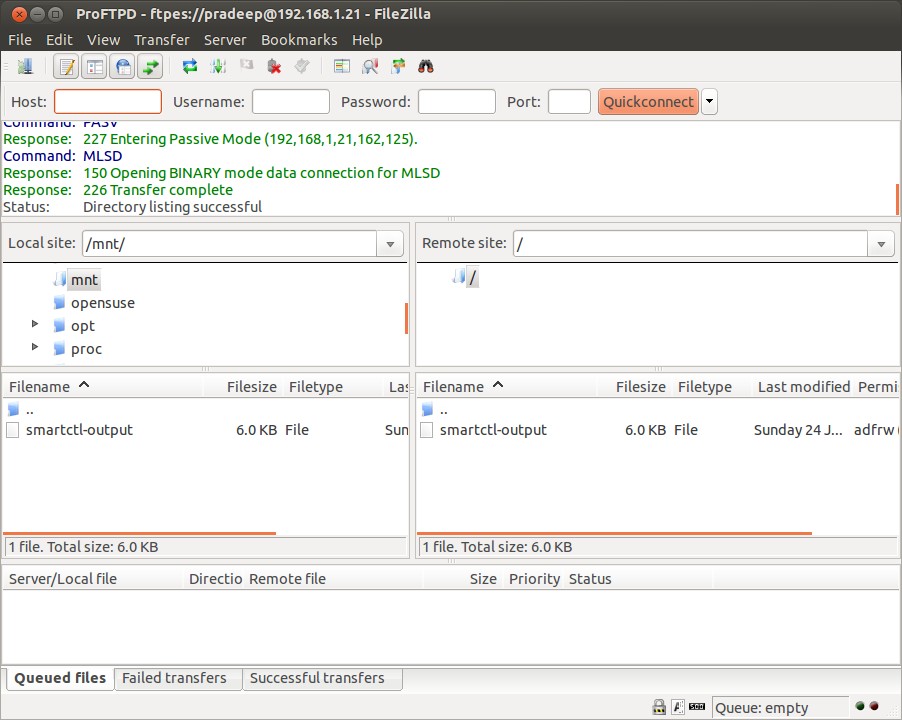
Step:5 Connect to ProFTPD server using Filezilla.

FileZilla-ubuntu-linux

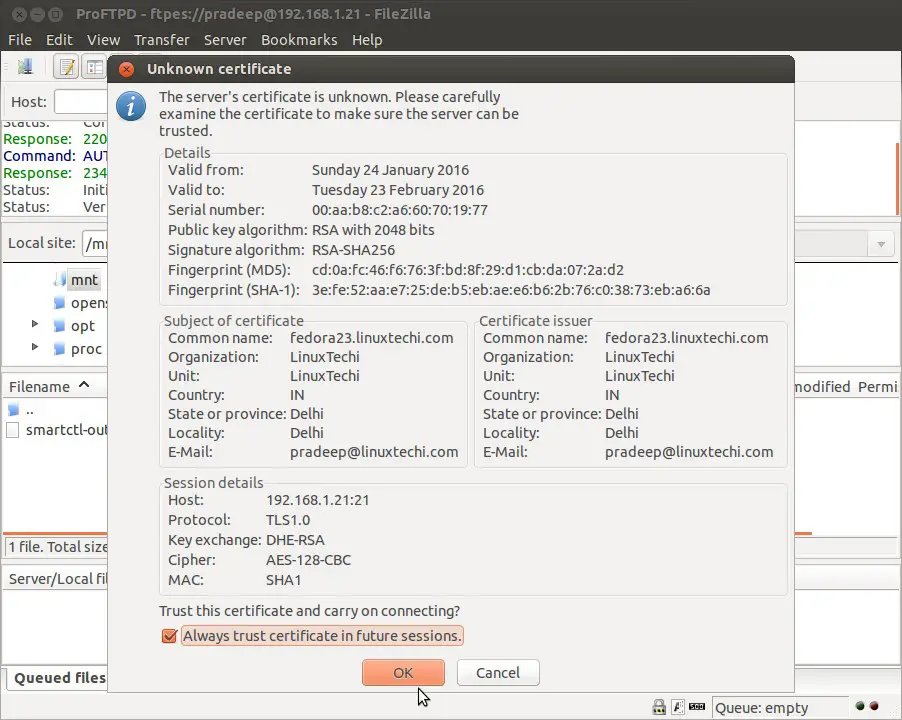
Click on Connect…

ProFTPD-certificate

Click On ‘OK’ to trust the Certificate.

ProFTPD-successful-login

As we are able to login successfully, now you can download & upload files to your home directory.

Hope you like installation and Configuration steps :)

Steps to Install ownCloud 8.2 on CentOS 7

$
0
0

ownCloud is an open source software which allows us to set up our private ‘file-hosting’ cloud or we can say ‘cloud storage’ over the network. Data hosted in ownCloud can be access at any time either via web browsers or desktop client or may be via smart phone aaps.

Some of the important features of ownCloud are listed below :

owncloud-features

In this article we will install ownCloud 8.2 on CentOS 7. Hostname and ip address of my CentOS 7 machine is “owncloud.linuxtechi.com” & “192.168.1.101″

Following are the prerequisites for ownCloud.

  • PHP
  • Apache Web Server ( Apache )
  • Database Server ( MariaDB or SQLite or Oracle or PostgreSQL )

Step:1 Install PHP and Web Server (HTTPD)

Use below yum command to install php and apache web server (httpd) and other PHP dependencies.

[root@owncloud ~]# yum install httpd php php-mysql sqlite php-dom php-mbstring php-gd php-pdo php-json php-xml php-zip php-gd curl php-curl php-mcrypt php-pear

Start the Web Server service

[root@owncloud ~]# systemctl start httpd.service
[root@owncloud ~]# systemctl enable httpd.service
ln -s '/usr/lib/systemd/system/httpd.service' '/etc/systemd/system/multi-user.target.wants/httpd.service'
[root@owncloud ~]#

Step:2 Install and Configure Database for ownCloud.

In CentOS 7 MariaDB is the default database server.

[root@owncloud ~]# yum install mariadb-server mariadb

Start the Database Service

[root@owncloud ~]# systemctl start mariadb.service
[root@owncloud ~]#
[root@owncloud ~]# systemctl enable mariadb.service
ln -s '/usr/lib/systemd/system/mariadb.service' '/etc/systemd/system/multi-user.target.wants/mariadb.service'
[root@owncloud ~]#

Set the Root password and other database parameters using below command :

[root@owncloud ~]# mysql_secure_installation

Create the database (owncloud_db).

[root@owncloud ~]# mysql -u root -p
Enter password:

MariaDB [(none)]> create database owncloud_db;
Query OK, 1 row affected (0.00 sec)
MariaDB [(none)]>

Create a database user(dbuser) and grant all the privileges on the database (owncloud_db)

MariaDB [(none)]> grant all on owncloud_db.* to 'dbuser'@'localhost' identified by 'Owncloud@123#';
Query OK, 0 rows affected (0.00 sec)

MariaDB [(none)]> FLUSH PRIVILEGES;
Query OK, 0 rows affected (0.00 sec)

MariaDB [(none)]> exit
Bye
[root@owncloud ~]#

Step:3 Install ownCloud package using yum command.

ownCloud Package is not available in the default yum repositories so we will set below EPEL and ownlcoud repositories.

Note : Install wget package in case it is not installed on your system.

[root@owncloud ~]# yum install wget
[root@owncloud ~]# rpm -Uhv http://dl.fedoraproject.org/pub/epel/7/$(uname -i)/e/epel-release-7-5.noarch.rpm
[root@owncloud ~]# wget http://download.owncloud.org/download/repositories/stable/CentOS_7/ce:stable.repo -O /etc/yum.repos.d/ce:stable.repo
[root@owncloud ~]# yum install owncloud

Allow Web Server’s port in the OS(Operating System) firewall.

[root@owncloud ~]# firewall-cmd --permanent --zone=public --add-service=http
success
[root@owncloud ~]# firewall-cmd --permanent --zone=public --add-service=https
success
[root@owncloud ~]# firewall-cmd --reload
success
[root@owncloud ~]#

Set the required permissions on ownlcoud folder “/var/www/html/owncloud

[root@owncloud ~]# chown -R apache.apache /var/www/html/owncloud/
[root@owncloud ~]#

Set the below SELinux Rules if SELinux is enabled on your system

[root@owncloud ~]# semanage fcontext -a -t httpd_sys_rw_content_t '/var/www/html/owncloud/data'
[root@owncloud ~]# restorecon '/var/www/html/owncloud/data'
[root@owncloud ~]# semanage fcontext -a -t httpd_sys_rw_content_t '/var/www/html/owncloud/config'
[root@owncloud ~]# restorecon '/var/www/html/owncloud/config'
[root@owncloud ~]# semanage fcontext -a -t httpd_sys_rw_content_t '/var/www/html/owncloud/apps'
[root@owncloud ~]# restorecon '/var/www/html/owncloud/apps'
[root@owncloud ~]#

Step:4 Start ownCloud Installation from the Browser.

To start the ownCloud installation open the web browser and type :

http://192.168.1.101/owncloud/

Replace the ip address as per your setup.

Specify the User name as ‘admin’ and give password that you want set for admin user. Data Folder as ‘/var/www/html/owncloud/data’ and Database name (owncloud_db) and database user (dbuser) credentials that we created in above steps.

ownCloud-installation-scree

Click on ‘Finish setup’

Files-ownCloud-CentOS7

Get ownCloud Clients and aaps to sync your data.

Home Page of Our ownCloud will look like below.

Home-Page-ownCloud

Installation and Configuration of ownCloud is completed. Now upload data and share it among users.

By Default only 513MB data file can be uploaded in case you want to change this limit , edit the file ‘/var/www/html/owncloud/.htaccess‘ and set the limit as per requirement.

maximum-upload-limit-owncloud

Automount NFS share in Linux using autofs

$
0
0

Autofs is a service in Linux like operating system which automatically mounts the file system and remote shares when it is accessed. Main advantage of autofs is that you don’t need to mount file system at all time, file system is only mounted when it is in demand.

Autofs service reads two files Master map file ( /etc/auto.master ) and a map file like /etc/auto.misc or /etc/auto.xxxx.

In ‘/etc/auto.master’ file we have three different fields :

/<Mount-Point>     <Map-file>     <Timeout-Value>

In map file (/etc/auto.misc or /etc/auto.xxxx) also we have three different fields:

<Mount-Point>    <Mount-Options>        <Location_of_File System>

In this article we will mount the NFS share using autofs. NFS share ‘/db_backup‘ is exported from Fedora NFS Server (192.168.1.21). We are going to mount this nfs share on CentOS 7 & Ubuntu Linux using autofs.

Steps to mount nfs share using Autofs in CentOS 7.

Step:1 Install autofs package.

Install the autofs package using below yum command if it is not installed.

[root@linuxtechi ~]# rpm -q autofs
package autofs is not installed
[root@linuxtechi ~]# yum install autofs

Step:2 Edit the Master map file (/etc/auto.master )

Add the following line .

[root@linuxtechi ~]# vi /etc/auto.master
/dbstuff  /etc/auto.nfsdb  --timeout=180

Note : Mount point ‘/dbstuff’‘ must exist on your system. If not then create a directory ‘mkdir /dbstuff‘. NFS Share will automatically umount after 180 seconds or 3 minutes if don’t perform any action on the share.

Step:2 Creat a map file ‘/etc/auto.nfsdb’

Create a map file and add the following line.

[root@linuxtechi ~]# vi /etc/auto.nfsdb
db_backup  -fstype=nfs,rw,soft,intr  192.168.1.21:/db_backup

Save and exit the file.

Where :

  • db_backup is a mount point.
  • -fstype=nfs is the file system type & ‘rw,soft,intr’ are mount options.
  • ‘192.168.1.21:/db_backup’ is nfs share location.

Step:3 Start the auotfs service.

[root@linuxtechi ~]# systemctl start autofs.service
[root@linuxtechi ~]# systemctl enable autofs.service
ln -s '/usr/lib/systemd/system/autofs.service' '/etc/systemd/system/multi-user.target.wants/autofs.service'
[root@linuxtechi ~]#

Step:3 Now try to access the mount point.

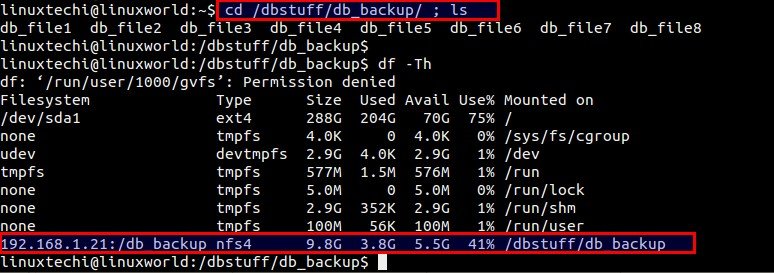
Mount point of nfs share will be ‘/dbstuff/db_backup’. When we try access the mount point then autofs service will mount nfs share automatically.

nfs-mount-autofs

Steps to mount NFS share using autofs in Ubuntu Linux.

Step:1 Install the autofs package using apt-get command.

linuxtechi@linuxworld:~$ sudo apt-get install autofs

Step:2 Edit the Master Map file ‘/etc/auto.master’

Add the following line in the master map file.

linuxtechi@linuxworld:~$ sudo vi /etc/auto.master
/dbstuff   /etc/auto.nfsdb   --timeout=180

Save & exit the file.

Create the mount point.

linuxtechi@linuxworld:~$ sudo mkdir /dbstuff
linuxtechi@linuxworld:~$

Step:2 Create a map file ‘/etc/auto.nfsdb’.

Add the following line in the map file.

linuxtechi@linuxworld:~$ sudo vi /etc/auto.nfsdb
db_backup   -fstype=nfs4,rw,soft,intr   192.168.1.21:/db_backup

Step:3 Start the autofs service.

linuxtechi@linuxworld:~$ sudo /etc/init.d/autofs start

Step:4 Try to access the mount point.

autofs-ubuntu

Two Node Apache Web Server Clustering using Pacemaker on CentOS 7

$
0
0

Pacemaker is a High Availability cluster Software for Linux like Operating System.Pacemaker is known as ‘Cluster Resource Manager‘, It provides maximum availability of the cluster resources by doing fail over of resources between the cluster nodes.

Pacemaker use corosync for heartbeat and internal communication among cluster components , Corosync also take care of Quorum in cluster.

In this article we will demonstrate the installation and configuration of two Node Apache (httpd) Web Server Clustering using Pacemaker on CentOS 7.

In my setup i will use two Virtual Machines and Shared Storage from Fedora Server ( two disks will be shared where one disk will be used as fencing device and other disk will used as shared storage for web server )

  • node1.linuxtechi.com ( 192.168.1.51 ) — CentOS 7.x
  • node2.linuxtechi.com (192.168.1.52 ) — CentOS 7.x

Step:1 Update ‘/etc/hosts’ file

Add the following lines in /etc/hosts file in both the nodes.

192.168.1.51 node1.linuxtechi.com node1
192.168.1.52 node2.linuxtechi.com node2

Step:2 Install the Cluster and other required packages.

Use th below yum command on both the nodes to install cluster package (pcs ), fence-agents & web server (httpd)

[root@node1 ~]# yum -y update
[root@node1 ~]# yum -y install pcs fence-agents-all iscsi-initiator-utils httpd

[root@node2 ~]# yum -y update
[root@node2 ~]# yum -y install pcs fence-agents-all iscsi-initiator-utils httpd

Step:3 Set the password to ‘hacluster’ user

It is recommended to use the same password of ‘hacluster’ user on both the nodes.

[root@node1 ~]# echo <new-password> | passwd --stdin hacluster
[root@node2 ~]# echo <new-password> | passwd --stdin hacluster

Step:4 Allow High Availability ports in firewall.

Use ‘firewall-cmd‘ command on both the nodes to open High Availability ports in OS firewall.

[root@node1 ~]# firewall-cmd --permanent --add-service=high-availability
success
[root@node1 ~]# firewall-cmd --reload
success
[root@node1 ~]#

[root@node2 ~]# firewall-cmd --permanent --add-service=high-availability
success
[root@node2 ~]# firewall-cmd --reload
success
[root@node2 ~]#

Step:5 Start the Cluster Service and authorize nodes to join the cluster.

Lets start the cluster service on both the nodes,

[root@node1 ~]# systemctl start pcsd.service
[root@node1 ~]# systemctl enable pcsd.service
ln -s '/usr/lib/systemd/system/pcsd.service' '/etc/systemd/system/multi-user.target.wants/pcsd.service'
[root@node1 ~]#

[root@node2 ~]# systemctl start pcsd.service
[root@node2 ~]# systemctl enable pcsd.service
ln -s '/usr/lib/systemd/system/pcsd.service' '/etc/systemd/system/multi-user.target.wants/pcsd.service'
[root@node2 ~]#

Use below command on either of the node to authorize the nodes to join cluster.

[root@node1 ~]# pcs cluster auth node1 node2
Username: hacluster
Password:
node1: Authorized
node2: Authorized
[root@node1 ~]#

Step:6 Create the Cluster & enable the Cluster Service

Use below pcs commands on any of the cluster nodes to create a cluster with the name ‘apachecluster‘ and node1 & node2 are the cluster nodes.

[root@node1 ~]# pcs cluster setup --start --name apachecluster node1 node2
Shutting down pacemaker/corosync services...
Redirecting to /bin/systemctl stop pacemaker.service
Redirecting to /bin/systemctl stop corosync.service
Killing any remaining services...
Removing all cluster configuration files...
node1: Succeeded
node2: Succeeded
Starting cluster on nodes: node1, node2...
node2: Starting Cluster...
node1: Starting Cluster...
Synchronizing pcsd certificates on nodes node1, node2...
node1: Success
node2: Success
Restaring pcsd on the nodes in order to reload the certificates...
node1: Success
node2: Success
[root@node1 ~]#

Enable the Cluster Service using below pcs command :

[root@node1 ~]# pcs cluster enable --all
node1: Cluster Enabled
node2: Cluster Enabled
[root@node1 ~]#

Now Verify the cluster Service

[root@node1 ~]# pcs cluster status

pacemaker-cluster-service

Step:7 Setup iscsi shared Storage on Fedora Server for both the nodes.

IP address of Fedora 23 Server = 192.168.1.21

Install the required package first.

[root@fedora23 ~]# dnf -y install targetcli

I have a new disk (/dev/sdb) of size 11 GB on my fedora server on which i have created two LV one for Fecing and other is for Apache file system.

[root@fedora23 ~]# pvcreate /dev/sdb
 Physical volume "/dev/sdb" successfully created
[root@fedora23 ~]# vgcreate cluster_data /dev/sdb
 Volume group "cluster_data" successfully created
[root@fedora23 ~]# lvcreate -L 1G -n fence_storage cluster_data
 Logical volume "fence_storage" created.
[root@fedora23 ~]# lvcreate -L 10G -n apache_storage cluster_data
 Logical volume "apache_storage" created.
[root@fedora23 ~]#

Get the Initiator Names of the both nodes.

[root@node1 ~]# cat /etc/iscsi/initiatorname.iscsi 
InitiatorName=iqn.1994-05.com.redhat:63ba7391df7f
[root@node1 ~]# 

[root@node2 ~]# cat /etc/iscsi/initiatorname.iscsi 
InitiatorName=iqn.1994-05.com.redhat:d4337e65531e
[root@node2 ~]#

Now use ‘targetcli‘ command to configure iscsi storage for both nodes.

[root@fedora23 ~]# targetcli
/> cd /backstores/block
/backstores/block> create apache-fs /dev/cluster_data/apache_storage 
/backstores/block> create fence-storage /dev/cluster_data/fence_storage 
/backstores/block> cd /iscsi
/iscsi> create
/iscsi> cd iqn.2003-01.org.linux-iscsi.fedora23.x8664:sn.646023b9e9c6/tpg1/luns
/iscsi/iqn.20...9c6/tpg1/luns> create /backstores/block/apache-fs
/iscsi/iqn.20...9c6/tpg1/luns> create /backstores/block/fence-storage
/iscsi/iqn.20...9c6/tpg1/luns> cd ../acls
/iscsi/iqn.20...9c6/tpg1/acls> create iqn.1994-05.com.redhat:63ba7391df7f
/iscsi/iqn.20...9c6/tpg1/acls> create iqn.1994-05.com.redhat:d4337e65531e
/iscsi/iqn.20...9c6/tpg1/acls> cd /
/> saveconfig 
/> exit

targetcli-command-fedora23

Start & enable the target service

[root@fedora23 ~]# systemctl start target.service
[root@fedora23 ~]# systemctl enable target.service
[root@fedora23 ~]#

Open the iscsi ports in the OS Firewall.

[root@fedora23 ~]# firewall-cmd --permanent --add-port=3260/tcp
success
[root@fedora23 ~]# firewall-cmd --reload
success
[root@fedora23 ~]#

Now Scan the iscsi storage on both the nodes :

Run below commands on both the nodes

# iscsiadm --mode discovery --type sendtargets --portal 192.168.1.21
# iscsiadm -m node -T iqn.2003-01.org.linux-iscsi.fedora23.x8664:sn.646023b9e9c6 -l -p 192.168.1.21:3260

Replace the target ‘iqn’ and ‘ip address’ as per your setup. After executing above command we can see two new disk in ‘fdisk -l’ command output.

fdisk-l-command-output

List the ids of newly scan iscsi disk.

[root@node1 ~]# ls -l /dev/disk/by-id/
total 0
..........
lrwxrwxrwx. 1 root root 9 Feb 21 03:22 wwn-0x60014056e8763c571974ec3b78812777 -> ../../sdb
lrwxrwxrwx. 1 root root 9 Feb 21 03:22 wwn-0x6001405ce01173dcd7c4c0da10051405 -> ../../sdc
[root@node1 ~]#

Start and enable iscsi service on both the nodes.

[root@node1 ~]# systemctl start iscsi.service
[root@node1 ~]# systemctl enable iscsi.service
[root@node1 ~]# systemctl enable iscsid.service
ln -s '/usr/lib/systemd/system/iscsid.service' '/etc/systemd/system/multi-user.target.wants/iscsid.service'
[root@node1 ~]# 

[root@node2 ~]# systemctl start iscsi.service
[root@node2 ~]# systemctl enable iscsi.service
[root@node2 ~]# systemctl enable iscsid.service
ln -s '/usr/lib/systemd/system/iscsid.service' '/etc/systemd/system/multi-user.target.wants/iscsid.service'
[root@node2 ~]#

Step:8 Create the Cluster Resources.

Define stonith (Shoot The Other Node In The Head) fencing device for the cluster. It is a method to isolate the node from cluster when node become unresponsive.

I am using 1 GB iscsi storage (/dev/sdc ) for fencing.

Run the following commands on either of the node :

[root@node1 ~]# pcs stonith create scsi_fecing_device fence_scsi pcmk_host_list="node1 node2" pcmk_monitor_action="metadata" pcmk_reboot_action="off" devices="/dev/disk/by-id/wwn-0x6001405ce01173dcd7c4c0da10051405" meta provides="unfencing"
[root@node1 ~]# 
[root@node1 ~]# pcs stonith show
 scsi_fecing_device (stonith:fence_scsi): Started node1
[root@node1 ~]#

Now Create a partition on second iscsi storage (/dev/sdb) that will be used as document root for our web server.

[root@node1 ~]# fdisk /dev/disk/by-id/wwn-0x60014056e8763c571974ec3b78812777

create-partition-using-fdik-command

Format the newly created partition :

[root@node1 ~]# mkfs.ext4 /dev/disk/by-id/wwn-0x60014056e8763c571974ec3b78812777-part1

Mount the new file system temporary on /var/www and create sub-folders and set the selinux rule.

[root@node1 html]# mount /dev/disk/by-id/wwn-0x60014056e8763c571974ec3b78812777-part1 /var/www/
[root@node1 html]# mkdir /var/www/html
[root@node1 html]# mkdir /var/www/cgi-bin
[root@node1 html]# mkdir /var/www/error
[root@node1 html]# restorecon -R /var/www
[root@node1 html]# echo "Apache Web Sever Pacemaker Cluster" > /var/www/html/index.html

Umount the file system now because cluster will mount the file system when required.

[root@node1 html]# umount /var/www/
[root@node1 html]#

Create the Web Server file system Cluster Resource using below pcs command.

[root@node1 html]# pcs resource create webserver_fs Filesystem device="/dev/disk/by-id/wwn-0x60014056e8763c571974ec3b78812777-part1" directory="/var/www" fstype="ext4" --group webgroup
[root@node1 html]# 
[root@node1 html]# pcs resource show
 Resource Group: webgroup
 webserver_fs (ocf::heartbeat:Filesystem): Started node1
[root@node1 html]#

Add the following lines in ‘/etc/httpd/conf/httpd.conf’ file on both the nodes.

<Location /server-status>
 SetHandler server-status
 Order deny,allow
 Deny from all
 Allow from 127.0.0.1
</Location>

Open the httpd or web server port in OS firewall on both the nodes

[root@node1 ~]# firewall-cmd --permanent --add-service=http
success
[root@node1 ~]# firewall-cmd --reload
success

[root@node1 ~]#
[root@node2 ~]# firewall-cmd --permanent --add-service=http
success
[root@node2 ~]# firewall-cmd --reload
success
[root@node2 ~]#

Create Virtual IP (IPaddr2) Cluster Resource using below command. Execute the following command on any of the node.

[root@node1 ~]# pcs resource create vip_res IPaddr2 ip=192.168.1.151 cidr_netmask=24 --group webgroup
[root@node1 ~]#

Create Apache Cluster Resource using below Command :

[root@node1 ~]# pcs resource create apache_res apache configfile="/etc/httpd/conf/httpd.conf" statusurl="http://127.0.0.1/server-status" --group webgroup
[root@node1 ~]#

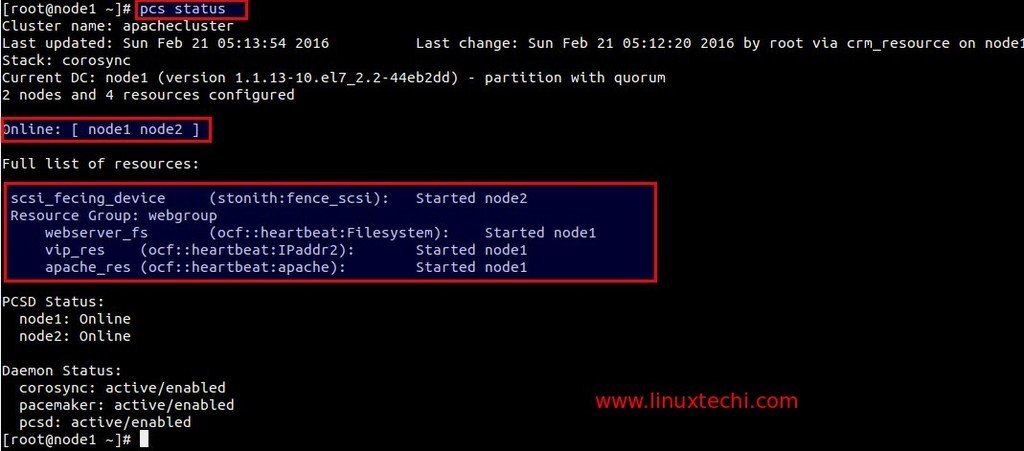
Verify the Cluster Status :

[root@node1 ~]# pcs status

pacemaaker-cluster-status

Use ‘df‘ and ‘ip add‘ command to verify the file system and ip address failover.

Now Try to access the web site using vip (192.168.1.151 ).webserver-vip

Pacemaker GUI :

GUI of Pacemaker can be accessed from web browser using vip.

https://192.168.1.151:2224/

Pacemaker-Corosync-GUI

Use the user name ‘hacluster’ and its password that we set in above step.

Add the existing Cluster nodes.

Pacemaker-GUI-Existing-Cluster

pacemaker-gui-node-authentication

Pacemaker-GUI-Admin-Panel

Installation and Configuration of Pacemaker is completed Now, Hope you have enjoy the steps. Please share your valuable feedback & comments :)

Reference : http://clusterlabs.org/quickstart-redhat.html
How to Install iRedMail (Mail Server) on CentOS 7 & RHEL 7

$
0
0

iRedMail is out of the box open source mail server solution on Linux like operating system. The beauty of iRedMail is that it provides web based admin panel from where mail admin or system admins can do all email related operations task. Some of other features are listed below :

  • Support unlimited email accounts.
  • It provides Roundcube as webmail (MUA )
  • It used Postfix as MTA & Dovecot as MDA
  • It pvoides Calendar service via CalDAV & Contact service via CardDAV
  • It uses SpamAssassin for Spam scan and Amavis & Clamav for Mail virus scan.
  • OpenLDAP, MariaDB and PostgreSQL can be used to save mail accounts

In this article we will demonstrate how to install and configure iRedMail on CentOS 7 & RHEL 7. I am going to use followings for iRedMail setup.

  • OS = CentOS 7 or RHEL 7
  • Domain = nsitmail.com
  • Server Hostname = mail.nsitmail.com

Note : In case if you want mails from your mail server to be delivered in inbox not in spam folder then update the DNS records like A & PTR  before installation and TXT ( SPF & DKIM ) after installation.

Step:1 Set hostname and disable Selinux.

Set the proper hostname using hostnamectl command if it is not set.

[root@mail ~]# hostnamectl set-hostname mail.nsitmail.com
[root@mail ~]# hostname -f
mail.nsitmail.com
[root@mail ~]#

Update the /etc/hosts file

127.0.0.1 mail.nsitmail.com localhost.localdomain localhost

Disable Selinux

[root@mail ~]# setenforce 0

Edit the file /etc/sysconfig/selinux , set the parameter “SELINUX=disabled” , Reboot the server to disable selinux completely.

Step:2 Download the tar file of iRedmail.

Download the latest version of iRedmail from their Official Web Site or use below wget command to download from terminal.

[root@mail ~]# wget https://bitbucket.org/zhb/iredmail/downloads/iRedMail-0.9.3.tar.bz2

Step:3 Extract the tar file & execute installation Script.

[root@mail ~]# ll
total 124
-rw-r--r-- 1 root root 126277 Dec 20 19:12 iRedMail-0.9.3.tar.bz2
[root@mail ~]#
[root@mail ~]# tar -jxvf iRedMail-0.9.3.tar.bz2
[root@mail ~]# cd iRedMail-0.9.3
[root@mail iRedMail-0.9.3]# sh iRedMail.sh

After couple of seconds , below screen will appear , Select yes and press enter.

iRedmail-installation-welcome-message

Define the folder or directory where users mailbox will be stored.

iredmail-users-mailbox-location

Select the web Server for iRedmail. Default is Nginx.

Webserver-for-iRedmail

Select the database of your choice which will store domain names and mail accounts. In my case i am using MariaDB.

mariadb-iredmail

Define the domain name for your mail server. In my case domain name is “nsitmail.com

domain-name-for-iredmail

Set Password for postmaster account.

postmaster-password-iredmail

Select Optional Components of iRedmail installation

Select-optional-components-iredmail

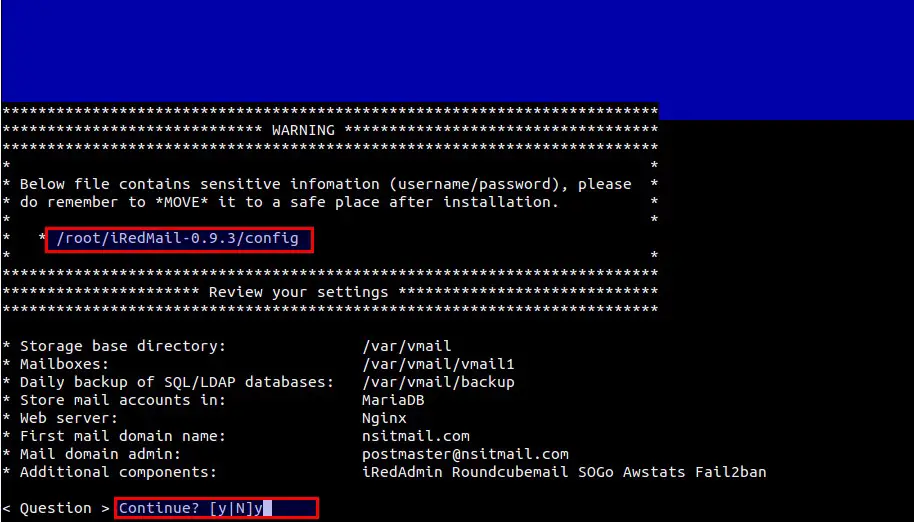
Press “y” to continue installation, Mail Server info & Credentials are kept in the file “/root/iRedMail-0.9.3/config”. Please keep this file in secure place.

iredmail-credentials

iredmail-installation-completed

As per instructions , reboot the server to enable all mail services.

Postfix mail logs and iRedmail logs are stored in “/var/log/maillog” and “/var/log/iredapd/iredapd.log” respectively.

Note : Default administrator name is “postmaster@nsitmail.com”

Following are the Important URLs after the Installation is completed , replace the domain name as per your setup in mentioned URLs.

iRedAdmin – official web-based admin panel:

https://mail.nsitmail.com/iredadmin/

Username: postmaster@nsitmail.com, password: XXXXXXXXXX

Roundcube webmail URL :

http://mail.nsitmail.com/mail/

SOGo Groupware

https://mail.nsitmail.com/SOGo/

Step:4 Create Users & domain from Admin Panel.

To create users first login to admin panel. Use user name as “postmaster@<domain>” and password that we set during installation.

iRedmail-webadmin-panel

Dashboard-iredmail

Click on Add option and then Select Users.

Add-user-under-domain-iredmail

Add a new Domain :

From the admin Panel , Select “Domain & accounts” option and then click on Add domain

Domains-Accounts-iredmail

Define the domain name & Organization Name and then further we can create users on newly created domain.

Add-domain-iredmail

Step:5 Access Roundcube (Webmail).

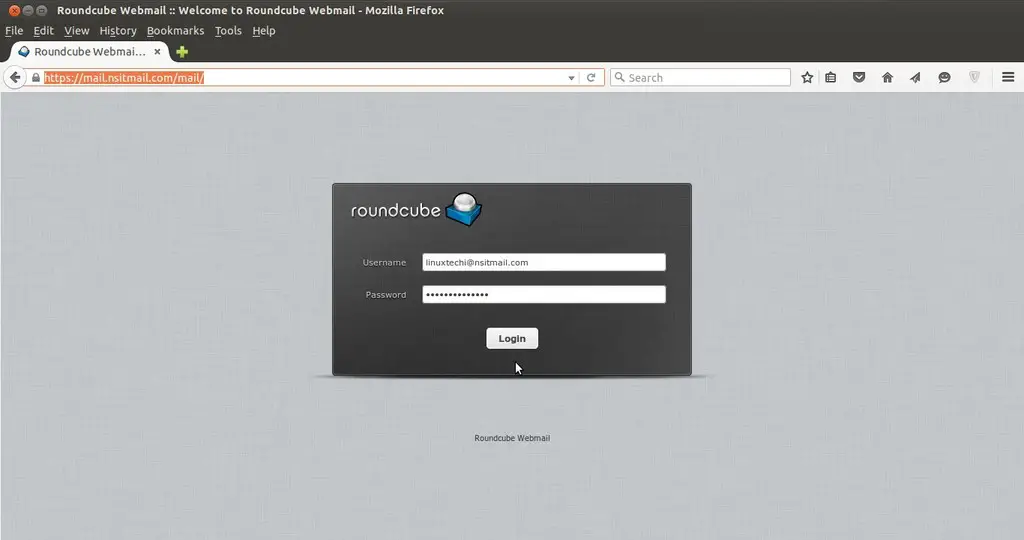
Open the url in the browser “https://mail.nsitmail.com/mail/” , replace the domain name as per your setup.

Roundcube-Webmail-iredmail

Roundcube-Webmail-Inbox

Send a test mail to verify the functionality.

compose-mail-roundcube-iredmail

mail-from iredmail-on-gmail

As we see that i got the mail from iRedmail mail server, so we can say the iRedmail is successfully installed and configured.


Single Node OpenStack (Liberty) Installation Steps on CentOS 7

$
0
0

OpenStack is a Cloud Software that manage large pool of compute (hypervisors), storage ( block & swift ) and network resources of a data center. It provides a Dashboard where admins can create and manage Projects (Tenants ) and give appropriate access to the project members , further on Project members can create VMs (Virtual Machine).

In this article we will install latest version of OpenStack ‘Liberty’ on CentOS 7 using rdo repositories. As per my setup i am using followings on my CentOS 7 Machine

  • Hostname = openstack.example.com
  • IP address = 192.168.1.3
  • netmask = 255.255.255.0
  • Gateway = 192.168.1.1
  • DNS = 192.168.1.254

Step:1 Set the hostname using hostnamectl command .

[root@localhost ~]# hostnamectl set-hostname "openstack.example.com"
[root@localhost ~]#

Step:2 Set the Selinux in Permissive Mode

[root@localhost ~]# setenforce 0

Edit the selinux config file ( /etc/sysconfig/selinux ) and set “SELINUX=permissive

[root@localhost ~]# grep permissive /etc/sysconfig/selinux
SELINUX=permissive
[root@localhost ~]#

Step:3 Disable firewalld & NetworkManager Service

[root@openstack ~]# systemctl stop firewalld
[root@openstack ~]# systemctl disable firewalld
Removed symlink /etc/systemd/system/dbus-org.fedoraproject.FirewallD1.service.
Removed symlink /etc/systemd/system/basic.target.wants/firewalld.service.
[root@openstack ~]#
[root@openstack ~]# systemctl stop NetworkManager
[root@openstack ~]# systemctl disable NetworkManager
Removed symlink /etc/systemd/system/multi-user.target.wants/NetworkManager.service.
Removed symlink /etc/systemd/system/dbus-org.freedesktop.NetworkManager.service.
Removed symlink /etc/systemd/system/dbus-org.freedesktop.nm-dispatcher.service.
[root@openstack ~]#

Step:4 Enable rdo repository for liberty packages.

Use below commands to update the system and enable rdo repository

[root@openstack ~]# yum update -y
[root@openstack ~]# yum install -y https://www.rdoproject.org/repos/rdo-release.rpm

Step:5 Install OpenStack PackStack Package

[root@openstack ~]# yum install -y openstack-packstack

Generate the answer file using below command.

[root@openstack ~]# packstack --gen-answer-file=/root/answer.txt
Packstack changed given value to required value /root/.ssh/id_rsa.pub

Edit the answer file “/root/answer.txt” , set the following parameters and leave rest of parameters as it is.

# NTP Server
CONFIG_NTP_SERVERS=<NTP_Server_IP>

# Disable Demo Version
CONFIG_PROVISION_DEMO=n

# Set KeyStone Admin Password or Admin user Password
CONFIG_KEYSTONE_ADMIN_PW=<password>

# Config Horizon over SSL
CONFIG_HORIZON_SSL=y

# Disable Nagios
CONFIG_NAGIOS_INSTALL=n

Note : In case if you don’t have NTP server in your setup then you can leave NTP parameter as it is.

Step:6 Start OpenStack installation using answer file.

[root@openstack ~]# packstack --answer-file /root/answer.txt

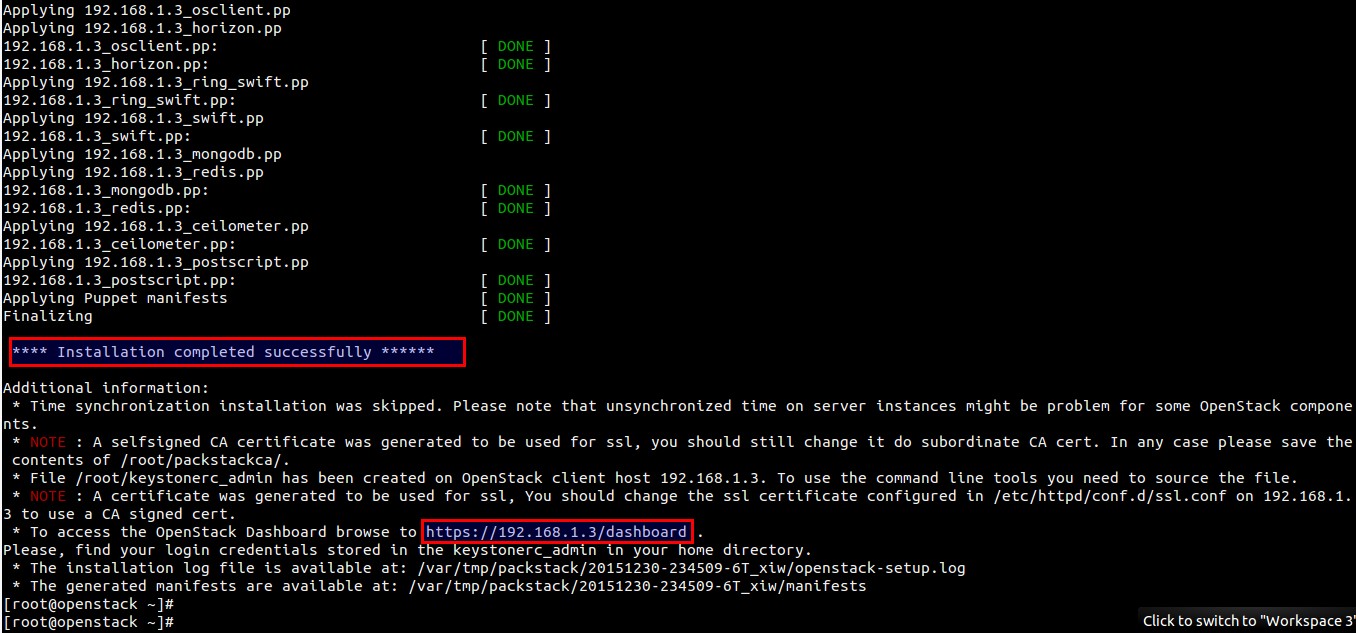
Once the installation is completed , we will get below message.

openstack-installation-packstack

After the installation a new interface “br-ex” will be created and assign the IP addess of eth0 or enp0s3 to br-ex .

[root@openstack ~]# cd /etc/sysconfig/network-scripts/
[root@openstack network-scripts]# cp ifcfg-enp0s3 ifcfg-br-ex
[root@openstack network-scripts]# vi ifcfg-enp0s3
DEVICE=enp0s3
HWADDR="08:00:27:8E:EA:56"
TYPE=OVSPort
DEVICETYPE=ovs
OVS_BRIDGE=br-ex
ONBOOT=yes

[root@openstack network-scripts]# vi ifcfg-br-ex
DEVICE=br-ex
DEVICETYPE=ovs
TYPE=OVSBridge
BOOTPROTO=static
IPADDR=192.168.1.3
NETMASK=255.255.255.0
GATEWAY=192.168.1.1
DNS1=192.168.1.254
ONBOOT=yes

In above files please change the IP details, Hardware address and Device name as per your setup.

When we restart the network service , it will add “enp0s3” as a port in br-ex OVS bridge.

[root@openstack network-scripts]# systemctl restart network
[root@openstack network-scripts]#

Please take a reboot and check whether settings are persistent or not.

Step:7 Now Access OpenStack Dashboard.

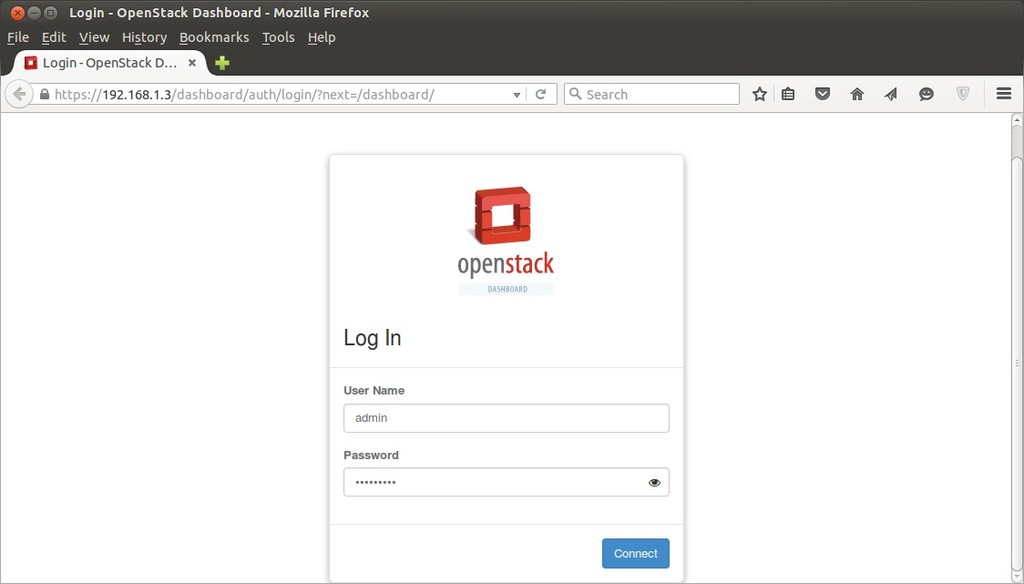
When the installation is completed a dashboard link was provided on the screen , in My Case it is “https://192.168.1.3/dashboard”

Liberty-OpenStack-Dashboard jpg

Use the user name as “admin” and password that we set for keystone admin user in answer file.

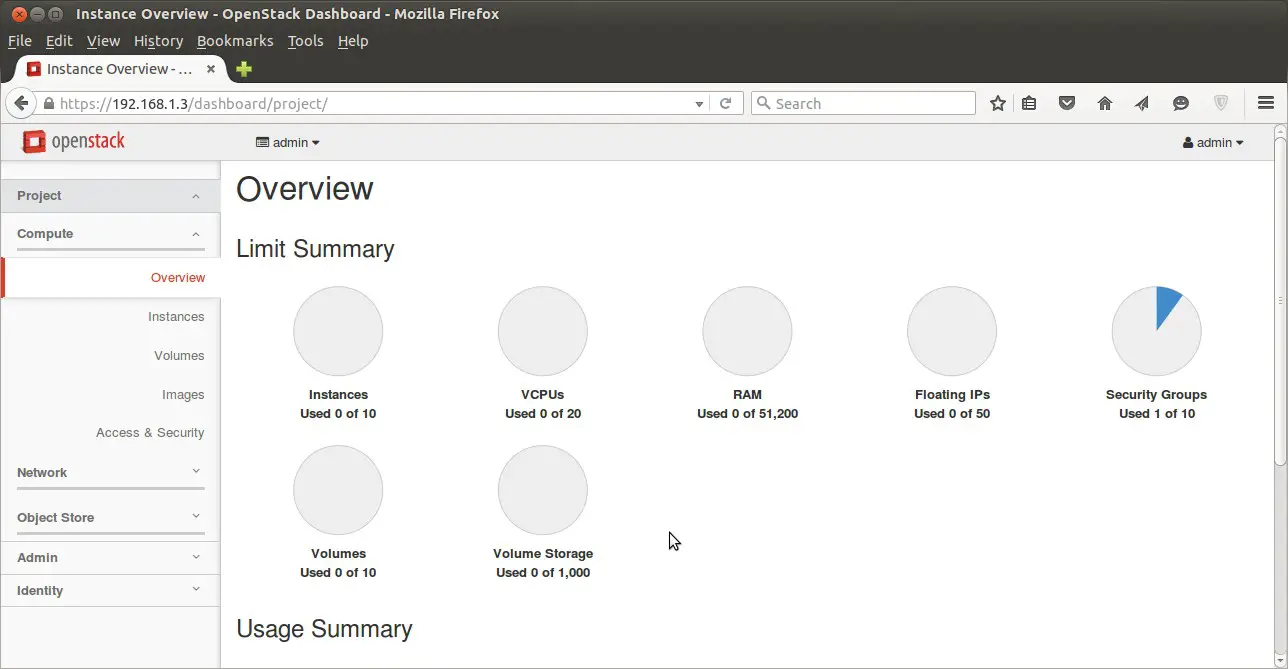
Instance-Overview- OpenStack-Dashboard

As we are able to login in Dashboard , so OpenStack installation part is completed. Now our next task is to “Launch an Instance from OpenStack Dashboard

Launch an Instance from OpenStack (Liberty) Dashboard

$
0
0

To Launch an instance from OpenStack dashboard, first we need to finish following steps :

  • Create a Project and add a member to the Project.
  • Create a Image and Flavor
  • Create a Network and Router for a Project.

In my Case i will use Project Name as “Innovation” and linuxtechi as Project Member of Innovation.

  • Internal Network = 10.10.10.0/24
  • External Network or Floating IP Network = 192.168.1.0/24
  • Gateway of External Network = 192.168.1.1

Create a Project and add a member to the Project.

Login to the dashboard using Admin credentials and Go to Identity Tab –> Projects and Click on Create Project.

Create-Projects-OpenStack-Dashboard

Click on “Create Project” , We can also set the Quota for the project from Quota Tab.

To create Users , Go to Identify Tab–> Users–> Click on ‘Create User’

In my case i have specify the followings :

  • User Name = linuxtechi
  • email = linuxtechi@example.com
  • password = xxxxxx
  • Primary Project = innovation
  • Role = member

Create-Users-OpenStack-Dashboard

Create a flavor and image :

To create a flavor login in dashboard using admin credentials , Go to Admin Tab –> Flavors –> Click on create Flavor.

Flavors-OpenStack-Dashboard

Specify the Flavor Name (fedora.small) , VCPU , Root Disk , Ephemeral Disk & Swap disk.

Create-Flavors-OpenStack-Dashboard

To Create Image , Go to Admin Tab –> Images—> Click on Create Image.

Specify the Image Name , Description, Image Soure ( in my case i am using Image File as i have already downloaded the Fedora 23 Cloud Image ) , Format QCOW2

Create-Images-OpenStack Dashboard

Create Network and Router for Project Innovation.

To create Network and router for Innovation project sign out of admin user and login as “linuxtechi” user in dashboard.

Go to the Network Tab —> Click on Networks —> then Click on Create Network

Specify the Network Name as Internal

internal-network-name-openstack

click on Next..

Specify the Subnet name (sub-internal) and Network Address (10.10.0.0/24)

internal-subnet-name-openstack

Click on Next..

click-create-internal-network-openstack

VMs will be getting internal ip from DHCP Server because we enable DHCP option for internal network.

Now Create External Network . Click on “Create Network” again , Specify Network Name as “external

external-network-openstack-dashboard

Click on Next…

Specify subnet Name as “sub-external” & Network Address as “192.168.1.0/24

subnet-name-external-name-openstack

Click on Next

Untick  “Enable DHCP” option and Specify the ip address pool for external network.

ipaddress-pool-external-network-openstack

Click on Create.

Now time to create a Router.

Go To Network Tab –> Routers –> Click on ‘+ Create Router’

create-router-openstack

Now Mark External network as “External” , this task can be completed only from admin user , so logout from linuxtechi user and login as admin.

Go to Admin Tab —> Networks–> Click on Edit Network for “External”

Set-External-Networks-OpenStack-Dashboard

Click on Save Changes

Now Logout from admin user and login as linuxtechi user.

Go to Network Tab —> Routers –> for Router1 click on “Set Gateway”

Set-Gateway-Router-OpenStack-Dashboard

Click on “Set Gateway” , this will add a interface on router and will assign the first ip of external subnet (192.168.1.0/24).

Add internal interface to router as well , Click on the “router1″ and select on “interfaces” and then click on “Add interface”

Add-internal-interface-router-OpenStack-Dashboard

Click on Add interface.

Network Part is completed Now & we can view Network Topology from “Network Topology” Tab

Network-Topology-OpenStack-Dashboard

Now Create a key pair that will be used for accessing the VM and define the Security firewall rules.

For creating a key pair

Go to ‘Access & Security’  Tab —> Click on Key Pairs –> then click on ‘Create Key Pair

Access-security-OpenStack-Dashboard

It will create a Key pair with name “myssh-keys.pem

Add a new Security Group with name ‘fedora-rules’ from Access & Security Tab. Allow 22 and ICMP from Internet ( 0.0.0.0 ).

Security-Group-OpenStack-Dashboard

Once the Security Group ‘fedora-rules’ created , click on Manage Rules and allow 22 & ICMP ping.

Manage-Security-Group-Rules-OpenStack Dashboard

Click on Add , Similarly add a rule for ICMP.

Now Finally it’s time to Launch an instance.

Go to Compute Tab –> Click on Instances –> then click on ‘Launch Instance’

Instances-Details-OpenStack-Dashboard

Specify the Instance Name , Flavor that we created in above steps and ‘Boot from image’ from Instance Boot Source option and Select Image Name ‘fedora-image’.

Click on ‘Access & Security’ and Select the Security Group ‘fedora-rules’ & Key Pair ”myssh-keys

Instances-Security-group-keypair-OpenStack-Dashboard

Now Select Networking and add ‘Internal’ Network and the Click on Launch ….

Instances-Network-OpenStack-Dashboard

Once the VM is launched , Associate a floating ip so that we can access the VM.

Associate-floating-ip-Instances-OpenStack-Dashboard

Click on ‘Associate Floating IP

Allocating-floating-OpenStack Dashboard

Click on Allocate IP.

Associate-floating-ip-instance-OpenStack-Dashboard

Click on Associate

Instances-internal-floating-OpenStack-Dashboard

Now try to access the VM with floating IP ( 192.168.1.20) using keys.

Access-openstack-instance-using-keys

As we can see above that we are able to access the VM using keys. Our task of launching a VM from Dashboard is Completed Now.

Hope you like steps and do not hesitate to share this article.

Create & Restore VM Snapshot in VirtualBox on Ubuntu Linux

$
0
0

VM Snapshot a method to create a copy of Virtual Machine (VM) at specific point of time and in other words in we can say VM snapshot is used to preserve a particular state of a VM.

In this article we discuss how to create and restore VM snapshot in VirtualBox on Ubuntu Linux, I am assuming VirtualBox is already installed on Ubuntu Linux and couple of VM s are running on it.

Create VM Snapshot :

Step:1  Start the VirtualBox

Ubuntu-Oracle-VM-VirtualBox-Manager

Step:2 Select the virtual machine for snapshot and then click on ‘Snapshots‘ option,  in my case i am going to create a snapshot of CentOS 7 VM.

VM-SnapShot-VirtualBox

Specify the Snapshot Name and Description and then Click on ‘OK

vm-snaphsot-state-virtualbox

Note : When we try to take snapshot of running VM then Virtualbox manager will put that VM in Paused state , so once the snapshot task is completed then we can move the VM’s state from Paused to Running.

paused-state-VM-virtualbox

Restore VM Snapshot :

Step:1 Power off the Virtual Machine.

Step:2 Select the VM and Go to ‘Snapshots‘ option and then click on “Restore Snapshot option

restore-vmsnaphsot-option-virtaulbox

When we click on “Restore Snapshot” option , it will give us an option to create snapshot of current sate of the VM and if you don’t want the current state snapshot then untick the option ( Current state will be deleted permanently ).

restore-snapshot-virtualbox

Click on “Restore” option to Restore the snapshot.

saved-state-after-snapshot-restore-virtualbox

Now Click on Start option to start the VM

start-vm-after-snapshot-restoration

How to Install Drupal 8 On CentOS 7

$
0
0

Drupal is an Open Source Content Management Software which allows us to build & create web sites without doing any coding. Drupal’s code is written in PHP and comes under GNU GPL (General Public License ).

In this article we will demonstrate how to install Drupal 8 on CentOS 7.  Hostname and IP of my machine on which i will install Drupal 8

  • Hostname = drupal.example.com
  • IP Address = 192.168.1.11

Step:1 Install Apache Web Server (httpd) & PHP 5.5

Drupal 8 require at least PHP 5.5 or above, But php 5.5 is not available in the default yum repository so we will set the following repositories so that we can install php 5.5 using yum command.

[root@drupal ~]# rpm -Uvh https://dl.fedoraproject.org/pub/epel/epel-release-latest-7.noarch.rpm
[root@drupal ~]# rpm -Uvh https://mirror.webtatic.com/yum/el7/webtatic-release.rpm

Use below command to install web server ( httpd), PHP5.5 & other required php dependencies.

[root@drupal ~]# yum install httpd php55w php55w-opcache php55w-mbstring php55w-gd php55w-xml php55w-pear php55w-fpm php55w-mysql

Start the Web Server Service

[root@drupal ~]# systemctl start httpd
[root@drupal ~]# systemctl enable httpd
ln -s '/usr/lib/systemd/system/httpd.service' '/etc/systemd/system/multi-user.target.wants/httpd.service'
[root@drupal ~]#

In case firewall is running on the Server then use below commands to open 80 & 443 port.

[root@drupal ~]# firewall-cmd --permanent --zone=public --add-service=http
success
[root@drupal ~]# firewall-cmd --permanent --zone=public --add-service=https
success
[root@drupal ~]# firewall-cmd --reload
success
[root@drupal ~]#

Step:2 Install Database Server ( MariaDB )

In CentOS 7 mariadb is default database server. Use below command to install mariadb .

[root@drupal ~]# yum install mariadb-server mariadb

Start the Database service using below command

[root@drupal ~]# systemctl start mariadb
[root@drupal ~]# systemctl enable mariadb
ln -s '/usr/lib/systemd/system/mariadb.service' '/etc/systemd/system/multi-user.target.wants/mariadb.service'
[root@drupal ~]#

Set the “root password”, “Remove anonymous users” and “disable remote root login” and other parameters using below “mysql_secure_installation” command.

[root@drupal ~]# mysql_secure_installation

Create the database for drupal

[root@drupal ~]# mysql -u root -p

MariaDB [(none)]> create database drupal_db;
Query OK, 1 row affected (0.00 sec)
MariaDB [(none)]>

Create a user for database (drupal_db) and grant all privileges to the user on the database ‘drupal_db

MariaDB [(none)]> CREATE USER db_user@localhost IDENTIFIED BY 'Durpal@123#';
Query OK, 0 rows affected (0.01 sec)

MariaDB [(none)]> GRANT ALL PRIVILEGES ON drupal_db.* TO db_user@localhost;
Query OK, 0 rows affected (0.00 sec)

MariaDB [(none)]> FLUSH PRIVILEGES;
Query OK, 0 rows affected (0.00 sec)

MariaDB [(none)]> exit
Bye
[root@drupal ~]#

Restart the DB service

[root@drupal ~]# systemctl restart mariadb
[root@drupal ~]#

Step:3 Download Drupal 8 using wget command.

Download the latest version of drupal from from their official site “Download Drupal

We can also use wget command to download drupal from the terminal. In case wget and gzip package is not installed then below command to install wget and gzip command.

[root@drupal ~]# yum install wget gzip
[root@drupal ~]# wget https://ftp.drupal.org/files/projects/drupal-8.0.2.tar.gz

Step:4 Untar the downloaded file and set the required permissions.

Use the below command to untar the downloaded drupal file.

[root@drupal ~]# ls -l drupal-8.0.2.tar.gz
-rw-r--r--. 1 root root 11720487 Jan 6 17:57 drupal-8.0.2.tar.gz
[root@drupal ~]#
[root@drupal ~]# tar -zxpvf drupal-8.0.2.tar.gz

Move the drupal folder to web server’s document root ( /var/www/html ) and set the permissions.
[root@drupal ~]# mv drupal-8.0.2 /var/www/html/drupal
[root@drupal ~]# chown -R apache:apache /var/www/html/drupal/
[root@drupal ~]#

Now create settings file (settings.php ), a default settings file (default.settings.php) is already placed in the folder (/var/www/html/drupal/sites/default).

[root@drupal ~]# cd /var/www/html/drupal/sites/default
[root@drupal default]# cp -p default.settings.php settings.php
[root@drupal default]#

Note : Set the Selinux rule on the folder “/var/www/html/drupal/sites/” in case SElinux is enable on your Linux box.

[root@drupal ~]# chcon -R -t httpd_sys_content_rw_t /var/www/html/drupal/sites/
[root@drupal ~]#

Step:5 Start the Drupal installation

Open the web browser and type “http://<server_ip_address_or_hostname>/drupal

Choose your preferred language.

Choose-language-drupal-installation

Click on “Save and Continue

Select the installation Profile.

Select-installation-profile-drupal

Verify Requirements for Drupal Installation :

Drupal-installation-requirements-review

click on “continue anyway

Database Configuration : Use drupal database, user name & its password that we created  in above steps.

Database configuration-drupal-installation

Click on ‘Save and Continue’ and then Installation will start as shown in below.

Installing-Drupal-progress

Specify the Site info :

Please change the below parameters as per your setup and in my case i am using below :

  • Site Name : drupal.example.com
  • Site email address : linuxtechi@example.com
  • User Name for Site Maintenance Account : linuxtechi
  • Password : XXXXX
  • Country : India
  • Default time zone : UTC

configure-site-drupal-install

Save-and-continue-Drupal-installation

Click on ‘Save and Continue’ to finish the installation.

Drupal-installation-completed

Now Add the content to your site, In my case when i click on add Content , i was getting an error “URL /drupal/node/add was not found on this server

404-Not-Found-error-drupal-install

To resolve this issue , i have changed the parameter ‘AllowOverride none’ to ‘AllowOverride all’ in the web server config file ‘/etc/httpd/conf/httpd.conf’ and restart the web server service:

[root@drupal ~]# systemctl restart httpd

Add-content-drupal-sites

Now the Drupal installation is Completed. Add content to your site have fun :)

Install and Configure ProFTPD (FTP Server) on Fedora 23

$
0
0

ProFTPD is an Open Source FTP server in Unix like operating System. ProFTPD stands for “Professional File Transfer Protocol (FTP) daemon” and comes under GPL License. Configuration file of ProFTPD is similar as of ‘Apache HTTPD Server‘ and it can configured as Stand alone server or via Xinetd.

In this article we will Install and Configure ProFTPD on Fedora 23 . Host name & ip address of my machine is :

  • hostname = fedora23.linuxtechi.com
  • ip address = 192.168.1.21

Step:1 Install ProFTPD package using below command.

Use below dnf command to install proftpd and proftpd-utils .

[root@fedora23 ~]# dnf install proftpd proftpd-utils

install-proftpd-uisng-dnf

Step:2 Edit ProFTPD config file.

Configure ProFTPD by making the required changes in config file ‘/etc/proftpd.conf’

Set the below parameters in the config file.

[root@fedora23 ~]# vi /etc/proftpd.conf

ServerName          "fedora23.linuxtechi.com"
ServerIdent          on "FTP Server ready."
ServerAdmin          pradeep@linuxtechi.com
DefaultServer        on
ExtendedLog          /var/log/proftpd/access.log WRITE,READ default
ExtendedLog          /var/log/proftpd/auth.log AUTH auth
DefaultRoot          ~ !adm
AuthPAMConfig        proftpd
AuthOrder            mod_auth_pam.c* mod_auth_unix.c

config-file-proftpd-fedora23

Change the ServerName and ServerAdmin Email address as per your setup.

Note : All the users will be chroot to their home directory means users can’t access the files outside of their home directory .

Start and Enable the ProFTPD service.

[root@fedora23 ~]# systemctl start proftpd
[root@fedora23 ~]# systemctl enable proftpd
Created symlink from /etc/systemd/system/multi-user.target.wants/proftpd.service to /usr/lib/systemd/system/proftpd.service.
[root@fedora23 ~]#

Now Create Group and Users for ProFTPD and set the required permissions on user’s home directory.

[root@fedora23 ~]# groupadd proftp_grp
[root@fedora23 ~]# mkdir /opt/ftp_dir
[root@fedora23 ~]# useradd -G proftp_grp -s /sbin/nologin -d /opt/ftp_dir pradeep
[root@fedora23 ~]#
[root@fedora23 ~]# chmod 1775 /opt/ftp_dir
[root@fedora23 ~]# chgrp proftp_grp /opt/ftp_dir
[root@fedora23 ~]# ls -ld /opt/ftp_dir/
drwxrwxr-t. 2 root proftp_grp 4096 Jan 24 09:55 /opt/ftp_dir/
[root@fedora23 ~]#

Now assign password to the user.

[root@fedora23 ~]# passwd pradeep

Note: In my case i have created a user ‘pradeep’ whose home directory is “/opt/ftp_dir/” and secondary group is “ proftp_grp”. Now using ftp client pradeep can download and upload files from their home directory.

Step:3 Set SELinux & Firewall Rules.

In case SELinux is enable then set the following selinux rules for FTP.

[root@fedora23 ~]# setsebool -P ftp_home_dir=1
[root@fedora23 ~]# setsebool -P allow_ftpd_full_access=1

Open the FTP port in  Operating System (OS) Firewall

[root@fedora23 ~]# firewall-cmd --permanent --add-port=21/tcp
success
[root@fedora23 ~]# firewall-cmd --reload
success
[root@fedora23 ~]#

Step:4 Enable Encryption between ProFTPD Server and FTP Clients

Connection between ProFTPD server and its client is consider less secure , so to make secure communication between Server and its clients we can use SSL certificates.

To generate SSL certificates we will use openssl command , use below command to install openssl if it is not installed.

[root@fedora23 ~]# dnf install openssl

Now Generate SSL certificates

[root@fedora23 ~]# openssl req -x509 -nodes -newkey rsa:2048 -keyout /etc/pki/tls/certs/ftpserver.pem -out /etc/pki/tls/certs/ftpserver.pem

It will prompt you to enter the information associated with the certificate and will create a private key ‘/etc/pki/tls/certs/ftpserver.pem’

openssl-private-key-proftpd

Set the permission on Private Key :

[root@fedora23 ~]# chmod 600 /etc/pki/tls/certs/ftpserver.pem
[root@fedora23 ~]#

Add the following lines in ‘/etc/proftpd.conf

[root@fedora23 ~]# vi /etc/proftpd.conf
TLSEngine                  on
TLSRequired                on
TLSProtocol                SSLv23
TLSLog                     /var/log/proftpd/tls.log
TLSRSACertificateFile      /etc/pki/tls/certs/ftpserver.pem
TLSRSACertificateKeyFile   /etc/pki/tls/certs/ftpserver.pem

SSL-certificate-proftpd-config

Restart the ProFTPD service.

[root@fedora23 ~]# systemctl restart proftpd
[root@fedora23 ~]#

Open the ports in the OS firewall for TLS.

[root@fedora23 ~]# firewall-cmd --add-port=1024-65534/tcp
success
[root@fedora23 ~]# firewall-cmd --add-port=1024-65534/tcp --permanent
success
[root@fedora23 ~]# firewall-cmd --reload
success

Step:5 Connect to ProFTPD server using Filezilla.

FileZilla-ubuntu-linux

Click on Connect…

ProFTPD-certificate

Click On ‘OK’ to trust the Certificate.

ProFTPD-successful-login

As we are able to login successfully, now you can download & upload files to your home directory.

Hope you like installation and Configuration steps :)

Steps to Install ownCloud 8.2 on CentOS 7

$
0
0

ownCloud is an open source software which allows us to set up our private ‘file-hosting’ cloud or we can say ‘cloud storage’ over the network. Data hosted in ownCloud can be access at any time either via web browsers or desktop client or may be via smart phone aaps.

Some of the important features of ownCloud are listed below :

owncloud-features

In this article we will install ownCloud 8.2 on CentOS 7. Hostname and ip address of my CentOS 7 machine is “owncloud.linuxtechi.com” & “192.168.1.101″

Following are the prerequisites for ownCloud.

  • PHP
  • Apache Web Server ( Apache )
  • Database Server ( MariaDB or SQLite or Oracle or PostgreSQL )

Step:1 Install PHP and Web Server (HTTPD)

Use below yum command to install php and apache web server (httpd) and other PHP dependencies.

[root@owncloud ~]# yum install httpd php php-mysql sqlite php-dom php-mbstring php-gd php-pdo php-json php-xml php-zip php-gd curl php-curl php-mcrypt php-pear
Start the Web Server service

[root@owncloud ~]# systemctl start httpd.service
[root@owncloud ~]# systemctl enable httpd.service
ln -s '/usr/lib/systemd/system/httpd.service' '/etc/systemd/system/multi-user.target.wants/httpd.service'
[root@owncloud ~]#

Step:2 Install and Configure Database for ownCloud.

In CentOS 7 MariaDB is the default database server.

[root@owncloud ~]# yum install mariadb-server mariadb

Start the Database Service

[root@owncloud ~]# systemctl start mariadb.service
[root@owncloud ~]#
[root@owncloud ~]# systemctl enable mariadb.service
ln -s '/usr/lib/systemd/system/mariadb.service' '/etc/systemd/system/multi-user.target.wants/mariadb.service'
[root@owncloud ~]#

Set the Root password and other database parameters using below command :

[root@owncloud ~]# mysql_secure_installation

Create the database (owncloud_db).

[root@owncloud ~]# mysql -u root -p
Enter password:

MariaDB [(none)]> create database owncloud_db;
Query OK, 1 row affected (0.00 sec)
MariaDB [(none)]>

Create a database user(dbuser) and grant all the privileges on the database (owncloud_db)

MariaDB [(none)]> grant all on owncloud_db.* to 'dbuser'@'localhost' identified by 'Owncloud@123#';
Query OK, 0 rows affected (0.00 sec)

MariaDB [(none)]> FLUSH PRIVILEGES;
Query OK, 0 rows affected (0.00 sec)

MariaDB [(none)]> exit
Bye
[root@owncloud ~]#

Step:3 Install ownCloud package using yum command.

ownCloud Package is not available in the default yum repositories so we will set below EPEL and ownlcoud repositories.

Note : Install wget package in case it is not installed on your system.

[root@owncloud ~]# yum install wget
[root@owncloud ~]# rpm -Uhv http://dl.fedoraproject.org/pub/epel/7/$(uname -i)/e/epel-release-7-5.noarch.rpm
[root@owncloud ~]# wget http://download.owncloud.org/download/repositories/stable/CentOS_7/ce:stable.repo -O /etc/yum.repos.d/ce:stable.repo
[root@owncloud ~]# yum install owncloud

Allow Web Server’s port in the OS(Operating System) firewall.

[root@owncloud ~]# firewall-cmd --permanent --zone=public --add-service=http
success
[root@owncloud ~]# firewall-cmd --permanent --zone=public --add-service=https
success
[root@owncloud ~]# firewall-cmd --reload
success
[root@owncloud ~]#

Set the required permissions on ownlcoud folder “/var/www/html/owncloud

[root@owncloud ~]# chown -R apache.apache /var/www/html/owncloud/
[root@owncloud ~]#

Set the below SELinux Rules if SELinux is enabled on your system

[root@owncloud ~]# semanage fcontext -a -t httpd_sys_rw_content_t '/var/www/html/owncloud/data'
[root@owncloud ~]# restorecon '/var/www/html/owncloud/data'
[root@owncloud ~]# semanage fcontext -a -t httpd_sys_rw_content_t '/var/www/html/owncloud/config'
[root@owncloud ~]# restorecon '/var/www/html/owncloud/config'
[root@owncloud ~]# semanage fcontext -a -t httpd_sys_rw_content_t '/var/www/html/owncloud/apps'
[root@owncloud ~]# restorecon '/var/www/html/owncloud/apps'
[root@owncloud ~]#

Step:4 Start ownCloud Installation from the Browser.

To start the ownCloud installation open the web browser and type :

http://192.168.1.101/owncloud/

Replace the ip address as per your setup.

Specify the User name as ‘admin’ and give password that you want set for admin user. Data Folder as ‘/var/www/html/owncloud/data’ and Database name (owncloud_db) and database user (dbuser) credentials that we created in above steps.

ownCloud-installation-scree

Click on ‘Finish setup’

Files-ownCloud-CentOS7

Get ownCloud Clients and aaps to sync your data.

Home Page of Our ownCloud will look like below.

Home-Page-ownCloud

Installation and Configuration of ownCloud is completed. Now upload data and share it among users.

By Default only 513MB data file can be uploaded in case you want to change this limit , edit the file ‘/var/www/html/owncloud/.htaccess‘ and set the limit as per requirement.

maximum-upload-limit-owncloud

How to enable Kdump on RHEL 7 and CentOS 7

$
0
0

Kdump is a kernel feature which is used to capture crash dumps when the system or kernel crash. For enabling kdump we have to reserve some portion of physical RAM which will be used to execute kdump kernel in the event of kernel panic or crash.

When a kernel crash or kernel panic occurs then running kernel runs ‘kexec(kdump kernel)‘ and it loads kdump kernel from reserve memory and then contents of RAM and Swap is copied to vmcore file either on local disk or on remote disk and finally reboot the box.

By analyzing the crash dumps we can find the reason or the root case of system failure. If you have OS support then you can share the crash dumps to the vendor for analysis.

In this article we will demonstrate how to enable kdump on RHEL 7 and CentOS 7

Step:1 Install ‘kexec-tools’ using yum command

Use the below yum command to install ‘kexec-tools’ package in case it is not installed.

[root@cloud ~]# yum install kexec-tools

Step:2 Update the GRUB2 file to Reserve Memory for Kdump kernel.

Edit the GRUB2 file (/etc/default/grub), add the parameter ‘crashkernel=<Reserved_size_of_RAM>‘ in the line beginning with ‘GRUB_CMDLINE_LINUX

GRUB_CMDLINE_LINUX="rd.lvm.lv=centos/swap vconsole.font=latarcyrheb-sun16 rd.lvm.lv=centos/root crashkernel=128M vconsole.keymap=us rhgb quiet"

grub-file-centos7

Execute the below command to regenerate grub2 configuration.

[root@cloud ~]# grub2-mkconfig -o /boot/grub2/grub.cfg

In case of UEFI firmware, use the below command

[root@cloud ~]# grub2-mkconfig -o /boot/efi/EFI/redhat/grub.cfg

Above command will inform bootlaoder to reserve 128 MB RAM after reboot.

Reboot the box now using below command :

[root@cloud ~]# shutdown -r now

Step:3 Update the dump location & default action in the file (/etc/kdump.conf).

To store crash dump or vmcore file on a local file system, edit the file ‘/etc/kdump.conf‘ and specify the location as per your setup. In my case i am using a separate local file system ( /var/crash). It is recommended that size of file system should be equivalent to the size of your system’s RAM or file system should have free space equivalent to the size of RAM. Kdump allows to compress the dump data using ‘core collector’ option (core_collector makedumpfile -c ) where -c is used for compression.

In case if kdump fails to store the dump file to specified location then default action will be performed which is mention in the default directive. In my case default action is reboot.

Update the below three directives in kdump.conf file.

[root@cloud ~]# vi /etc/kdump.conf

path /var/crash
core_collector makedumpfile -c
default reboot

Different Options to store dump :

options-store-dump

Step:4 Start and enable kdump service.

[root@cloud ~]# systemctl start kdump.service
[root@cloud ~]# systemctl enable kdump.service
[root@cloud ~]#

Step:5 Now Test Kdump by manually crashing the system.

Before crashing your system , please verify whether the kdump service is running or not using below command.

[root@cloud crash]# systemctl is-active kdump.service
[root@cloud crash]# service kdump status

To test our kdump configuration we will manually crash our system with below commands.

[root@cloud ~]# echo 1 > /proc/sys/kernel/sysrq ; echo c > /proc/sysrq-trigger

This will create a crash dump file (vmcore ) under ‘/var/crash‘ file system.

[root@cloud ~]# ls -lR /var/crash
/var/crash:
total 0
drwxr-xr-x. 2 root root 42 Mar 4 03:02 127.0.0.1-2016-03-04-03:02:17

/var/crash/127.0.0.1-2016-03-04-03:02:17:
total 135924
-rw-------. 1 root root 139147524 Mar 4 03:02 vmcore
-rw-r--r--. 1 root root 35640 Mar 4 03:02 vmcore-dmesg.txt
[root@cloud ~]#

Step:6 Use ‘crash’ command to analyze and debug crash dumps.

Crash is the utility or command to debug and analyze the crash dump or vmcore file.

To use the crash, make sure two packages are installed : ‘crash & kernel-debuginfo

[root@cloud ~]# yum install crash

To install ‘kernel-debuginfo’ package , first enable debug repo. Edit the repo file /etc/yum.repos.d/CentOS-Debuginfo.repo

change ‘enbled=0’ to ‘enabled=1’

[root@cloud ~]# yum install kernel-debuginfo

Once the kernel-debuginfo is installed , then try to execute below crash command, it will give us a crash prompt where we can run commands to find process info , list of open files when the system got crashed.

[root@cloud ~]# crash /var/crash/127.0.0.1-2016-03-04-14\:20\:06/vmcore /usr/lib/debug/lib/modules/`uname -r`/vmlinux

crash>

Type ‘ps‘ command to list the Process which were running when the system got crashed.

crash> ps

process-list-during-system-crash

To view the files that were open when system got crashed , type ‘files’ command at crash prompt.

crash> files
PID: 5577 TASK: ffff88007b44f300 CPU: 0 COMMAND: "bash"
ROOT: / CWD: /root
 FD FILE DENTRY INODE TYPE PATH
 0 ffff880036b85000 ffff8800796fa540 ffff88007966f4d0 CHR /dev/pts/0
 1 ffff880036b73900 ffff880068c409c0 ffff8800794a8d10 REG /proc/sysrq-trigger
 2 ffff880036b85000 ffff8800796fa540 ffff88007966f4d0 CHR /dev/pts/0
 10 ffff880036b85000 ffff8800796fa540 ffff88007966f4d0 CHR /dev/pts/0
255 ffff880036b85000 ffff8800796fa540 ffff88007966f4d0 CHR /dev/pts/0
crash>

Type ‘sys’ command to list the system info when it got crashed.

crash> sys
 KERNEL: /usr/lib/debug/lib/modules/3.10.0-327.10.1.el7.x86_64/vmlinux
 DUMPFILE: /var/crash/127.0.0.1-2016-03-04-14:20:06/vmcore
 CPUS: 1
 DATE: Fri Mar 4 14:20:01 2016
 UPTIME: 00:02:00
LOAD AVERAGE: 0.75, 0.48, 0.19
 TASKS: 115
 NODENAME: cloud.linuxtechi.com
 RELEASE: 3.10.0-327.10.1.el7.x86_64
 VERSION: #1 SMP Tue Feb 16 17:03:50 UTC 2016
 MACHINE: x86_64 (2388 Mhz)
 MEMORY: 2 GB
 PANIC: "SysRq : Trigger a crash"
crash>

To get help of any command on crash prompt , type ‘help <command>‘ , example is shown below.

help-crash-commands

That’s conclude the article, Please don’t hesitate to share it if you have enjoyed.


Shutter Screenshot Tool in Ubuntu Linux

$
0
0

Shutter is a screenshot tool in Ubuntu Linux. Using Shutter we can take a screenshot of a specific area, window and whole screen. It also allows us to draw and highlights important area on screenshot image. Screenshot image can be saved as jpeg, png, gif, bmp, pdf, ps or svg and can be uploaded to image hosting site using FTP credentials.

In this article we will demonstrate how to install and use shutter in Ubuntu Linux.

There are two ways to install shutter either from command line using apt-get command or by using synaptic package manager

Install Shutter from command line :

Open the terminal and type below command command

linuxtechi@linuxtechi:~$ sudo apt-get update
linuxtechi@linuxtechi:~$ sudo apt-get install shutter

Install Shutter from Synaptic Package Manager

In case Synaptic is not installed then use the below command to install.

linuxtechi@linuxtechi:~$ sudo apt-get install synaptic

Start the Synaptic and search ‘shutter’

install-shutter-using-synaptic

Select ‘mark for installation’ and then click on Apply.

Once the Installation is completed , Now try to access the shutter.

Access-shutter-ubuntu

Click on the Shutter icon.

shutter-window-ubuntu

Different Screenshots that can be captured using shutter :

  • To take a screenshot of particular or selected area click on ‘Selection’ option
  • To take a screenshot of the whole desktop click on ‘Desktop’ option
  • To take a screenshot of a particular window click on ‘window’ option

To change the default settings of Shutter , Got to Edit —> Preferences

shutter-preference-option

shutter-preferences-ubuntu

Change the settings as per your requirements and save the changes.

Using shutter We can also upload the screenshot images to image hosting websites using FTP credentials.

Click on upload option on Shutter Preferences window. Specify the FTP URI , ftp user name & its password and Web Site URL.

upload-images-using-shutter

Insert Text and highlight important area on screenshot Image.

Select the image file and then click on Edit option.

Edit-option-screenshot-image

we can draw rectangle, eclipse and insert text into image, example is shown below.

Insert-text-draw-circle-shutter-screenshot-image

That’s conclude this article. Enjoy & have fun with Shutter :)

notepadqq – Notepad++ for Ubuntu Linux

$
0
0

As we know Notepad++ is the most commonly used text editor or source code editor in Microsoft windows operating system. In Ubuntu Linux ‘notepadqq’ is the alternate of notepad++. In other words we can say that notepadqq is Notepad++ for Ubuntu Linux.

In this article we will demonstrate how to install ‘notepadqq‘ in Ubuntu Linux.

Steps to Install notepadqq on Ubuntu 14.04 LTS / 15.10 / 16.04 LTS

Step:1 Add Ubuntu PPA Repository

notpadqq‘ package is not available in the default Ubuntu repository, we will add Ubuntu PPA repository using below command.

linuxtechi@cloud:~$ sudo add-apt-repository ppa:notepadqq-team/notepadqq

Adding-notepadqq-ubuntu-ppa-repo

Step:2 Refresh the Repositories using below apt-get command.

linuxtechi@cloud:~$ sudo apt-get update

Step:3 Install notepaddqq Debian package

Now we can install notepadqq package either from command line using apt-get command or from Synaptic Package Manager.

Installing notepaddqq from the Command line.

linuxtechi@cloud:~$ sudo apt-get install notepadqq

Installing notepadqq using synaptic Package Manager.

Start the Synaptic Package Manager , search ‘notepadqq’ package.

Notepadqq-Synaptic-Package-Manager

Select the ‘notepadqq‘ & ‘Mark for installation‘ and then click on Apply option to install notepadqq.

Now the installation is completed , try to open text file using notepadqq editor.

notepadqq-editor

How to enable Kdump on RHEL 7 and CentOS 7

$
0
0

Kdump is a kernel feature which is used to capture crash dumps when the system or kernel crash. For enabling kdump we have to reserve some portion of physical RAM which will be used to execute kdump kernel in the event of kernel panic or crash.

When a kernel crash or kernel panic occurs then running kernel runs ‘kexec(kdump kernel)‘ and it loads kdump kernel from reserve memory and then contents of RAM and Swap is copied to vmcore file either on local disk or on remote disk and finally reboot the box.

By analyzing the crash dumps we can find the reason or the root case of system failure. If you have OS support then you can share the crash dumps to the vendor for analysis.

In this article we will demonstrate how to enable kdump on RHEL 7 and CentOS 7

Step:1 Install ‘kexec-tools’ using yum command

Use the below yum command to install ‘kexec-tools’ package in case it is not installed.

[root@cloud ~]# yum install kexec-tools

Step:2 Update the GRUB2 file to Reserve Memory for Kdump kernel.

Edit the GRUB2 file (/etc/default/grub), add the parameter ‘crashkernel=<Reserved_size_of_RAM>‘ in the line beginning with ‘GRUB_CMDLINE_LINUX

GRUB_CMDLINE_LINUX="rd.lvm.lv=centos/swap vconsole.font=latarcyrheb-sun16 rd.lvm.lv=centos/root crashkernel=128M vconsole.keymap=us rhgb quiet"

grub-file-centos7

Execute the below command to regenerate grub2 configuration.

[root@cloud ~]# grub2-mkconfig -o /boot/grub2/grub.cfg

In case of UEFI firmware, use the below command

[root@cloud ~]# grub2-mkconfig -o /boot/efi/EFI/redhat/grub.cfg

Above command will inform bootlaoder to reserve 128 MB RAM after reboot.

Reboot the box now using below command :

[root@cloud ~]# shutdown -r now

Step:3 Update the dump location & default action in the file (/etc/kdump.conf).

To store crash dump or vmcore file on a local file system, edit the file ‘/etc/kdump.conf‘ and specify the location as per your setup. In my case i am using a separate local file system ( /var/crash). It is recommended that size of file system should be equivalent to the size of your system’s RAM or file system should have free space equivalent to the size of RAM. Kdump allows to compress the dump data using ‘core collector’ option (core_collector makedumpfile -c ) where -c is used for compression.

In case if kdump fails to store the dump file to specified location then default action will be performed which is mention in the default directive. In my case default action is reboot.

Update the below three directives in kdump.conf file.

[root@cloud ~]# vi /etc/kdump.conf

path /var/crash
core_collector makedumpfile -c
default reboot

Different Options to store dump :

options-store-dump

Step:4 Start and enable kdump service.

[root@cloud ~]# systemctl start kdump.service
[root@cloud ~]# systemctl enable kdump.service
[root@cloud ~]#

Step:5 Now Test Kdump by manually crashing the system.

Before crashing your system , please verify whether the kdump service is running or not using below command.

[root@cloud crash]# systemctl is-active kdump.service
[root@cloud crash]# service kdump status

To test our kdump configuration we will manually crash our system with below commands.

[root@cloud ~]# echo 1 > /proc/sys/kernel/sysrq ; echo c > /proc/sysrq-trigger

This will create a crash dump file (vmcore ) under ‘/var/crash‘ file system.

[root@cloud ~]# ls -lR /var/crash
/var/crash:
total 0
drwxr-xr-x. 2 root root 42 Mar 4 03:02 127.0.0.1-2016-03-04-03:02:17

/var/crash/127.0.0.1-2016-03-04-03:02:17:
total 135924
-rw-------. 1 root root 139147524 Mar 4 03:02 vmcore
-rw-r--r--. 1 root root 35640 Mar 4 03:02 vmcore-dmesg.txt
[root@cloud ~]#

Step:6 Use ‘crash’ command to analyze and debug crash dumps.

Crash is the utility or command to debug and analyze the crash dump or vmcore file.

To use the crash, make sure two packages are installed : ‘crash & kernel-debuginfo

[root@cloud ~]# yum install crash

To install ‘kernel-debuginfo’ package , first enable debug repo. Edit the repo file /etc/yum.repos.d/CentOS-Debuginfo.repo

change ‘enbled=0’ to ‘enabled=1’

[root@cloud ~]# yum install kernel-debuginfo

Once the kernel-debuginfo is installed , then try to execute below crash command, it will give us a crash prompt where we can run commands to find process info , list of open files when the system got crashed.

[root@cloud ~]# crash /var/crash/127.0.0.1-2016-03-04-14\:20\:06/vmcore /usr/lib/debug/lib/modules/`uname -r`/vmlinux

crash>

Type ‘ps‘ command to list the Process which were running when the system got crashed.

crash> ps

process-list-during-system-crash

To view the files that were open when system got crashed , type ‘files’ command at crash prompt.

crash> files
PID: 5577 TASK: ffff88007b44f300 CPU: 0 COMMAND: "bash"
ROOT: / CWD: /root
 FD FILE DENTRY INODE TYPE PATH
 0 ffff880036b85000 ffff8800796fa540 ffff88007966f4d0 CHR /dev/pts/0
 1 ffff880036b73900 ffff880068c409c0 ffff8800794a8d10 REG /proc/sysrq-trigger
 2 ffff880036b85000 ffff8800796fa540 ffff88007966f4d0 CHR /dev/pts/0
 10 ffff880036b85000 ffff8800796fa540 ffff88007966f4d0 CHR /dev/pts/0
255 ffff880036b85000 ffff8800796fa540 ffff88007966f4d0 CHR /dev/pts/0
crash>

Type ‘sys’ command to list the system info when it got crashed.

crash> sys
 KERNEL: /usr/lib/debug/lib/modules/3.10.0-327.10.1.el7.x86_64/vmlinux
 DUMPFILE: /var/crash/127.0.0.1-2016-03-04-14:20:06/vmcore
 CPUS: 1
 DATE: Fri Mar 4 14:20:01 2016
 UPTIME: 00:02:00
LOAD AVERAGE: 0.75, 0.48, 0.19
 TASKS: 115
 NODENAME: cloud.linuxtechi.com
 RELEASE: 3.10.0-327.10.1.el7.x86_64
 VERSION: #1 SMP Tue Feb 16 17:03:50 UTC 2016
 MACHINE: x86_64 (2388 Mhz)
 MEMORY: 2 GB
 PANIC: "SysRq : Trigger a crash"
crash>

To get help of any command on crash prompt , type ‘help <command>‘ , example is shown below.

help-crash-commands

That’s conclude the article, Please don’t hesitate to share it if you have enjoyed.

Install and Configure ProFTPD (FTP Server) on Fedora 23

$
0
0

ProFTPD is an Open Source FTP server in Unix like operating System. ProFTPD stands for “Professional File Transfer Protocol (FTP) daemon” and comes under GPL License. Configuration file of ProFTPD is similar as of ‘Apache HTTPD Server‘ and it can configured as Stand alone server or via Xinetd.

In this article we will Install and Configure ProFTPD on Fedora 23 . Host name & ip address of my machine is :

  • hostname = fedora23.linuxtechi.com
  • ip address = 192.168.1.21

Step:1 Install ProFTPD package using below command.

Use below dnf command to install proftpd and proftpd-utils .

[root@fedora23 ~]# dnf install proftpd proftpd-utils

install-proftpd-uisng-dnf

Step:2 Edit ProFTPD config file.

Configure ProFTPD by making the required changes in config file ‘/etc/proftpd.conf’

Set the below parameters in the config file.

[root@fedora23 ~]# vi /etc/proftpd.conf

ServerName          "fedora23.linuxtechi.com"
ServerIdent          on "FTP Server ready."
ServerAdmin          pradeep@linuxtechi.com
DefaultServer        on
ExtendedLog          /var/log/proftpd/access.log WRITE,READ default
ExtendedLog          /var/log/proftpd/auth.log AUTH auth
DefaultRoot          ~ !adm
AuthPAMConfig        proftpd
AuthOrder            mod_auth_pam.c* mod_auth_unix.c

config-file-proftpd-fedora23

Change the ServerName and ServerAdmin Email address as per your setup.

Note : All the users will be chroot to their home directory means users can’t access the files outside of their home directory .

Start and Enable the ProFTPD service.

[root@fedora23 ~]# systemctl start proftpd
[root@fedora23 ~]# systemctl enable proftpd
Created symlink from /etc/systemd/system/multi-user.target.wants/proftpd.service to /usr/lib/systemd/system/proftpd.service.
[root@fedora23 ~]#

Now Create Group and Users for ProFTPD and set the required permissions on user’s home directory.

[root@fedora23 ~]# groupadd proftp_grp
[root@fedora23 ~]# mkdir /opt/ftp_dir
[root@fedora23 ~]# useradd -G proftp_grp -s /sbin/nologin -d /opt/ftp_dir pradeep
[root@fedora23 ~]#
[root@fedora23 ~]# chmod 1775 /opt/ftp_dir
[root@fedora23 ~]# chgrp proftp_grp /opt/ftp_dir
[root@fedora23 ~]# ls -ld /opt/ftp_dir/
drwxrwxr-t. 2 root proftp_grp 4096 Jan 24 09:55 /opt/ftp_dir/
[root@fedora23 ~]#

Now assign password to the user.

[root@fedora23 ~]# passwd pradeep

Note: In my case i have created a user ‘pradeep’ whose home directory is “/opt/ftp_dir/” and secondary group is “ proftp_grp”. Now using ftp client pradeep can download and upload files from their home directory.

Step:3 Set SELinux & Firewall Rules.

In case SELinux is enable then set the following selinux rules for FTP.

[root@fedora23 ~]# setsebool -P ftp_home_dir=1
[root@fedora23 ~]# setsebool -P allow_ftpd_full_access=1

Open the FTP port in  Operating System (OS) Firewall

[root@fedora23 ~]# firewall-cmd --permanent --add-port=21/tcp
success
[root@fedora23 ~]# firewall-cmd --reload
success
[root@fedora23 ~]#

Step:4 Enable Encryption between ProFTPD Server and FTP Clients

Connection between ProFTPD server and its client is consider less secure , so to make secure communication between Server and its clients we can use SSL certificates.

To generate SSL certificates we will use openssl command , use below command to install openssl if it is not installed.

[root@fedora23 ~]# dnf install openssl

Now Generate SSL certificates

[root@fedora23 ~]# openssl req -x509 -nodes -newkey rsa:2048 -keyout /etc/pki/tls/certs/ftpserver.pem -out /etc/pki/tls/certs/ftpserver.pem

It will prompt you to enter the information associated with the certificate and will create a private key ‘/etc/pki/tls/certs/ftpserver.pem’

openssl-private-key-proftpd

Set the permission on Private Key :

[root@fedora23 ~]# chmod 600 /etc/pki/tls/certs/ftpserver.pem
[root@fedora23 ~]#

Add the following lines in ‘/etc/proftpd.conf

[root@fedora23 ~]# vi /etc/proftpd.conf
TLSEngine                  on
TLSRequired                on
TLSProtocol                SSLv23
TLSLog                     /var/log/proftpd/tls.log
TLSRSACertificateFile      /etc/pki/tls/certs/ftpserver.pem
TLSRSACertificateKeyFile   /etc/pki/tls/certs/ftpserver.pem

SSL-certificate-proftpd-config

Restart the ProFTPD service.

[root@fedora23 ~]# systemctl restart proftpd
[root@fedora23 ~]#

Open the ports in the OS firewall for TLS.

[root@fedora23 ~]# firewall-cmd --add-port=1024-65534/tcp
success
[root@fedora23 ~]# firewall-cmd --add-port=1024-65534/tcp --permanent
success
[root@fedora23 ~]# firewall-cmd --reload
success

Step:5 Connect to ProFTPD server using Filezilla.

FileZilla-ubuntu-linux

Click on Connect…

ProFTPD-certificate

Click On ‘OK’ to trust the Certificate.

ProFTPD-successful-login

As we are able to login successfully, now you can download & upload files to your home directory.

Hope you like installation and Configuration steps :)

Steps to Install ownCloud 8.2 on CentOS 7

$
0
0

ownCloud is an open source software which allows us to set up our private ‘file-hosting’ cloud or we can say ‘cloud storage’ over the network. Data hosted in ownCloud can be access at any time either via web browsers or desktop client or may be via smart phone aaps.

Some of the important features of ownCloud are listed below :

owncloud-features

In this article we will install ownCloud 8.2 on CentOS 7. Hostname and ip address of my CentOS 7 machine is “owncloud.linuxtechi.com” & “192.168.1.101″

Following are the prerequisites for ownCloud.

  • PHP
  • Apache Web Server ( Apache )
  • Database Server ( MariaDB or SQLite or Oracle or PostgreSQL )

Step:1 Install PHP and Web Server (HTTPD)

Use below yum command to install php and apache web server (httpd) and other PHP dependencies.

[root@owncloud ~]# yum install httpd php php-mysql sqlite php-dom php-mbstring php-gd php-pdo php-json php-xml php-zip php-gd curl php-curl php-mcrypt php-pear
Start the Web Server service

[root@owncloud ~]# systemctl start httpd.service
[root@owncloud ~]# systemctl enable httpd.service
ln -s '/usr/lib/systemd/system/httpd.service' '/etc/systemd/system/multi-user.target.wants/httpd.service'
[root@owncloud ~]#

Step:2 Install and Configure Database for ownCloud.

In CentOS 7 MariaDB is the default database server.

[root@owncloud ~]# yum install mariadb-server mariadb

Start the Database Service

[root@owncloud ~]# systemctl start mariadb.service
[root@owncloud ~]#
[root@owncloud ~]# systemctl enable mariadb.service
ln -s '/usr/lib/systemd/system/mariadb.service' '/etc/systemd/system/multi-user.target.wants/mariadb.service'
[root@owncloud ~]#

Set the Root password and other database parameters using below command :

[root@owncloud ~]# mysql_secure_installation

Create the database (owncloud_db).

[root@owncloud ~]# mysql -u root -p
Enter password:

MariaDB [(none)]> create database owncloud_db;
Query OK, 1 row affected (0.00 sec)
MariaDB [(none)]>

Create a database user(dbuser) and grant all the privileges on the database (owncloud_db)

MariaDB [(none)]> grant all on owncloud_db.* to 'dbuser'@'localhost' identified by 'Owncloud@123#';
Query OK, 0 rows affected (0.00 sec)

MariaDB [(none)]> FLUSH PRIVILEGES;
Query OK, 0 rows affected (0.00 sec)

MariaDB [(none)]> exit
Bye
[root@owncloud ~]#

Step:3 Install ownCloud package using yum command.

ownCloud Package is not available in the default yum repositories so we will set below EPEL and ownlcoud repositories.

Note : Install wget package in case it is not installed on your system.

[root@owncloud ~]# yum install wget
[root@owncloud ~]# rpm -Uhv http://dl.fedoraproject.org/pub/epel/7/$(uname -i)/e/epel-release-7-5.noarch.rpm
[root@owncloud ~]# wget http://download.owncloud.org/download/repositories/stable/CentOS_7/ce:stable.repo -O /etc/yum.repos.d/ce:stable.repo
[root@owncloud ~]# yum install owncloud

Allow Web Server’s port in the OS(Operating System) firewall.

[root@owncloud ~]# firewall-cmd --permanent --zone=public --add-service=http
success
[root@owncloud ~]# firewall-cmd --permanent --zone=public --add-service=https
success
[root@owncloud ~]# firewall-cmd --reload
success
[root@owncloud ~]#

Set the required permissions on ownlcoud folder “/var/www/html/owncloud

[root@owncloud ~]# chown -R apache.apache /var/www/html/owncloud/
[root@owncloud ~]#

Set the below SELinux Rules if SELinux is enabled on your system

[root@owncloud ~]# semanage fcontext -a -t httpd_sys_rw_content_t '/var/www/html/owncloud/data'
[root@owncloud ~]# restorecon '/var/www/html/owncloud/data'
[root@owncloud ~]# semanage fcontext -a -t httpd_sys_rw_content_t '/var/www/html/owncloud/config'
[root@owncloud ~]# restorecon '/var/www/html/owncloud/config'
[root@owncloud ~]# semanage fcontext -a -t httpd_sys_rw_content_t '/var/www/html/owncloud/apps'
[root@owncloud ~]# restorecon '/var/www/html/owncloud/apps'
[root@owncloud ~]#

Step:4 Start ownCloud Installation from the Browser.

To start the ownCloud installation open the web browser and type :

http://192.168.1.101/owncloud/

Replace the ip address as per your setup.

Specify the User name as ‘admin’ and give password that you want set for admin user. Data Folder as ‘/var/www/html/owncloud/data’ and Database name (owncloud_db) and database user (dbuser) credentials that we created in above steps.

ownCloud-installation-scree

Click on ‘Finish setup’

Files-ownCloud-CentOS7

Get ownCloud Clients and aaps to sync your data.

Home Page of Our ownCloud will look like below.

Home-Page-ownCloud

Installation and Configuration of ownCloud is completed. Now upload data and share it among users.

By Default only 513MB data file can be uploaded in case you want to change this limit , edit the file ‘/var/www/html/owncloud/.htaccess‘ and set the limit as per requirement.

maximum-upload-limit-owncloud

Viewing all 455 articles
Browse latest View live