Quantcast
Channel: How To
Viewing all 465 articles
Browse latest View live

How to Install Memcached (Caching Server) on CentOS 8

$
0
0

Memcached is a high-performance, opensource in-memory key-value caching service that comes in handy in a variety of ways. First, it helps speed up the applications by caching session data, user authentication tokens, and API calls. Furthermore, it provides a mechanism that helps in sharing data across multiple application instances.

So, what are the benefits of using Memcached?  We can summarize the advantages into two: improving application performance and reducing the cost of running your applications since it’s free.

Let’s now see how you can install and configure Memcached on CentOS 8.

What you need

As you get started out, ensure you that the following requirements are fulfilled:

  • Access to CentOS 8 server
  • A standard user with sudo or elevated privileges

Without much further ado, let’s roll up our sleeves and get busy.

Step 1)  Install Memcached caching server

To install the Memcached caching server, first update the system package list using the command:

$ sudo dnf update -y

Since the Memcached package alongside its dependencies is present on the AppStream repositories, we will install Memcached using the default package manager as shown:

$ sudo dnf install -y memcached libmemcached

dfn-Install-memcached-centos8

Finally, you will get the output below to indicate that the installation was successful.

successfully-installed-memcached-centos8

To be sure that Memcached is installed on CentOS 8, execute:

$ rpm -q memcached
memcached-1.5.9-2.el8.x86_64
$

For more detailed information about Memcached, use the -qi arguments as shown. This displays more in-depth information such as the Memcached version, Architecture, install date, build date and so much more.

$ rpm -qi memcached

rpm-qi-memcached-centos8

Step 2) Configure Memcached

The Memcached default configuration file is /etc/sysconfig/memcached. By default, it listens on port 11211 and on the localhost,  system denoted by 127.0.0.1 as observed on line 5.

[pkumar@memcache-centos8 ~]$ cat -n /etc/sysconfig/memcached
     1  PORT="11211"
     2  USER="memcached"
     3  MAXCONN="1024"
     4  CACHESIZE="64"
     5  OPTIONS="-l 127.0.0.1,::1"
[pkumar@memcache-centos8 ~]$

If the application you intend to connect to Memcached is located on the same server as Memcached, please leave the default configuration as it is.

If you have an application running on a remote system, on the same LAN and you’d want it to connect to the Memcached server, adjust line 5 by replacing the localhost address 127.0.0.1 with the IP address of the remote system.

For example, the remote system on which our application is hosted has an IP 192.168.2.100. Therefore, adjust the configuration file as shown.

[pkumar@memcache-centos8 ~]$ sudo vi /etc/sysconfig/memcached
      1 PORT="11211"
      2 USER="memcached"
      3 MAXCONN="1024"
      4 CACHESIZE="64"
      5 OPTIONS="-l 192.168.2.100,::1"

Save and exit the configuration file.

Step 3: Configure the firewall to allow traffic to Memcached server

Additionally, we need to allow traffic to the Memcached server by opening the default port ( port 11211) on the firewall.

Therefore, run the commands below:

$ sudo firewall-cmd --add-port=11211/tcp --zone=public --permanent
$ sudo firewall-cmd --reload

Step 3) Start and enable memcached service

With all the configurations done with, start, and enable Memcached as shown:

$ sudo systemctl start memcached
$ sudo systemctl enable memcached

To confirm that Memcached is up and running, run the command:

$ sudo systemctl status memcached

Memcached-Service-Status-

Integrating Memcached with PHP

As we stated earlier, Memcached can be used in speeding up applications. For that to happen, you need to install a language-specific client on the server. For example, if you are running a PHP application such as WordPress, OwnCloud or Magento, install the php-pecl-memcache extension as shown.

Above said extension or package is not available in the default CentOS 8 repositories, so first we must enable epel and remi repositories, run the following commands one after the another,

$ sudo dnf install epel-release -y
$ sudo dnf install https://rpms.remirepo.net/enterprise/remi-release-8.rpm -y
$ sudo dnf module enable php:remi-7.4 -y
$ sudo dnf install -y php-pecl-memcache php-pecl-memcached

Read Also: How to Install PHP 7.4 on CentOS 8 / RHEL 8

Now to test it, let’s install a web server and other PHP dependencies

$ sudo dnf install -y nginx php php-cli

Now start web server’s service (nginx) and create a test PHP page to verify whether Memcached is enabled for PHP or Not

$ sudo systemctl enable nginx.service –now
$ sudo systemctl restart memcached.service
$ sudo vi /usr/share/nginx/html/info.php

Now paste the following content into the file and save the changes.

<?php
phpinfo();
?>

Thereafter, head out to your browser and browse the address below

http://server-ip/info.php

Scroll down and be on the lookout for the Memcached section that displays all the information about Memcached.

memcache-php-nginx-centos8 Memcached-php-nginx-CentOS8

This is a confirmation that Memcached is installed and working well with PHP and your Nginx web server.

Integrate Memcached for Python-based applications

For Python applications, ensure that you install pymemcache and python-memcached libraries as shown using pip.

$ pip3 install pymemcache --user
$ pip3 install python-memcached --user

As we wrap up, Memcached is a simple and cost-effective way of speeding up your applications by caching frequently used content. It’s free and opensource and you can tweak it to your preferences. You can visit the Memcached Wiki. For more detailed information about Memcached.


Top 5 Open Source Linux Caching Tools Recommended by Geeks

$
0
0

Hello All!

Welcome back to LinuxTechi! Caching of data is highly important for any website or application out there as it can largely help in reduce the server load. In this article, we’ll be looking at the top 5 open source linux caching tools recommended by linux system administrators or geeks. So, without wasting much time, let’s jump directly into the article.

5) Varnish Cache

Varnish cache finds the fifth position in our list of the top 5 open source linux caching tools recommended by Linux system administrators. It is a popular HTTP accelerator used in more than 3 million websites. Administrators say that adding the Varnish cache increases the website to a considerable extent.

As the name implies, this caching HTTP reverse proxy tool will store the contents of a website when you visit a website. Next time when you visit the website again, if there are no changes made in the web page, then you will be getting the content only from the cache and not from the website.

This means that the content delivery is lightning fast and you don’t need to wait for the content to be downloaded from the server. It is open-source and highly flexible and serves as a versatile tool as well. It is compatible with all modern Linux distros, Solaris, and FreeBSD platforms.

Remote Dictionary Server (Redis) doesn’t come with a native support for SSL, but it provides able support to logging, authentication and authorization using VMODS. It can also act as a web application firewall as well as a load balancer.

What We Like
  • Open Source
  • Highly flexible
  • Excellent performance
  • Compatible with OS X, FreeBSD, Linux, and Solaris etc
  • Supports logging
What We Don’t Like
  • No native support for SSL/TLS

4) Hazelcast IMDG

Next in our list is another open-source in-memory data grid called Hazelcast IMDG. It is highly powerful, quick, lightweight, and extendable as well. One of the major highlights of this linux caching tool is that it is compatible with Windows, Mac OS X, Linux, and all platforms that has got Java installed.

The main advantage of using Hazelcast IMDG is for its incredible speed as you don’t want to rely on any remote storage and can handle millions of transactions per second. With Hazelcast you get a restart rate faster by 2.5X times faster than your SSDs.

You can easily upgrade the cluster nodes without needing to worry about disrupting the services. Admins are provided with a management center to quickly have a look at the cluster activities, REST APIs and configurable watermarks as well.

What We Like
  • Quickest
  • Highly scalable IMDG
  • Continuous processing
  • Hassle-free upgrade process
  • 5x faster restart times than SSDs
  • Compatible with Intel Optane DC Persistent Memory for RAM
  • Easy to use
  • Clear documentation
What We Don’t Like
  • Lower consistency

3) Couchbase

When it comes to caching, most companies choose Couchbase as it is highly reliable caching tool. It comes with a built-in layer specially designed for caching that provides the core-functionality to high-speed reading and writing of data. The Couchbase server works with the disk space utility to ensure that the caching layer always has adequate space to store the cached data.

In Couchbase server, the cached data is stored in a key-value format. It is highly compatible with Linux and with other platforms like Windows and Mac OS X. It makes use of N1QL, a highly sophisticated and a feature-rich query language for indexing and querying content from the database.

What We Like
  • Asynchronous
  • Monitors data access constantly
  • Easy to use
  • Excellent performance
  • Better than MongoDB
  • Quick deploy
What We Don’t Like
  • Limited full-text search capability
  • Advanced data modeling

2) Memcached

The caching tool that takes the coveted second place in our list of the top 5 open source linux caching tools recommended by Linux system administrators is Memcached. There is always a debate among system administrators that whether Redis or Memcached is the best caching tool for linux.

It is one of the most-powerful, open-source caching tools available for the linux platform. It comes equipped with a distributed memory object caching functionality that stores data in small chunks in the form of key values.

Quick result sets from a database query or API calls are mostly placed in these key values for quick retrieval of data. It is highly compatible with various platforms like Linux, Mac OS X, Windows etc.

One of the highlights of Memcached is that it reduces the load on the database as it acts as a short-term memory for data access by applications and websites. It also provides API access for many other programming languages.

What We Like
  • Ease of use
  • Highly reliable
  • Sub-millisecond latency
  • Data Partitioning
  • Supports various programming languages
  • Stable
  • Excellent performance
What We Don’t Like
  • Supports only lazy eviction
  • Supports only string data type

Also Read : How to Install Memcached (Caching Server) on CentOS 8

1) Redis

The number one Linux caching tool that tops our list is Redis (Remote Dictionary Server). It is completely free, open-source and compatible with various programming languages.When compared with Memcached, Redis supports various data types including string, list, set, hash and sorted set. Even though both Memcached and Redis provides supports for in-memory data store and key value data stores, Redis seems to be more accurate than the former. Another highlight with Redis is that provides support for data persistency. It is compatible with Linux, BSD, and Mac OS X.

What We Like
  • Incredibly fast
  • High performance
  • Data Persistence
  • Supports various data types
  • Cluster management
  • Ease of use
  • Data partitioning
What We Don’t Like
  • Not the best cross DC replication capabilities
  • Handling of 1M r/s is poor

Also Read: How to Install Redis Server on CentOS 8 / RHEL 8

Final Thoughts

After we reviewed several caching tools and other tools provided in the list above, we can conclude that Redis is the best among the best as it is extremely fast and offers excellent performance. Caching tools are highly beneficial and adds a lot of value to applications and websites as they can largely reduce the use of network bandwidth, latency, and server load as well.

I hope the information provided above gives you a basic idea about the best open source linux caching tools. And the tools listed are not recommended by several linux administrators, but we’ve also analyzed and installed each and every tool along with various other tools for this review. Please share your valuable comments and suggestions in the feedback section below.

How to Install Kubernetes (k8s) on Ubuntu 20.04 LTS Server

$
0
0

Kubernetes (k8s) is a free and open-source container orchestration tool. It is used for deploying, scaling and managing containerized based applications. In this article we will demonstrate how to install Kubernetes Cluster on Ubuntu 20.04 LTS Server (Focal Fossa) using kubeadm. In my lab setup I have used three Ubuntu 20.04 LTS server machines. Following are the system requirements on each Ubuntu system.

  • Minimum of 2 GB RAM
  • 2 Core (2 vCPUs)
  • 15 GB Free Space on /var
  • Privileged user with sudo rights
  • Stable Internet Connection

Following are the details of my lab setup:

  • Machine 1 (Ubuntu 20.04 LTS Server) – K8s-master – 192.168.1.40
  • Machine 2 (Ubuntu 20.04 LTS Server) – K8s-node-0 – 192.168.1.41
  • Machine 3 (Ubuntu 20.04 LTS Server) – K8s-node-1 – 192.168.1.42

k8s-cluster-setup-ubuntu-20-04-lts-server

Now let’s jump into the Kubernetes installation steps

Step1) Set hostname and add entries in /etc/hosts file

Use hostnamectl command to set hostname on each node, example is shown below:

$ sudo hostnamectl set-hostname "k8s-master"     // Run this command on master node
$ sudo hostnamectl set-hostname "k8s-node-0"     // Run this command on node-0
$ sudo hostnamectl set-hostname "k8s-node-1"     // Run this command on node-1

Add the following entries in /etc/hosts files on each node,

192.168.1.40    k8s-master
192.168.1.41    k8s-node-0
192.168.1.42    k8s-node-1

Step 2) Install Docker (Container Runtime) on all 3 nodes

Login to each node and run the following commands to install docker,

$ sudo apt update
$ sudo apt install -y docker.io

Now start and enable docker service on each node using beneath systemctl command,

$ sudo systemctl enable docker.service --now

Run the following command to verify the status of docker service and its version,

$ systemctl status docker
$ docker --version

Docker-Version-Service-Status-Ubuntu-20-04

Step 3) Disable swap and enable IP forwarding on all nodes

To disable swap, edit /etc/fstab file and comment out the line which includes entry either swap partition or swap file.

$ sudo vi /etc/fstab

Swap-disable-Ubuntu-20-04

Save & exit the file

Run swapoff command to disable the swap on the fly

$ sudo swapoff -a

To enable the ip forwarding permanently, edit the file “/etc/sysctl.conf” and look for line “net.ipv4.ip_forward=1” and un-comment it. After making the changes in the file, execute the following command

$ sudo sysctl -p
net.ipv4.ip_forward = 1
$

Step 4) Install Kubectl, kubelet and kubeadm on all nodes

Run the following commands on all 3 nodes to install kubectl , kubelet and kubeadm utility

$ sudo apt install -y apt-transport-https curl
$ curl -s https://packages.cloud.google.com/apt/doc/apt-key.gpg | sudo apt-key add
$ sudo apt-add-repository "deb http://apt.kubernetes.io/ kubernetes-xenial main"
$ sudo apt update
$ sudo apt install -y kubelet kubeadm kubectl

Note : At time of writing this article , Ubuntu 16.04 (Xenial Xerus ) Kubernetes repository was available but in future, when the kubernetes repository is available for Ubuntu 20.04 then replace xenial with focal word in above ‘apt-add-repository’ command.

Step 4) Initialize Kubernetes Cluster using kubeadm (from master node)

Login to your master node (k8s-master) and run below ‘kubeadm init‘ command to initialize Kubernetes cluster,

$ sudo kubeadm init

Once the cluster is initialized successfully, we will get the following output

Kubernetes-Cluster-Successfully-Ubuntu-20-04

To start using the cluster as a regular user, let’s execute the following commands, commands are already there in output just copy paste them.

pkumar@k8s-master:~$  mkdir -p $HOME/.kube
pkumar@k8s-master:~$  sudo cp -i /etc/kubernetes/admin.conf $HOME/.kube/config
pkumar@k8s-master:~$  sudo chown $(id -u):$(id -g) $HOME/.kube/config

Now Join the worker nodes (k8s-node-0/1) to cluster, command to join the cluster is already there in the output. Copy “kubeadm join” command and paste it on both nodes (worker nodes).

Login to Node-0 and run following command,

pkumar@k8s-node-0:~$ sudo kubeadm join 192.168.1.40:6443 --token b4sfnc.53ifyuncy017cnqq --discovery-token-ca-cert-hash sha256:5078c5b151bf776c7d2395cdae08080faa6f82973b989d29caaa4d58c28d0e4e

Node-0-Join-Cluster-Ubuntu-20-04

Login to Node-1 and run following command to join the cluster,

pkumar@k8s-node-1:~$ sudo kubeadm join 192.168.1.40:6443 --token b4sfnc.53ifyuncy017cnqq --discovery-token-ca-cert-hash sha256:5078c5b151bf776c7d2395cdae08080faa6f82973b989d29caaa4d58c28d0e4e

Node-1-Join-Cluster-Ubuntu-20-04

From the master node run “kubectl get nodes” command to verify nodes status

pkumar@k8s-master:~$ kubectl get nodes
NAME         STATUS     ROLES    AGE     VERSION
k8s-master   NotReady   master   27m     v1.18.3
k8s-node-0   NotReady   <none>   8m3s    v1.18.3
k8s-node-1   NotReady   <none>   7m19s   v1.18.3
pkumar@k8s-master:~$

As we can see both worker nodes and master node have joined the cluster, but status of each node is “NotReady”. To make the status “Ready” we must deploy Container Network Interface (CNI) based Pod network add-ons like calico, kube-router and weave-net. As the name suggests, pod network add-ons allow pods to communicate each other.

Step 5) Deploy Calico Pod Network Add-on (Master Node)

From the master node, run the following command to install Calico pod network add-on,

pkumar@k8s-master:~$ kubectl apply -f https://docs.projectcalico.org/v3.14/manifests/calico.yaml

calico-pod-network-add-on-ubuntu-20-04

Once it has been deployed successfully then nodes status will become ready, let’s re-run kubectl command to verify nodes status

pkumar@k8s-master:~$ kubectl get nodes
NAME         STATUS   ROLES    AGE   VERSION
k8s-master   Ready    master   39m   v1.18.3
k8s-node-0   Ready    <none>   19m   v1.18.3
k8s-node-1   Ready    <none>   19m   v1.18.3
pkumar@k8s-master:~$

Run below command to verify status of pods from all namespaces

pods-status-k8s-ubuntu-20-04

Perfect, above confirms that all the pods are running and are in healthy state. Let’s try to deploy pods, service and deployments to see whether our Kubernetes cluster is working fine or not.

Note: To enable bash completion feature on your master node, execute the followings

pkumar@k8s-master:~$ echo 'source <(kubectl completion bash)' >>~/.bashrc
pkumar@k8s-master:~$ source .bashrc

Step 6) Test and Verify Kubernetes Cluster

Let’s create a deployment named nginx-web with nginx container image in the default namespace, run the following kubectl command from the master node,

pkumar@k8s-master:~$ kubectl create deployment nginx-web --image=nginx
deployment.apps/nginx-web created
pkumar@k8s-master:~$

Run below command to verify the status of deployment

pkumar@k8s-master:~$ kubectl get deployments.apps
NAME        READY   UP-TO-DATE   AVAILABLE   AGE
nginx-web   1/1     1            1           41s
pkumar@k8s-master:~$ kubectl get deployments.apps  -o wide
NAME        READY   UP-TO-DATE   AVAILABLE   AGE   CONTAINERS   IMAGES   SELECTOR
nginx-web   1/1     1            1           56s   nginx        nginx    app=nginx-web
pkumar@k8s-master:~$
pkumar@k8s-master:~$ kubectl get  pods
NAME                         READY   STATUS    RESTARTS   AGE
nginx-web-7748f7f978-nk8b2   1/1     Running   0          2m50s
pkumar@k8s-master:~$

As we can see that deployment has been created successfully with default replica.

Let’s scale up the deployment, set replicas as 4. Run the following command,

pkumar@k8s-master:~$ kubectl scale --replicas=4 deployment nginx-web
deployment.apps/nginx-web scaled
pkumar@k8s-master:~$

Now verify status of your deployment using following commands,

pkumar@k8s-master:~$ kubectl get deployments.apps nginx-web
NAME        READY   UP-TO-DATE   AVAILABLE   AGE
nginx-web   4/4     4            4           13m
pkumar@k8s-master:~$
pkumar@k8s-master:~$ kubectl describe deployments.apps nginx-web

deployment-describe-kubectl-command

Above confirms that nginx based deployment has been scale up successfully.

Let’s perform one more test, create a pod named “http-web” and expose it via service named “http-service” with port 80 and NodePort as a type.

Run the following command to create a pod,

pkumar@k8s-master:~$ kubectl run http-web --image=httpd --port=80
pod/http-web created
pkumar@k8s-master:~$

Create a service using beneath command and expose above created pod on port 80,

pkumar@k8s-master:~$ kubectl expose pod http-web --name=http-service --port=80 --type=NodePort
service/http-service exposed
pkumar@k8s-master:~$
pkumar@k8s-master:~$ kubectl get service http-service
NAME           TYPE       CLUSTER-IP       EXTERNAL-IP   PORT(S)        AGE
http-service   NodePort   10.101.152.138   <none>        80:31098/TCP   10s
pkumar@k8s-master:~$

Kubectl-service-describe-ubuntu

Get Node IP or hostname on which http-web pod is deployed and then access webserver via NodePort (31098)

pkumar@k8s-master:~$ kubectl get pods http-web -o wide
NAME       READY   STATUS    RESTARTS   AGE   IP              NODE         NOMINATED NODE   READINESS GATES
http-web   1/1     Running   0          59m   172.16.11.196   k8s-node-0   <none>           <none>
pkumar@k8s-master:~$
pkumar@k8s-master:~$ curl http://k8s-node-0:31098
<html><body><h1>It works!</h1></body></html>
pkumar@k8s-master:~$

Perfect, it is working fine as expected. This conclude the article and confirms that we have successfully setup Kubernetes cluster on Ubuntu 20.04 LTS Server.

How to Install vsftpd (ftp server) on CentOS 8 / RHEL 8

$
0
0

FTP, short for File Transfer Protocol, is a protocol that provides access to files residing on a server. It’s one of the earliest protocols that enabled users to download files over the internet.  With the FTP protocol, users can download and upload files on servers with ease.

Vsftpd, short for Very Secure FTP daemon, is a secure FTP daemon that is an upgrade of FTP protocol. It enforces secure connections to FTP servers by encrypting traffic send to and from the server, and by so doing, the file transfer is kept safe and secure from hackers.

In this topic, we shine the spotlight on the installation of vsftpd on CentOS 8 / RHEL 8.

Step 1) Install vsftpd using dnf command

Right off the bat, we are going to install vsftpd. To achieve this, we will run the command below:

$ sudo dnf install vsftpd

dnf-install-vsftpd-centos8

Press ‘y’ and hit ENTER to get underway with the installation. The installation takes a few seconds and will complete in no time. The output below confirms that vsftpd has been successfully installed.

Successfully-installed-vsftpd-centos8

The output indicates that we have installed vsftpd version 3.0.3-31.el8.x86_64. To confirm this, execute the following command:

[linuxtechi@centos8-vsftpd ~]$ rpm -q vsftpd
vsftpd-3.0.3-31.el8.x86_64
[linuxtechi@centos8-vsftpd ~]$

The output should tally with the version printed on the terminal upon successful installation. To retrieve more detailed information about Vsftpd, append the -i flag at the end as shown:

$ rpm -qi vsftpd

This will print additional information on the screen such as the Architecture, install date, license and signature to mention a few.

rpm-qi-vsftpd-centos8

With vsftpd installed, we need it running to facilitate access to file shares.

To start the vsftpd service, run the command:

$ sudo systemctl start vsftpd

You may also want to enable it to start automatically upon a reboot. To achieve this, run the command

$ sudo systemctl enable vsftpd --now

To verify the status of vsftpd on your system, run:

$ sudo systemctl status vsftpd

vsftpd-service-status-centos8

If you see the “active: (running)” directive in green as indicated on the terminal, then the vsftpd service is up and running.

Step 2) Create a ftp user and its directory

Next, we will create a user that we will use to access the FTP server. In this case, the user will be ftpuser but feel free to give your user a name of your choice.

$ sudo adduser ftpuser
$ sudo passwd ftpuser

With the FTP user in place, we will proceed and create the FTP directory and assign the following permissions and directory ownership.

$ sudo mkdir -p /home/ftpuser/ftp_dir
$ sudo chmod -R 750 /home/ftpuser/ftp_dir
$ sudo chown -R ftpuser: /home/ftpuser/ftp_dir

We also need to add the FTP user to the /etc/vsftpd/user_list file to allow the user access to the vsftp server.

$ sudo bash -c 'echo ftpuser >> /etc/vsftpd/user_list'

Step 3) Configure vsftpd via its configuration file

So far, we have managed to install and confirm that vsftpd is up and running.  Further adjustments are necessary for Vsftpd to allow users access to the server.

The default configuration file for vsftpd is the /etc/vsftpd/vsftpd.conf file. The file is replete with directives that help fortify your FTP server’s security.

In this section, we will make a few tweaks to the configuration file and allow users to access the server.

To allow local users to access the FTP server remotely, and block anonymous users, ensure you have the directives as shown:

anonymous_enable=NO
local_enable=YES

To grant users rights to run any FTP command & make changes such as uploading, downloading and deleting files, have the following line in place.

write_enable=YES

For security purposes, you may opt to restrict users from accessing any files & directories outside their home directories. Therefore, have the following directive in place.

chroot_local_user=YES

To grant users write access to their respective home directories, ensure you have this directive.

allow_writeable_chroot=YES

Next, we are going to define custom ports to enable Passive FTP connections. In this case, we will specify ports 30000 and 31000. We shall later open these on the firewall.

pasv_min_port=30000
pasv_max_port=31000

Next, we are going to only allow the users defined in the /etc/vsftpd/user_list access to the server and block the rest. To achieve this, have the lines below.

userlist_file=/etc/vsftpd/user_list
userlist_deny=NO

Finally, save and close the file. For the changes to persist, restart the Vsftpd service.

$ sudo systemctl restart vsftpd

At this point, you can test for FTP connectivity by running

$ ftp ip-address

Specify the username of the ftp user and later provide the password. You should get the output as shown.

ftp-command-linux

Though we have established connectivity to the vsftpd server. The connection is not secure, and information sent is in plain text and not encrypted. We, therefore, need to take extra steps to encrypt communications sent to the server.

Step 4) Configure SSL / TLS for vsftpd

To encrypt communications between the server and a client system, we need to generate a TLS certificate and later configure the server to use it.

To generate the certificate, run the command below:

$ sudo openssl req -x509 -nodes -days 3650 -newkey rsa:2048 -keyout /etc/vsftpd/vsftpd.pem -out /etc/vsftpd/vsftpd.pem

This will be followed by a series of prompts where you will be required to provide a few details such as country name, state or province, and organizational name to mention a few. Fill out all the details accordingly as shown.

SSL-Certs-vsftpd-CentOS8

We also need to tell the server where the certificate files are stored. So, head back to the configuration file /etc/vsftpd/vsftpd.conf and specify the path to the certificate files.

rsa_cert_file=/etc/vsftpd/vsftpd.pem
rsa_private_key_file=/etc/vsftpd/vsftpd.pem

And then, instruct the server to turn on SSL.

ssl_enable=YES

Save and exit the configuration file. To make above changes into the effect, restart vsftpd service,

$ sudo systemctl restart vsftpd

Step 5) Allow ftp server (vsftpd) ports in the firewall

If you are running a firewall, you need to allow these salient ports”

  • 20 – to allow FTP traffic
  • 21 – FTP data port
  • 30000-31000 – To allow passive communication with the FTP server.

Therefore, run the commands below:

$ sudo firewall-cmd --permanent --add-port=20-21/tcp
$ sudo firewall-cmd --permanent --add-port=30000-31000/tcp

Then reload the firewall for the changes to come into effect.

$ sudo firewall-cmd --relo­ad

Step 6) Test your vsftpd or FTP server

With all settings done, it’s time to test our connectivity. In this example, we are using an FTP client known as FileZilla which is a free FTP client for both client and server systems. It supports both plain FTP and FTP over TLS which is what we are going to test.

When launched, the interface looks as shown. Provide the IP address of the host (vsftpd), username and password of the ftp user and then click on the ‘Quickconnect’ button.

Connect-ftpserver-filezilla

Shortly after, a pop-up will appear displaying the FTP server’s certificate & session details. To proceed with the connection, click on “Always trust this certificate in future session” and then hit enter.

SSL-Certs-vsftpd-filezilla

If you all your configurations are correct, you should gain entry without any issues as shown. On the bottom right pane, the remote server’s home directory as shown. You can now upload, download and edit the files as you deem fit.

Access-ftp-server-filezilla

This concludes our topic on the installation of vsftpd on CentOS 8. It’s our hope that you can now comfortably set up your own vsftpd (secure ftp) server. Please do share it among your technical friends and also share your valuable feedback and comments.

Also Read : How to Rotate and Compress Log Files in Linux with Logrotate

Also Read: How to Install Memcached (Caching Server) on CentOS 8

How to Install OpenStack on CentOS 8 with Packstack

$
0
0

Openstack is a free and open-source private cloud software through which we can manage compute, network and storage resources of our data center with an ease using a single dashboard and via openstack cli commands. In this article we will demonstrate on how to install Openstack on a CentOS 8 system with packstack. Packstack is a command line utility which deploy different components of openstack using puppet modules.

Openstack deployment with packstack is generally used for POC (proof of concept) purpose, so it is not recommended to use packstack for production deployment. Use TripleO method to deploy openstack in production environment.

Minimum System requirements for OpenStack

  • Minimal CentOS 8
  • Dual core Processor
  • 8 GB RAM
  • 40 GB free disk space
  • Stable Internet Connection
  • At least one nic card

My Lab setup details:

  • Hostname – openstack.example.com
  • IP – 192.168.1.8
  • Flat Network – 192.168.1.0/24

Let’s deep dive into the openstack installation steps,

Step 1) Set the hostname and update /etc/hosts file

Open the terminal and set the hostname using the following hostnamectl command,

[root@localhost ~]# hostnamectl set-hostname "openstack.example.com"
[root@localhost ~]# exec bash

Run below echo command to append hostname entry in /etc/hosts file.

[root@openstack ~]# echo -e "192.168.1.8\topenstack.example.com" >> /etc/hosts

Step 2) Disable Network Manager and Configure Network using network-scripts

Network-Manager is the default tool in CentOS 8 to manager networks but for Openstack we must disable it because openstack networking will not work properly with network-manager. In place of network manager, we must install native network-scripts.

To disable network-manager run the following commands,

[root@openstack ~]# systemctl disable NetworkManager
[root@openstack ~]# systemctl stop NetworkManager

Run following dnf command to install native network-scripts

[root@openstack ~]# dnf install network-scripts -y

Once the network-scripts package is installed then we can manage networking (ifcfg-* files) using native network.service

Now let’s configure IP address in ifcfg-enp0s3 file and start network service

root@openstack ~]# vi /etc/sysconfig/network-scripts/ifcfg-enp0s3

network-file-ifcfg-enp0s3-centos8

Save and exit the file and then start network service using following command,

[root@openstack ~]# systemctl start network
[root@openstack ~]# systemctl enable network

Now verify whether IP is assigned to NIC (enp0s3) using ip command,

[root@openstack ~]# ip a s enp0s3

ifcfg-enp0s3-ip-command-linux

Step 3) Enable OpenStack repositories and install packstack utility

At time of writing this article, ussuri openstack was available, so run the following command to configure its repositories

[root@openstack ~]# dnf config-manager --enable PowerTools
[root@openstack ~]# dnf install -y centos-release-openstack-ussuri

Now installed all the available updates and reboot your system,

[root@openstack ~]# dnf update -y
[root@openstack ~]# reboot

Once the system is available after the reboot, execute following dnf command to install packstack utility

[root@openstack ~]# dnf install -y openstack-packstack

Step 4) Generate answer file and install openstack using packstack

Use packstack command to generate the answer file,

[root@openstack ~]# packstack --gen-answer-file /root/openstack-answer.txt

Once the answer file is generated, edit the following parameters using vi editor,

[root@openstack ~]# vi /root/openstack-answer.txt
..............
CONFIG_HEAT_INSTALL=y
CONFIG_PROVISION_DEMO=n
CONFIG_KEYSTONE_ADMIN_PW=P@ssw0rd
CONFIG_NEUTRON_OVN_BRIDGE_IFACES=br-ex:enp0s3
..............

Save and exit the file.

Replace the interface name (enp0s3) as per your setup.

Note: Default Tenant network type drive is set as “geneve” and default neutron type driver is set as “geneve and flat”. If wish to change these default parameters, then update following lines in answer file. In this demonstration i am not going to update these parameters.

CONFIG_NEUTRON_ML2_TYPE_DRIVERS=geneve,flat
CONFIG_NEUTRON_ML2_TENANT_NETWORK_TYPES=geneve

Run the following command to initiate the openstack deployment using answer file.

[root@openstack ~]# packstack --answer-file /root/openstack-answer.txt

Deployment will take around 20 to 30 minutes depending on your system’s hardware and internet speed. Once it is installed successfully, we will get the following:

Openstack-Successfull-Installation-Screen

Now verify whether IP from enp03 interface is assigned to bridge br-ex and also confirm whether interface enp0s3 is added as a port in ovs-bridge.

Run the following commands:

[root@openstack ~]# ip a s enp0s3
[root@openstack ~]# ip a s br-ex
[root@openstack ~]# ovs-vsctl show

ovs-vsctl-command-centos8

Perfect, above output confirms that installation was successful, and networking is also configured as per the answer file.

Step 5) Access Horizon Dashboard

Now try to login to Horizon dashboard. URL is already specified in the above output, in my case url is http://192.168.1.8/dashboard , Use the user name as admin and password that we specify in answer file.

We also refer the file “keystonerc_admin” for credentials

OpenStack-Horizon-Dashboard-CentOS8

Instance-Overview-OpenStack-Dashboard

Now, let’s test this openstack deployment by launching an instance.

Step 6) Test and verify OpenStack installation by launching an instance

Before launching an instance in openstack, first we must create networks and router and glance image. So, let’s first create external network in admin tenant using following neutron commands,

[root@openstack ~]# source keystonerc_admin
[root@openstack ~(keystone_admin)]# neutron net-create external_network --provider:network_type flat --provider:physical_network extnet --router:external

Now add a subnet of your flat network to external network by running following neutron command.

[root@openstack ~(keystone_admin)]# neutron subnet-create --name public_subnet --enable_dhcp=True --allocation-pool=start=192.168.1.210,end=192.168.1.230 --gateway=192.168.1.1 external_network 192.168.1.0/24

Create a router by executing the following neutron command and set its gateway using external network

[root@openstack ~(keystone_admin)]# neutron router-create dev-router
[root@openstack ~(keystone_admin)]# neutron router-gateway-set dev-router external_network

Create private network and attach a subnet to it. Run the following neutron command,

[root@openstack ~(keystone_admin)]# neutron net-create pvt_net
[root@openstack ~(keystone_admin)]# neutron subnet-create --name pvt_subnet pvt_net 10.20.1.0/24

Add pvt_net interface to router “dev_router” using beneath neutron command,

[root@openstack ~(keystone_admin)]# neutron router-interface-add dev-router  pvt_subnet

Now Download Cirros image and then upload it to glance

[root@openstack ~(keystone_admin)]# wget http://download.cirros-cloud.net/0.5.1/cirros-0.5.1-x86_64-disk.img
[root@openstack ~(keystone_admin)]# openstack image create --disk-format qcow2 --container-format bare --public --file cirros-0.5.1-x86_64-disk.img  cirros

Now head back to horizon dashboard and verify the network topology

Network-Topology-OpenStack-Dashboard

Perfect, above confirms that private and external network have been setup correctly along with the router.

One final step before creating a vm, update the default security group, add icmp and ssh ingress rules, click on “Security Groups” under the network Tab, Click on Manage Rules and then click on “Add rule

Manage-Security-Group-Rules-ICMP-OpenStack

Similarly add rule for ssh

Manage-Security-Group Rules-ssh-OpenStack

Click on Add

Now all the requirements for launching an openstack instance are fullfilled. Click on Compute Tab and then Choose Instances option and click on “Launch Instance

VM-Creation-OpenStack

Once VM is launched successfully then we will get something like below,

Instances-Status-OpenStack-Dashboard

Now Associate floating IP to instance (demo_vm), Under the “Actions” Tab, Choose “Associate Floating IP

Associate-Floating-IP-Option-Openstack

Now Choose IP or Click on + sign to get floating IP from external network and then associate it

Choose-IP-Associate-Port-OpenStack

Once IP is associated to the VM then floating IP will be displayed for under ‘IP Address‘ option, example is shown below

Floating-IP-Address-Openstack-VM

Now try to access this demo_vm using the floating ip, use cirros as a user and ‘gocubsgo’ as password

Access-VM-using-floating-ip-openstack

Great, above output confirms that we can access our instance via floating ip. This concludes the article; I hope this tutorial helps to deploy openstack on CentOS 8 system. Please don’t hesitate to share your feedback and comments.

Also Read: How to Create an Instance in OpenStack via Command Line

How to Use Jinja2 Template in Ansible Playbook

$
0
0

Jinja2 is a powerful and easy to use python-based templating engine that comes in handy in an IT environment with multiple servers where configurations vary every other time. Creating static configuration files for each of these nodes is tedious and may not be a viable option since it will consume more time and energy. And this is where templating comes in.

Jinja2 templates are simple template files that store variables that can change from time to time. When Playbooks are executed, these variables get replaced by actual values defined in Ansible Playbooks. This way, templating offers an efficient and flexible solution to create or alter configuration file with ease.

In this guide, we will focus on how you can configure and use Jinja2 template in Ansible playbook.

Template architecture

A Jinja2 template file is a text file that contains variables that get evaluated and replaced by actual values upon runtime or code execution. In a Jinja2 template file, you will find the following tags:

  • {{ }}  : These double curly braces are the widely used tags in a template file and they are used for embedding variables and ultimately printing their value during code execution. For example, a simple syntax using the double curly braces is as shown: The {{ webserver }} is running on  {{ nginx-version }}
  • {%  %} : These are mostly used for control statements such as loops and if-else statements.
  • {#  #} : These denote comments that describe a task.

In most cases, Jinja2 template files are used for creating files or replacing configuration files on servers. Apart from that, you can perform conditional statements such as loops and if-else statements, and transform the data using filters and so much more.

Template files bear the .j2 extension, implying that Jinja2 templating is in use.

Creating template files

Here’s an example of a Jinja2 template file example_template.j2 which we shall use to create a new file with the variables  shown

Hey guys!
Apache webserver {{ version_number }} is running on {{ server }}
Enjoy!

Here, the variables are {{ version_number }} & {{ server }

These variables are defined in a playbook and will be replaced by actual values in the playbook YAML file example1.yml below.

example-ansibe-playbook-template

When the playbook is executed, the variables in the template file get replaced by the actual values and a new file is either created or replaces an already existing file.txt in the destination path.

Run-Example1-Ansible-Playbook

From the playbook execution, view the destination and notice that the variables have been replaced by the values defined in the Ansible playbook file.

To get a better sense of how you can push configuration files, we are going to create a Jinja2 template that creates an index.html file in the web root or document directory /var/www/html on a CentOS 7 server.  Apache is already running and is displaying the default welcome page as shown,

WebServer-Default-Page-CentOS

The template file, index.html.j2 appears as shown. Notice the presence of the ansible_hostname variable which is a built-in variable. When a playbook is executed, this will be replaced by the hostname of the webserver.

<html>
    <center><h1> The Apache webserver is running on {{ ansible_hostname }} </h1>
    </center>
</html>

The playbook file is shown below.

Ansible-Playbook-Jinja2-Template-Example

When the playbook is executed, a new index.html file is created and as you can see, the variable ansible_hostname has been replaced by the actual hostname of the server, in this case, Centos-7.

Apache-WebServer-Jinja2-Template

Jinja2 template with Conditionals

Jinja2 templating can also be used with conditional statements such as for loops to iterate over a list of items. Consider the Playbook example2.yml as shown in the pictorial below: We are going to create a template that will iterate over the list of car models called ‘cars’ and print the result in the file2.txt destination file.

Ansible-playbook-Vars-Jinja2-Template

The for loop in the Jinja2 template file – example2_template.j2 – is as shown

example2-for-loop-Jinja2-Template

When the playbook is executed, the loop iterates over the car list, and prints out the car models in the destination file.  You can use the cat command to examine the output and verify where the models exist in the file.

Example2-for-loop-jinja2-ansible-execution

Jinja2 template with filters

Filters are used to alter the appearance of output or formatting data. This works by piping the variable name as shown:

{{ variable | argument }}

Let’s check out a few use cases:

a) Transform strings into either Uppercase or lowercase format

For example, to print the values in the previous list in uppercase characters using the template, pipe the variable item into  the ‘UPPER’ argument as shown: {{ item | upper }}

When the playbook is executed, the values are transformed into uppercase

UpperCase-Filter-Jinja2-Template-Ansible

If the values are in lowercase from the start, use the ‘lower’ argument.

{{ item | lower }}

b) Use list filters to display maximum, & minimum values

If you are working with arrays or lists inside the template as shown, you can choose to print out your preferred values based on certain criteria.

For example, to print out the minimum value in a list, pass the whole list to the ‘min’ filter as shown.

{{ [ 100, 37, 45, 65, 60, 78 ] | min }}     =>   37

To get the maximum value, use the  ‘max’  filter.

{{ [ 100, 37, 45, 65, 60, 78 ] | max }}     =>   100

You can obtain unique values from a list of duplicate values in an array using the unique filter as shown:

{{ [ 3, 4, 3, 3, 4, 2, 2 ] | unique }}     =>   3,4,2

c) Replacing a string value with another

Additionally, you can replace a string with a new one using the replace argument as shown

{{ ” Hello guys” | replace (“guys”, “world”) }} => Hello world

In the above example, the string guys will be replaced with world and now the statement will read:

Hello world

These are just a few filters. There are tons of builtin filters that you can use to manipulate the output of the Ansible Playbook execution.

The Jinja2 templating is an ideal solution when handling dynamic variables in configuration files. It’s a much efficient option than manually changing values which often takes a lot of time and can be quite tedious. Your feedback on this article is much welcome.

How to Setup NGINX Ingress Controller in Kubernetes

$
0
0

Ingress is one of the important concepts in Kubernetes, which allows external users to access containerized application using FQDN (fully qualified domain name). Though Ingress is not enabled and installed by default in Kubernetes cluster. We must enable to this core concept using third party ingress controllers like Nginx, Traefik, HAProxy and Istio etc.

In this tutorial we will demonstrate how we can enable and use NGINX Ingress controller in Kubernetes Cluster.

NGINX-Ingress-Controller-Kubernetes

As above picture, external users are accessing applications using NGINX Ingress Controller via FQDN and internal ingress controller routes the request to service and then service routes the request to backend end points or pods.

Enable NGINX Ingress Controller in Minikube

Minikube is a single node Kubernetes cluster, we can easily enable nginx ingress controller in minikube by running “minikube addons” command.

Run below command to verify the status of ingress controller,

# minikube addons list

Minikube-addons-status-linux

Run following minikube command to enable ingress controller,

[root@linuxtechi ~]# minikube addons enable ingress
* The 'ingress' addon is enabled
[root@linuxtechi ~]#

If we re-run “minikube addons list” command, this time we must see the status of ingress is enabled.

Run following kubectl command to verify whether ingress controller’s pod is running or not.

[root@linuxtechi ~]# kubectl get pods --all-namespaces | grep -i nginx-controller
kube-system      ingress-nginx-controller-7bb4c67d67-gkjj5    1/1     Running            0          20m
[root@linuxtechi ~]#

Above output confirms that nginx-controller has been enabled and started its pod successfully under kube-system namespace.

Setup NGINX Ingress Controller in multi-node Kubernetes cluster

Note: I am assuming Kubernetes cluster is up and running.

Go to master node or control plane node and execute following kubectl command,

$ kubectl apply -f https://raw.githubusercontent.com/kubernetes/ingress-nginx/master/deploy/static/provider/baremetal/deploy.yaml

We will get the following output,

Kubectl-Deploy-NGINX-Ingress-Controller-Kubernetes

Run following kubectl command to verify the status of nginx-ingress controller pods,

pkumar@k8s-master:~$ kubectl get pods -n ingress-nginx -l app.kubernetes.io/name=ingress-nginx
NAME                                        READY   STATUS      RESTARTS   AGE
ingress-nginx-admission-create-v7ftn        0/1     Completed   0          6m12s
ingress-nginx-admission-patch-njdnf         0/1     Completed   0          6m12s
ingress-nginx-controller-75f84dfcd7-p5dct   1/1     Running     0          6m23s
pkumar@k8s-master:~$

Perfect, above output confirms that NGINX Ingress Controller has been deployed successfully and it’s pod is currently running.

Test Ingress Controller

To test Ingress controller, we will create two applications based on httpd and nginx container and will expose these applications via their respective services and then will create ingress resource which will allow external users to access these applications using their respective urls.

Deploy httpd based deployment and its service with NodePort type listening on the port 80, Create the following yaml file which includes deployment and service section,

[root@linuxtechi ~]# vi httpd-deployment.yaml
apiVersion: apps/v1
kind: Deployment
metadata:
  name: httpd-deployment
spec:
  replicas: 1
  selector:
    matchLabels:
      run: httpd-deployment
  template:
    metadata:
      labels:
        run: httpd-deployment
    spec:
      containers:
      - image: httpd
        name: httpd-webserver

---
apiVersion: v1
kind: Service
metadata:
  name: httpd-service
spec:
  type: NodePort
  selector:
    run: httpd-deployment
  ports:
    - port: 80

Save and close the file.

Run kubectl command to deploy above httpd based deployment and its service,

[root@linuxtechi ~]# kubectl create -f httpd-deployment.yaml
deployment.apps/httpd-deployment created
service/httpd-service created
[root@linuxtechi ~]#

Deploy our next NGINX based deployment and its service with NodePort as its type and port as 80, Content of yaml file listed below,

[root@linuxtechi ~]# vi nginx-deployment.yaml
apiVersion: apps/v1
kind: Deployment
metadata:
  name: nginx-deployment
spec:
  replicas: 1
  selector:
    matchLabels:
      run: nginx-deployment
  template:
    metadata:
      labels:
        run: nginx-deployment
    spec:
      containers:
      - image: nginx
        name: nginx-webserver

---
apiVersion: v1
kind: Service
metadata:
  name: nginx-service
spec:
  type: NodePort
  selector:
    run: nginx-deployment
  ports:
    - port: 80

Save and exit the file

Now run following kubectl command to deploy above nginx based deployment and its service,

[root@linuxtechi ~]# kubectl create -f nginx-deployment.yaml
deployment.apps/nginx-deployment created
service/nginx-service created
[root@linuxtechi ~]#

Run below command to verify the status of both deployments and their services

[root@linuxtechi ~]# kubectl get deployments.apps httpd-deployment
NAME               READY   UP-TO-DATE   AVAILABLE   AGE
httpd-deployment   1/1     1            1           19m
[root@linuxtechi ~]#
[root@linuxtechi ~]# kubectl get deployments.apps nginx-deployment
NAME               READY   UP-TO-DATE   AVAILABLE   AGE
nginx-deployment   1/1     1            1           24m
[root@linuxtechi ~]#
[root@linuxtechi ~]# kubectl get service nginx-service httpd-service
NAME TYPE CLUSTER-IP EXTERNAL-IP PORT(S) AGE
nginx-service NodePort 10.103.75.91 <none> 80:30042/TCP 78m
httpd-service NodePort 10.98.6.131 <none> 80:31770/TCP 73m
[root@linuxtechi ~]#

Create and Deploy Ingress Resource

Create the following ingress resource yaml file which will route the request to the respective service based url or path. In our example we be using url or fqdn.

[root@linuxtechi ~]# vim myweb-ingress.yaml
apiVersion: networking.k8s.io/v1beta1
kind: Ingress
metadata:
  name: name-based-virtualhost-ingress
spec:
  rules:
  - host: httpd.example.com
    http:
      paths:
      - backend:
          serviceName: httpd-service
          servicePort: 80

  - host: nginx.example.com
    http:
      paths:
      - backend:
          serviceName: nginx-service
          servicePort: 80

save and close the file.

Execute beneath kubectl command to create above ingress resource,

[root@linuxtechi ~]# kubectl create -f myweb-ingress.yaml
ingress.networking.k8s.io/name-based-virtualhost-ingress created
[root@linuxtechi ~]#

Run following to verify the status of above created ingress resource

[root@linuxtechi ~]# kubectl get ingress name-based-virtualhost-ingress
[root@linuxtechi ~]# kubectl describe ingress name-based-virtualhost-ingress

Ingress-describe-example-linux

Perfect, above output confirms that ingress resources have been created successfully.

Before accessing these urls from outside of the cluster please make sure to add the following entries in hosts file of your system from where you intended to access these.

192.168.1.190                httpd.example.com
192.168.1.190                nginx.example.com

Now try to access these URLs from web browser, type

http://httpd.example.com

http://nginx.example.com

httpd-ingress-hosts-linux nginx-ingress-hosts-linux

Great, above confirms that we have successfully deployed and setup nginx ingress controller in Kubernetes. Please do share your valuable feedback and comments.

How to Harden and Secure NGINX Web Server in Linux

$
0
0

Nginx is arguably one of the most widely used free and opensource web server used in hosting high-traffic websites. It is well known for its stability, stellar-performance, low resource consumption, and lean configuration. Some of the popular sites powered by Nginx include WordPress.com, GitHub, Netflix, Airbnb, Hulu, Eventbrite, Pinterest, and SoundCloud to mention a few.

While powerful and stable, the default configurations are not secure and extra tweaks are required to fortify the web server and give it the much-needed security to prevent attacks and breaches.

In this article, we touch base on some of the steps you can take to harden and secure your Nginx web server and get the most out of it.

1) Implement SSL Certificate

One of the preliminary and crucial steps in hardening your Nginx web server is to secure it by using an SSL certificate. The SSL certificate is a cryptographic digital certificate that encrypts traffic between your web server and the web browsers of your site’s visitors. It also forces your site to use the secure HTTPS protocol and drop HTTP which sends traffic in plain text. By so doing, communication back and forth is secured and kept safe from hackers who might try to eavesdrop and steal confidential information such as usernames, passwords, and credit card information.

You can take advantage of the Free Let’s Encrypt SSL certificate that is easy to install and configure and is valid for 90 days. Once you have it installed, you can verify the strength of the SSL encryption by testing your domain on SSL Labs. The results are shown below.

SSL-Report-Before-disable-weak-ssl-tls

As you can see, the domain we are using scored a grade B, due to weak protocol support highlighted in Yellow. We still need to make a few tweaks to take it to Grade A. Let’s see how we can improve on the Protocol support in the next step.

2) Disable weak SSL / TLS protocols

As you have seen from the results, implementing SSL does not necessarily imply that your site is fully secured. Deprecated versions such as TLS 1.0, TLS 1.1, and SSL 3 are considered weak and present vulnerabilities that hackers can exploit and eventually compromise your web server. These protocols are prone to vulnerabilities such as POODLE, BEAST and CRIME.

In fact, most popular and widely used web browsers have announced the end of support for TLS 1.0 and TLS 1.1 within the deadlines shown.

  • Browser Name           Date
  • Google Chrome           January 2020
  • Mozilla Firefox             March 2020
  • Safari/Webkit               March 2020
  • Microsoft Edge             June 2020

With this information at hand, it would be prudent to conform with the latest security protocols, and at the time of writing this article, the latest protocol is  TLS 1.2 with TLS 1.3 expected later in 2020.

To implement TLS 1.2 and  TLS 1.3, we are going to edit 2 files:

  • /etc/nginx/nginx.conf  –  This is the main nginx configuration file
  • /etc/nginx/sites-available/example.com (or /default)

If you are running Let’s Encrypt SSL, be sure to edit the following files

  • /etc/nginx/nginx.conf
  •  /etc/letsencrypt/options-ssl-nginx.conf

Use the following steps to disable weak SSL / TLS Protocols

Step 1) Edit the nginx.conf file

Firstly, ensure you take a backup of the /etc/nginx/nginx.conf file before making any changes. Then open the file using the text editor of your choice

$ sudo vi /etc/nginx/nginx.conf

Locate the following line

ssl_protocols TLSv1 TLSv1.1 TLSv1.2; # Dropping SSLv3, ref: POODLE

To disable the weak protocols, simply delete  TLSv1 and TLSv1.1 protocols and append TLSv1.2 &  TLSv1.3 at the end.

ssl_protocols TLSv1.2  TLSv1.3 ; # Dropping SSLv3, ref: POODLE

This should appear as follows on line 36

TLS-SSL-Settings-NGINX-Linux

Save and exit the configuration file.

Step 2) Edit the Nginx server block file

Obsolete protocols may still be sitting in your respective Nginx server block configuration files. The block configuration files are contained in the /etc/nginx/sites-available/ directory.

Therefore, proceed and modify your block configuration file

$ sudo vi /etc/nginx/sites-available/example.com
OR
$ sudo vi /etc/nginx/sites-available/default

As before, scroll and locate the following line

ssl_protocols TLSv1 TLSv1.1 TLSv1.2;

Again, delete the TLSv1 and TLSv1.1 protocol and add the TLSv1.3 at the end.

NOTE: If you are using Let’s Encrypt SSL, modify the SSL file:

$ sudo vi /etc/letsencrypt/options-ssl-nginx.conf

For the changes to persist, restart Nginx web server

$ sudo systemctl restart nginx

Now head over to the SSL Labs test and test your domain once again. This time, you should get an A rating as shown.

SSL-Report-after-disable-weak-ssl-tls

3)  Prevent Information disclosure

Part of hardening your server involves limiting information disclosure on your web server as much as possible. Information can be leaked through HTTP headers or error reporting. Some of this information includes the version of Nginx you are running, and you really wouldn’t want to disclose that to hackers.

By default, Nginx displays HTTP header information when you run the command:

$ curl -I http://localhost

Curl-nginx-headers-display

From the output on the second line, you can see that the version of Nginx and the Operating system it is running on has been disclosed

Server: nginx/1.14.0 (Ubuntu)

The version would also be displayed on a web browser if an error page such as a 404-error page is displayed as shown.

NGINX-WebServer-Verison-OS-Info-Error-Page

To avoid this information leakage, edit the nginx.conf file and under the http { section, uncomment the following line

server_tokens off;

Save the changes and exit. Then restart the webserver for the changes to reflect.

$ sudo systemctl restart nginx

Now reload the error page and notice the difference. The version and the OS Nginx is running has been omitted.

Hide-NGINX-OS-Info-Error-Page

Another way you can check how much information is leaking from your web server is by visiting the Server Signature Site and check your domain. If all is good, you will get the following output.

Server-Signature-Check-Online

4)  Get rid of unwanted HTTP methods

Another sound practice is to disable unwanted protocols that are not going to be implemented by the webserver. The line below will permit the implementation of GET, POST, and HEAD methods and exclude all the other methods including TRACE and DELETE. Add the following line in your server block file.

location / {
limit_except GET HEAD POST { deny all; }
}

5) Disable weak cipher suites

Besides the implementation of SSL, make it your goal to disable weak and insecure ciphers including the RC4 ciphers. These come bundled by default solely for the purpose of backward compatibility with previous Nginx releases and there’s no good reason to have them since they serve as potential vulnerabilities that can be exploited. Therefore, in your ssl.conf file, replace the ciphers with the following cipher suite.

'EECDH+AESGCM:EDH+AESGCM:AES256+EECDH:AES256+EDH';+AESGCM:EDH+AESGCM:AES256+EECDH:AES256+EDH';

6) Remove any unnecessary modules

To further minimize the threat landscape, it’s advisable to remove any unnecessary modules from the default server settings. Best practice demands that you keep a lean profile and only enable the modules that are used in serving content from the webserver. Be cautious, though, not to uninstall or remove the modules that you may require. As a recommendation, perform tests in a QA or test environment before deciding which modules should be disabled and which ones are necessary for your web server.

7) Prevent Better Overflow

In memory management, a buffer is a storage location that temporarily accommodates data as is it begin transferred from one memory location to another.

When the data volume exceeds the capacity of the memory buffer, a buffer overflow occurs. In other words, buffer overflows happen when a program writes more data on a block of memory that it can hold or handle.

An attacker can exploit this vulnerability to send malicious code that can compromise a system. As standard practice, it is recommended to make a few tweaks to the Web server to mitigate such issues. Add the lines of code below to the nginx.conf file.

##buffer policy
client_body_buffer_size 1K;
client_header_buffer_size 1k;
client_max_body_size 1k;
large_client_header_buffers 2 1k;
##end buffer policy

8) Prevent XSS attacks

An XSS ( cross-site scripting ) attack is an attack where a hacker uses a web application to inject malicious code or a browser-side script into a trusted site. When a visitor to the site visits the site, the script is downloaded and can access various browser resources such as cookies and session token.

One of the prevention measures against such type of attack is to append the line below in the ssl.conf file.

add_header X-XSS-Protection "1; mode=block";

9) Avoid Clickjacking attacks

To steer clear of clickjacking attacks, append the X-Frame-Options in the HTTP header in the nginx.conf file as shown

add_header X-Frame-Options "SAMEORIGIN";

Once done, save and restart Nginx web server.

10) Deny automated user agents

To keep your server safe from bots and other automated scripts that may be deployed by attackers to retrieve information from your site, it’s prudent to explicitly deny specific user agents which can ultimately lead to deny-of-service attacks DOS. Append the following line in the nginx.conf file.

if ($http_user_agent ~* LWP::Simple|BBBike|wget) {
return 403;
}

11) Prevent Image hotlinking

Hotlinking is a practice where a user links an image to your website instead of directly uploading the image on their site. When this happens, your image appears on their site and the flip side to this is that you end up paying for extra bandwidth.

To prevent this from happening, look for location directive inside Nginx configuration file and append the following snippet

# Stop deep linking or hot linking
location /images/ {
  valid_referers none blocked www.example.com example.com;
   if ($invalid_referer) {
     return   403;
   }
}

You can also specify the image extensions as shown:

valid_referers blocked www.example.com example.com;
if ($invalid_referer) {
    rewrite ^/images/uploads.*\.(gif|jpg|jpeg|png)$ http://www.example.com/banned.jpg last
}

12)  Keep Nginx updated

Easy right? Keeping your web server up to date is one of the ways you can secure your server. Updating your web server applies the required patches that address pre-existing vulnerabilities that can be exploited by hackers to compromise your server.

That was a round-up of some of the key measures you can take to harden your Nginx web server and secure it from common exploitation techniques. This will go a long way in protecting your website files and the visitors on your site as well.


How to Setup Kubernetes Cluster on Google Cloud Platform (GCP)

$
0
0

Popularly known as K8s or Kube, Kubernetes is an opensource orchestration platform that automates the deployment, scaling, and monitoring of containerized applications.

In simple terms, Kubernetes allows users to efficiently manage clusters which are made up of groups of running containers such as Linux containers.

Kubernetes clusters can be deployed both on-premise and on public cloud platforms such as AWS, Google Cloud (GCP), and Microsoft Azure. In this guide, we take you through a step-by-step procedure of how you can set up a Kubernetes cluster on Google Cloud Platform (GCP).

Prerequisites

Before proceeding, ensure that you have a Google Cloud Account. You can always create one upon which you get started with $300 worth of credits for a period of 365 days.

Create your first cluster

The first step in deploying your first Kubernetes Cluster is to log in to your Google Cloud Platform. Upon logging in, you will see the dashboard displayed as shown.

Click on the top left button & navigate to Kubernetes Engine –> Clusters

GCP-Kubernetes-Cluster-Option

This opens the ‘Clusters’ section shown below. If you are creating a Kubernetes Cluster for the first time, Google Cloud will take a few minutes enabling the Kubernetes Engine API, so some patience will do.

Enabling-Kuberntes-API-GCP

Once done, click on the ‘Create Cluster‘ button to deploy your first Kubernetes cluster.

In the next section, the default details of the cluster will be displayed as shown.

k8s-cluster-basics-gcp

You can click on the left sidebar to verify further details on your cluster. For example, you can click on the ‘Default-pool’ option to display more information about the node-pool.

Node-Pool-details-GCP

Feel free to make a few tweaks depending on your needs. You can increase the number of nodes, and make a few tweaks to suit your needs. Once you are satisfied with your selections, click the ‘CREATE’ button to create your Kubernetes Cluster.

Choose-Create-Zonal-K8s-Cluster-GCP

This takes a few minutes, so go ahead and grab some tea as Google Cloud begins to initialize and create the Cluster. After a successful deployment of the Kubernetes cluster, the cluster will be listed as shown.

K8s-Cluster-After-deployment-GCP

Connecting to the Kubernetes Cluster

Our cluster is up and running, but it doesn’t help much if you don’t have command-line access. There are 2 ways you can connect to your cluster: Using the Google Cloud Shell and connecting remotely from a Linux system using the Google Cloud SDK kit.

To connect to the Kubernetes cluster using the Google Cloud Shell, click on the ‘Connect’ button adjacent to the cluster.

Connect-k8s-console-gcp

This opens a pop-up screen as shown with a command that you should run in the Cloud Shell to start managing your cluster.

Command-line-access-k8s-gcp

To run the command, click on the ‘Run in Cloud Shell’ button. Google Cloud will start initializing and establishing a connection to the cloud shell.

Connecting-Google-Cloud-Shell-K8S

Finally, the Cloud shell will be displayed with the command already pasted on the shell. Hit ‘ENTER’ to run the command and begin managing your cluster and performing cluster administrative tasks. For example, to display the number of nodes, run the command:

$ kubectl get nodes

K8s-google-cloud-console-access-gcp

As you might have observed, the Kubernetes cluster comprises of 3 nodes as configured by default earlier on.

Connecting to the Cluster using Google Cloud SDK

Additionally, you can connect to a Kubernetes cluster using the Google Cloud SDK.  The Google Cloud SDK is a set of command-line tools that are used to remotely connect to the Google Cloud Platform to perform administrative tasks.

In this guide, we will install the Cloud SDK on Ubuntu 18.04 which should work with Ubuntu 18.04 and Debian 9 and later versions.

First, add the Google Cloud SDK repository as shown:

$ echo "deb [signed-by=/usr/share/keyrings/cloud.google.gpg] http://packages.cloud.google.com/apt cloud-sdk main" | sudo tee -a /etc/apt/sources.list.d/google-cloud-sdk.list

Next, import the Public key for Google Cloud Platform:

$ curl https://packages.cloud.google.com/apt/doc/apt-key.gpg | sudo apt-key --keyring /usr/share/keyrings/cloud.google.gpg add -

Download-google-cloud-sdk-ubuntu

Then update your system’s package list and install Google Cloud SDK.

$ sudo apt  update && sudo apt install -y google-cloud-sdk

Install-google-cloud-sdk-gcp

The installation will be complete in a few minutes. To confirm that the Cloud SDK has been installed, execute:

$ dpkg -l | grep google-cloud-sdk

Google-Cloud-SDK-Version-Ubuntu

Initializing Google Cloud SDK

After the successful installation of Google Cloud SDK, we need to authorize the SDK tools to gain access to the Google cloud platform in order to perform administrative tasks.

To achieve this, issue the command:

$ gcloud init --console-only

Next, You will be asked if you’d like to continue to log in. Press ‘Y’ to accept the option to log in

Initialize-google-cloud-console-ubuntu

A link will be provided on the terminal that you will copy and open with a browser. Next, authenticate with your Google Account. Copy the verification code provided and paste it back on the terminal.

GCP-Cloud-SDK-Console-Code-Ubuntu

Google-Cloud-SDK-Installation-Ubuntu

Next, you will be required to choose a project. The first project is usually your current project. So type in the numeric choice 1 and hit ENTER.

When asked about configuring a default zone, you can opt to create one by typing ‘Y’ from where you will be required to select a region from the list provided. If you do not wish to create one, simply type ‘n’.

A default configuration will be created at your home directory. Your cloud SDK is now easy to use.

Run the initial command that was provided by the cloud shell when connecting to the cluster.

$ gcloud container clusters get-credentials cluster-1 --zone us-central1-c --project basic-breaker-281614

At this point, you can begin managing your Kubernetes Cluster. To check the number of running nodes, again use the kubectl command as shown:

$ kubectl get nodes

glcoud-contianer-cluster-sdk-ubuntu

Conclusion

Kubernetes continues to be an essential platform in the DevOps field. It makes the management of nodes in a production environment easier and more efficient. In this guide, we walked you through how to set up a Kubernetes cluster on Google Cloud Platform.

Also Read: How to Setup NGINX Ingress Controller in Kubernetes

How to Setup Highly Available Kubernetes Cluster with Kubeadm

$
0
0

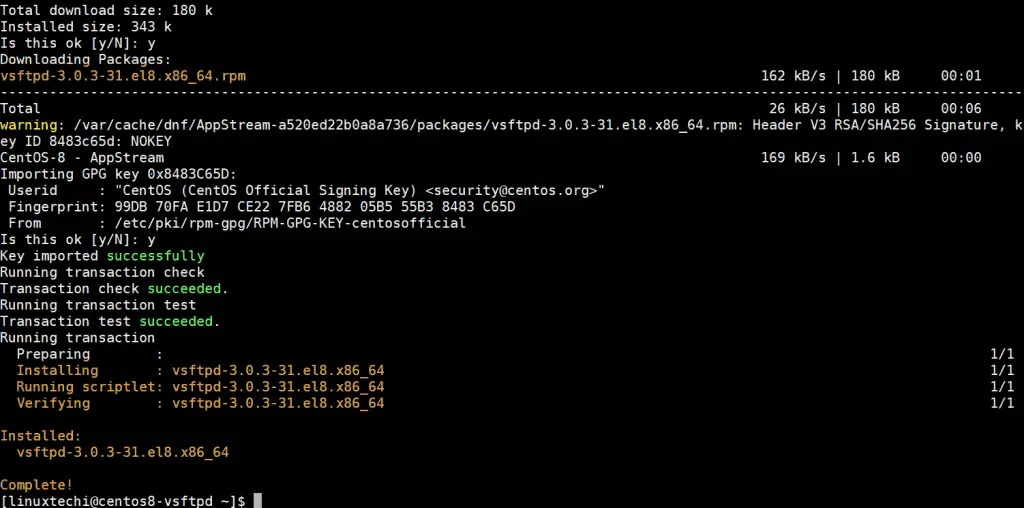
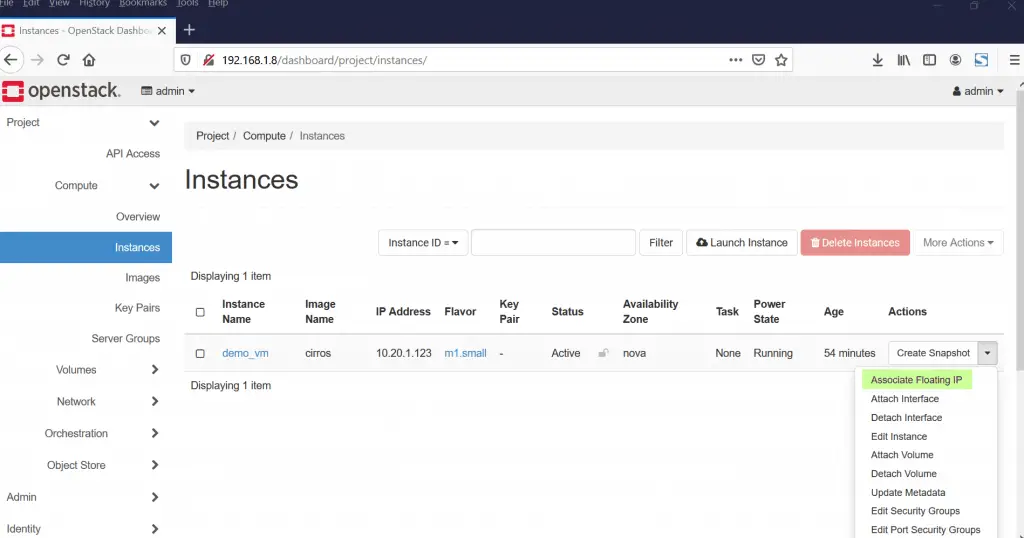
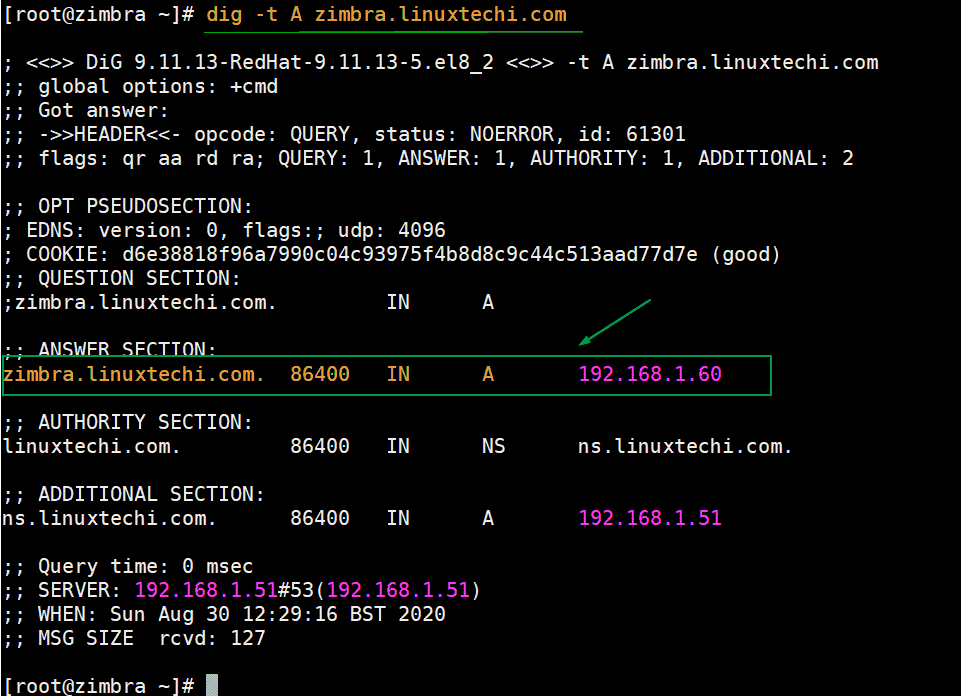
When we setup Kubernetes (k8s) cluster on-premises for production environment then it is recommended to deploy it in high availability. Here high availability means installing Kubernetes master or control plane in HA. In this article I will demonstrate how we can setup highly available Kubernetes cluster using kubeadm utility.

For the demonstration, I have used five CentOS 7 systems with following details:

  • k8s-master-1 – Minimal CentOS 7 – 192.168.1.40 – 2GB RAM, 2vCPU, 40 GB Disk
  • k8s-master-2 – Minimal CentOS 7 – 192.168.1.41 – 2GB RAM, 2vCPU, 40 GB Disk
  • k8s-master-3 – Minimal CentOS 7 – 192.168.1.42 – 2GB RAM, 2vCPU, 40 GB Disk
  • k8s-worker-1 – Minimal CentOS 7 – 192.168.1.43 – 2GB RAM, 2vCPU, 40 GB Disk
  • k8s-worker-2 – Minimal CentOS 7 – 192.168.1.44 – 2GB RAM, 2vCPU, 40 GB Disk

HA-Kubernetes-Cluster-Setup

Note: etcd cluster can also be formed outside of master nodes but for that we need additional hardware, so I am installing etcd inside my master nodes.

Minimum requirements for setting up Highly K8s cluster

  • Install Kubeadm, kubelet and kubectl on all master and worker Nodes
  • Network Connectivity among master and worker nodes
  • Internet Connectivity on all the nodes
  • Root credentials or sudo privileges user on all nodes

Let’s jump into the installation and configuration steps

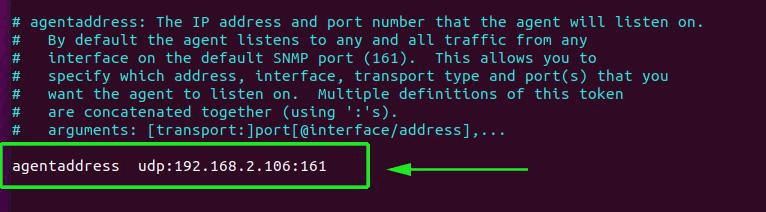
Step 1) Set Hostname and add entries in /etc/hosts file

Run hostnamectl command to set hostname on each node, example is shown for k8s-master-1 node,

$ hostnamectl set-hostname "k8s-master-1"
$ exec bash

Similarly, run above command on remaining nodes and set their respective hostname. Once hostname is set on all master and worker nodes then add the following entries in /etc/hosts file on all the nodes.

192.168.1.40   k8s-master-1
192.168.1.41   k8s-master-2
192.168.1.42   k8s-master-3
192.168.1.43   k8s-worker-1
192.168.1.44   k8s-worker-2
192.168.1.45   vip-k8s-master

I have used one additional entry “192.168.1.45   vip-k8s-master” in host file because I will be using this IP and hostname while configuring the haproxy and keepalived on all master nodes. This IP will be used as kube-apiserver load balancer ip. All the kube-apiserver request will come to this IP and then the request will be distributed among backend actual kube-apiservers.

Step 2) Install and Configure Keepalive and HAProxy on all master / control plane nodes

Install keepalived and haproxy on each master node using the following yum command,

$ sudo yum install haproxy keepalived -y

Configure Keepalived on k8s-master-1 first, create check_apiserver.sh script will the following content,

[kadmin@k8s-master-1 ~]$ sudo vi /etc/keepalived/check_apiserver.sh
#!/bin/sh
APISERVER_VIP=192.168.1.45
APISERVER_DEST_PORT=6443

errorExit() {
    echo "*** $*" 1>&2
    exit 1
}

curl --silent --max-time 2 --insecure https://localhost:${APISERVER_DEST_PORT}/ -o /dev/null || errorExit "Error GET https://localhost:${APISERVER_DEST_PORT}/"
if ip addr | grep -q ${APISERVER_VIP}; then
    curl --silent --max-time 2 --insecure https://${APISERVER_VIP}:${APISERVER_DEST_PORT}/ -o /dev/null || errorExit "Error GET https://${APISERVER_VIP}:${APISERVER_DEST_PORT}/"
fi

save and exit the file.

Set the executable permissions

$ sudo chmod +x /etc/keepalived/check_apiserver.sh

Take the backup of keepalived.conf file and then truncate the file.

[kadmin@k8s-master-1 ~]$ sudo cp /etc/keepalived/keepalived.conf /etc/keepalived/keepalived.conf-org
[kadmin@k8s-master-1 ~]$ sudo sh -c '> /etc/keepalived/keepalived.conf'

Now paste the following contents to /etc/keepalived/keepalived.conf file

[kadmin@k8s-master-1 ~]$ sudo vi /etc/keepalived/keepalived.conf
! /etc/keepalived/keepalived.conf
! Configuration File for keepalived
global_defs {
    router_id LVS_DEVEL
}
vrrp_script check_apiserver {
  script "/etc/keepalived/check_apiserver.sh"
  interval 3
  weight -2
  fall 10
  rise 2
}

vrrp_instance VI_1 {
    state MASTER
    interface enp0s3
    virtual_router_id 151
    priority 255
    authentication {
        auth_type PASS
        auth_pass P@##D321!
    }
    virtual_ipaddress {
        192.168.1.45/24
    }
    track_script {
        check_apiserver
    }
}

Save and close the file.

Note: Only two parameters of this file need to be changed for master-2 & 3 nodes. State will become SLAVE for master 2 and 3, priority will be 254 and 253 respectively.

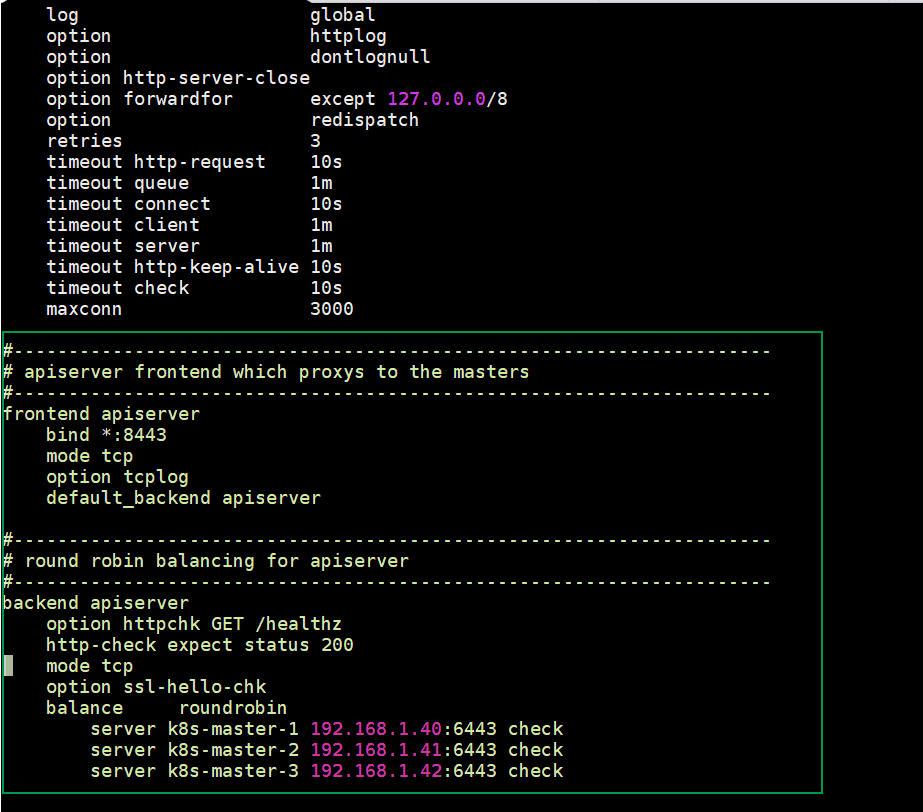
Configure HAProxy on k8s-master-1 node, edit its configuration file and add the following contents:

[kadmin@k8s-master-1 ~]$ sudo cp /etc/haproxy/haproxy.cfg /etc/haproxy/haproxy.cfg-org

Remove all lines after default section and add following lines

[kadmin@k8s-master-1 ~]$ sudo vi /etc/haproxy/haproxy.cfg
#---------------------------------------------------------------------
# apiserver frontend which proxys to the masters
#---------------------------------------------------------------------
frontend apiserver
    bind *:8443
    mode tcp
    option tcplog
    default_backend apiserver
#---------------------------------------------------------------------
# round robin balancing for apiserver
#---------------------------------------------------------------------
backend apiserver
    option httpchk GET /healthz
    http-check expect status 200
    mode tcp
    option ssl-hello-chk
    balance     roundrobin
        server k8s-master-1 192.168.1.40:6443 check
        server k8s-master-2 192.168.1.41:6443 check
        server k8s-master-3 192.168.1.42:6443 check

Save and exit the file

haproxy-kubeapiserver-linux

Now copy theses three files (check_apiserver.sh , keepalived.conf and haproxy.cfg) from k8s-master-1 to k8s-master-2 & 3

Run the following for loop to scp these files to master 2 and 3

[kadmin@k8s-master-1 ~]$ for f in k8s-master-2 k8s-master-3; do scp /etc/keepalived/check_apiserver.sh /etc/keepalived/keepalived.conf root@$f:/etc/keepalived; scp /etc/haproxy/haproxy.cfg root@$f:/etc/haproxy; done

Note: Don’t forget to change two parameters in keepalived.conf file that we discuss above for k8s-master-2 & 3

In case firewall is running on master nodes then add the following firewall rules on all three master nodes

$ sudo firewall-cmd --add-rich-rule='rule protocol value="vrrp" accept' --permanent
$ sudo firewall-cmd --permanent --add-port=8443/tcp
$ sudo firewall-cmd --reload

Now Finally start and enable keepalived and haproxy service on all three master nodes using the following commands :

$ sudo systemctl enable keepalived --now
$ sudo systemctl enable haproxy --now

Once these services are started successfully, verify whether VIP (virtual IP) is enabled on k8s-master-1 node because we have marked k8s-master-1 as MASTER node in keepalived configuration file.

vip-keepalived-kubernetes-linux

Perfect, above output confirms that VIP has been enabled on k8s-master-1.

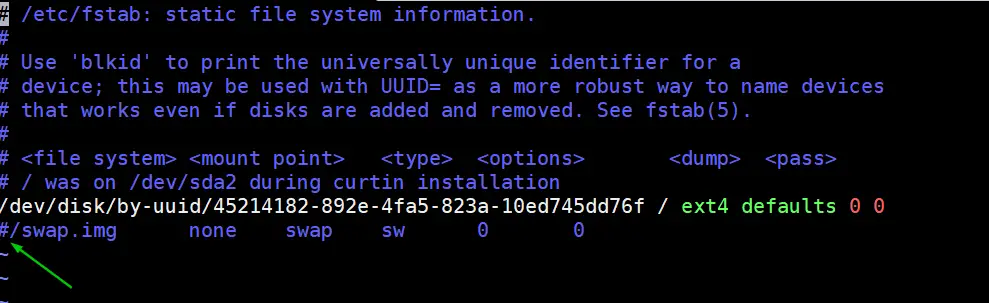
Step 3) Disable Swap, set SELinux as permissive and firewall rules for Master and worker nodes

Disable Swap Space on all the nodes including worker nodes, Run the following commands

$ sudo swapoff -a 
$ sudo sed -i '/ swap / s/^\(.*\)$/#\1/g' /etc/fstab

Set SELinux as Permissive on all master and worker nodes, run the following commands,

$ sudo setenforce 0
$ sudo sed -i 's/^SELINUX=enforcing$/SELINUX=permissive/' /etc/selinux/config

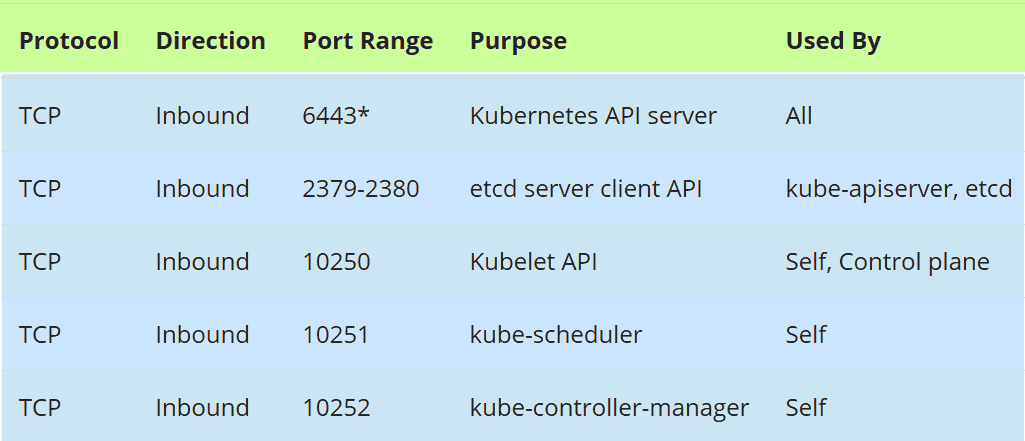
Firewall Rules for Master Nodes:

In case firewall is running on master nodes, then allow the following ports in the firewall,

Firewall-Ports-Master-nodes-kubernetes

Run the following firewall-cmd command on all the master nodes,

$ sudo firewall-cmd --permanent --add-port=6443/tcp
$ sudo firewall-cmd --permanent --add-port=2379-2380/tcp
$ sudo firewall-cmd --permanent --add-port=10250/tcp
$ sudo firewall-cmd --permanent --add-port=10251/tcp
$ sudo firewall-cmd --permanent --add-port=10252/tcp
$ sudo firewall-cmd --permanent --add-port=179/tcp
$ sudo firewall-cmd --permanent --add-port=4789/udp
$ sudo firewall-cmd --reload
$ sudo modprobe br_netfilter
$ sudo sh -c "echo '1' > /proc/sys/net/bridge/bridge-nf-call-iptables"
$ sudo sh -c "echo '1' > /proc/sys/net/ipv4/ip_forward"

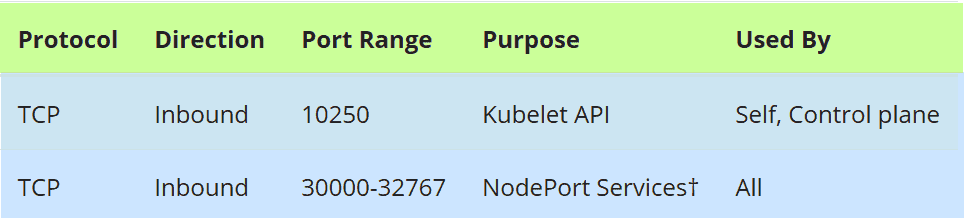
Firewall Rules for Worker nodes:

In case firewall is running on worker nodes, then allow the following ports in the firewall on all the worker nodes

Firewall-ports-Worker-Nodes-Kubernetes

Run the following commands on all the worker nodes,

$ sudo firewall-cmd --permanent --add-port=10250/tcp
$ sudo firewall-cmd --permanent --add-port=30000-32767/tcp                                                   
$ sudo firewall-cmd --permanent --add-port=179/tcp
$ sudo firewall-cmd --permanent --add-port=4789/udp
$ sudo firewall-cmd --reload
$ sudo modprobe br_netfilter
$ sudo sh -c "echo '1' > /proc/sys/net/bridge/bridge-nf-call-iptables"
$ sudo sh -c "echo '1' > /proc/sys/net/ipv4/ip_forward"

Step 4) Install Container Run Time (CRI) Docker on Master & Worker Nodes

Install Docker (Container Run Time) on all the master nodes and worker nodes, run the following command,

$ sudo yum install -y yum-utils
$ sudo yum-config-manager --add-repo https://download.docker.com/linux/centos/docker-ce.repo
$ sudo yum install docker-ce -y

Run following systemctl command to start and enable docker service, (Run this command too on all master and worker nodes)

$ sudo systemctl enable docker --now

Now, let’s install kubeadm , kubelet and kubectl in the next step

Step 5) Install Kubeadm, kubelet and kubectl

Install kubeadm, kubelet and kubectl on all master nodes as well as worker nodes. Before installing these packages first, we must configure Kubernetes repository, run the following command on each master and worker nodes,

cat <<EOF | sudo tee /etc/yum.repos.d/kubernetes.repo
[kubernetes]
name=Kubernetes
baseurl=https://packages.cloud.google.com/yum/repos/kubernetes-el7-\$basearch
enabled=1
gpgcheck=1
repo_gpgcheck=1
gpgkey=https://packages.cloud.google.com/yum/doc/yum-key.gpg https://packages.cloud.google.com/yum/doc/rpm-package-key.gpg
exclude=kubelet kubeadm kubectl
EOF

Now run below yum command to install these packages,

$ sudo yum install -y kubelet kubeadm kubectl --disableexcludes=kubernetes

Run following systemctl command to enable kubelet service on all nodes ( master and worker nodes)

$ sudo systemctl enable kubelet --now

Step 6) Initialize the Kubernetes Cluster from first master node

Now move to first master node / control plane and issue the following command,

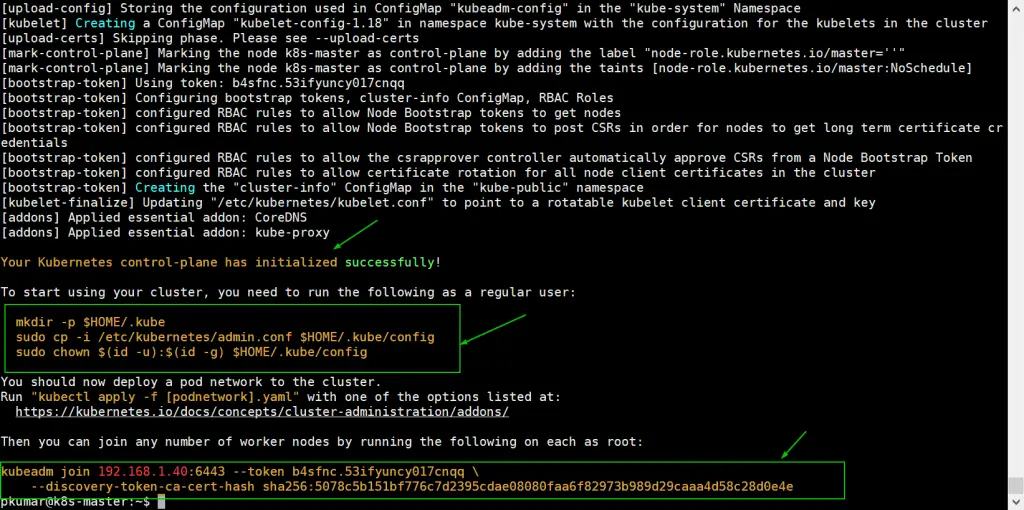
[kadmin@k8s-master-1 ~]$ sudo kubeadm init --control-plane-endpoint "vip-k8s-master:8443" --upload-certs

In above command, –control-plane-endpoint set dns name and port for load balancer (kube-apiserver), in my case dns name is “vip-k8s-master” and port is “8443”, apart from this ‘–upload-certs’ option will share the certificates among master nodes automatically,

Output of kubeadm command would be something like below:

kubeadm-success-ha-cluster

Great, above output confirms that Kubernetes cluster has been initialized successfully. In output we also got the commands for other master and worker nodes to join the cluster.

Note: It is recommended to copy this output to a text file for future reference.

Run following commands to allow local user to use kubectl command to interact with cluster,

[kadmin@k8s-master-1 ~]$ mkdir -p $HOME/.kube
[kadmin@k8s-master-1 ~]$ sudo cp -i /etc/kubernetes/admin.conf $HOME/.kube/config
[kadmin@k8s-master-1 ~]$ sudo chown $(id -u):$(id -g) $HOME/.kube/config
[kadmin@k8s-master-1 ~]$

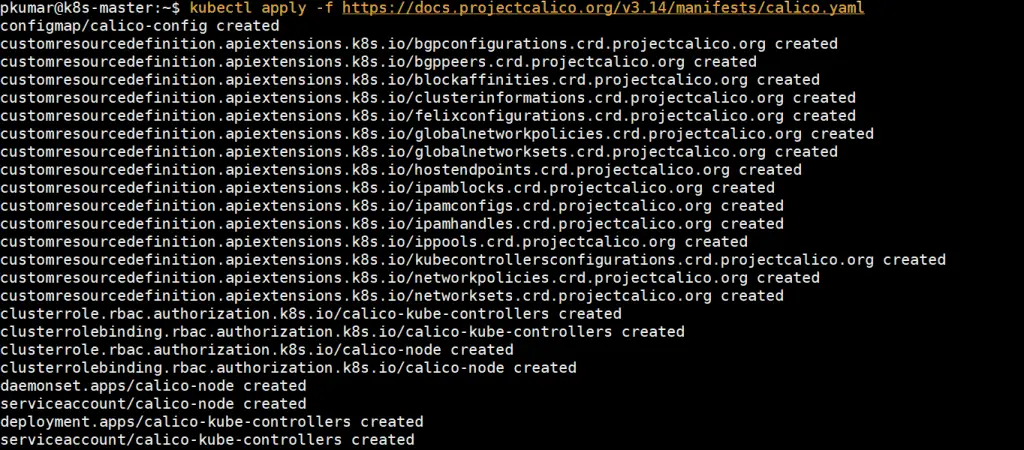
Now, Let’s deploy pod network (CNI – Container Network Interface), in my case I going to deploy calico addon as pod network, run following kubectl command

[kadmin@k8s-master-1 ~]$ kubectl apply -f https://docs.projectcalico.org/v3.14/manifests/calico.yaml

Once the pod network is deployed successfully, add remaining two master nodes to cluster. Just copy the command for master node to join the cluster from the output and paste it on k8s-master-2 and k8s-master-3, example is shown below

[kadmin@k8s-master-2 ~]$ sudo kubeadm join vip-k8s-master:8443 --token tun848.2hlz8uo37jgy5zqt  --discovery-token-ca-cert-hash sha256:d035f143d4bea38d54a3d827729954ab4b1d9620631ee330b8f3fbc70324abc5 --control-plane --certificate-key a0b31bb346e8d819558f8204d940782e497892ec9d3d74f08d1c0376dc3d3ef4

Output would be:

Master-2-Join-K8s-Cluster

Also run the same command on k8s-master-3,

[kadmin@k8s-master-3 ~]$ sudo kubeadm join vip-k8s-master:8443 --token tun848.2hlz8uo37jgy5zqt  --discovery-token-ca-cert-hash sha256:d035f143d4bea38d54a3d827729954ab4b1d9620631ee330b8f3fbc70324abc5 --control-plane --certificate-key a0b31bb346e8d819558f8204d940782e497892ec9d3d74f08d1c0376dc3d3ef4

Output would be:

Master-3-Join-K8s-Cluster

Above output confirms that k8s-master-3 has also joined the cluster successfully. Let’s verify the nodes status from kubectl command, go to master-1 node and execute below command,

[kadmin@k8s-master-1 ~]$ kubectl get nodes
NAME           STATUS   ROLES    AGE     VERSION
k8s-master-1   Ready    master   31m     v1.18.6
k8s-master-2   Ready    master   10m     v1.18.6
k8s-master-3   Ready    master   3m47s   v1.18.6
[kadmin@k8s-master-1 ~]$

Perfect, all our three master or control plane nodes are ready and join the cluster.

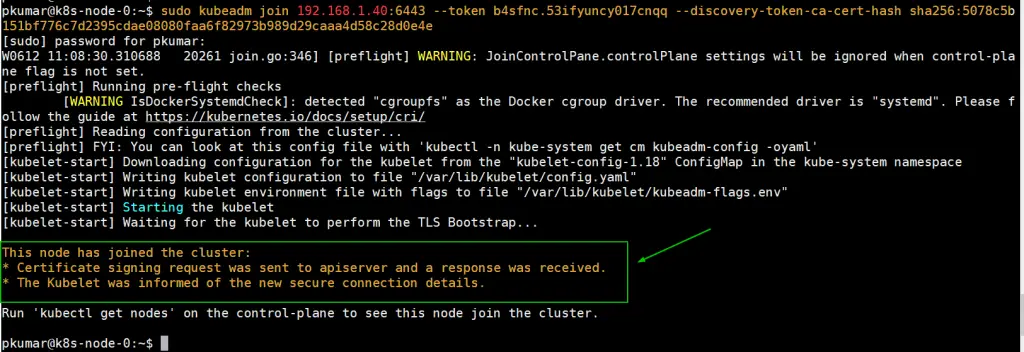
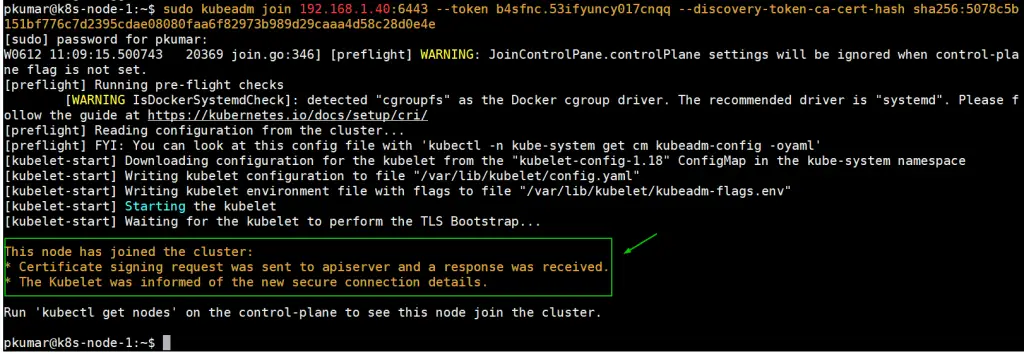
Step 7) Join Worker nodes to Kubernetes cluster

To join worker nodes to cluster, copy the command for worker node from output and past it on both worker nodes, example is shown below:

[kadmin@k8s-worker-1 ~]$ sudo kubeadm join vip-k8s-master:8443 --token tun848.2hlz8uo37jgy5zqt --discovery-token-ca-cert-hash sha256:d035f143d4bea38d54a3d827729954ab4b1d9620631ee330b8f3fbc70324abc5

[kadmin@k8s-worker-2 ~]$ sudo kubeadm join vip-k8s-master:8443 --token tun848.2hlz8uo37jgy5zqt --discovery-token-ca-cert-hash sha256:d035f143d4bea38d54a3d827729954ab4b1d9620631ee330b8f3fbc70324abc5

Output would be something like below:

worker-2-join-kubernetes-cluster

Now head to k8s-master-1 node and run below kubectl command to get status worker nodes,

[kadmin@k8s-master-1 ~]$ kubectl get nodes
NAME           STATUS   ROLES    AGE     VERSION
k8s-master-1   Ready    master   43m     v1.18.6
k8s-master-2   Ready    master   21m     v1.18.6
k8s-master-3   Ready    master   15m     v1.18.6
k8s-worker-1   Ready    <none>   6m11s   v1.18.6
k8s-worker-2   Ready    <none>   5m22s   v1.18.6
[kadmin@k8s-master-1 ~]$

Above output confirms that both workers have also joined the cluster and are in ready state.

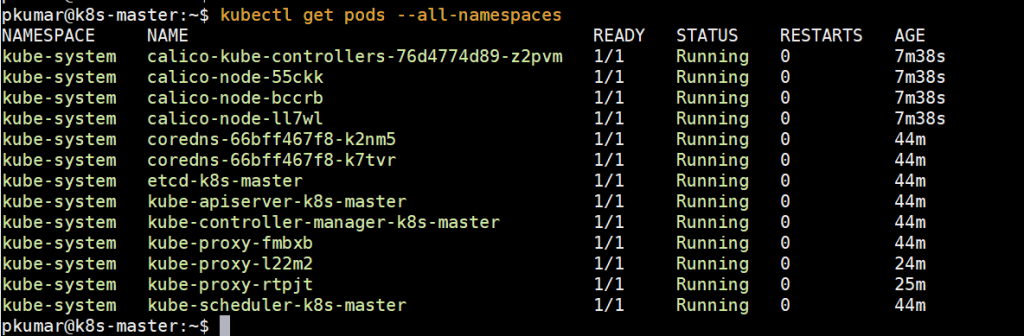
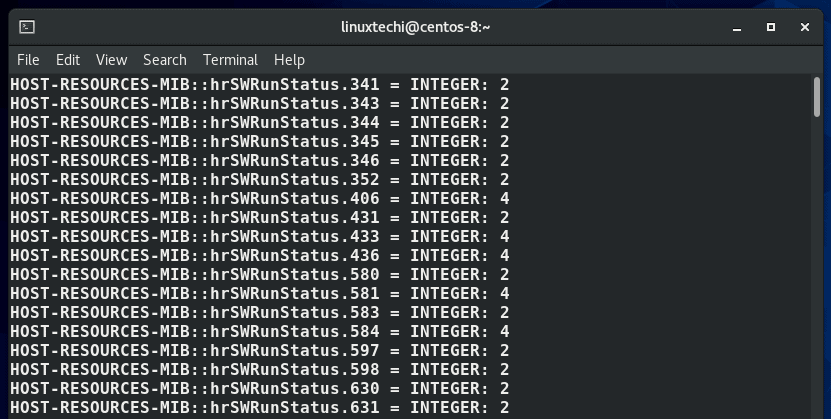
Run below command to verify the status infra pods which are deployed in kube-system namespace.

[kadmin@k8s-master-1 ~]$ kubectl get pods -n kube-system

Kubernetes-infra-pods

Step 8) Test Highly available Kubernetes cluster

Let’s try to connect to the cluster from remote machine (CentOS system) using load balancer dns name and port. On the remote machine first, we must install kubectl package. Run below command to set kubernetes repositories.

cat <<EOF | sudo tee /etc/yum.repos.d/kubernetes.repo
[kubernetes]
name=Kubernetes
baseurl=https://packages.cloud.google.com/yum/repos/kubernetes-el7-\$basearch
enabled=1
gpgcheck=1
repo_gpgcheck=1
gpgkey=https://packages.cloud.google.com/yum/doc/yum-key.gpg https://packages.cloud.google.com/yum/doc/rpm-package-key.gpg
exclude=kubelet kubeadm kubectl
EOF

$ sudo yum install -y  kubectl --disableexcludes=kubernetes

Now add following entry in /etc/host file,

192.168.1.45   vip-k8s-master

Create kube directory and copy /etc/kubernetes/admin.conf file from k8s-master-1 node to $HOME/.kube/config ,

$ mkdir -p $HOME/.kube
$ scp root@192.168.1.40:/etc/kubernetes/admin.conf $HOME/.kube/config
$ sudo chown $(id -u):$(id -g) $HOME/.kube/config

Now run “kubectl get nodes” command,

[kadmin@localhost ~]$ kubectl get nodes
NAME           STATUS   ROLES    AGE    VERSION
k8s-master-1   Ready    master   3h5m   v1.18.6
k8s-master-2   Ready    master   163m   v1.18.6
k8s-master-3   Ready    master   157m   v1.18.6
k8s-worker-1   Ready    <none>   148m   v1.18.6
k8s-worker-2   Ready    <none>   147m   v1.18.6
[kadmin@localhost ~]$

Let’s create a deployment with name nginx-lab with image ‘nginx’ and then expose this deployment as service of type “NodePort

[kadmin@localhost ~]$ kubectl create deployment nginx-lab --image=nginx
deployment.apps/nginx-lab created
[kadmin@localhost ~]$
[kadmin@localhost ~]$ kubectl get deployments.apps nginx-lab
NAME        READY   UP-TO-DATE   AVAILABLE   AGE
nginx-lab   1/1     1            1           59s
[kadmin@localhost ~]$ kubectl get pods
NAME                         READY   STATUS    RESTARTS   AGE
nginx-lab-5df4577d49-rzv9q   1/1     Running   0          68s
test-844b65666c-pxpkh        1/1     Running   3          154m
[kadmin@localhost ~]$

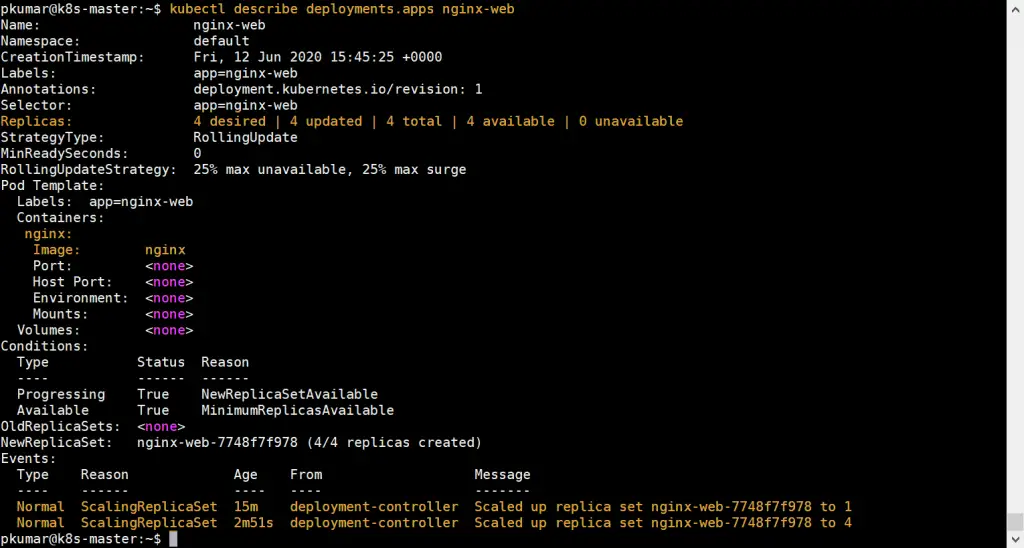
Let’s try to scale replicas from 1 to 4, run the following command,

[kadmin@localhost ~]$ kubectl scale deployment nginx-lab --replicas=4
deployment.apps/nginx-lab scaled
[kadmin@localhost ~]$
[kadmin@localhost ~]$ kubectl get deployments.apps nginx-lab
NAME        READY   UP-TO-DATE   AVAILABLE   AGE
nginx-lab   4/4     4            4           3m10s
[kadmin@localhost ~]$

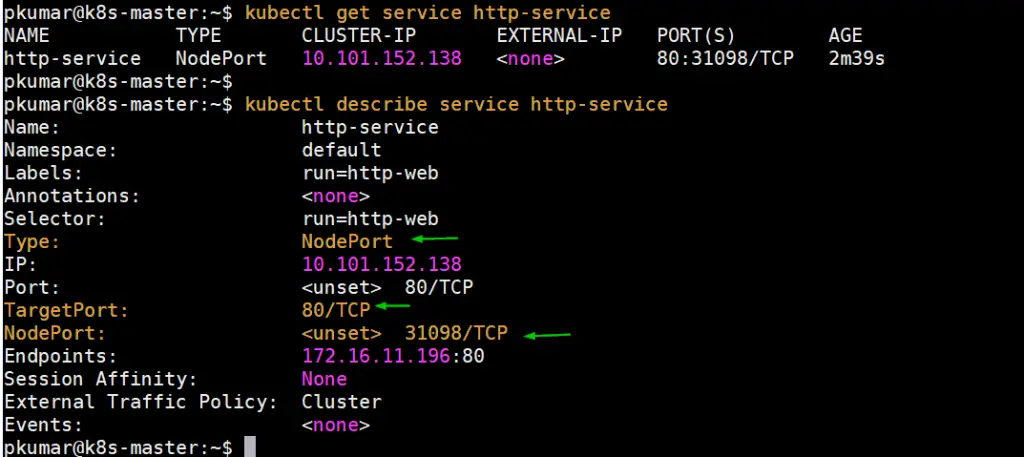
Now expose the deployment as service, run

[kadmin@localhost ~]$ kubectl expose deployment nginx-lab --name=nginx-lab --type=NodePort --port=80 --target-port=80
service/nginx-lab exposed
[kadmin@localhost ~]$

Get port details and try to access nginx web server using curl,

[kadmin@localhost ~]$ kubectl get svc nginx-lab
NAME        TYPE       CLUSTER-IP     EXTERNAL-IP   PORT(S)        AGE
nginx-lab   NodePort   10.102.32.29   <none>        80:31766/TCP   60s
[kadmin@localhost ~]$

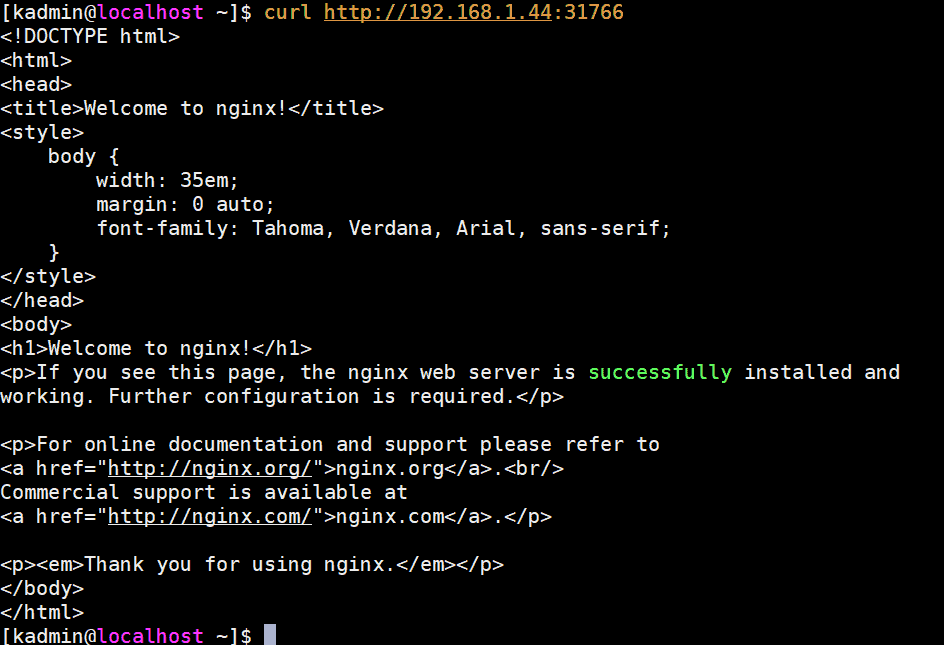
To access nginx web server we can use any master or worker node IP and port as “31766”

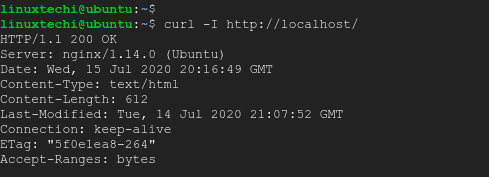
[kadmin@localhost ~]$ curl http://192.168.1.44:31766

Output would be something like below:

curl-nginx-server-kubernetes-cluster

Perfect, that’s confirm we have successfully deployed highly available Kubernetes cluster with kubeadm on CentOS 7 servers. Please don’t hesitate to share your valuable feedback and comments.

Also Read : How to Setup NGINX Ingress Controller in Kubernetes

Top 7 Security Hardening Tips for CentOS 8 / RHEL 8 Server

$
0
0

Once you have installed your CentOS 8 / RHEL 8 server, securing it to prevent unauthorized access and intrusions comes second. As the adage goes , “Prevention is better than cure” so is prevention of hacks better that taking remediation attempts.

Let explore a few steps that you can take to harden and secure CentOS 8 / RHEL 8 server and thwart hacking attempts.

1) Set up a firewall

As a security-minded Linux user, you wouldn’t just allow any traffic into your CentOS 8 / RHEL 8 system for security reasons. In fact, setting up a firewall is one of the initial server setup tasks that a systems administrator needs to perform to only open specific ports and allow services currently in use.

By default, CentsO8 / RHEL 8 system ship with firewalld firewall which can be started and enabled on startup by running the commands:

$ sudo systemctl start firewalld
$ sudo systemctl enable firewalld

To check the services allowed on the firewall, simply run the command:

$ sudo firewall-cmd --list all

To open a port on the firewall e.g port 443, execute the command:

$ sudo firewall-cmd --add-port=443/tcp --zone=public --permanent

To allow a service e.g ssh , use the command:

$ sudo firewall-cmd --add-service=ssh  --zone=public --permanent

To remove a port and a service , use the –remove-port  and –remove-service attributes respectively.

For the changes to take effect , always reload the firewall as shown.

$ sudo firewall-cmd --reload

2) Disable unused / undesirable services

It’s always advised to turn off unused or unnecessary services on your server. This is because the higher the number of services running, the more the number of ports open on your system which can be exploited by an attacker to gain entry to your system. Additionally, desist from using old and insecure service like telnet which send traffic in plain text

Best security practices recommend disabling unused services and getting rid of all the insecure services running on your system. You can use the nmap tool to scan your system and check which ports are open and being listened to.

3) Secure critical files

It’s essential to lock down critical files to prevent accidental deletion or editing. Such files include the /etc/passwd and /etc/gshadow which contain hashed passwords. To make the files immutable ( i.e prevent modification or accidental deletion ) use the chattr command as shown:

$ sudo chattr +i /etc/passwd
$ sudo chattr +i /etc/shadow

This ensures that a hacker cannot change any of the users’ password or delete them leading to denial of login to the system.

4) Secure SSH protocol

SSH protocol is a popularly used protocol for remote logins. By default , the protocol has native weaknesses that can be exploited by a hacker.

By default, SSH allows remote login by the root user. This is a potential loophole and if a hacker can get a hold of the root’s password to your system, your server is pretty much at their mercy. To prevent this, it’s advisable to deny remote root login and instead create a login regular user with sudo privileges. You can effect this  by modifying the SSH configuration file /etc/ssh/sshd_config and disable root login as shown:

PermitRootLogin

Another way you can secure SSH is by setting up SSH passwordless authentication by use of ssh keys. Instead of using password authentication which is prone to brute force attacks, SSH keys are preferred as they only allow entry to users with the ssh key to login to the remote server and block out any other user. The first step in enabling passwordless authentication is generating a key pair using the command:

$ ssh-keygen

This generates a public and private key pair. The private key resides on the host while the public key is copied to the remote system or server. Once the ssh-key pair is copied, you can effortlessly login to the remote system without being prompted for a password. Next, disable password authentication by modifying the /etc/ssh/sshd_config configuration file and setting this value:

PasswordAuthentication no

Once you have made the changes be sure to restart the SSH service for the changes to take effect.

$ sudo systemctl restart sshd

5 ) Define a limit for password attempts

To further harden your server, you might consider limiting the number of password attempts when logging via SSH to deter brute force attacks. Again, head over to the SSH configuration file, scroll and locate the  “MaxAuthTries” parameter. Uncomment it and set a value , for example 3 as shown.

MaxAuthTries 3

This implies that after 3 incorrect password attempts, the session will be closed. This comes in handy especially when you want to block robotic scripts/programs trying to gain access to your system.

6) Set up an intrusion prevention system (IPS)

So far, we have covered the basic steps you can take to harden your CentOS 8 / RHEL 8 server. To add another layer, it’s recommended that you install an intrusion detection system. A perfect example of an IPS is Fail2ban.

Fail2ban is a free and open source intrusion prevention system that shields servers from brute force attacks by banning IP addresses after a certain number of login attempts which can be specified in its configuration file. Once blocked, the malicious or unauthorized user cannot even initiate an SSH login attempt.

7) Regularly update your server

This article would not be complete without emphasizing how critical it is to update your server regularly. This ensures that your server gets the latest feature and security updates which are essential in addressing existing security issues.

You can set up automatic updates using cockpit utility which is a GUI-based server management tool that also performs a host of other tasks. This is ideal especially if you intend to go on a long stay or vacation without access to the server.

How to Enforce Password Policies in Linux (Ubuntu / CentOS)

$
0
0

As much as Linux is considered a secure operating system, its security is just as good as the password strength of login users. Password policies exist to ensure that a strong password is set for users and as a Linux user, you should be mindful to enforce these policies to make it difficult for breaches to occur. You surely don’t want users configuring weak or guessable passwords which can be brute forced by hackers in a matter of seconds.

In this article, we touch base on how to enforce password policies in Linux, more specifically CentOS and Ubuntu. We will cover enforcing password policies such as password expiration period, password complexity and password length.

Enforce Password Policies in Ubuntu / Debian

There are 2 main ways that you can enforce password policies. Let’s take a look at each in detail.

1) Configure the maximum number of days that a password can be used

For start, you can configure a password policy that requires users to change their passwords after a certain number of days. Best practice dictates that a password should be changed periodically to keep malicious users off-kilter and make it harder for them to breach your system. This applies not just in Linux but in other systems such as Windows and macOS.

To achieve this In Debian/Ubuntu, you need to modify the /etc/login.defs file and be on the lookout for the PASS_MAX_DAYS attribute.

By default, this is set to 99,999 days as shown.

linux-login-defs-defaults-entries

You can modify this to a reasonable duration, say, 30 days. Simply set the current value to 30 as shown and save the changes. Upon lapsing of the 30 days, you will be compelled to create another password.

Modify-pass-max-days-login-defs-linux

2) Configure Password complexity with pam

Ensuring that password meets a certain degree of complexity is equally crucial and further thwarts any attempts by hackers to infiltrate your system using brute force.

As a general rule, a strong password should have a combination of Uppercase, lowercase, numeric and special characters and should be at least 12-15 characters long.

To enforce password complexity in Debian / Ubuntu systems, you need to install  the libpam-pwquality package as shown:

$ sudo apt install libpam-pwquality

Install-libpam-ubuntu-linux

Once installed, head out to the /etc/pam.d/common-password file from where you are going to set the password policies. Be default, the file appears as shown:

update-common-password-pam-file-ubuntu

Locate the line shown below

password   requisite   pam_pwquality.so retry=3

Add the following attributes to the line:

minlen=12 maxrepeat=3 ucredit=-1 lcredit=-1 dcredit=-1 ocredit=-1 difok=4 reject_username enforce_for_root

The entire line should appear as shown:

add-password-policies-ubuntu-linux

Let’s flesh out what these directives stand for:

  • retry=3: This option will prompt the user 3 times before exiting and returning an error.
  • minlen=12: This specifies that the password cannot be less than 12 characters.
  • maxrepeat=3: This allows implies that only a maximum of 3 repeated characters can be included in the password.
  • ucredit=-1: The option requires at least one uppercase character in the password.
  • lcredit=-1: The option requires at least one lowercase character in the password.
  • dcredit=-1: This implies that the password should have at last a numeric character.
  • ocredit=-1: The option requires at least one special character included in the password.
  • difok=3: This implies that only a  maximum of 3 character changes in the new password should be present in the old password.
  • reject_username: The option rejects a password if it consists of the username either in its normal way or in reverse.
  • enforce_for_root: This ensures that the password policies are adhered to even if it’s the root user configuring the passwords.

Enforce Password Policies in CentOS / RHEL

For Debian and Ubuntu systems, we enforced the password policy by making changes to the /etc/pam.d/common-password configuration file.

For CentOS 7 and other derivatives, we are going to modify the /etc/pam.d/system-auth  or /etc/security/pwquality.conf  configuration file.

So, proceed and open the file:

$ sudo vim /etc/pam.d/system-auth

Locate the line shown below

password    requisite     pam_pwquality.so try_first_pass local_users_only retry=3 authtok_type=

Append the options in the line as shown.

minlen=12 lcredit=-1 ucredit=-1 dcredit=-1 ocredit=-1 enforce_for_root

You will end up having the line below:

system-auth-pam-file-centos

Once done, save the password policies and exit the file.

Once again, when you try creating a user with a weak password that doesn’t adhere to the enforced policies, you will encounter the error shown in the terminal.

Check-password-policies-by-changing-password

Conclusion

As you have seen, enforcing a password policy is quite easy and serves as a superb way of preventing users from setting up weak passwords which may easy to guess or prone to brute-force attacks. By enforcing these policies, you can rest assured that you have fortified your system’s security and made it more difficult for hackers to compromise your system.

How to Install and Configure Jenkins on Ubuntu 20.04

$
0
0

Automation of tasks can be quite tricky especially where multiple developers are submitting code to a shared repository. Poorly executed automation processes can often lead to inconsistencies and delays. And this is where Jenkins comes in.  Jenkins is a free and opensource continuous integration tool that’s predominantly used in the automation of tasks. It helps to streamline the continuous development, testing and deployment of newly submitted code.

In this guide, we will walk you through the installation and configuration of Jenkins on Ubuntu 20.04 LTS system.

Step 1:  Install Java with apt command

Being a Java application, Jenkins requires Java 8 and later versions to run without any issues. To check if Java is installed on your system, run the command:

$ java --version

If Java is not installed, you will get the following output.

Java-version-output-before-installation

To install Java on your system, execute the command:

$ sudo apt install openjdk-11-jre-headless

Install-Java-Ubuntu-20-04

After the installation, once again verify that Java is installed:

$ java --version

Java-version-command-ubuntu-20-04

Perfect! We now have OpenJDK installed. We can now proceed.

Step 2:  Install Jenkins via its official repository

With Java installed, we can now proceed to install Jenkins. The second step is to import the Jenkins GPG key from Jenkins repository as shown:

$ wget -q -O - https://pkg.jenkins.io/debian/jenkins.io.key | sudo apt-key add -

Next, configure Jenkins repository to the sources list file as shown.

$ sudo sh -c 'echo deb http://pkg.jenkins.io/debian-stable binary/ > /etc/apt/sources.list.d/jenkins.list'

Next, update the system’s package list.

$ sudo apt update

And install Jenkins as follows.

$ sudo apt install jenkins

Install-Jenkins-ubuntu-20-04

Once the installation is complete, Jenkins should start automatically. To confirm this, run the command:

$ sudo systemctl status jenkins

Jenkins-service-status-ubuntu-20-04

If by any chance Jenkins is not running, execute the following command to start it.

$ sudo systemctl start jenkins

Step 3: Configuring the firewall rules for Jenkins

As we have seen, Jenkins natively listens on port 8080, and if you have installed Jenkins on a server with UFW enabled, you need to open that port to allow traffic.

To enable firewall on Ubuntu 20.04 LTS run,

$ sudo ufw enable

To open port 8080 on ufw firewall, run the command:

$ sudo ufw allow 8080/tcp

Then reload the firewall to effect the changes.

$ sudo ufw reload

To confirm that port 8080 is open on the firewall, execute the command:

$ sudo ufw status

Ubuntu-firewall-status-output

From the output, we can clearly see that Port 8080 has been opened on the system.

Step 4:  Configure Jenkins with GUI

We are almost done now. The only thing remaining is to set up Jenkins using your favorite browser. So, head over to the URL bar and browse your server’s address as shown:

http://server-IP:8080

To check your server’s IP address, use the ifconfig command.

ifconfig-output-ubuntu-20-04

You will get the page similar to what we have below prompting you to provide the Administrator’s password. As per the instructions, the password is located in the file:

/var/lib/jenkins/secrets/initialAdminPassword

Unlock-Jenkins-Ubuntu-20-04

To view the password, simply switch to root user and use the cat command as shown:

$ cat /var/lib/jenkins/secrets/initialAdminPassword

Jenkins-password-Ubuntu-20-04

Copy the password and paste it in the text field shown and click the “Continue” button.

Enter-Jenkins-Password-ubuntu-20-04

In the next step, select ‘Install suggested plugin‘ for simplicity’s sake.

Install-suggested-plugins-ubuntu-20-04

Thereafter, the installation of the necessary plugin required by Jenkins will commence.

Jenkins-pulgins-installation-ubuntu-20-04

When the installation of plugins is complete, the installer will take you to the next section where you will be required to create an Admin user and click on the ‘Save and Continue’ button.

Create-Admin-User-Jenkins-Ubuntu-20-04

The next step will populate the default URL for your Jenkin’s instance. No action is required, simply click ‘Save and Finish’.

Install-Configuration-Jenkins-Ubuntu-20-04

Finally, click on the ‘Start using Jenkins’ button to gain access to Jenkins.

Jenkins-ready-portal-ubuntu-20-04

This ushers you to Jenkin’s dashboard as shown.

Jenkins-Dashboard-Ubuntu-20-04

And there you have it. We have successfully managed to install Jenkins on Ubuntu 20.04 LTS.

The post How to Install and Configure Jenkins on Ubuntu 20.04 first appeared on Linuxtechi.

How to Install Cockpit Web Console on Ubuntu 20.04 Server

$
0
0

Cockpit is a free and open source web console tool for Linux administrators and used for day to day administrative and operations tasks. Initially Cockpit was only available for RHEL based distributions but now a days it is available for almost for all Linux distributions. In this article we will demonstrate how to install Cockpit on Ubuntu 20.04 LTS Server (focal fossa) and what administrative tasks can be performed with Cockpit Web Console.

Installation of Cockpit on Ubuntu 20.04 LTS Server

Since Ubuntu 17.04, cockpit package is available in the default package repositories. So the installation has become straight forward using apt command,

$ sudo apt update
$ sudo apt install cockpit -y

apt-install-cockpit-ubuntu-20-04-lts-server

Once cockpit package is installed successfully then start its service using the following systemctl command,

$ sudo systemctl start cockpit

Run the following to verify the status of cockpit service,

$ sudo systemctl status cockpit

cockpit-service-status-ubuntu-20-04

Above output confirms that cockpit has been started successfully.

Access Cockpit Web Console

Cockpit listen its service on 9090 tcp port, in case firewall is configured on your Ubuntu server 20.04 then you have to allow 9090 port in firewall.

pkumar@ubuntu-20-04-server:~$ ss -tunlp | grep 9090
tcp   LISTEN  0       4096                  *:9090               *:*
pkumar@ubuntu-20-04-server:~$

Run following ‘ufw’ command to allow cockpit port in OS firewall,

pkumar@ubuntu-20-04-server:~$ sudo ufw allow 9090/tcp
Rule added
Rule added (v6)
pkumar@ubuntu-20-04-server:~$

Now access Cockpit web console using following url:

https://<Your-Server-IP>:9090

Cockpit-Ubuntu-20-04-Login-Console

Use the root credentials or sudo user credentials to login, in my case ‘pkumar’ is the sudo user for my setup.

Cockpit-Dashboard-Ubuntu-20-04

Perfect above screen confirms that we have successfully able to access and login cockpit dashboard. Let’s see what are the different administrative task that can be performed from this dashboard.

Administrative Task from Cockpit Web Console on Ubuntu 20.04 LTS Server

When we first time login to dashboard, it shows basic information about our system like package updates, RAM & CPU utilization and Hardware and system configuration etc.

1)    Apply System Updates

One of important administrative task is to apply system updates, from cockpit web console we can easily do this, go to the ‘System Updates’ option where we you will get the available updates for your system, example is shown below,

Software-Updates-Cockpit-Ubuntu-20-04-Server

If you wish to install all available updates, then click on “Install All Updates” option

Apply-Updates-Cockpit-Ubuntu-20-04

We will get the message on the screen to reboot the system after applying the updates. So, go ahead and click on “Restart System”

2)    Managing KVM Virtual Machine with cockpit

It is also possible that we can manage KVM VMs using cockpit web console but by default ‘Virtual Machine’ option is not enabled. To enable this option install ‘cockpit-machines’ using apt command,

$ sudo apt install cockpit-machines -y

Once the package is installed then logout and login to Cockpit console.

Virtual-Machines-Ubuntu-20-04-Cockpit

3)    View System Logs

From the ‘Logs’ tab we can view our system logs. System logs can also be viewed based on its severity.

Logs-ubuntu-20-04-cockpit

4)    Manage Networking with Cockpit

System networking can easily be managed via networking tab from cockpit web console. Here we can view our system Ethernet cards speed. We have the features like creating bonding and bridge interface. Apart from this we can also add VLAN tagged interfaces on our system.

Networking-ubuntu-20-04-cockpit

5)    Manage System and Application services

From the ‘services’ tab we can restart, stop and enable system and application services. If you wish to manage any service, just click on that service

Services-cockpit-Ubuntu-20-04-server

6)    Manage Local Accounts

If you want to manage local account then choose ‘Accounts’ tab from web console, here you can create new local accounts and change the parameters of existing users like password reset, roles and lock account.

Manage-Accounts-Cockpit-ubuntu-20-04

7)    Terminal Access

If you wish to access terminal of your system from cockpit dashboard then choose “Terminal” tab.

Cockpit-Terminal-Ubuntu-20-04

That’s all from this tutorial, I hope you got an idea on how to install and use Cockpit Web console effectively on Ubuntu 20.04 LTS Server. Please don’t hesitate to share your valuable feedback and comments.

The post How to Install Cockpit Web Console on Ubuntu 20.04 Server first appeared on Linuxtechi.

How to Configure NFS based Persistent Volume in Kubernetes

$
0
0

It is recommended to place pod’s data into some persistent volume so that data will be available even after pod termination. In Kubernetes (k8s), NFS based persistent volumes can be used inside the pods. In this article we will learn how to configure persistent volume and persistent volume claim and then we will discuss, how we can use the persistent volume via its claim name in k8s pods.

I am assuming we have a functional k8s cluster and NFS Server. Following are details for lab setup,

  • NFS Server IP = 192.168.1.40
  • NFS Share = /opt/k8s-pods/data
  • K8s Cluster = One master and two worker Nodes

Note: Make sure NFS server is reachable from worker nodes and try to mount nfs share on each worker once for testing.

Create a Index.html file inside the nfs share because we will be mounting this share in nginx pod later in article.

[kadmin@k8s-master ~]$ echo "Hello, NFS Storage NGINX" > /opt/k8s-pods/data/index.html

Configure NFS based PV (Persistent Volume)

To create an NFS based persistent volume in K8s, create the yaml file on master node with the following contents,

[kadmin@k8s-master ~]$ vim nfs-pv.yaml
apiVersion: v1
kind: PersistentVolume
metadata:
  name: nfs-pv
spec:
  capacity:
    storage: 10Gi
  volumeMode: Filesystem
  accessModes:
    - ReadWriteMany
  persistentVolumeReclaimPolicy: Recycle
  storageClassName: nfs
  mountOptions:
    - hard
    - nfsvers=4.1
  nfs:
    path: /opt/k8s-pods/data
    server: 192.168.1.40

Save and exit the file

NFS-PV-Yaml-File-K8s

Now create persistent volume using above created yaml file, run

[kadmin@k8s-master ~]$ kubectl create -f nfs-pv.yaml
persistentvolume/nfs-pv created
[kadmin@k8s-master ~]$

Run following kubectl command to verify the status of persistent volume

[kadmin@k8s-master ~]$ kubectl get pv
NAME     CAPACITY   ACCESS MODES   RECLAIM POLICY   STATUS      CLAIM   STORAGECLASS   REASON   AGE
nfs-pv   10Gi       RWX            Recycle          Available           nfs                     20s
[kadmin@k8s-master ~]$

Above output confirms that PV has been created successfully and it is available.

Configure Persistent Volume Claim

To mount persistent volume inside a pod, we have to specify its persistent volume claim. So,let’s create persistent volume claim using the following yaml file

[kadmin@k8s-master ~]$ vi nfs-pvc.yaml
apiVersion: v1
kind: PersistentVolumeClaim
metadata:
  name: nfs-pvc
spec:
  storageClassName: nfs
  accessModes:
    - ReadWriteMany
  resources:
    requests:
      storage: 10Gi

Save and exit file.

NFS-PVC-Yaml-k8s

Run the beneath kubectl command to create pvc using above yaml file,

[kadmin@k8s-master ~]$ kubectl create -f nfs-pvc.yaml
persistentvolumeclaim/nfs-pvc created
[kadmin@k8s-master ~]$

After executing above, control plane will look for persistent volume which satisfy the claim requirement with same storage class name and then it will bind the claim to persistent volume, example is shown below:

[kadmin@k8s-master ~]$ kubectl get pvc nfs-pvc
NAME      STATUS   VOLUME   CAPACITY   ACCESS MODES   STORAGECLASS   AGE
nfs-pvc   Bound    nfs-pv   10Gi       RWX            nfs            3m54s
[kadmin@k8s-master ~]$
[kadmin@k8s-master ~]$ kubectl get pv nfs-pv
NAME     CAPACITY   ACCESS MODES   RECLAIM POLICY   STATUS   CLAIM             STORAGECLASS   REASON   AGE
nfs-pv   10Gi       RWX            Recycle          Bound    default/nfs-pvc   nfs                     18m
[kadmin@k8s-master ~]$

Above output confirms that claim (nfs-pvc) is bound with persistent volume (nfs-pv).

Now we are ready to use nfs based persistent volume nside the pods.

Use NFS based Persistent Volume inside a Pod

Create a nginx pod using beneath yaml file, it will mount persistent volume claim on ‘/usr/share/nginx/html

[kadmin@k8s-master ~]$ vi nfs-pv-pod
apiVersion: v1
kind: Pod
metadata:
  name: nginx-pv-pod
spec:
  volumes:
    - name: nginx-pv-storage
      persistentVolumeClaim:
        claimName: nfs-pvc
  containers:
    - name: nginx
      image: nginx
      ports:
        - containerPort: 80
          name: "nginx-server"
      volumeMounts:
        - mountPath: "/usr/share/nginx/html"
          name: nginx-pv-storage

Save and close the file.

Pod-Using-PVC-K8s

Now create the pod using above yaml file, run

[kadmin@k8s-master ~]$ kubectl create -f nfs-pv-pod.yaml
pod/nginx-pv-pod created
[kadmin@k8s-master ~]$
[kadmin@k8s-master ~]$ kubectl get pod nginx-pv-pod -o wide
NAME           READY   STATUS    RESTARTS   AGE   IP              NODE           NOMINATED NODE   READINESS GATES
nginx-pv-pod   1/1     Running   0          66s   172.16.140.28   k8s-worker-2   <none>           <none>
[kadmin@k8s-master ~]$

Note: To get more details about pod , kubectl describe pod <pod-name>

Above commands output confirm that pod has been created successfully. Now try to access nginx page using curl command

[kadmin@k8s-master ~]$ curl http://172.16.140.28
Hello, NFS Storage NGINX
[kadmin@k8s-master ~]$

Perfect, above curl command’s output confirms that persistent volume is mounted correctly inside pod as we are getting the contents of index.html file which is present on NFS share.

This concludes the article, I believe you guys got some basic idea on how to configure and use NFS based persistent volume inside Kubernetes pods.

Also Read : How to Setup Highly Available Kubernetes Cluster with Kubeadm

The post How to Configure NFS based Persistent Volume in Kubernetes first appeared on Linuxtechi.


How to Install Zimbra Mail Server on CentOS 8 / RHEL 8

$
0
0

Mail server is one of the important server for any organization as all the communication are done via emails. There are number free and enterprise mail servers available in the IT world. Zimbra is one of the high rated mail server that comes in open source and enterprise edition. In this article, we touch base on how to install and configure single node open-source Zimbra mail server on CentOS 8 / RHEL 8 system.

Zimbra is also known as Zimbra Collaboration Suite (ZCS) because it consists numbers of components like MTA (postfix), Database (MariaDB), LDAP and MailboxdUI etc. Below is the architecture of Zimbra

Zimbra-Architecure-Overview

Minimum System Requirements for Open Source Zimbra Mail Server

  • Minimal CentOS 8/ RHEL 8
  • 8 GB RAM
  • 64-bit Intel / AMD CPU (1.5 GHz)
  • Separate Partition as /opt with at least 5 GB free space
  • Fully Qualified Domain Name (FQDN), like ‘zimbra.linuxtechi.com’
  • Stable Internet Connection with Fixed Internal / Public IP

Following are my Zimbra Lab Setup details:

  • Hostname: zimbra.linuxtechi.com
  • Domain: linuxtechi.com
  • IP address: 192.168.1.60
  • DNS Server: 192.168.1.51
  • SELinux : Enabled
  • Firewall : Enabled

Before jumping into the installation steps of Zimbra, let’s verify DNS records (A & MX) for our Zimbra Server, Login to your CentOS 8 / RHEL 8 system and use dig command to query dns records

Note: In case dig command is not available then install ‘bind-utils’ package

Run following dig command to query A record of our Zimbra server

[root@zimbra ~]# dig -t A zimbra.linuxtechi.com

DNS-A-Record-Zimbra-CentOS8-RHEL8

Run following dig command to query MX record for our domain ‘linuxtechi.com

[root@zimbra ~]# dig -t MX linuxtechi.com

Query-MX-Record-Zimbra-dig-command-CentOS8

Above outputs confirm that DNS records are configured correctly for our Zimbra mail server.

Read Also : How to Setup DNS Server (Bind) on CentOS 8 / RHEL8

Note: Before starting Zimbra installation, please make sure no MTA ( or mail server) configured on the system. In case it is installed then first disable its service and remove its package

# systemctl stop postfix
# dnf remove postfix -y

Let’s dive into Zimbra installation steps,

Step 1) Apply Updates, add entry in hosts file and reboot your system

Add the hostname entry in hosts file, run the following echo command,

[root@zimbra ~]# echo "192.168.1.60  zimbra.linuxtechi.com" >> /etc/hosts

Run the beneath command to apply all the available updates,

[root@zimbra ~]# dnf update -y

Once all the updates have been installed then reboot your system once.

[root@zimbra ~]# reboot

Step 2) Download Open source Zimbra Collaboration suite

As we discussed above, Zimbra comes in two editions, so use the following URLs to download

To Download it from the command line, run following commands,

[root@zimbra ~]# dnf install wget tar perl net-tools nmap-ncat -y
[root@zimbra ~]# wget https://files.zimbra.com/downloads/8.8.15_GA/zcs-8.8.15_GA_3953.RHEL8_64.20200629025823.tgz

Step 3) Start Zimbra Installation via installation script

Once the compressed Zimbra tar file is downloaded in step 2 then extract it in your current working directory using tar command,

[root@zimbra ~]# tar zxpvf zcs-8.8.15_GA_3953.RHEL8_64.20200629025823.tgz
[root@zimbra ~]# ls -l
total 251560
-rw-------. 1 root root      1352 Aug 30 10:46 anaconda-ks.cfg
drwxrwxr-x. 8 1001 1001      4096 Jun 29 11:39 zcs-8.8.15_GA_3953.RHEL8_64.20200629025823
-rw-r--r--. 1 root root 257588163 Jul  1 07:16 zcs-8.8.15_GA_3953.RHEL8_64.20200629025823.tgz
[root@zimbra ~]#

Go to the extracted directory and execute install script to begin the installation

[root@zimbra ~]# cd zcs-8.8.15_GA_3953.RHEL8_64.20200629025823
[root@zimbra zcs-8.8.15_GA_3953.RHEL8_64.20200629025823]# ls -l
total 24
drwxrwxr-x. 2 1001 1001  127 Jun 29 11:39 bin
drwxrwxr-x. 2 1001 1001   31 Jun 29 11:39 data
drwxrwxr-x. 3 1001 1001   34 Jun 29 11:39 docs
-rwxr-xr-x. 1 1001 1001 8873 Jun 29 11:39 install.sh
drwxrwxr-x. 3 1001 1001   18 Jun 29 11:39 lib
drwxrwxr-x. 3 1001 1001 4096 Jun 29 11:39 packages
-rw-rw-r--. 1 1001 1001  369 Jun 29 11:39 readme_binary_en_US.txt
-rw-rw-r--. 1 1001 1001  428 Jun 29 11:39 README.txt
drwxrwxr-x. 3 1001 1001   76 Jun 29 11:39 util
[root@zimbra zcs-8.8.15_GA_3953.RHEL8_64.20200629025823]# ./install.sh

Output of install script would be something like below

Press ‘Y’ to accept the license agreement

Accept-Zimbra-License-Agreement-Installation

In the next screen, press ‘Y’ to configure Zimbra package repository and install its components.

Configure-Zimbra-repsository-during-installation

In the next following screen, press ‘Y’ to modify the system,

press-y-to-modify-system-zimbra-installation-centos8

Once we press ‘Y’, it will start downloading and installing the Zimbra and its components. After the successful installation we will get the following screen:

Succesfull-installation-Zimbra-CentOS8

As we can see above, admin user’s password is not set, so press 7 and then 4 to assign password to admin user.

Admin-user-password-set-zimbra-installation

Once the password is set then press ‘r’ to go previous screen and then press ‘a’ to apply changes.

Apply-Changes-Zimbra-Installation-CentOS8

Once all the configurations are completed and Zimbra services are started successfully then we will get following screen:

Configuration-Completed-Zimbra-Installation-CentOS8

Perfect, above confirms that we have successfully installed Zimbra mail server. Before accessing its admin and web client portal, allow the following ports in OS firewall (In case firewall is disabled then you skip this step)

[root@zimbra ~]# firewall-cmd --add-service={http,https,smtp,smtps,imap,imaps,pop3,pop3s} --permanent
success
[root@zimbra ~]# firewall-cmd --add-port 7071/tcp --permanent
success
[root@zimbra ~]# firewall-cmd --add-port 8443/tcp --permanent
success
[root@zimbra ~]# firewall-cmd --reload
success
[root@zimbra ~]#

Step 4) Access Zimbra Mail Server Admin portal and Web Client

To Access Admin Portal, use the following URL:

https://zimbra.linuxtechi.com:7071/

Use the username as ‘admin’ and password that we set during the installation

Zimbra-Administration-Login-Page-CentOS8

Click on ‘Sign In

Zimbra-Admin-Portal-CentOS8

Note: After Zimbra installation on CentOS 8 / RHEL 8 system, I have found amavis was not running and when I checked Zimbra logs (/var/log/zimbra.log)  then I have found below error:

Sep  5 09:53:05 zimbra amavis[29288]: Net::Server: Binding to TCP port 10024 on host 127.0.0.1 with IPv4
Sep  5 09:53:05 zimbra amavis[29288]: Net::Server: Binding to TCP port 10024 on host ::1 with IPv6
Sep  5 09:53:05 zimbra amavis[29288]: (!)Net::Server: 2020/09/05-09:53:05 Can't connect to TCP port 10024 on ::1 [Cannot assign requested address]\n  at line 64 in file /opt/zimbra/common/lib/perl5/Net/Server/Proto/TCP.pm
Sep  5 09:53:05 zimbra amavis[29288]: Net::Server: 2020/09/05-09:53:05 Server closing!

I resolved amavis issue by adding the following parameter in /opt/zimbra/conf/amavisd.conf  file

$inet_socket_bind = '127.0.0.1';

and restarted the amavis service using following command,

[zimbra@zimbra ~]$ zmamavisdctl restart

To access web client, use the following URL:

https://zimbra.linuxtechi.com

Zimbra-Web-Client-Sign-CentOS8

After Entering credentials, click on ‘Sign In

Zimbra-Web-Client-Inbox

Step 5) Manage Zimbra from Command Line

All most all the Linux geeks prefer command line to manage their servers, so Zimbra can also be managed from command line with zmcontrol utility. All Zimbra related admin and operations task are performed with Zimbra user.

[root@zimbra ~]# su - zimbra
Last login: Sat Sep  5 09:51:41 BST 2020 on pts/1
[zimbra@zimbra ~]$ zmcontrol status
Host zimbra.linuxtechi.com
        amavis                  Running
        antispam                Running
        antivirus               Running
        dnscache                Running
        imapd                   Running
        ldap                    Running
        logger                  Running
        mailbox                 Running
        memcached               Running
        mta                     Running
        opendkim                Running
        proxy                   Running
        service webapp          Running
        snmp                    Running
        spell                   Running
        stats                   Running
        zimbra webapp           Running
        zimbraAdmin webapp      Running
        zimlet webapp           Running
        zmconfigd               Running
[zimbra@zimbra ~]$

If you want to restart Zimbra service then run,

[zimbra@zimbra ~]$ zmcontrol restart

Zimbra logs are stored in ‘/var/log/zimbra.log’ file. We should always refer this file while troubleshooting. Log files for individual components are stored under ‘/opt/zimbra/log’ directory.

[zimbra@zimbra ~]$ ls -l /opt/zimbra/log | more
total 6244
-rw-r-----. 1 zimbra zimbra  194710 Sep  5 12:40 access_log.2020-09-05
-rw-r-----. 1 zimbra zimbra       0 Sep  5 09:11 activity.log
-rw-r-----. 1 zimbra zimbra       6 Sep  5 09:58 amavis-mc.pid
-rw-r-----. 1 zimbra zimbra       6 Sep  5 09:58 amavisd.pid
-rw-r-----. 1 zimbra zimbra   16112 Sep  5 12:40 audit.log
-rw-r-----. 1 zimbra zimbra   10999 Sep  5 12:49 clamd.log
-rw-rw-r--. 1 zimbra zimbra       6 Sep  5 09:53 clamd.pid
-rw-r-----. 1 zimbra zimbra       0 Sep  5 09:11 ews.log
-rw-r-----. 1 zimbra zimbra    3427 Sep  5 11:54 freshclam.log
-rw-rw----. 1 zimbra zimbra       6 Sep  5 09:53 freshclam.pid
-rw-r-----. 1 root   root    553466 Sep  5 12:47 gc.log
-rw-r-----. 1 zimbra zimbra       6 Sep  5 09:54 httpd.pid
-rw-r-----. 1 zimbra zimbra    1241 Sep  5 09:54 httpd_error.log.2020-09-05
-rw-r-----. 1 zimbra zimbra       0 Sep  5 09:13 imapd-audit.log
-rw-r-----. 1 zimbra zimbra  247177 Sep  5 12:49 imapd.log
-rw-r-----. 1 zimbra zimbra     159 Sep  5 09:54 imapd.out
-rw-r-----. 1 zimbra zimbra       5 Sep  5 09:54 imapd.pid
-rw-r-----. 1 zimbra zimbra       6 Sep  5 09:51 logswatch.pid
-rw-r-----. 1 zimbra zimbra  584562 Sep  5 12:48 mailbox.log
-rw-r-----. 1 zimbra zimbra       6 Sep  5 09:51 memcached.pid
-rw-rw----. 1 zimbra zimbra   40340 Sep  5 12:48 myslow.log
-rw-rw----. 1 zimbra zimbra       6 Sep  5 09:51 mysql.pid
-rw-rw----. 1 zimbra zimbra   18266 Sep  5 09:51 mysql_error.log
-rw-r-----. 1 zimbra zimbra   20130 Sep  5 12:24 nginx.access.log
-rw-r-----. 1 zimbra zimbra   12652 Sep  5 12:24 nginx.log
-rw-r--r--. 1 root   root         6 Sep  5 09:51 nginx.pid
-rw-r-----. 1 zimbra zimbra       6 Sep  5 09:53 opendkim.pid
-rw-r-----. 1 zimbra zimbra       0 Sep  5 09:11 searchstat.log

Step 6) Uninstallation of Zimbra Server

For any reasons, if you wish to uninstall Zimbra server from your CentOS 8 / RHEL 8 system then go to Zimbra extracted folder and execute install script with ‘-u’ parameter, example is shown below:

[root@zimbra ~]# cd zcs-8.8.15_GA_3953.RHEL8_64.20200629025823
[root@zimbra zcs-8.8.15_GA_3953.RHEL8_64.20200629025823]# ./install.sh -u

That’s all from this tutorial, I hope you manage to install open source Zimbra server on your system by referring these steps. Please do share your feedback and comments.

Read Also : Top 7 Security Hardening Tips for CentOS 8 / RHEL 8 Server

The post How to Install Zimbra Mail Server on CentOS 8 / RHEL 8 first appeared on Linuxtechi.

How to Add Remote Linux Host to Cacti for Monitoring

$
0
0

In the previous guide, we demonstrated how you can install Cacti monitoring server on CentOS 8. This tutorial goes a step further and shows you how you can add and monitor remote Linux hosts on Cacti. We are going to add remote Ubuntu 20.04 LTS and CentOS 8 systems to the cacti server for monitoring.

Let’s begin.

Step 1)  Install SNMP service on Linux hosts

SNMP, short for Simple Network Management Protocol is a protocol used for gathering information about devices in a network. Using SNMP, you can poll metrics such as CPU utilization, memory usage, disk utilization, network bandwidth etc. This information will, later on, be graphed in Cacti to provide an intuitive overview of the remote hosts’ performance.

With that in mind, we are going to install and enable SNMP service on both Linux hosts:

On Ubuntu 20.04

To install snmp agent, run the command:

$ sudo apt install snmp snmpd -y

On CentOS 8

$ sudo dnf install net-snmp net-snmp-utils -y

SNMP starts automatically upon installation. To confirm this, confirm the status by running:

$ sudo systemctl status snmpd

If the service is not running yet, start and enable it on boot as shown:

$ sudo systemctl start snmpd

We can clearly see that the service is up and running. By default, SNMP runs listens on UDP port 161, You can verify this using the netstat command as shown.

$ sudo netstat -pnltu | grep snmpd

netstat-snmp-linux

Step 2) Configuring SNMP service

So far, we have succeeded in installing snmp service and confirmed that it is running as expected. The next course of action is to configure the snmp service so that data can be collected and shipped to the Cacti service.

The configuration file is located at /etc/snmp/snmpd.conf

For Ubuntu 20.04

We need to configure a few parameters. First, locate the sysLocation and sysContact directives. These define your Linux client’s Physical location.

Default-syslocation-syscontact-snmpd-linux

Therefore, feel free to provide your client’s location.

Syslocation-Syscontact-snmpd-ubuntu-20-04

Next, locate the agentaddress directive. This refers to the IP address and the port number that the agent will listen to.

Default-agent-address-snmpd-ubuntu-20-04

Adjust the directive as shown below where 192.168.2.106 is my client system’s address.

agentaddress  udp:192.168.2.106:161

AgentAddress-cacti-server-Ubuntu-20-04

The directive will now allow the system’s local IP to listen to any snmp requests. Next up, add the view directive below above the other view directives:

view     all      included     .1      80

View-Directive-snmpd-Ubuntu-20-04

Next, change the rocommunity attribute shown below

rocommunity  public default -V systemonly
to:
rocommunity  public default -V all

rocommunity-snmpd-linux

Finally, to ensure the snmp service is working as expected, run the command below on the Linux host.

$ sudo snmpwalk -v 1 -c public -O e 192.168.2.106

You should get some massive output as shown.

snmpwalk-command-cacti-ubuntu-20-04

For CentOS 8

In CentOS 8, the configuration is slightly different. First, locate the line that begins with the com2sec  directive as shown:

default-com2sec-directive-snmpd-centos8

We will specify a new security name known as AllUser and delete the notConfigUser as shown:

Update-com2sec-directive-snmpd-centos8

Next, locate the line that starts with the group directive as shown.

Default-Group-directive-snmpd-centos8

We will modify the second attribute and specify AllGroup as the group name and AllUser as the security name as previously defined.Change-group-directive-snmpd-centos8

In the view section, add this line

view    AllView         included        .1

View-Directive-snmpd-centos8

Finally, locate the line beginning with the access directive.

Default-access-directive-snmpd-centos8

Modify it as shown:

Change-access-directive-snmpd-centos8

Save the changes and exit the configuration file. Restart snmpd daemon for the changes to take effect

$ sudo systemctl restart snmpd

Also, enable the service to start on boot.

$ sudo systemctl enable snmpd

Once again, verify if the snmp configuration is working as expected using the snmpwalk command:

$ sudo snmpwalk -v 2c -c public -O e 127.0.0.1

snmpwalk-command-cacti-centos8

Perfect! everything seems to be running as expected.

Step 3) Configure the firewall rules for snmp

Next, we need to open udp port 161 to allow snmp traffic on both the Cacti server and Linux hosts.

For Ubuntu 20.04 host

Run the beneaths commands to allow udp port 161 in firewall,

$ sudo ufw allow 161/udp
$ sudo ufw reload

For CentOS 8 host

For CentOS 8 client and the Cacti server that also runs on CentOS 8, invoke the following commands:

$ sudo firewall-cmd --add-port=161/udp --zone=public --permanent
$ sudo firewall-cmd --reload

Head over to the Cacti server and run the commands shown to confirm that snmp is shipping metrics from the remote clients.

$ sudo snmpwalk -v 1 -c public -O e 192.168.2.106  # Ubuntu
$ sudo snmpwalk -v 2c -c public -O e 192.168.2.104 # CentOS

snmpwalk-from-cacti-server-centos8

Great! This confirms that the Cacti server is receiving system metrics from the remote Linux systems.

Step 4) Adding remote Linux host to Cacti

This is the last section where you have to add your remote Linux hosts. So, log in to the Cacti server and click on ‘Create devices’ as shown.

Create-Device-option-Cacti-Tool

In my case, my Ubuntu remote host was already detected by Cacti and listed as shown.

Auto-detected-remote-ubuntu-machine-cacti

Click on your device and be keen to notice the SNMP information at the very top as shown.

Remote-Ubuntu-snmp-information-Cacti-Toll

Next, scroll down and click on the ‘Save’ button.

Save-snmp-information-remote-ubuntu-cacti-tool

If your device is not listed, simply click on ‘Create’ > ‘Devices’ and fill out the details of your device like in the CentOS8 host as shown.

Create-device-remote-centos8-cacti-tool

Once the device is added, click on the ‘Graphs’ tab.

Graphs-Option-Cacti-Tool-CentOS8

On the next page, select your device’s name

Generate-Graph-Ubuntu-host-Cacti-Tool

Scroll all the way to the bottom and click the ‘Create’ button.

Choose-Create-Option-generate-graphs-cacti-tool

Wait about 10-20 minutes for the graphs to start being populated. Finally, you will start noticing the remote host’s statistics being graphed as shown.

Remote-Ubuntu-host-graphs-Cacti-Tool

And this brings a conclusion to this article. We are glad you were able to follow along the way. Do let us know how it went and we will gladly help out in case of any issues.

The post How to Add Remote Linux Host to Cacti for Monitoring first appeared on Linuxtechi.

How to Setup Jenkins on CentOS 8 / RHEL 8

$
0
0

In this article, we will acquire a knowledge of how-to setup the Jenkins on CentOS 8 or RHEL 8. We will also go through why there is a need of an additional tool for delivering a project. But before we start with all gun blazing and put this tool to work, we should know what it is exactly and why it is needed.

Jenkins is an open-source software for continuous software development. It is based on Java and it is the only tool which can be used in every part of software development cycle.

What is Jenkins ?

Jenkins is a CI/CD tool. Here CI means continuous integration and CD means continuous delivery. Jenkins is also considered as automation tool or server, It helps to automate software development which are related to building, testing and deploying. It is a server-based tool which runs on servlet containers like Apache Tomcat.

Why do we need Jenkins tool?

As maximum organization is now having agile process. Agile methodology is a practice that promotes both continuous integration and continuous delivery, it has scrum process that can be of 2/3 weeks, which is also known as scripts. In every sprint developers and tester has to do continuous development and testing with continuous integration and continuous delivery. In every sprint client get the privilege to check that the software/application is building according to the given requirement. They also have the leverage to change/update the requirement according to their business needs. This is one of the main reasons why Jenkins is one of the most popular tools in the market nowadays.

Prerequisites:

  • Minimal CentOS 8 / RHEL 8
  • User with sudo rights
  • Stable Internet Connection
  • For RHEL 8 system, active subscription is required.

Jenkins Lab details:

  • Host Name: Jenkins.linuxtechi.com
  • IP Address: 192.168.1.190
  • SELinux : Enabled
  • Firewall: Running

Installation Steps of Jenkins on CentOS 8 / RHEL 8

Step 1) Update hosts file and apply updates

Add the following hostname entry in /etc/hosts file, run below echo command:

[pkumar@jenkins ~]$ echo "192.168.1.190   jenkins.linuxtechi.com" | sudo tee -a /etc/hosts

Install all the available updates using the beneath dnf command,

[pkumar@jenkins ~]$ sudo dnf update -y

Once all the updates are installed successfully then reboot your system once.

[pkumar@jenkins ~]$ sudo reboot

Step 2) Enable Jenkins Package Repository

Run the following command to enable Jenkins package repository for CentOS 8 / RHEL 8,

[pkumar@jenkins ~]$ sudo dnf install wget -y
[pkumar@jenkins ~]$ sudo wget http://pkg.jenkins-ci.org/redhat-stable/jenkins.repo -O /etc/yum.repos.d/jenkins.repo

Run below rpm command to import GPG key for Jenkins packages

[pkumar@jenkins ~]$ sudo rpm --import https://pkg.jenkins.io/redhat/jenkins.io.key

Step 3) Install Java and Jenkins with dnf command

Java is one of the perquisites for Jenkins, so run below dnf command to install java

[pkumar@jenkins ~]$ sudo  dnf install -y java-11-openjdk-devel

Verify the java version using below command:

pkumar@jenkins ~]$ java --version

Java-version-check-centos8

Now install Jenkins using beneath dnf command,

[pkumar@jenkins ~]$ sudo dnf install -y jenkins

dnf-install-jenkins-centos8

Step 4) Start and Enable Jenkins Service via systemctl

Run following systemctl command to start and enable Jenkins service

[pkumar@jenkins ~]$ sudo systemctl start jenkins
[pkumar@jenkins ~]$ sudo systemctl enable jenkins

Verify Jenkins service status by running following command,

[pkumar@jenkins ~]$ sudo systemctl status jenkins

Jenkins-Service-Status-CentOS8

Above output confirms that Jenkins service is active and running.

Step 5) Configure firewall rules for jenkins  

Allow 8080 tcp port in OS firewall for Jenkins, run following firewall-cmd commands,

[pkumar@jenkins ~]$ sudo firewall-cmd --permanent --add-port=8080/tcp
[pkumar@jenkins ~]$ sudo firewall-cmd --reload

Step 6) Setting Up Jenkins with Web Portal

In this step, we will setup the Jenkins via its web portal, access its portal from the browser and type the URL:

http://<Server-IP>:8080

Unlock-Jenkins-CentOS8-RHEL8

The browser displays the unlock Jenkins page. It will ask to enter temporary password. To retrieve this password run following cat command from the terminal,

[pkumar@jenkins ~]$ sudo cat /var/lib/jenkins/secrets/initialAdminPassword
802dffd0fbb74fa2bde9e6c1264a5f10
[pkumar@jenkins ~]$

Copy and paste the password into the password field and then click on continue.

Password-Jenkins-CentOS8

Jenkins will now ask to install plugins. There will be two options ‘Install using suggested plugins‘ or ‘Select plugins to install‘. It is recommended to go with ‘Install using suggested plugins ‘. So Click on the first option

Install-suggessted-plugins-Jenkins-CentOS8

Plugins-Installation-Jenkins-CentOS8

Once all the suggested plugins are installed then setup wizard will prompt us to create admin user.

Admin-User-Creation-Jenkins-CentOS8

Click on ‘Save and Continue

Jenkins-url-setup-centos8

Click on ‘Save and Finish

Jenkins-Setup-Ready-CentOS8

Click on ‘Restart’, Once Jenkins is restarted then we will get following login page:

Signin-Jenkins-CentOS8

Use the same user credentials that we have created during the Jenkins setup.

Dashboard-Jenkins-CentOS8

Above screen confirms that Jenkins has been installed successfully. That’s all from this article, please do share your feedback and comments.

The post How to Setup Jenkins on CentOS 8 / RHEL 8 first appeared on Linuxtechi.

How to Setup Private Docker Registry in Kubernetes (k8s)

$
0
0

It is always recommended to have private docker registry or repository in your Kubernetes cluster. Docker private registry allows the developers to push and pull their private container images. Once the application’s containers are pushed to private registry then developers can use the path of their private registry while creating and deploying their yaml files.

In this article, we will learn how we can deploy private docker registry as a deployment on top of Kubernetes cluster. I am assuming Kubernetes cluster is already up and running.

Kubernetes lab details for setting up private docker registry

  • k8s-master – 192.168.1.40 – CentOS 7
  • k8s-worker-1 – 192.168.1.41 – CentOS 7
  • k8s-worker-2 – 192.168.1.42  – CentOS 7
  • kadmin user with sudo rights
  • NFS share ‘/opt/certs’ & ‘/opt/registry’

Note:  In my case, I have setup nfs server on master node and exported /opt/certs and /opt/registry as nfs share.

Before starting the deployment of private registry, please make sure these nfs shares are mounted on each worker nodes. Run the following commands on each worker node.

$ sudo mkdir /opt/certs /opt/registry
$ sudo mount 192.168.1.40:/opt/certs /opt/certs
$ sudo mount 192.168.1.40:/opt/registry /opt/registry

For permanent mount, add nfs entries in /etc/fstab file.

In place of mounting these nfs shares, we can also create nfs based persistent volumes and later we can use these persistent volumes in yaml file.

Let’s dive into installation and configuration steps of private docker registry in Kubernetes.

Step 1) Generate self-signed certificates for private registry

Login to your control plane or master node and use openssl command to generate self-signed certificates for private docker repository.

[kadmin@k8s-master ~]$ cd /opt
[kadmin@k8s-master opt]$ sudo openssl req -newkey rsa:4096 -nodes -sha256 -keyout ./certs/registry.key -x509 -days 365 -out ./certs/registry.crt

Private-Docker-Repo-Key-Cerificate-k8s

Once the key and certificate file are generated, use ls command to verify them,

[kadmin@k8s-master opt]$ ls -l certs/
total 8
-rw-r--r--. 1 root root 2114 Sep 26 03:26 registry.crt
-rw-r--r--. 1 root root 3272 Sep 26 03:26 registry.key
[kadmin@k8s-master opt]$

Step 2) Deploy private registry as deployment via yaml file

On your master node, create a private-registry.yaml file with the following contents

[kadmin@k8s-master ~]$ mkdir docker-repo
[kadmin@k8s-master ~]$ cd docker-repo/
[kadmin@k8s-master docker-repo]$ vi private-registry.yaml
apiVersion: apps/v1
kind: Deployment
metadata:
  name: private-repository-k8s
  labels:
    app: private-repository-k8s
spec:
  replicas: 1
  selector:
    matchLabels:
      app: private-repository-k8s
  template:
    metadata:
      labels:
        app: private-repository-k8s
    spec:
      volumes:
      - name: certs-vol
        hostPath:
          path: /opt/certs
          type: Directory
      - name: registry-vol
        hostPath:
          path: /opt/registry
          type: Directory

      containers:
        - image: registry:2
          name: private-repository-k8s
          imagePullPolicy: IfNotPresent
          env:
          - name: REGISTRY_HTTP_TLS_CERTIFICATE
            value: "/certs/registry.crt"
          - name: REGISTRY_HTTP_TLS_KEY
            value: "/certs/registry.key"
          ports:
            - containerPort: 5000
          volumeMounts:
          - name: certs-vol
            mountPath: /certs
          - name: registry-vol
            mountPath: /var/lib/registry

save and close the yaml file

private-registry-deployment-yaml-k8s

Run the following kubectl command deploy the private registry using above created yaml file,

[kadmin@k8s-master docker-repo]$ kubectl create -f private-registry.yaml
deployment.apps/private-repository-k8s created
[kadmin@k8s-master docker-repo]$

Execute below kubectl commands to verify status of registry deployment and its pod.

[kadmin@k8s-master ~]$ kubectl get deployments private-repository-k8s
NAME                     READY   UP-TO-DATE   AVAILABLE   AGE
private-repository-k8s   1/1     1            1           3m32s
[kadmin@k8s-master ~]$
[kadmin@k8s-master ~]$ kubectl get pods | grep -i private-repo
private-repository-k8s-85cf76b9d7-qsjxq   1/1     Running   0          5m14s
[kadmin@k8s-master ~]$

Perfect, above output confirms that registry has been deployed successfully, Now copy the registry certificate file to worker nodes and master node under the folder “/etc/pki/ca-trust/source/anchors“. Execute the following commands on master node and each worker nodes

$ sudo cp /opt/certs/registry.crt /etc/pki/ca-trust/source/anchors/
$ sudo update-ca-trust
$ sudo systemctl restart docker

Step 3) Expose registry deployment as a nodeport service type

To expose registry deployment as a nodeport service type, create the following yaml file with the beneath contents,

[kadmin@k8s-master ~]$ cd docker-repo/
[kadmin@k8s-master docker-repo]$ vi private-registry-svc.yaml
apiVersion: v1
kind: Service
metadata:
  labels:
    app: private-repository-k8s
  name: private-repository-k8s
spec:
  ports:
  - port: 5000
    nodePort: 31320
    protocol: TCP
    targetPort: 5000
  selector:
    app: private-repository-k8s
  type: NodePort

save and close the file.

Now deploy the service by running following kubectl command,

[kadmin@k8s-master docker-repo]$ kubectl create -f private-registry-svc.yaml
service/private-repository-k8s created
[kadmin@k8s-master docker-repo]$

Run below kubectl command to verify the service status,

[kadmin@k8s-master ~]$ kubectl get svc private-repository-k8s
NAME                     TYPE       CLUSTER-IP      EXTERNAL-IP   PORT(S)          AGE
private-repository-k8s   NodePort   10.100.113.39   <none>        5000:31320/TCP   2m1s
[kadmin@k8s-master ~]$

Step 4) Test and Use private docker registry in k8s

To test private registry, we will download nginx image locally and then will upload that image to private registry, from the master node run the following set of commands,

[kadmin@k8s-master ~]$ sudo docker pull nginx
[kadmin@k8s-master ~]$ sudo docker tag nginx:latest k8s-master:31320/nginx:1.17
[kadmin@k8s-master ~]$ sudo docker push k8s-master:31320/nginx:1.17

Output of above command would like below:

Docker-push-command-example

Run below docker command to verify whether nginx is uploaded to private repository or not.

[kadmin@k8s-master ~]$ sudo docker image ls | grep -i nginx
nginx                                latest              7e4d58f0e5f3        2 weeks ago         133MB
k8s-master:31320/nginx               1.17                7e4d58f0e5f3        2 weeks ago         133MB
[kadmin@k8s-master ~]$

Now, let’s deploy a nginx based deployment and in the yaml file specify the image’s path as our private docker registry. Example is shown below:

[kadmin@k8s-master ~]$ vi nginx-test-deployment.yaml
apiVersion: apps/v1
kind: Deployment
metadata:
  name: nginx-test-deployment
  labels:
    app: nginx
spec:
  replicas: 3
  selector:
    matchLabels:
      app: nginx
  template:
    metadata:
      labels:
        app: nginx
    spec:
      containers:
      - name: nginx-1-17
        image: k8s-master:31320/nginx:1.17
        ports:
        - containerPort: 80

Save and Close the file

private-repository-deployment-yaml

Run following kubectl commands,

[kadmin@k8s-master ~]$ kubectl create -f nginx-test-deployment.yaml
deployment.apps/nginx-test-deployment created
[kadmin@k8s-master ~]$ kubectl get deployments  nginx-test-deployment
NAME                    READY   UP-TO-DATE   AVAILABLE   AGE
nginx-test-deployment   3/3     3            3           13s
[kadmin@k8s-master ~]$
[kadmin@k8s-master ~]$ kubectl get  pods | grep nginx-test-deployment
nginx-test-deployment-f488694b5-2rvmv     1/1     Running   0          80s
nginx-test-deployment-f488694b5-8kb6c     1/1     Running   0          80s
nginx-test-deployment-f488694b5-dgcxl     1/1     Running   0          80s
[kadmin@k8s-master ~]$

Try to describe any pod using ‘kubectl describe‘ command and verify image path

[kadmin@k8s-master ~]$ kubectl describe pod nginx-test-deployment-f488694b5-2rvmv

Output of above command would be,

kubectl-describe-pod-k8s

Above output confirms that container’s image path is our private docker registry, so it means nginx image has been downloaded from private registry. That’s all from this article, I hope these steps help you to setup private docker registry on your Kubernetes cluster. Please do share your feedback and comments in the comments section below.

The post How to Setup Private Docker Registry in Kubernetes (k8s) first appeared on Linuxtechi.

How to Install and Use Terraform on CentOS 8

$
0
0

In this guide, we will show you how to install and use Terraform on CentOS 8. Before we proceed further, what is Terraform? Created by Hashicorp, Terraform is a free and opensource declarative coding tool that allows you to automate and manage your IT infrastructure and various services that run on servers. In fact, Terraform is popularly referred to as ‘Infrastructure as a Code’ tool.

Terraform makes use of a simple syntax to efficiently and safely provision resources across on-premise and cloud platforms such as Microsoft Azure, Google Cloud Platform and AWS. Where required, it can also re-provision these changes in response to changes in configuration.

Without much further ado, let us walk you through the installation steps.

Installation of Terraform on CentOS 8

First up, head over to the official Terraform download site and download the latest zip file. By the time of writing down this guide, the latest version is Terraform 0.13.3. To download use the wget command as shown

[james@linuxtechi ~]$ wget https://releases.hashicorp.com/terraform/0.13.3/terraform_0.13.3_linux_amd64.zip

Once downloaded, unzip the file to the /usr/local/bin path using the -d switch as shown.

[james@linuxtechi ~]$ sudo unzip terraform_0.13.3_linux_amd64.zip -d /usr/local/bin
Archive:  terraform_0.13.3_linux_amd64.zip
  inflating: /usr/local/bin/terraform
[james@linuxtechi ~]$

Alternatively, you can locally unzip the file in your current working directory and later move the unzipped directory to the /usr/local/bin destination.

[james@linuxtechi ~]$  unzip terraform_0.13.3_linux_amd64.zip
[james@linuxtechi ~]$  mv terraform /usr/local/bin

To confirm that everything went as expected, invoke the following command:

[james@linuxtechi ~]$ terraform -v
Terraform v0.13.3
[james@linuxtechi ~]$

And that’s it! We are done installing Terraform.  The output confirms that Terraform is successfully installed on our system. As you can see, installing Terraform is quite a simple and straightforward procedure.

Terraform in action – Deploying a VM in GCP

To get a better understanding of how Terraform can be used to provision resources, we are going to demonstrate how to deploy a vm on Google cloud.

But first, you need to have a Google Cloud account with billing enabled. Usually, you get $300 worth of free credit during your free trial. In this demo, we are using a free trial.

Once you have logged in, click on the cloud shell icon as shown

Activate-Cloud-Shell-Terraform

This will initialize the Google cloud shell at the bottom of your screen. This usually takes a few seconds.

GCP-Cloud-shell-Screen

Next, we are going to install Terraform locally using docker to make it more convenient. To make it more persistent on restarts, we will install it into $HOME/bin as shown.

$ docker run -v $HOME/bin:/software sethvargo/hashicorp-installer terraform 0.13.3
$ sudo chown -R $(whoami):$(whoami) $HOME/bin/

Next, add bin to the path as shown

$ export PATH=$HOME/bin:$PATH

At this point, terraform is installed. Next, you need to enable the Cloud Engine API to make the API available for use.

$ gcloud services enable compute.googleapis.com

We are going to download a terraform configuration file from Github. The configuration file initializes a compute instance (virtual machine) that installs Apache webserver with a custom configuration. The compute engine is assigned a unique name and an external IP address that you will use to access the webserver.  To download the config file, run:

$ curl -sSfO https://raw.githubusercontent.com/sethvargo/terraform-gcp-examples/master/public-instance-webserver/main.tf

Use cat command to view the contents of main.tf file

$ cat main.tf

Here’s just a snippet of the file.

main-tf-terraform-gcp-instance

Using terraform command, proceed and initialize terraform to download Google’s latest version and random providers.

$ terraform init

If all goes well, you will get a notification at the very end showing you that Terraform has been initialized.

Terraform-initialization-gcp

To validate the configuration syntax and have a glance of the expected outcome run the command below. In the output, Terraform creates a google compute instance, a google firewall rule together with a random_id resource among other things

$ terraform plan

To apply the changes, issue the apply command as shown.

$ terraform apply

At some point, you will come across the output below. Type ‘Yes’ and press ‘ENTER’ to proceed.

Actions-Terraform-gcp

After the completion of the application process, you will get the output shown as a confirmation that everything went on just fine.

Terraform-Completions-Screen-GCP

Right at the bottom, the external IP address of the compute instance will be displayed. Copy and paste it on your system’s browser and view your instance’s welcome page as shown.

Terraform-Page-GCP

Bravo! We have managed to deploy a virtual instance using Terraform. When you are done and no longer require it, simply invoke the command:

$ terraform destroy

Once again, type in ‘Yes’ when prompted to discard the instance.

Terrafrom-destroy-gcp

That was a brief overview of just how useful Terraform can be in deploying cloud resources.  It’s our hope that you can now comfortably install Terraform on CentOS 8 and get started with provisioning your resources and managing different services.

The post How to Install and Use Terraform on CentOS 8 first appeared on Linuxtechi.

Viewing all 465 articles
Browse latest View live