Quantcast
Channel: How To
Viewing all 452 articles
Browse latest View live

How to Install Graylog with Elasticsearch on CentOS 8

$
0
0

This guide takes you through the installation of Graylog with Elasticsearch 7.x on CentOS 8. Graylog is an opensource log management solution that was founded in 2009 for capturing and centralizing real-time logs from various devices in a network. It’s a perfect tool for analyzing crucial logs such as SSH logins, breaches or any fishy or unusual incidents which may point to a system breach. With real-time logging capability, it comes across as perfect cybersecurity tool that operation teams can use to mitigate small issues before they snowball into huge threats.

Graylog is made up of 3 crucial components:

  • Elasticsearch: This is an opensource analytics engine that indexes data received from the Graylog server.
  • MongoDB: This is an opensource NoSQL database that stores meta information and configurations.
  • Graylog server: This passes logs and provides a web interface where logs are visualized.

With that summary, we are going to right away install Graylog on CentOS 8.

Prerequisites for Graylog server

As you get started, ensure your CentOS 8 instance meets the following requirements:

  • 2 CPUs
  • 4 GB RAM
  • Fast and stable internet connection

Step 1) Install Java 8 with dnf command

Elasticsearch is built on Java and thus, we need to install Java and more specifically Java 8 before anything else. You have the option of installing OpenJDK or Oracle Java. In this guide, we are installing OpenJDK 8.

$ sudo dnf install -y java-1.8.0-openjdk java-1.8.0-openjdk-devel

To confirm the version of Java installed, run:

$ java -version

Java-Version-Check-CentOS8

Step 2) Install Elasticsearch 7.x

We are going to install the latest version of Elasticsearch which by the time of penning down this guide, is Elasticsearch 7.9.2. Elasticsearch is not available on CentOS 8 repositories, and so we will create a local repository. But first, let’s import the GPG key as shown.

$ sudo rpm --import https://artifacts.elastic.co/GPG-KEY-elasticsearch

Using your text editor, create a new repository file as shown:

$ sudo vi /etc/yum.repos.d/elasticsearch.repo

Paste the content shown below

[elasticsearch-7.x]
name=Elasticsearch repository for 7.x packages
baseurl=https://artifacts.elastic.co/packages/7.x/yum
gpgcheck=1
gpgkey=https://artifacts.elastic.co/GPG-KEY-elasticsearch
enabled=1
autorefresh=1
type=rpm-md

Save and exit the configuration file. To install Elasticsearch, run the command:

$ sudo dnf install -y elasticsearch

Install-elasticsearch-centos8

Once the installation is complete, notify systemd and enable Elasticsearch.

$ sudo systemctl daemon-reload
$ sudo systemctl enable elasticsearch

We need to make Elasticsearch work with Graylog and therefore, we will update the cluster name to ‘graylog’ as shown:

$ sudo vi /etc/elasticsearch/elasticsearch.yml
.........
cluster.name:  graylog
.........

Save & exit the file and restart elasticsearch for the changes to take effect.

$ sudo systemctl restart elasticsearch

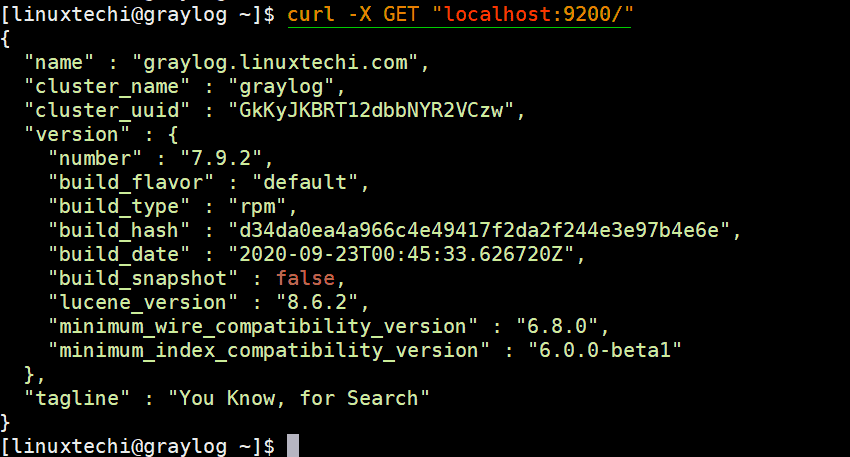
To verify that Elasticsearch is running, we will send a HTTP request via port 9200 as shown.

$ curl -X GET "localhost:9200/"

You should get the output as shown below.

Elasticsearch-Status-CentOS8

Step 3) Install MongoDB 4

To install MongoDB, create a local repository file

$ sudo vi /etc/yum.repos.d/mongodb-org-4.repo

Paste the configuration shown below

[mongodb-org-4]
name=MongoDB Repository
baseurl=https://repo.mongodb.org/yum/redhat/8/mongodb-org/4.2/x86_64/
gpgcheck=1
enabled=1
gpgkey=https://www.mongodb.org/static/pgp/server-4.2.asc

Save and exit and then install MongoDB using the command shown.

$ sudo dnf install -y mongodb-org

Once MongoDB is installed then start MongoDB and confirm its status as shown

$ sudo systemctl start mongod
$ sudo systemctl enable mongod
$ sudo systemctl status mongod

MongoDB-Service-Status-CentOS8

Perfect, above output confirms that mongodb service is started successfully and running fine.

Step 4) Install and configure Graylog server

To install the Graylog server, first begin by installing the Graylog repository as shown:

$ sudo rpm -Uvh https://packages.graylog2.org/repo/packages/graylog-3.3-repository_latest.rpm

Once the repository is added, install the Graylog server as shown.

$ sudo dnf install -y graylog-server

Install-Graylog-Server-with-dnf-CentOS8

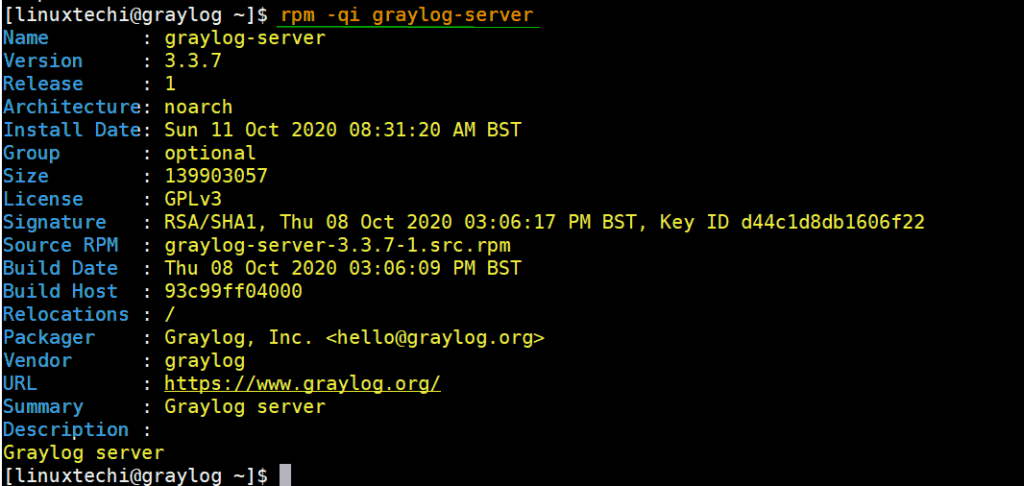
Upon successful installation, you can confirm more details about the Graylog server by running:

$ rpm -qi graylog-server

Graylog-Server-RPM-Info-CentOS8

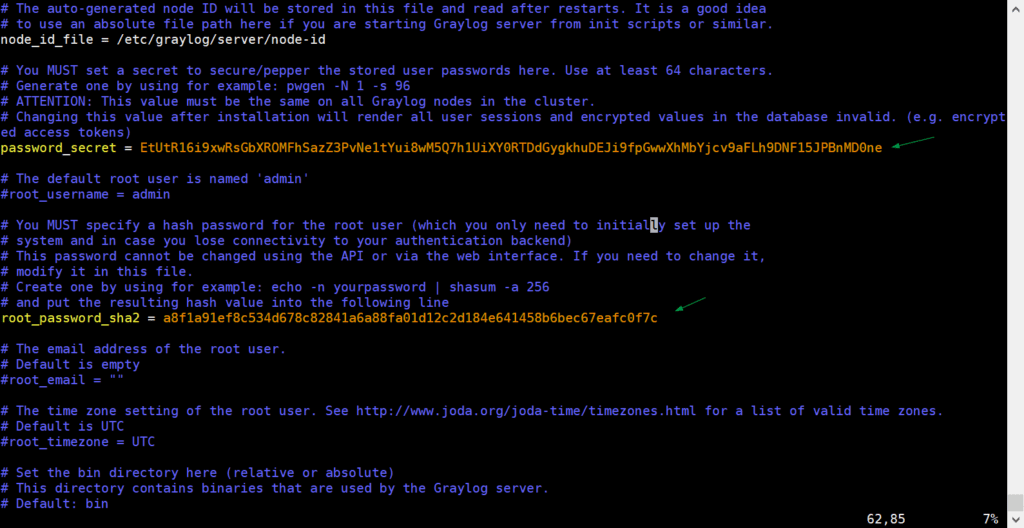
Let’s now make a few configurations. First, we will generate a secret password that will be passed in the password_secret directive in the /etc/graylog/server/server.conf configuration file. To do this we will generate a random password using a random password generator called pwgen. To install it, first we need to enable EPEL repository for CentOS 8.

$ sudo dnf install -y epel-release
$ sudo dnf install -y pwgen

Once installed, you can generate a random password using the command.

$ sudo pwgen -N 1 -s 96

Output of command would be look like below:

[linuxtechi@graylog ~]$ sudo pwgen -N 1 -s 96
EtUtR16i9xwRsGbXROMFhSazZ3PvNe1tYui8wM5Q7h1UiXY0RTDdGygkhuDEJi9fpGwwXhMbYjcv9aFLh9DNF15JPBnMD0ne
[linuxtechi@graylog ~]$

Copy the encrypted password and save it somewhere, preferably on a text editor. You will need this somewhere else.

Next, generate a password for the root_password_sha2 attribute as shown.

$ echo -n Gr@yLog@123# | sha256sum

Output would be,

[linuxtechi@graylog ~]$ echo -n Gr@yLog@123# | sha256sum
a8f1a91ef8c534d678c82841a6a88fa01d12c2d184e641458b6bec67eafc0f7c  -
[linuxtechi@graylog ~]$

Once again, save this encrypted password somewhere. Now open Graylog’s configuration file.

$ sudo vi /etc/graylog/server/server.conf

Locate the password_secret and root_password_sha2 attributes and paste the corresponding encrypted passwords.

password-secret-root-password-graylog-centos8

Next, uncomment the http_bind_address attribute and enter your server’s IP.

http-bind-address-graylog-centos8

Reload systemd, start and enable Graylog.

$ sudo systemctl daemon-reload
$ sudo systemctl start graylog-server
$ sudo systemctl enable graylog-server

Run following command to verify the Graylog service status:

$ sudo systemctl status graylog-server

Graylog-Service-Status-CentOS8

You can also verify the graylog service status using its log file “/var/log/graylog-server/server.log

Allow Graylog Server in firewall:

In case firewall is enabled and running then allow 9000 tcp port using beneath commands,

$ sudo firewall-cmd --permanent --add-port=9000/tcp
$ sudo firewall-cmd --reload

To access Graylog on a browser, browse your server’s IP address as shown:

http://server-IP:9000

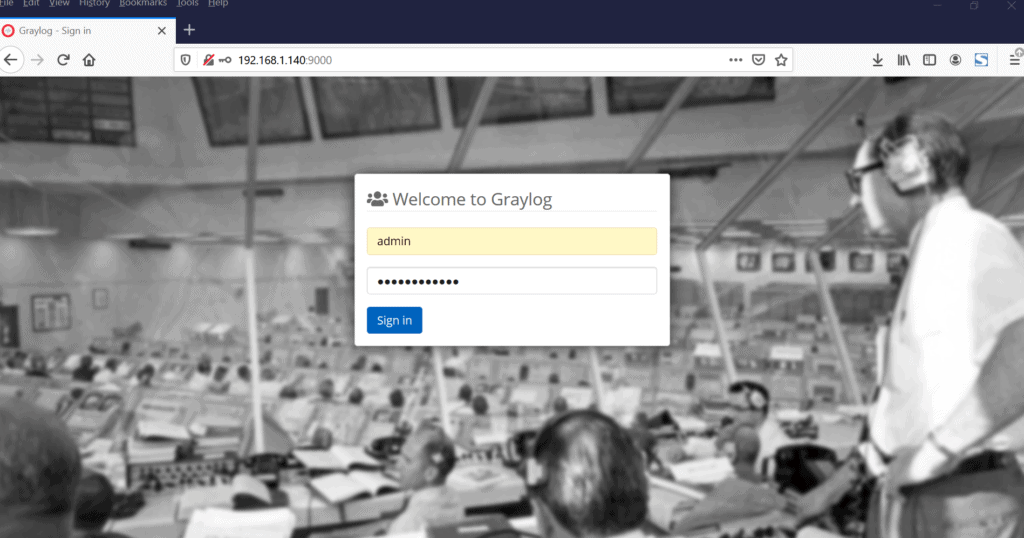
Be sure to log in with the username admin and the password that your set for the root user as specified in the configuration file.

Graylog-Login-Page-CentOS8

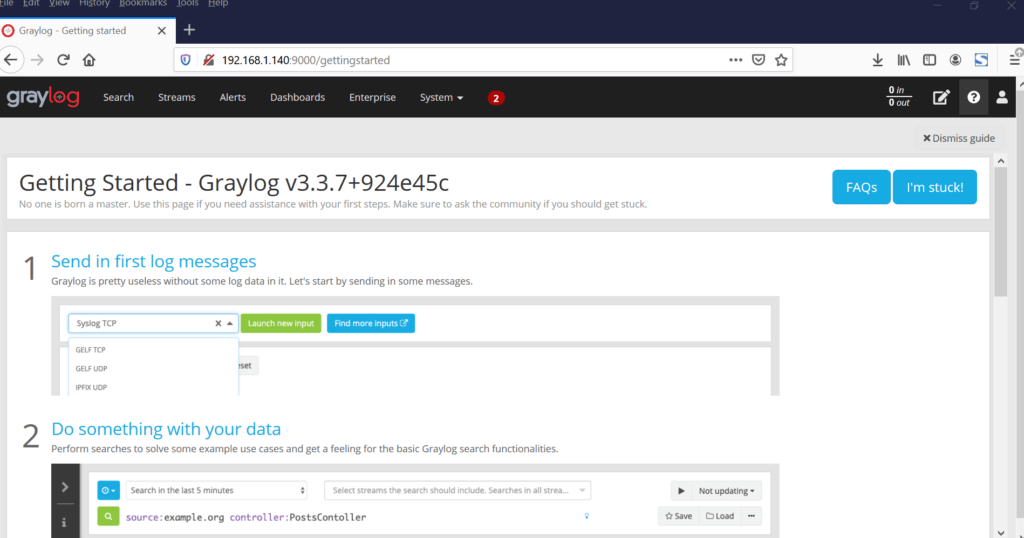
Graylog-Dashboard-CentOS8

This wraps up our topic for today. We have taken you a step-by-step procedure of installing Graylog on CentOS 8. Please do share your feedback and comments.

The post How to Install Graylog with Elasticsearch on CentOS 8 first appeared on Linuxtechi.


How to Run Jenkins Server in Docker Container with Systemd

$
0
0

Repetitive tasks are usually tedious and end up taking up a lot of your time and energy. Over time, multiple automation tools have been developed to help alleviate the hassle of executing repetitive jobs. One such automation tool is Jenkins. Jenkins is an opensource automation server that is designed to help software developers build, test and deploy applications and thereby streamline the continuous integration and delivery process.  We have penned an article before on how to install Jenkins on CentOS 8/ RHEL 8. In this article, we will do things a little different and run the Jenkins server in a Docker container as a systemd service.

Prerequisites

A few things are required before you continue.

  • Docker installed on your Linux system.
  • A regular user with sudo privileges.

Step 1) Install Docker Engine

To begin, you need to have Docker engine installed on your system. We have a detailed article on how to install Docker on CentOS 8 / RHEL 8. Run below docker command to display the docker version

$ sudo docker version

Docker-Version-Check-CentOS8

From the snippet above, we have confirmed that docker is installed and that we are running docker version 19.03.13.

Step 2) Create a Jenkins user

Next, we will create a ‘Jenkins’ system user that will manage Jenkins service. But first, create a system group for Jenkins:

$ sudo groupadd --system jenkins

Then create Jenkins system user

$ sudo useradd -s /sbin/nologin --system -g jenkins jenkins

And finally add Jenkins user to docker group as shown:

$ sudo usermod -aG docker jenkins

To confirm that Jenkins user is added to the docker group, run the id command as shown

$ id jenkins

Output will be,

[linuxtechi@centos8 ~]$ id jenkins
uid=991(jenkins) gid=986(jenkins) groups=986(jenkins),989(docker)
[linuxtechi@centos8 ~]$

Fantastic! Let’s proceed and pull a Jenkins image.

Step 3)  Pull Jenkins Image from Docker hub

Invoke the following command to pull the latest Jenkins image from Docker hub.

$ sudo docker pull jenkins/jenkins:lts

Download-Jenkins-Docker-Image-CentOS8

This usually takes a few seconds on a fairly stable internet connection. Once downloaded, verify that the Jenkins image is present by invoking the following command:

$ sudo docker images | grep jenkins

Output of above command would be:

[linuxtechi@centos8 ~]$ sudo docker images | grep jenkins
jenkins/jenkins     lts                 f669140ba6ec        6 days ago          711MB
[linuxtechi@centos8 ~]$

Jenkins requires a persistent storage to store data and re-use even in the event of a container crash. Therefore, we will create a storage directory as shown.

$ sudo mkdir /var/jenkins
$ sudo chown -R 1000:1000 /var/jenkins

Step 4) Create a systemd service for Jenkins

Using your preferred text editor, create a Jenkins systemd file as shown:

$ sudo vi /etc/systemd/system/jenkins-docker.service

Paste the following contents & save the file.

[Unit]
Description=Jenkins Server
Documentation=https://jenkins.io/doc/
After=docker.service
Requires=docker.service

[Service]
Type=simple
User=jenkins
Group=jenkins
TimeoutStartSec=0
Restart=on-failure
RestartSec=30s
ExecStartPre=-/usr/bin/docker kill jenkins-server
ExecStartPre=-/usr/bin/docker rm jenkins-server
ExecStartPre=/usr/bin/docker pull jenkins/jenkins:lts
ExecStart=/usr/bin/docker run  --name jenkins-server  --publish 8080:8080 --publish 50000:50000  --volume /var/jenkins:/var/jenkins_home  jenkins/jenkins:lts
SyslogIdentifier=jenkins
ExecStop=/usr/bin/docker stop jenkins-server

[Install]
WantedBy=multi-user.target

To start Jenkins service, reload systemd first and thereafter start Jenkins.

$ sudo systemctl daemon-reload
$ sudo systemctl start jenkins-docker

Let’s now check if Jenkins is running. To do so, we will execute:

$ sudo systemctl status jenkins-docker

Jenkins-Service-Status-CentOS8

Great ! Jenkins is up and running as a systemd service. Since Jenkins will be running on port 8080, open the port on the firewall as shown:

$ sudo firewall-cmd --permanent --add-port=8080/tcp
$ sudo firewall-cmd --reload

To set up Jenkins, simply browse the server’s URL as shown

http://server-ip:8080

You will get the ‘Unlock Jenkins’ page as shown. To proceed, you need to provide the password that is located in the file shown

[linuxtechi@centos8 ~]$ cat /var/jenkins/secrets/initialAdminPassword
9c61bd823a404056bf0a408f4622aafc
[linuxtechi@centos8 ~]$

Once done, Click on ‘Continue

Enter-Jenkins-Admin-Password-CentOS8

Next, select ‘Install suggested plugins’ option as shown.

Choose-Install-suggested-plugins-Jenkins-docker

Thereafter, create an administrative user for the Jenkins account and click ‘Save and continue

Setup-Wizard-Jenkins-Account

The installer will guide you through the remaining steps right to the very end. After successfull Installation, we will get the following Jenkins dashboard

Dashboard-Jenkins-Docker-Container-CentOS8

And it’s a wrap. In this guide, you learned how to run Jenkins inside a docker container as a systemd service.

Also ReadHow to Install and Configure Jenkins on Ubuntu 20.04

The post How to Run Jenkins Server in Docker Container with Systemd first appeared on Linuxtechi.

How to Install OpenLiteSpeed Web Server on CentOS 8/RHEL 8

$
0
0

When it comes to opensource web servers, Apache and Nginx usually take the lion’s share in the hosting space and will often get the most attention. But those aren’t the only opensource web servers in the market which offer great performance and impressive stability. OpenLiteSpeed is yet another powerful, lightweight and opensource HTTP web server that is developed by LightSpeed technologies under the GPLv3.0 license. Notable features include:

  • An intuitive web-based admin GUI that displays real-time statistics.
  • Event-drive architecture with low resource overheads (RAM & CPU).
  • Efficient page caching.
  • Remarkable scalability thanks to worker processes.
  • Ability to handle thousands of concurrent connections without yielding load spikes.
  • Support for third-party modules.

And so much more.

In this guide, we will walk you the installation of OpenLiteSpeed on CentOS 8 / RHEL 8 system.

Step 1) Configure OpenLiteSpeed Repository

Before anything else, the first step is to add the OpenLiteSpeed repository to your CentOS 8 or RHEL 8 instance. This will allow you to install the OpenLiteSpeed web server and associated packages and dependencies. Therefore, log into your server instance and invoke the command below.

$ sudo rpm -Uvh http://rpms.litespeedtech.com/centos/litespeed-repo-1.1-1.el8.noarch.rpm

Then update the package lists as shown:

$ sudo dnf update

Step 2) Install PHP from OpenLiteSpeed Repositories

In this step, we are going to install PHP 7.4 using OpenLiteSpeed repository colloquially referred to as LSPHP. But before that, ensure that you have added the EPEL repo using the command:

$ sudo dnf install -y epel-release

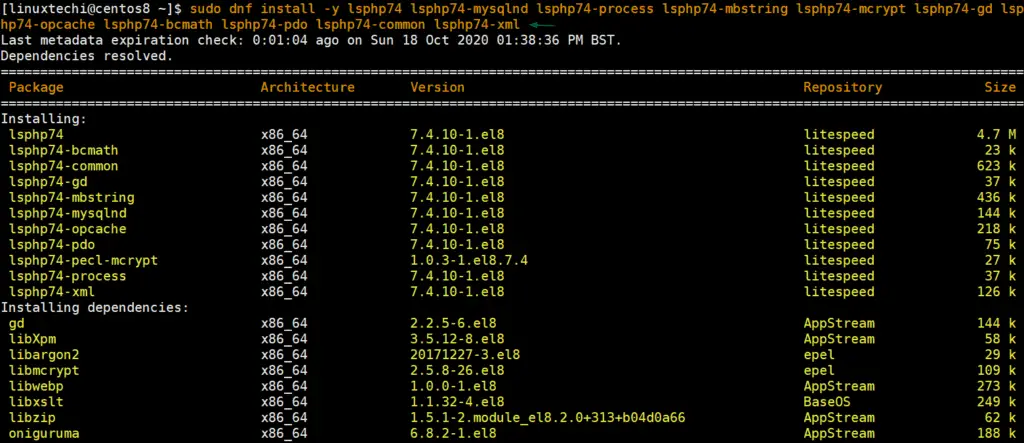
After installing the EPEL repo, install LSPHP as shown

$ sudo dnf install -y lsphp74 lsphp74-mysqlnd lsphp74-process lsphp74-mbstring lsphp74-mcrypt lsphp74-gd lsphp74-opcache lsphp74-bcmath lsphp74-pdo lsphp74-common lsphp74-xml

Install-lsphp74-centos8-dnf-command

Once PHP packages have been installed successfully using above dnf command then let’s install MariaDB database server.

Step 3) Install & Secure MariaDB database server

To install MariaDB database server, run:

$ sudo dnf install -y mariadb mariadb-server

Once installed, start mariadb database server by running:

$ sudo systemctl start mariadb
$ sudo systemctl enable mariadb

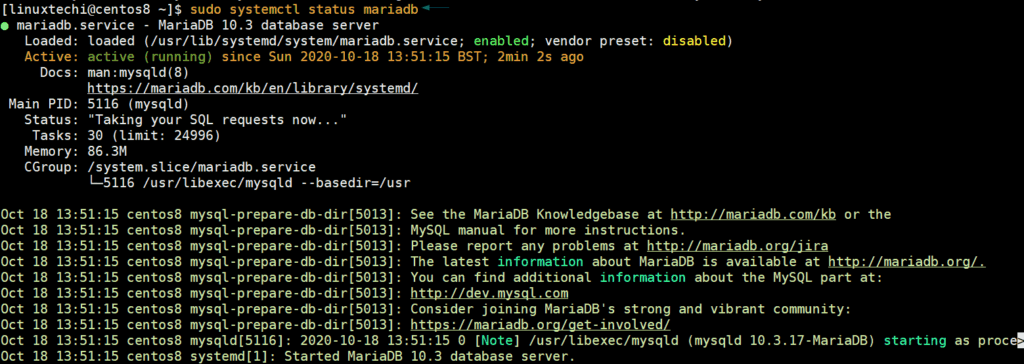
Run following systemctl command to check status of mariadb service,

$ sudo systemctl status mariadb

Mariadb-Server-Service-Status-CentOS8

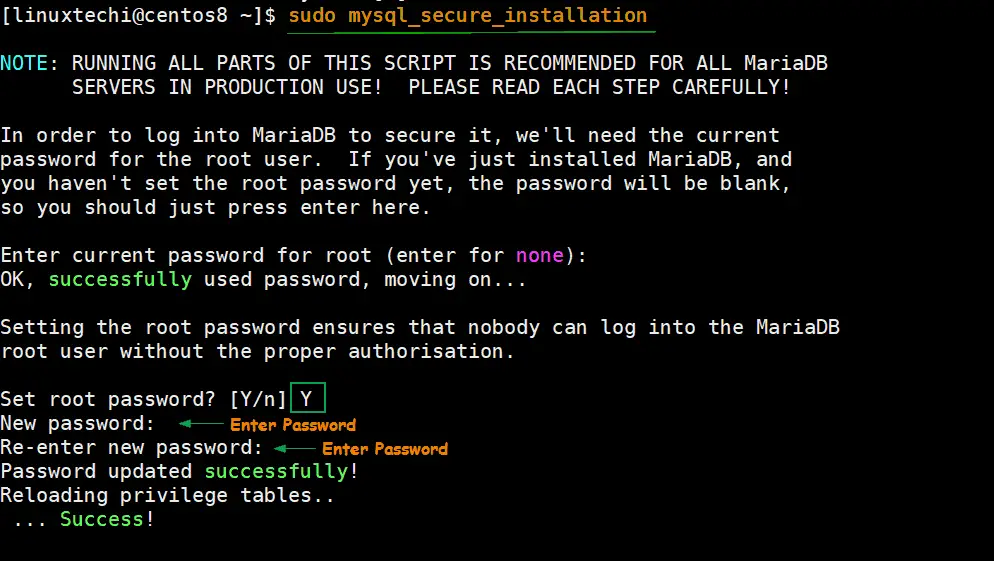
By default, MariaDB is not secure and therefore, we need to take some extra steps to secure it and avoid breaches. To do so, run:

$ sudo mysql_secure_installation

Begin by setting the root password if none was assigned.

mysql-secure-Installation-centos8-part1

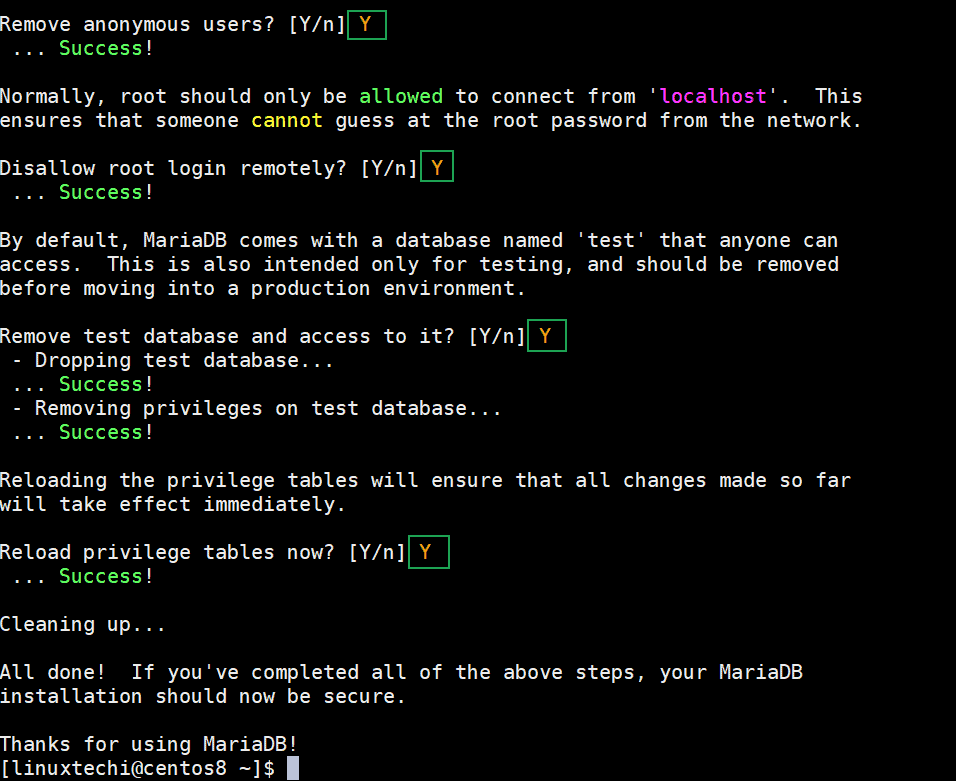
For the remainder of the prompts. Simply press ‘Y’ for Yes to enforce best practice settings.

mysql-secure-Installation-centos8-part2

Step 4) Install OpenLiteSpeed with dnf command

Now, you need to get OpenLiteSpeed installed on your CentOS 8 instance. To install the web server, simply invoke the following dnf command:

$ sudo dnf install -y openlitespeed

Once the installation is completed, you can check the status of the web server using the command:

$ sudo systemctl status lsws

OpenLiteSpeed-server-status-CentOS8

If the web server is not active and running, you can start it by running the command:

$ sudo systemctl start lsws

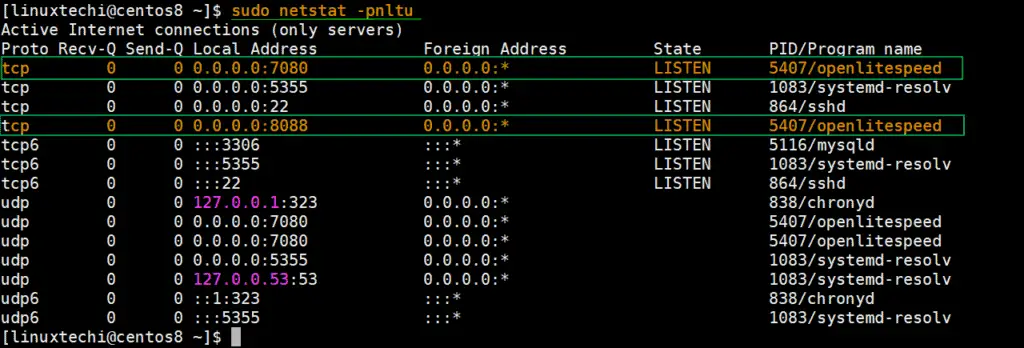
The web server listens on two ports:  8088 and 7080. Port 8088 is for demo purposes while the port 7080 gives you access to the administrative UI.

You can confirm the ports that the web server is listening on using the netstat command as shown:

$ sudo netstat -pnltu

netstat-command-openlitespeed-centos8

If the firewall is running on your system then you should consider opening these ports as shown.

$ sudo firewall-cmd --zone=public --permanent --add-port=8088/tcp
$ sudo firewall-cmd --zone=public --permanent --add-port=7080/tcp
$ sudo firewall-cmd --reload

Step 5) Change the default Administrator Password

By default, the Admin’s password is set to ‘123456’, and for obvious reasons, we need to change this password and set a very robust password. Even better, we will specify a different username from the default ‘admin’ username.

To achieve this run the script shown below

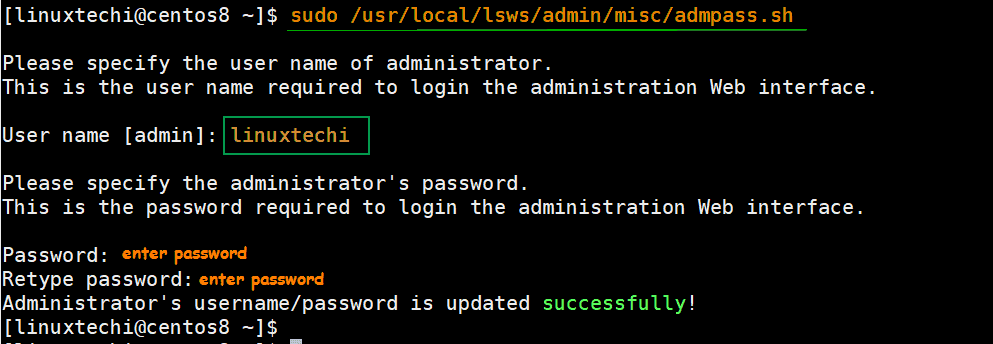
$ sudo /usr/local/lsws/admin/misc/admpass.sh

Specify a different username and password as demonstrated below.

OpenLiteSpeed-Admin-Credentails-CentOS8

Step 6) Accessing OpenLiteSpeed web server

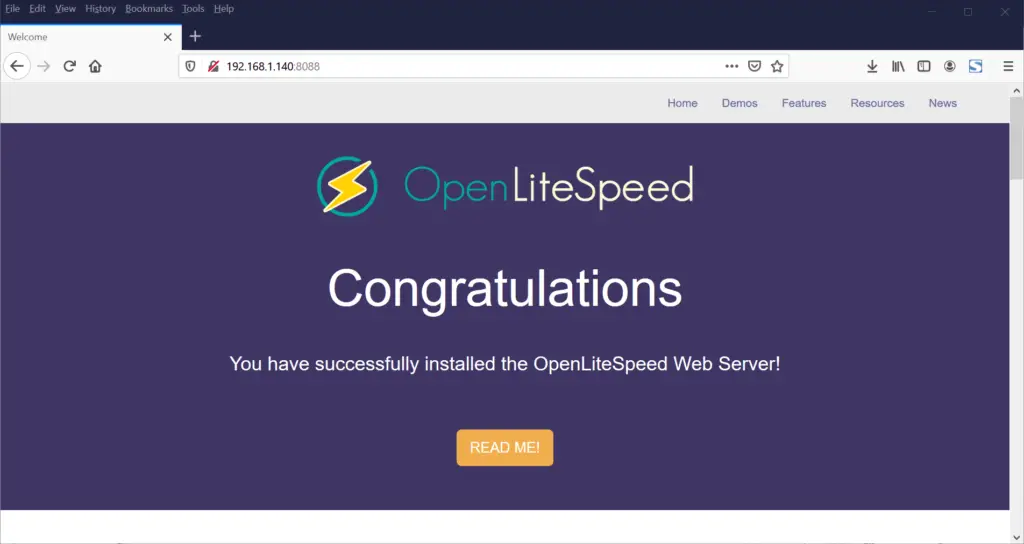
To access the default page for OpeLiteSpeed web server, browser the server’s address as shown:

http://server-ip:8088

This takes you to the demo page as shown.

Welcome-Page-OpenLiteSpeed-WebServer-CentOS8

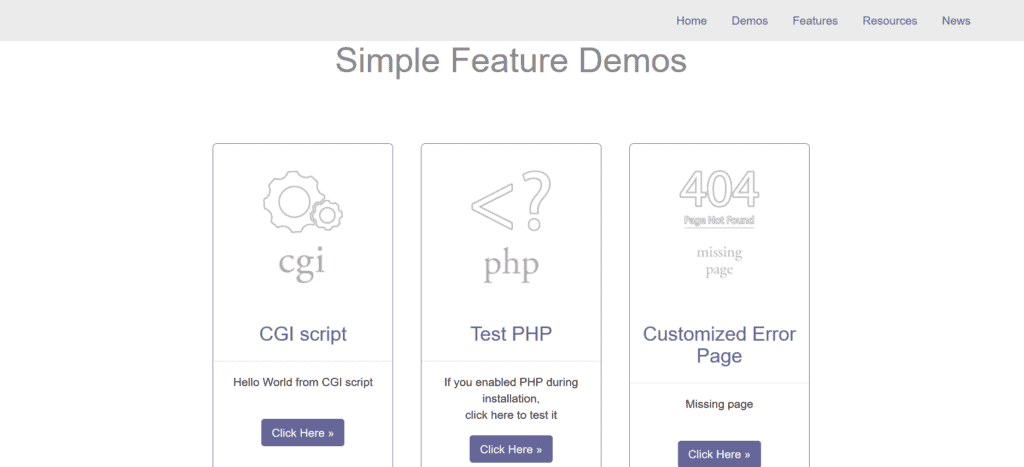
You can click the menu bar options so see what’s in store. For example, when you click on the ‘Demos’ option, you get some featured demos such as testing the output ‘Hello word’ from the CGI script and the PHP version.

Demos-Option-OpenLiteSpeed-Web-Server

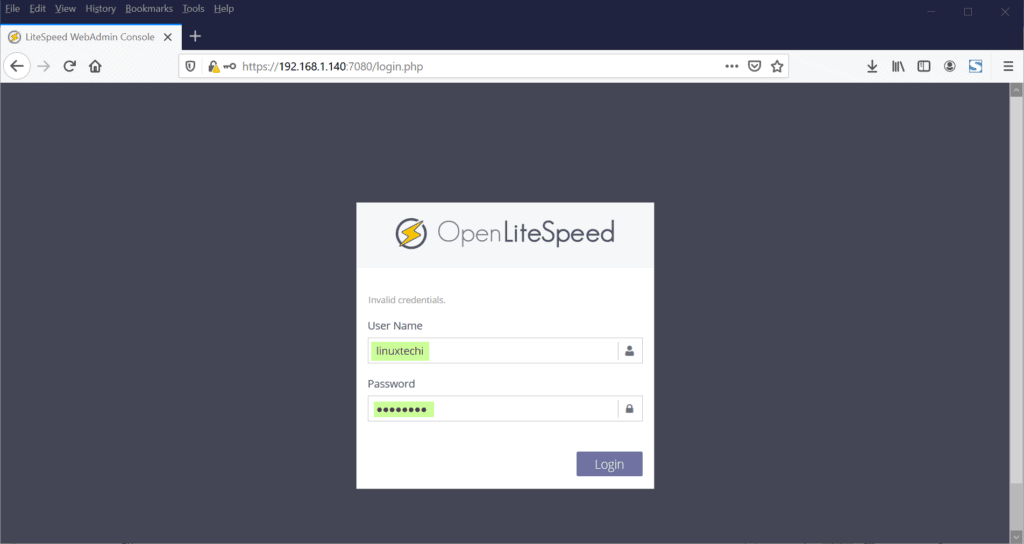
To access the administrative section, browse the server’s IP with the port 7080 using the https protocol.

https://server-ip:7080

Provide the new username and password that you set in the previous step and click the ‘Login’ button.

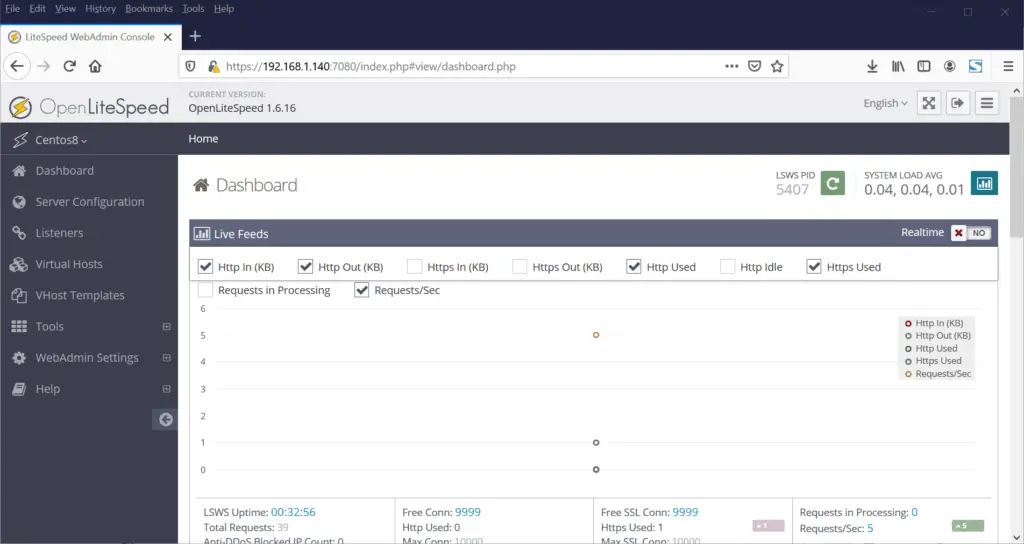
LiteSpeed-WebAdmin-Console-CentOS8

This takes you to the OpenLiteSpeed dashboard as shown below.

LiteSpeed-WebAdmin-Console-Dashboard-CentOS8

From here, you can configure virtual hosts, change the default port from port 8088 to another port and so much more. And this brings down the curtain on our topic for today. Please don’t hesitate to share your feedback and comments in the comments section below.

Also ReadHow to Harden and Secure NGINX Web Server in Linux

The post How to Install OpenLiteSpeed Web Server on CentOS 8/RHEL 8 first appeared on Linuxtechi.

How to Configure NGINX as TCP/UDP Load Balancer in Linux

$
0
0

As we know NGINX is one of the highly rated open source web server but it can also be used as TCP and UDP load balancer. One of the main benefits of using nginx as load balancer over the HAProxy is that it can also load balance UDP based traffic. In this article we will demonstrate how NGINX can be configured as Load balancer for the applications deployed in Kubernetes cluster.

NGINX-LB-Kubernetes-Setup

I am assuming Kubernetes cluster is already setup and it is up and running, we will create a VM based on CentOS / RHEL for NGINX.

Following are the lab setup details:

  • NGINX VM (Minimal CentOS / RHEL) – 192.168.1.50
  • Kube Master – 192.168.1.40
  • Kube Worker 1 – 192.168.1.41
  • Kube worker 2 – 192.168.1.42

Let’s jump into the installation and configuration of NGINX, in my case I am using minimal CentOS 8 for NGINX.

Step 1) Enable EPEL repository for nginx package

Login to your CentOS 8 system and enable epel repository because nginx package is not available in the default repositories of CentOS / RHEL.

[linuxtechi@nginxlb ~]$ sudo dnf install epel-release -y

Step 2) Install NGINX with dnf command

Run the following dnf command to install nginx,

[linuxtechi@nginxlb ~]$ sudo dnf install nginx -y

Verify NGINX details by running beneath rpm command,

# rpm -qi nginx

NGINX-Info-rpm-command-linux

Allow NGINX ports in firewall by running beneath commands

[root@nginxlb ~]# firewall-cmd --permanent --add-service=http
[root@nginxlb ~]# firewall-cmd --permanent --add-service=https
[root@nginxlb ~]# firewall-cmd –reload

Set the SELinux in permissive mode using the following commands,

[root@nginxlb ~]# sed -i s/^SELINUX=.*$/SELINUX=permissive/ /etc/selinux/config
[root@nginxlb ~]# setenforce 0
[root@nginxlb ~]#

Step 3) Extract NodePort details for ingress controller from Kubernetes setup

In Kubernetes, nginx ingress controller is used to handle incoming traffic for the defined resources. When we deploy ingress controller then at that time a service is also created which maps the host node ports to port 80 and 443. These host node ports are opened from each worker node. To get this detail, login to kube master node or control plan and run,

$ kubectl get all -n ingress-nginx

kubectl-ingress-nginx-controller-details

As we can see the output above, NodePort 32760 of each worker nodes is mapped to port 80 and NodePort 32375 are mapped to 443 port. We will use these node ports in Nginx configuration file for load balancing tcp traffic.

Step 4) Configure NGINX to act as TCP load balancer

Edit the nginx configuration file and add the following contents to it,

[root@nginxlb ~]# vim /etc/nginx/nginx.conf

Comments out the Server sections lines (Starting from 38 to 57) and add following lines,

Comments-Out-Default-server-section-nginx-centos8

K8s-workers-nginx-lb-centos8

upstream backend {
   server 192.168.1.41:32760;
   server 192.168.1.42:32760;
}

server {
   listen 80;
   location / {
       proxy_read_timeout 1800;
       proxy_connect_timeout 1800;
       proxy_send_timeout 1800;
       send_timeout 1800;
       proxy_set_header        Accept-Encoding   "";
       proxy_set_header        X-Forwarded-By    $server_addr:$server_port;
       proxy_set_header        X-Forwarded-For   $remote_addr;
       proxy_set_header        X-Forwarded-Proto $scheme;
       proxy_set_header Host $host;
       proxy_set_header X-Real-IP $remote_addr;
       proxy_pass http://backend;
   }

    location /nginx_status {
        stub_status;
    }
}

Save & exit the file.

As per the above changes, when any request comes on port 80 on nginx server IP then it will be routed to Kubernetes worker nodes IPs (192.168.1.41/42) on NodePort (32760).

Let’s start and enable NGINX service using following commands,

[root@nginxlb ~]# systemctl start nginx
[root@nginxlb ~]# systemctl enable nginx

Test NGINX for TCP Load balancer

To test whether nginx is working fine or not as TCP load balancer for Kubernetes, deploy nginx based deployment, expose the deployment via service and defined an ingress resource for nginx deployment. I have used following commands and yaml file to deploy these Kubernetes objects,

[kadmin@k8s-master ~]$ kubectl create deployment nginx-deployment --image=nginx
deployment.apps/nginx-deployment created
[kadmin@k8s-master ~]$ kubectl expose deployments nginx-deployment  --name=nginx-deployment --type=NodePort --port=80
service/nginx-deployment exposed
[kadmin@k8s-master ~]$
[kadmin@k8s-master ~]$ vi nginx-ingress.yaml

nginx-ingress-resource-example-k8s

[kadmin@k8s-master ~]$ kubectl create -f nginx-ingress.yaml
ingress.networking.k8s.io/nginx-ingress-example created
[kadmin@k8s-master ~]$

Run following commands to get deployment, svc and ingress details:

Deployment-SVC-Ingress-Details-k8s

Perfect, let update your system’s host file so that nginx-lb.example.com points to nginx server’s ip address  (192.168.1.50)

192.168.1.50      nginx-lb.example.com

Let’s try to ping the url to confirm that it points to NGINX Server IP,

# ping nginx-lb.example.com
Pinging nginx-lb.example.com [192.168.1.50] with 32 bytes of data:
Reply from 192.168.1.50: bytes=32 time<1ms TTL=64

Now try to access the URL via web browser,

Nginx-page-via-lb-ingress-k8s

Great, above confirms that NGINX is working fine as TCP load balancer because it is load balancing tcp traffic coming on port 80 between K8s worker nodes.

Step 5) Configure NGINX to act as UDP Load Balancer

Let’s suppose we have an UDP based application running inside the Kubernetes, application is exposed with UDP port 31923 as NodePort type. We will configure NGINX to load balance the UDP traffic coming on port 1751 to NodePort of k8s worker nodes.

Let’s assume we have already running a pod named “linux-udp-port” in which nc command is available, expose it via service on UDP port 10001 as NodePort type.

[kadmin@k8s-master ~]$ kubectl expose pod linux-udp-pod --type=NodePort --port=10001 --protocol=UDP
service/linux-udp-pod exposed
[kadmin@k8s-master ~]$
[kadmin@k8s-master ~]$ kubectl get svc linux-udp-pod
NAME            TYPE       CLUSTER-IP    EXTERNAL-IP   PORT(S)           AGE
linux-udp-pod   NodePort   10.96.6.216   <none>        10001:31923/UDP   19m
[kadmin@k8s-master ~]$

To configure NGINX as UDP load balancer, edit its configuration file and add the following contents at end of file

[root@nginxlb ~]# vim /etc/nginx/nginx.conf
……
stream {
  upstream linux-udp {
    server 192.168.1.41:31923;
    server 192.168.1.42:31923;
  }
  server {
    listen 1751 udp;
    proxy_pass linux-udp;
    proxy_responses 1;
  }
 ……

UDP-NGINX-Configuration-Linux

Save and exit the file and restart nginx service using following command,

[root@nginxlb ~]# systemctl restart nginx

Allow UDP port 1751 in firewall by running following command

[root@nginxlb ~]# firewall-cmd --permanent --add-port=1751/udp
[root@nginxlb ~]# firewall-cmd --reload

Test UDP Load balancing with above configured NGINX

Login to the POD and start a dummy service which listens on UDP port 10001,

[kadmin@k8s-master ~]$ kubectl exec -it linux-udp-pod -- bash
root@linux-udp-pod:/# nc -l -u -p 10001

Leave this as it is, login to the machine from where you want to test UDP load balancing, make sure NGINX server is reachable from that machine, run the following command to connect to udp port (1751) on NGINX Server IP and then try to type the string

# nc -u 192.168.1.50 1751

[root@linux-client ~]# nc -u 192.168.1.50 1751
Hello, this UDP LB testing

Now go to POD’s ssh session, there we should see the same message,

root@linux-udp-pod:/# nc -l -u -p 10001
Hello, this UDP LB testing

Perfect above output confirms that, UDP load balancing is working fine with NGINX. That’s all from this article, I hope you find this informative and helps you to setup NGINX Load balancer. Please don’t hesitate to share your technical feedback in the comments section below.

The post How to Configure NGINX as TCP/UDP Load Balancer in Linux first appeared on Linuxtechi.
How to Solve ‘E: Could not get lock /var/lib/dpkg/lock’ Error in Ubuntu

$
0
0

Recently, I bumped into the error ‘Could not get lock /var/lib/dpkg/lock’. As a result, I could neither install any packages nor update the system. This error is also closely related to the ‘Could not get lock /var/lib/apt/lists/lock’ error.  Here’s some sample output on Ubuntu 20.04.

Reading package lists... Done
E: Could not get lock /var/lib/apt/lists/lock. It is held by process 3620 (apt)
N: Be aware that removing the lock file is not a solution and may break your system.
E: Unable to lock directory /var/lib/apt/lists/

apt-update-lock-error-ubuntu

This can be quite frustrating and often leaves you stranded, unable to update, upgrade or install any packages.

So, what causes this error?

As the error suggests, this error usually happens when another process is currently using the /var/lib/dpkg/lock or /var/lib/dpkg/lock file. Such happens when you have 2 or more terminals running a system update or upgrade.  It can also occur when you prematurely cancel an update/upgrade that is in progress, accidentally or otherwise. A second attempt to use apt or apt-get command will yield the error.

There’s absolutely no need to panic in case you run into this error. A couple of options are available to fix this issue. Let’s explore some of the solutions.

Solution 1)  Killing all processes which are using the APT manager

The first step in diagnosing this problem is listing the processes that are using the apt package manager. To do so, use the ps command as shown:

$ ps aux | grep - i apt

Here’s the output I got.

Process-associated-with-apt-command

To clear the error, you need to kill the processes that are associated with the apt command. You can do so by sending a SIGKILL command to shut down the process immediately. Execute the kill -9 command followed by the process ID as follows.

$ sudo kill -9 3619
$ sudo kill -9 3620

Once done, verify again if the processes have ended using the ps command. If they have all cleared, you can proceed to update the system without a problem.

Solution 2)

In some situations, the root cause could be the lock file.  The lock file blocks two or multiple processes from accessing the same data. When you run any apt or apt-get command, a lock file is usually created. However, if the latest apt command was not successfully executed (i.e terminated abruptly), the lock file persists and blocks any subsequent apt or apt-get instances.

The solution to this problem is to get rid of the apt lock file(s). And it’s quite easy. Simply run the command below:

$ sudo rm /var/lib/apt/lists/lock

If the error you are getting is the ‘Could not get lock /var/lib/dpkg/lock.’ error, delete the lock file as shown:

$ sudo rm /var/lib/dpkg/lock

Other times, you might get a /var/lib/dpkg/lock-frontend error. The lock-frontend error implies that a graphical application that used apt / dpkg is currently running. This could either be Gdebi or synaptic package manager or any other application.

The immediate remedy is to exit or close the application and give it another try. If nothing gives, simply remove the /var/lib/dpkg/lock-frontend file as shown.

$ sudo rm /var/lib/dpkg/lock-frontend

Removing the lock-frontend file might again lead to the  ‘Could not get lock /var/lib/dpkg/lock’ error, so once again, you will have to remove the lock file.

$ sudo rm /var/lib/dpkg/lock

If you happen to get an error about the apt-cache lock such as /var/cache/apt/archives/lock, proceed and remove the lock file as shown.

$ sudo rm /var/cache/apt/archives/lock
$ sudo rm /var/lib/dpkg/lock

And that’s how you resolve the ‘Could not get lock /var/lib/dpkg/lock‘ and could not get lock /var/lib/apt/lists/lock errors. I’m sure that if you have come this far, you should have resolved the error by now. Let us know how it went.

The post How to Solve ‘E: Could not get lock /var/lib/dpkg/lock’ Error in Ubuntu first appeared on Linuxtechi.
How to Setup Highly Available NGINX with KeepAlived in Linux

$
0
0

As we know NGINX is a highly rated web server which can also be used as reverse proxy, load balancer and HTTP cache. In this article, we will demonstrate how to setup highly available (HA) NGINX web server with keepalived in Linux. Keepalived works on VRRP (Virtual Router Redundancy Protocol) which allows one static IP to be fail-over between two Linux systems.

Following are my lab details for NGINX HA:

  • Node 1 – 192.168.1.130 – nginx1.example.com – minimal CentOS 8 / RHEL 8
  • Node 2 – 192.168.1.140 – nginx2.example.com – minimal CentOS 8 / RHEL 8
  • Virtual IP (VIP) – 192.168.1.150
  • sudo user pkumar
  • Firewalld enbled
  • SELinux Running

Let’s jump into the Installation and configuration steps,

Step 1) Install NGINX Web Server from command line

NGINX package is available in the default CentOS 8 / RHEL 8 repositories, so run below dnf command on both the nodes to install nginx web sever

$ sudo dnf install -y nginx

For CentOS 7 / RHEL 7

NGINX package is not available in default CentOS 7 / RHEL 7 repositories, so to install it first we have to enable epel repository. Run the following command on both the nodes

$ sudo yum install epel-release -y
$ sudo yum install -y nginx

For Ubuntu / Debian

For Debian based Linux distributions, nginx web server package is available in default package repositories, so to install nginx, run

$ sudo apt update
$ sudo apt install -y nginx

Step 2) Configure Custom index.html file for both nodes

Let’s create custom index.html file for both the nodes so that we can easily identify which server is serving the web site while accessing via virtual ip.

For node 1, run following echo command,

[pkumar@nginx1 ~]$ echo "<h1>This is NGINX Web Server from Node 1</h1>" | sudo tee /usr/share/nginx/html/index.html

For node 2, run

[pkumar@nginx2 ~]$ echo "<h1>This is NGINX Web Server from Node 2</h1>" | sudo tee /usr/share/nginx/html/index.html

Step 3) Allow NGINX port in firewall and start its service

In case firewall is enabled and running on both the nodes then allow port 80 by executing following commands,

For CentOS / RHEL System

$ sudo firewall-cmd --permanent --add-service=http
$ sudo firewall-cmd –reload

For Ubuntu / Debian System

$ sudo ufw allow 'Nginx HTTP'

Start and enable nginx service by running beneath command commands on both the nodes,

$ sudo systemctl start nginx
$ sudo systemctl enable nginx

Test NGINX Web server of both the nodes by running following curl command from outside,

$ curl http://192.168.1.130
<h1>This is NGINX Web Server from Node 1</h1>
$ curl http://192.168.1.140
<h1>This is NGINX Web Server from Node 2</h1>

Perfect, above command’s output confirm that nginx is running and accessible from outside with system’s ip address.

Step 4) Install and Configure Keepalived

For CentOS / RHEL systems, keepalived package and its dependencies are available in the default package repositories, so its installation is straight forward, just run below command on both the nodes.

$ sudo dnf install -y keepalived       // CentOS 8/ RHEL 8
$ sudo yum install -y keepalived      // CentOS 7 / RHEL 7

For Ubuntu / Debian System,

$ apt install -y keepalived

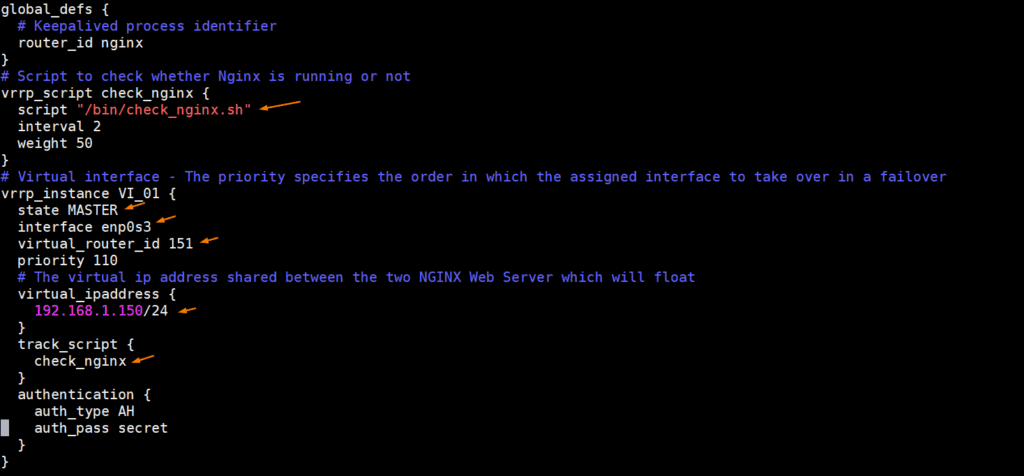
Once the keepalived is installed then configure it by editing its configuration file ‘/etc/keepalived/keepalived.conf’. We will keep node 1 as master node and node 2 as backup node.

Take backup of configuration file,

[pkumar@nginx1 ~]$ sudo cp /etc/keepalived/keepalived.conf /etc/keepalived/keepalived.conf-org

Replace the content of keepalived.conf with below:

[pkumar@nginx1 ~]$ echo -n | sudo tee /etc/keepalived/keepalived.conf
[pkumar@nginx1 ~]$ sudo vi /etc/keepalived/keepalived.conf

Paste the following contents

global_defs {
  # Keepalived process identifier
  router_id nginx
}

# Script to check whether Nginx is running or not
vrrp_script check_nginx {
  script "/bin/check_nginx.sh"
  interval 2
  weight 50
}

# Virtual interface - The priority specifies the order in which the assigned interface to take over in a failover
vrrp_instance VI_01 {
  state MASTER
  interface enp0s3
  virtual_router_id 151
  priority 110

  # The virtual ip address shared between the two NGINX Web Server which will float
  virtual_ipaddress {
    192.168.1.150/24
  }
  track_script {
    check_nginx
  }
  authentication {
    auth_type AH
    auth_pass secret
  }
}

Keepalived-conf-master-node-linux

Now create a script with the following contents which will check whether nginx service is running or not. Keepalived will always check the output of check_nginx.sh script, if it finds that nginx service is stopped or not responding then it will move virtual ip address on backup node.

[pkumar@nginx1 ~]$ sudo vi /bin/check_nginx.sh
#!/bin/sh
if [ -z "`pidof nginx`" ]; then
  exit 1
fi

save & close the file and set the required permission with chmod command,

[pkumar@nginx1 ~]$ sudo chmod 755 /bin/check_nginx.sh

Now copy the keepalived.conf and check_nginx.sh files from node 1 to node 2 using following scp command.

[pkumar@nginx1 ~]$ scp /etc/keepalived/keepalived.conf root@192.168.1.140:/etc/keepalived/
[pkumar@nginx1 ~]$ scp /bin/check_nginx.sh root@192.168.1.140:/bin/

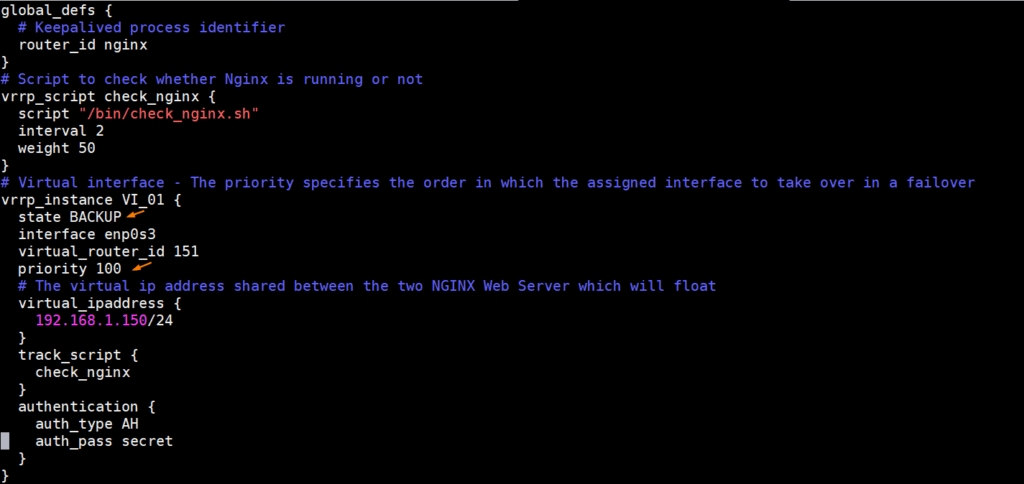
Once files are copied then login to Node 2 and make couple of changes in keepalived.conf file. Change State from MASTER to BACKUP and lower the priority by setting it as 100. After making the changes, keepalived.conf on Node 2 would look like below,

Keepalived-conf-node-2-linux

In Case OS firewall is running then allow VRRP by the running following commands,

Note – Execute these commands on both the nodes

For CentOS / RHEL Systems

$ sudo firewall-cmd --add-rich-rule='rule protocol value="vrrp" accept' --permanent
$ sudo firewall-cmd --reload

For Ubuntu / Debian Systems

Allow VRRP by executing followings, from the master node (Node 1), run

$ sudo ufw allow to 224.0.0.18 comment 'VRRP Broadcast'
$ sudo ufw allow from 192.168.1.140 comment 'VRRP Router'

From the Backup / Slave Node (Node 2)

$ sudo ufw allow to 224.0.0.18 comment 'VRRP Broadcast'
$ sudo ufw allow from 192.168.1.130 comment 'VRRP Router'

Now finally start keepalived service by running beneath systemctl commands from both the nodes,

$ sudo systemctl start keepalived
$ sudo systemctl enable keepalived

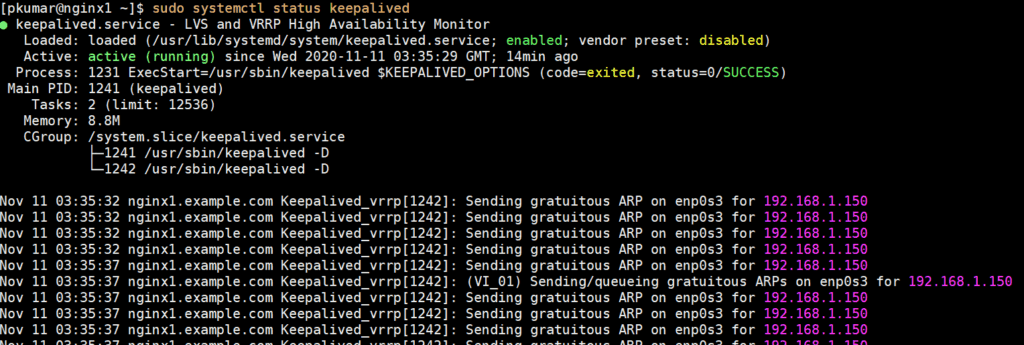
Verify the keepalived service by running below:

$ sudo systemctl status keepalived

keepalived-service-status-linux

Perfect, now verify VIP (virtual ip address) status on master node, in our case VIP is 192.168.1.130

$ ip add show

vip-master-node-keepalived-linux

Above output confirms VIP is configure on master node on its enp0s3 interface. So, lets do keepalived and nginx testing in the next step.

Step 5) Keepalived and NGINX Testing

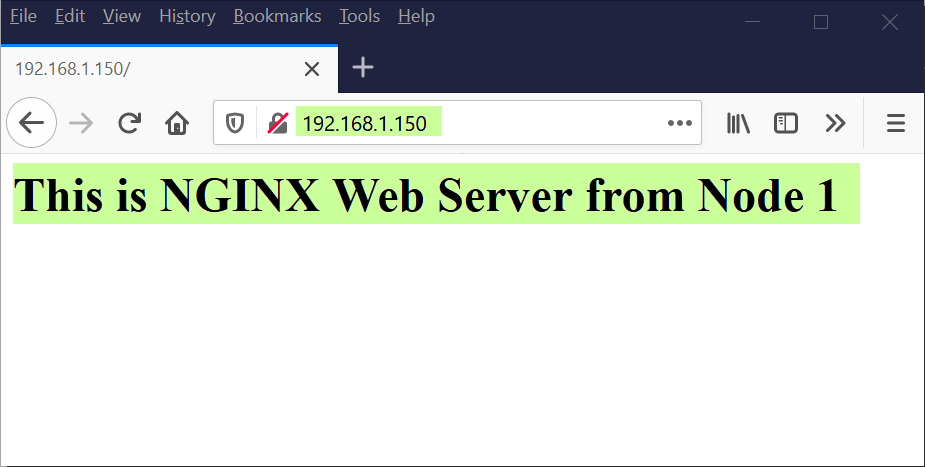
To perform the testing, try access nginx web server with virtual IP (192.168.1.150), currently it should show us node 1 nginx page.

Open the wen browser and type ‘http://192.168.1.150’ and hit enter,

NGINX-Web-Page-Node1

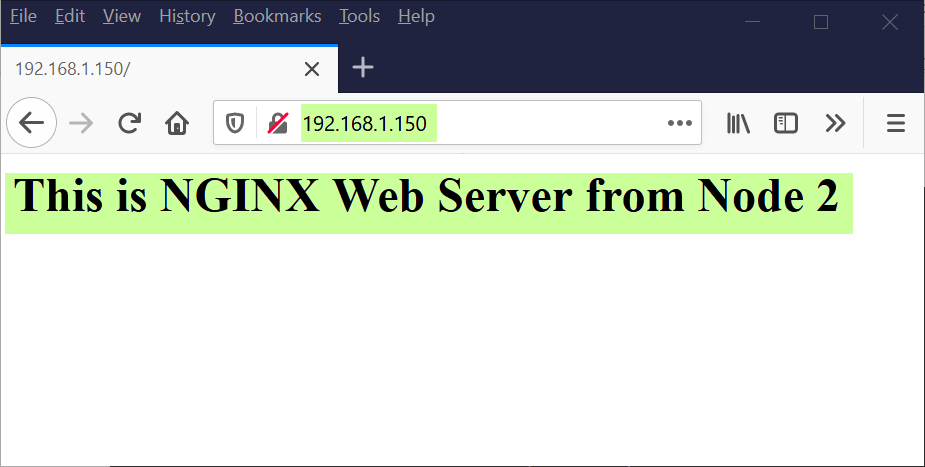
Now try to stop the NGINX service on node 1 and see whether virtual IP is switched from Node 1 to Node 2 and then try to access nginx web page with VIP (192.168.1.150) and this time it should show us nginx page from node 2.

[pkumar@nginx1 ~]$ sudo systemctl stop nginx
[pkumar@nginx1 ~]$ ip add show

nginx-service-stop-node1

Login to node 2 and run ip command to see verify the virtual IP address,

[pkumar@nginx2 ~]$ ip add show

virtual-ip-keepalived-linux-node2

Now, let’s try to access web page using virtual ip,

NGINX-Web-Page-Node2

Great, above confirms that we have successfully setup highly available NGINX Web server with keepalived. That’s all from this article, please do share your feedback, comments and suggestions.

The post How to Setup Highly Available NGINX with KeepAlived in Linux first appeared on Linuxtechi.

How to Replace Strings and Lines with Ansible

$
0
0

Ansible provide multiple ways that you can use to replace a string, an entire line or words that match a certain pattern. There are two modules that you can use to achieve this: the replace module and the inline module. We are going to dive deep and take a look at some examples of how these modules can be used in a playbook to replace strings and lines.

Replacing a string from a file with Ansible

The replace module replaces all instances of a defined string within a file.

If the string does not exist, then nothing will be done and no error will be displayed. Ansible simply returns that nothing has been changed. To successfully replace strings in a file, three parameters are required:

  • The location of the file denoted by the ‘path‘ directive.
  • The ‘regexp‘ directive – The string to be replaced or changed. Additionally, you can pass any regular Python expression.
  • The ‘replace‘ directive – This is the replacement word or string.

This is how the syntax looks like with the  replace module:

- replace:
    path: /path/to/file
    regexp: 'string or regular expression for search'
    replace: 'word to replace the search string'
    backup: yes

I have a sample text file called sample.txt which has the content below.

Unix is a free and opensource system used by developers, and desktop lovers.  Thanks to Linux Torvalds’ efforts, Unix grew to become the most popular opensource system.

The goal is to replace the string ‘Unix’ with ‘Linux’. To achieve that, we are going to create a playbook file as shown.

- hosts: 127.0.0.1
  tasks:
  - name: Ansible replace string example
    replace:
      path: /etc/ansible/sample.txt
      regexp: 'Unix'
      replace: "Linux"

We are then going to run the playbook.

# ansible-playbook sample.txt

From the output, you can clearly see that the string ‘Unix’ has been replaced by ‘Linux

Ansible-Playbook-replace-strings

Let’s take another example.

Our second objective is to change a hostname entry in my /etc/hosts file from server.myubuntu.com to server.linuxtechi.info

We will create a playbook file change_hostname.yml which will look as follows:

- hosts: 127.0.0.1
  tasks:
  - name: Ansible replace string example
    replace:
      path: /etc/hosts
      regexp:  '(\s+)server\.myubuntu\.com(\s+.*)?$'
      replace: '\1server.linuxtechi.info\2'

Change-hostname-with-ansible

Upon running the playbook, the name of the domain name changes accordingly as shown:

# ansible-playbook change_hostname.yml

Run-Playbook-to-change-hostname-Ansible

Ansible lineinfile module

The Ansible inline module can be used in a variety of ways. It can be used for inserting a new line, removing or modifying an existing line from the file. We are going to take a closer look at each of these.

Inserting a line at the end of the file (EOF)

To start off, we will begin by learning how to create a line if it is not present in a file. Begin by specifying the path of the file where you are going to add the line using the path attribute. This has replaced the dest option which was used in Ansible 2.3 and earlier versions.

Then specify the line to be added at EOF. In this case, we’re adding a new entry to the /etc/hosts file. If the line already exists, then Ansible will skip adding it and no changes will be made.

The state parameter instructs Ansible to write the line in the file and the create parameter tells Ansible to create the file if it’s not already there. This is the update_ip.yml playbook  file.

- hosts: 127.0.0.1
  tasks:
    - name: Ansible update IP address
      lineinfile:
        path: /etc/hosts
        line: '173.82.56.150 wwww.linuxtechi.io'
        state: present
        create: yes

Ansible-playbook-inline-usage

When the playbook file is run, notice that the  new entry or line has been added.

# ansible-playbook update_ip.yml

Inline-Playbook-execution-result

 Inserting a line before or after

Sometimes, you may want to insert a new line just before or after a section of a file and not always at the end of the line. For this, you need to use the insertafter and insertbefore directives.

In the playbook below, we are adding a line to specify our preferred inventory file just after the [defaults] section in the ansible.cfg file. We have escaped the [] since they are regex characters.

- hosts: 127.0.0.1
  tasks:
    - name: Ansible update IP address
      lineinfile:
        path: /etc/ansible/ansible.cfg
        line: 'inventory  = /home/linuxtechi/hosts'
        insertafter: '\[defaults\]'

Insert-Line-after-matching-pattern-with-ansible

To add a line just before a parameter, use the ‘insertbefore‘ parameter. In the example below, we are adding the same line just before the #library pattern in the Ansible config file.

- hosts: 127.0.0.1
  tasks:
    - name: Ansible update IP address
      lineinfile:
        path: /etc/ansible/ansible.cfg
        line: 'inventory  = /home/linuxtechi/hosts'
        insertbefore: ‘#library’

Remove a line using lineinfile module

This is the exact opposite of adding a line. A simple way of achieving this is to set the state parameter to absent . For example, to remove the entry in the file, ensure that the state parameter has the absent value

- hosts: 127.0.0.1
  tasks:
    - name: Ansible update IP address
      lineinfile:
        path: /etc/hosts
        line: ‘173.82.56.150 wwwwlinuxtechi.io’
        state: absent

Remove-Line-with-Ansible-playbook-execution

Another way of removing a line is by using the regexp parameter. For example, the playbook below deletes all lines in a file beginning with the Unix word.

- hosts: 127.0.0.1
  tasks:
    - name: Ansible lineinfile regexp example
      lineinfile:
        dest: /etc.ansible/sample.txt
        regexp: '^Unix'
        state: absent

That’s all from this article, I hope it helps to understand how to replace a string and lines with Ansible.

Also Read: 9 tee Command Examples in Linux

The post How to Replace Strings and Lines with Ansible first appeared on Linuxtechi.

How to Install Cockpit Web Console on Debian 10

$
0
0

Cockpit is free and open-source remote server management web console. Using cockpit web console one can do almost all day to day administrative tasks without login in server’s cli. Apart from administrative tasks, Cockpit provides real time RAM, CPU and DISK utilization report of your system. One of the major advantages of using cockpit tool is that it will not consume much resources from your system. In this article, we will demonstrate how to install and use cockpit web console on Debian 10 (Buster).

Prerequisites for Cockpit:

  • Freshly Installed Debian 10
  • Local user with sudo rights
  • Stable internet connection

Let’s dive into the Cockpit installation steps on Debian 10,

Step 1) Update apt package index

Login to your Debian 10 system and run ‘apt update’ command to update apt package index.

linuxtechi@debian-10:~$ sudo apt update

Step 2) Install Cockpit with apt command

Cockpit package and its modules are available in the default Debian 10 repository, so its installation is quite straight forward, just run the following command,

linuxtechi@debian-10:~$ sudo apt -y install cockpit

Create following directory to suppress warning message displayed in cockpit web console.

linuxtechi@debian-10:~$ sudo mkdir -p /usr/lib/x86_64-linux-gnu/udisks2/modules

To install additional cockpit modules like docker, then run

linuxtechi@debian-10:~$ sudo apt -y install cockpit-docker

Once cockpit and its dependencies are installed then start its service using beneath systemctl command,

linuxtechi@debian-10:~$ sudo systemctl start cockpit

Verify the cockpit service status by running following command

linuxtechi@debian-10:~$ sudo systemctl status cockpit

cockpit-service-status-debian10

Step 3) Allow Cockpit port in OS firewall

In case OS firewall is running on your Debian 10 system then allow 80 & 9090 tcp ports in the firewall by running beneath commands,

linuxtechi@debian-10:~$ sudo ufw allow 9090
linuxtechi@debian-10:~$ sudo ufw allow 80

Step 4) Access Cockpit Web Console

To access cockpit web console, type the following URL on your web browser,

https://<Your-Server-IP>:9090

Cockpit-WebConsole-Debain10

Use root user credentials or local user credentials to login.

Cockpit-Dashboard-debian-10

Great, above dashboard confirms that cockpit has been installed successfully on your Debian 10 system. Let’s look at some of the administrative tasks that can be accomplished via cockpit.

Software Updates

From the cockpit dashboard, we can view the available software updates for the system. Click on ‘Software Updates’ Tab

Available-Software-Updates-Cockpit-Dashboard-Debian10

If you wish to install only security related updates, then choose ‘Install Security Updates’ option and if you wish to install all updates then choose second option.

We also have the facility to install application and their update from the ‘Applications’ tab

Manage User Accounts

From the cockpit dashboard, we can manage local users. Choose ‘Accounts’ tab

Manage-Accounts-via-cockpit-Debian10

Manage Containers

From the ‘Containers’ tab, we can manage containers, here manage containers means start, stop and provision new containers using docker image.

Manage-Containers-Cockpit-Debian-10

Manage Networking

From ‘Networking’ tab, we can manage networking of our Debian 10 server

Manage-Networking-Cockpit-Debian10

Similarly using other tabs like ‘Storage‘ and ‘Logs‘ we can manage storage and logs of your Debian 10 system.

That’s all from this guide. I hope these steps help you to give technical insight on how to install and use Cockpit on Debian 10.

Also Read : Top 8 Things to do after Installing Debian 10 (Buster)

The post How to Install Cockpit Web Console on Debian 10 first appeared on Linuxtechi.


How to Install Minikube on Debian 10 (Buster)

$
0
0

If you are looking for an easy and cost-effective way of getting started with Kubernetes, then Minikube is your go to resource. So what is Minikube? Minikube is a free and opensource Kubernetes implementation that allows you to create a virtual machine locally on your PC and deploy a simple one-cluster node. Minikube provides a command-line interface that enables you to manage cluster operations such as starting, stopping and deleting nodes from the cluster. In this tutorial, you will learn how to install Minikube on Debian 10 (Buster).

Prerequisites for Minikube

  • A newly installed instance of Debian 10 Buster
  • A regular user with sudo
  • A stable internet connection

Let’s now roll our sleeves and get into installing Minikube on Debian 10.

Step 1) Apply updates & install minikube dependencies

First and foremost, we need to update the system packages on our instance. To achieve this, execute the commands:

$ sudo apt update -y
$ sudo apt upgrade -y

Additionally, ensure that you have installed the necessary packages to enable you execute subsequent commands later on in this guide.

$ sudo apt install curl wget apt-transport-https -y

Step 2) Install KVM hypervisor

To create virtual machines, we will need to have a hypervisor installed. In this guide, we are using KVM hypervisor. Check out this guide for more on  how to install KVM hypervisor in Debian 10

Step 3) Install Minikube

Once you have the KVM hypervisor is in place, then use the wget command to download the latest Minikube library as shown.

$ wget https://storage.googleapis.com/minikube/releases/latest/minikube-linux-amd64

Next, copy the binary file to the /usr/local/bin path as shown

$ sudo cp minikube-linux-amd64 /usr/local/bin/minikube

Be sure to assign execute permissions to the file.

$ sudo chmod +x /usr/local/bin/minikube

At this point, you can check the version of Minikube installed by running the command below. At the time of writing this guide. The latest version of Minikube is Minikube v1.15.1

$ minikube version

output of above command would be:

linuxtechi@debian-10:~$ minikube version
minikube version: v1.15.1
commit: 23f40a012abb52eff365ff99a709501a61ac5876
linuxtechi@debian-10:~$

Step 4) Install kubectl tool

Kubectl is Kubernetes command-line tool that enables you to execute commands against a Kubernetes cluster. With kubectl, you can deploy applications, manage and inspect cluster resources including having a peek at the log files.

To install kubectl , you first need to download the binary file using the curl command as shown:

$ curl -LO https://storage.googleapis.com/kubernetes-release/release/`curl -s https://storage.googleapis.com/kubernetes-release/release/stable.txt`/bin/linux/amd64/kubectl

Download-kubectl-Debian10

Make the binary file executable.

$ chmod +x ./kubectl

Next, move the binary file to your path as shown.

$ sudo mv ./kubectl /usr/local/bin

You can now verify the installation by running the command:

$ kubectl version -o yaml

kubectl-version-debian10

Step 4) Starting Minikube

To start Minikube run the command:

$ minikube start

The command automatically select the KVM driver, downloads the virtual machine boot image and creates a Kubernetes cluster with a single node.

Minikube-Start-Debian10

You can access Minikube on the command-line by running the command

$ minikube ssh

minikube-ssh-debian10

To exit from the shell, simply run:

$ exit

To stop a Kubernetes cluster run :

$ sudo minikube stop

To view the status of Minikube, run following minikube command:

linuxtechi@debian-10:~$ minikube status
minikube
type: Control Plane
host: Running
kubelet: Running
apiserver: Running
kubeconfig: Configured
linuxtechi@debian-10:~$

Run below command to verify status of node

linuxtechi@debian-10:~$ kubectl get nodes
NAME       STATUS   ROLES    AGE     VERSION
minikube   Ready    master   3h54m   v1.19.4
linuxtechi@debian-10:~$

To verify the status of the cluster, invoke the  command:

$ kubectl cluster-info

Some output similar to what we have will be displayed on the terminal.

minikube-cluster-info-debian10

Additionally, to get a glance at kubectl’s default configuration, run the command:

$ kubectl config view

Minikube-cluster-config-view

Step 6) Accessing Kubernetes dashboard

Kubernetes comes with built-in dashboard that allows you to manage your cluster. To view all the addons that come with minikube run:

$ minikube addons list

minikube-addon-list-debian10

To activate the Kubernetes dashboard, execute:

$ minikube dashboard

minikube-dashboard-debian10

This will trigger your default web browser to pop open the Kubernetes dashboard as shown below:

K8s-dashbaord-minikube-debian10

Perfect! We have successfully installed Minikube on Debian 10 and automatically created a single-node Kubernetes cluster.

Also Read : How to Setup Highly Available Kubernetes Cluster with Kubeadm

The post How to Install Minikube on Debian 10 (Buster) first appeared on https://www.linuxtechi.com.

How to Install PHP 8 on CentOS 8 / RHEL 8

$
0
0

Hello Geeks, recently PHP 8 has been released officially. It is a new major version and comes with lot of new improvements and features. In this article, we will demonstrate on how to install latest version of PHP 8 on CentOS 8 and RHEL 8 system.

Prerequisites for PHP 8

  • Minimal CentOS 8 / RHEL 8
  • User with sudo rights
  • Internet Connection

Let’s deep dive into the php 8 installation steps,

Note – These steps are also applicable for CentOS 8 stream operating system.

Step 1) Apply Updates

Login to your CentOS 8 / RHEL 8 system and apply the updates using beneath commands,

$ sudo dnf update
$ sudo dnf upgrade

Once all the updates are applied successfully then take a reboot of your system once.

$ sudo reboot

Step 2) Enable EPEL & Remi Repository

PHP 8 is not available in the default CentOS 8 and RHEL 8 package repositories. So, we have to enable EPEL and remi repositories. Run following commands to enable them,

$ sudo dnf install -y epel-release
$ sudo dnf install -y  http://rpms.remirepo.net/enterprise/remi-release-8.rpm
$ sudo dnf install -y dnf-utils

Run below command to list the available versions of PHP,

$ sudo dnf module list php

Output of above command would be:

PHP8-modules-list-centos8

Step 4) Install PHP 8 using Remi Module

Run the following commands to reset PHP module and install PHP 8 from remi-8.0 module.

$ sudo dnf module reset php
$ sudo dnf module install -y php:remi-8.0

Install-php8-remi-repository-centos8-rhel8

Once the PHP packages are installed successfully then execute below command to verify PHP version,

[linuxtechi@centos-8 ~]$ php -v
PHP 8.0.0 (cli) (built: Nov 24 2020 17:04:03) (NTS gcc x86_64 )
Copyright (c) The PHP Group
Zend Engine v4.0.0-dev, Copyright (c) Zend Technologies
[linuxtechi@centos-8 ~]$

Great, above output confirms that PHP 8 has been installed. This PHP is for HTTPD web server.

To Install PHP 8 for NGINX web server, we have to install php 8 fpm package.

$ sudo dnf install -y php-fpm

Once php-fpm package is installed then start and enable its services by executing following command,

$ sudo systemctl enable php-fpm --now

To verify the status of php-fpm service, run

$ systemctl status php-fpm

Verify-Status-php-fpm-service

PHP 8 extensions can also be installed via dnf command, some of the php 8 extensions installation example is listed below:

$ sudo dnf install -y php-{mysqlnd,xml,xmlrpc,curl,gd,imagick,mbstring,opcache,soap,zip}

Step 5) Configure PHP 8 for HTTPD & NGINX

To configure the PHP 8 for web servers, edit its configuration file and tweak the parameters that suits to your setup.

$ sudo vi /etc/php.ini
………
upload_max_filesize = 32M 
post_max_size = 48M 
memory_limit = 256M 
max_execution_time = 600 
max_input_vars = 3000 
max_input_time = 1000
………

Save & close the file and then restart web server’s service to make above changes into the effect.

For NGINX Web server, php-fpm is configured via its configuration file ‘/etc/php-fpm.d/www.conf’. you can tweak user and group information that suits to your setup. After making the changes, restart the php-fpm service.

That’s all from this article. I hope these helps you to install latest version of PHP 8 on your CentOS 8 / RHEL 8 system.

Also Read : 8 Stat Command Examples in Linux

The post How to Install PHP 8 on CentOS 8 / RHEL 8 first appeared on LinuxTechi.

How to Install PHP 8 on Debian 10

$
0
0

Recently stable version of PHP 8 has been released. This version comes with lot of advance features and improvements. In this guide, we will demonstrate on how to install PHP 8 on a Debian 10 system step by step.

Minimum requirements for PHP 8:

  • Debian 10 Installed system
  • Local user with sudo rights
  • Internet connection

Let’s jump into PHP 8 installation steps on Debian 10 system,

Step 1) Install updates with apt command

Login to your Debian 10 system with the local user and install all available updates using apt commands,

Note: In case you don’t want to install updates then you skip this step and then move to step 2

sysadmin@debian-10:~$ sudo apt update
sysadmin@debian-10:~$ sudo apt upgrade -y

Once all the updates are installed successfully and then reboot your system using below reboot command,

sysadmin@debian-10:~$ sudo reboot

Step 2) Enable PHP 8 Repository (SURY PPA)

PHP 8 packages are not available in the default Debian 10 package repositories. So, to install php 8 first we have to enable SURY PPA,

Run the Following commands one after the another

sysadmin@debian-10:~$ sudo apt install -y lsb-release apt-transport-https ca-certificates wget
sysadmin@debian-10:~$ sudo wget -O /etc/apt/trusted.gpg.d/php.gpg https://packages.sury.org/php/apt.gpg
sysadmin@debian-10:~$ echo "deb https://packages.sury.org/php/ $(lsb_release -sc) main" | sudo tee /etc/apt/sources.list.d/php.list

Run below ‘apt update’ command after enabling SURY PPA repository to update package index.

sysadmin@debian-10:~$ sudo apt update

Apt-update-Debian10

Above output confirms that we are ready to install php 8 on Debian 10 system,

Step 3) Install PHP 8 using apt command

To install php 8 for apache web server and other web applications, run the following command

sysadmin@debian-10:~$ sudo apt install php8.0 -y

To Install PHP 8 FPM for NGINX Web server, run the following command

sysadmin@debian-10:~$ sudo apt install php8.0-fpm -y

To install PHP extensions, run the following

$ sudo apt install php8.0-{extensions-name}

Let’s assume we want to install php extensions like mysql, cli, common, snmp, ldap, curl, mbstring and zip

sysadmin@debian-10:~$ sudo apt install -y php8.0-{mysql,cli,common,snmp,ldap,curl,mbstring,zip} -y

To Verify the PHP version, execute below php command,

sysadmin@debian-10:~$ php -v
PHP 8.0.0 (cli) (built: Dec  6 2020 06:56:45) ( NTS )
Copyright (c) The PHP Group
Zend Engine v4.0.0-dev, Copyright (c) Zend Technologies
    with Zend OPcache v8.0.0, Copyright (c), by Zend Technologies
sysadmin@debian-10:~$

To list all the loaded PHP modules, run beneath php command,

sysadmin@debian-10:~$ php -m

Step 4) Configure PHP 8 for Web Applications

To configure PHP 8 for the web applications like apache web server, edit its configuration file ‘/etc/php/8.0/apache2/php.ini’, add or change the below parameters that suits to your application

sysadmin@debian-10:~$ sudo vi /etc/php/8.0/apache2/php.ini
--------
upload_max_filesize = 16M
post_max_size = 30M
memory_limit = 128M
max_execution_time = 500
max_input_vars = 2000
max_input_time = 1000
--------

Save & close the file. To make the above changes into the effect restart the Apache service

sysadmin@debian-10:~$ sudo systemctl restart apache2

To configure php 8 fpm for NGINX web server, edit its configuration file ‘/etc/php/8.0/fpm/pool.d/www.conf‘ and set the parameters that suits to your nginx server setup. After making the changes to file, don’t forget to restart php 8 fpm service

sysadmin@debian-10:~$ sudo systemctl restart php8.0-fpm

Step 5) Test PHP 8 via Web Browser

Let’s create info.php file under apache web server document root,

sysadmin@debian-10:~$ sudo vi /var/www/html/info.php
<?php
phpinfo();
?>

Save & exit the file and restart apache service using the following systemctl command

sysadmin@debian-10:~$ sudo systemctl restart apache2

Now open the Web browser and type the following URL:

http://<Your-Server-IPAddress>/info.php

php8-info-page-debian10

Perfect, above screen confirms that PHP 8 has been installed successfully on Debian 10 system. That’s all from this guide, please don’t hesitate to share your feedback and comments in the comments section below.

The post How to Install PHP 8 on Debian 10 first appeared on LinuxTechi.

How to Boot Arch Linux in Single User Mode / Rescue Mode

$
0
0

Booting any Linux distribution into single user mode (or rescue mode) is one of the important troubleshooting methods that every Linux geek should know. In this guide we will demonstrate how to boot Arch Linux into a single user mode or rescue mode. There can be different scenarios where we need to boot arch linux into single user mode, some of these scenarios are listed below:

  • Reset Forgotten user’s password including root
  • Update /etc/fstab file
  • Repair corrupted file system
  • Release space from the file system which is 100 % utilized.
  • Start & stop any application service at boot time

Let’s dive into the single user mode booting steps.

Step 1) Reboot Arch Linux & Interrupt booting

Reboot the Arch Linux and go the the grub boot loader screen, choose the first option ‘Arch Linux’ as shown below:

Choose-Arch-Linux-Single-User-Mode

Step 2) Append an argument ‘init=/bin/bash’ to boot in single user mode

Press ‘e’ to enter in the edit mode and add ‘init=/bin/bash’ at the end of the line which starts with ‘linux’ word. Example is shown below

Single-UserMode-Entry-Grub-Arch-Linux

Now press ‘Ctrl-x‘ or F10 to boot Arch Linux in single user mode. Below window confirms that we have entered in single user mode or rescue mode.

Rescue-shell-arch-linux

Step 3) Mount root file system & perform troubleshooting

To run commands and perform troubleshooting steps, we have to first mount root file system (/) in read write mode.

Run following command to mount / file system in read write mode.

# mount -n -o remount,rw /

Mount-slash-filesystem-read-write-mode-archlinux

Now perform troubleshooting steps like resetting the forgotten root password and edit /etc/fstab file.

Reset-Root-Password-ArchLinux-Rescue-Mode

Once you are done with all the troubleshooting steps then execute the command ‘exec /sbin/init’ to save changes & start Arch Linux.

Save-Changes-Reboot-ArchLinux

That’s all from this guide. I hope, now you have better understanding on how to boot arch linux in single user mode or rescue mode. Please don’t hesitate to share your feedback and comments in comments section below.

Also Read : How to Install LEMP Stack on Arch Linux

The post How to Boot Arch Linux in Single User Mode / Rescue Mode first appeared on LinuxTechi.

Monitor API Call and User Activity in AWS Using CloudTrail

$
0
0

CloudTrail is a service that is used to track user activity and API usage in AWS cloud. It enables auditing and governance of the AWS account. With it, you can monitor what is happening in your AWS account and continuously monitor them. It provides event history which tracks resource changes. You can also enable logging of all the event in S3 and analyze which another service like Athena or Cloudwatch.

In this tutorial, we are going to see the event history of your AWS account. Also, we are going to create a ‘trail’ and store the event in S3 and analyze them using Cloudwatch.

Event history

All read/write management events are logged by event history. It lets you view, filter, and download your recent AWS account activity over the past 90 days. You don’t need to set anything for it.

Using AWS console

Go to the service ‘CloudTrail’ and click on the dashboard. You can see the event name, time, and source. You can click on ‘View full Event history’ to get all the events.

event-history-from-dashboard

event-history-detail

On the detail page of Event history, you can apply a filter as your choice. To see all the events use Read-only and false as above.

Using AWS CLI

You can also use AWS CLI to look at the events. The following command shows the Terminated instance of your account.

# aws cloudtrail lookup-events --lookup-attributes AttributeKey=EventName,AttributeValue=TerminateInstances

Trails

Now, let’s create a trail that will log all the events of your account and store them in an S3 bucket.

On the left side, select Trails and click on ‘Create trail

create-trail

On the next page, give a trail name, choose to create a new S3 bucket, and give a bucket name. (If you have already a bucket, you can choose the existing s3 bucket also)

choose-trail-attribute-1

Scroll down the page and enable CloudWatch Logs. Create a log group and give a name. Also, Assign IAM role and give a name. Then, Click on next.

click-next

If you want to log all types of events, then click select options under the Events type section. We are just going with Management events. So, click on next.

choose-log-events-next

Now, review your configuration and click on ‘Create Trail’.

You can also see the list of created trails with the help of following AWS command.

# aws cloudtrail list-trails

list-trails-cli

Use the following command to see all the events of the trail we created above.

# aws cloudtrail describe-trails --trail-name-list management-events

describe-trails-cli

Analyze log in Cloudwatch

During creating CloudTrail we have defined to send the log to Cloudwatch. So, go to Cloudwatch service and click on ‘log group’.

log-groups-cloudwatch

By default, logs are kept indefinitely and never expire. Here, you can also apply the filter to get the desired output. For example, we are going to see all the running instances in the AWS account. To do this, use the filter ‘RunInstances’ as shown below. The output is shown in JSON format.

runinstance-filter-cloudwatch

You can also use CLI to get all the log events. Run the following command to get all the events of the log group you defined above.

# aws logs filter-log-events --log-group-name aws-cloudtrail-logs-20201229

In this article, we see how to audit and find the activities in AWS account using CloudTrail. Thank you for reading.

Also Read: How to Extend EBS Boot Disk of EC2 Instance without Reboot

The post Monitor API Call and User Activity in AWS Using CloudTrail first appeared on LinuxTechi.

How to Create and Configure Sudo User on Arch Linux

$
0
0

It’s always advised against running administrative-level commands as the root user. In fact, as a rule of thumb, it’s recommended to configure or create a sudo user on any Linux server that you intend to manage. Executing commands as the root user is risky and can cause detrimental damage to your system. All it takes is a single command to accidentally crash your system. To avoid that, running elevated operations as the sudo user comes highly recommended.

A sudo user (short for super user do) is a regular user that has been granted root or elevated privileges and hence can perform elevated tasks similar to those which are a reserve for the root user. These include editing configuration files, installing and removing software packages, starting and stopping services, and so much more.

In this guide, we focus on how you can create and configure sudo user on Arch Linux.

Step 1) Install sudo package

Right off the bat, we need to install the sudo utility. Unlike other Linux distributions, this is not included by default in the base install. To install this, execute the following command as root:

# pacman -S sudo

Step 2) Create a regular user

Next, we need to create a regular user. We will later add this user to the sudoers group to enable them to carry out administrative tasks.

To create a sudo user, use the useradd command as shown:

# useradd -m -G wheel -s /bin/bash username

Let’s break down the command:

The -m option creates a home directory for the user /home/user.

The -G option adds the user to an additional group. In this case, the user is being added to the wheel group.

The -s option specifies the default login shell. In this case, we are assigning bash shell denoted by /bin/bash.

So, let’s assume you want to add a regular user called techuser. To accomplish this, run the command as follows:

# useradd -m -G wheel -s /bin/bash techuser

Step 3) Configure the regular user as sudo user

What we have so far done is to create a regular login user. The user does not yet have the capability of running elevated commands.  We need to edit the sudoers file located at /etc/sudoers

The wheel group is a special type of group in Linux systems that controls who has access to sudo commands.

To confirm that the wheel group is enabled, execute the command:

# visudo
Or
# vi /etc/ sudoers

This ushers you to the sudoers file which is rendered on a vim editor. The sudoers file defines access rights and can be edited to grant or deny certain privileges to regular users.

Once you have opened the sudoers file, scroll and locate the following entry. In the basic arch linux installation it would be commented. Uncomment it and save the file to enable the wheel group.

 %wheel   ALL=(ALL)   ALL

As we have already a regular user, let’s assign password as shown using the passwd command.

# passwd techuser

When prompted, provide the new user’s password and confirm it.

Alternate way to configure regular user as sudo user, add following user’s entry in the sudoers file as shown below,

# vim /etc/sudoers

Under the User privilege specification section, add the following line.

techuser ALL=(ALL)  ALL

Local-User-Sudoer-File-Arch-Linux

Save and exit the sudoers file

Step 3) Testing the sudo user

Lastly, we are going to confirm if the user can perform root tasks. First, switch over to the new user.

$ su - techuser

Provide the user’s password and hit ENTER.

Switch-User-Arch-Linux

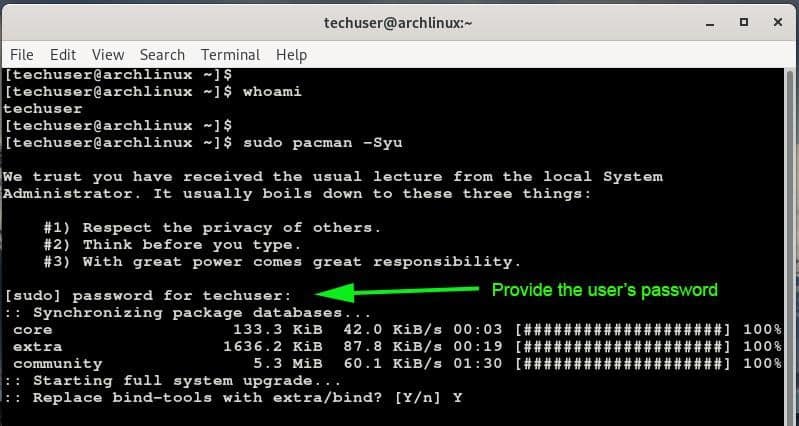
Now try invoking sudo along with a command that is usually reserved for the root user. In the example below, we are updating Arch Linux.

$ sudo  pacman -Syu

You will be provided with a disclaimer informing you of the salient things to keep in mind when invoking sudo and later, you will be prompted for the password.

Sudo-Command-Arch-Linux

That’s conclude the article, we hope that this guide has provided enough insights in the creation of a sudo user in Arch Linux. Please do share your feedback and comments in below comments section.

The post How to Create and Configure Sudo User on Arch Linux first appeared on LinuxTechi.
How to Install and Use Helm in Kubernetes

$
0
0

Deploying applications on a Kubernetes cluster can be a complex affair. It often requires users to create various YAML manifest files to create pods, service and replicasets. Helm is an opensource package manager for Kubernetes that allows developers to seamlessly automate the process of deploying and configuring applications in a Kubernetes Cluster. If you are new to Kubernetes, you might want to first familiarize yourself with basic Kubernetes concepts.

In this guide, we will give you an overview to Helm and how it comes in handy in managing applications and packages in Kubernetes cluster. At the time of writing this guide, the latest release is Helm v3.

Basic Helm Terminologies & Concepts

As with any technology, it’s good to look at a few terminologies to get a better understanding of how it works. But basically, Helm comprises two elements: Helm which is a client and Tiller, which is a server. The tiller runs inside the Kubernetes Cluster. Let’s now have a peek at the definitions:

  • Helm: This is a command-line interface that enables you to define, deploy, & upgrade Kubernetes applications using charts.
  • Tiller: This is a server component that runs in a Kubernetes cluster and accepts commands from helm. It handles the deployment and configuration of software applications on the cluster.
  • Chart: This is a collection of helm packages that comprise YAML configuration files and templates which are rendered in Kubernetes manifest files. A single chart can deploy a simple application such as a memcached  pod or a full web application with a database etc. Charts are quite easy to create, publish and share.
  • Chart repository: This is a location or database where charts can be collected and shared.
  • Release: It is a chart instance running inside a Kubernetes cluster. It can be installed as many times as possible as per the wish of a user and each time that happens, a new release is created.

Helm makes deployments easier and processes standardized and reusable. This makes it a cool way of managing a Kubernetes cluster. Helms charts are particularly helpful in that they help you get started without starting from scratch.

How to Install Helm on Kubernetes Cluster

Since Helm works in a Kubernetes Cluster, ensure that you first set up a Kubernetes Cluster. Also ensure that all the nodes are ready. You can achieve this by running the command from control plane:

$ kubectl get nodes

kubectl-get-command-output

There are a couple of ways of installing helm, but the simplest of all is using an automated script.So, go ahead and download the automated script using curl command as shown:

$ curl -fsSL -o get_helm.sh \
https://raw.githubusercontent.com/helm/helm/master/scripts/get-helm-3

Grant execute permissions asn execute the script as follows.

$ chmod 700 get_helm.sh
$ ./get_helm.sh

Helm will be installed in to the /usr/local/bin directory.

Download-Execute-Helm-Script-Kubernetes

To check the version of helm, run:

$ helm version

Check-Helm-Version

Using Helm in Kubernetes Cluster

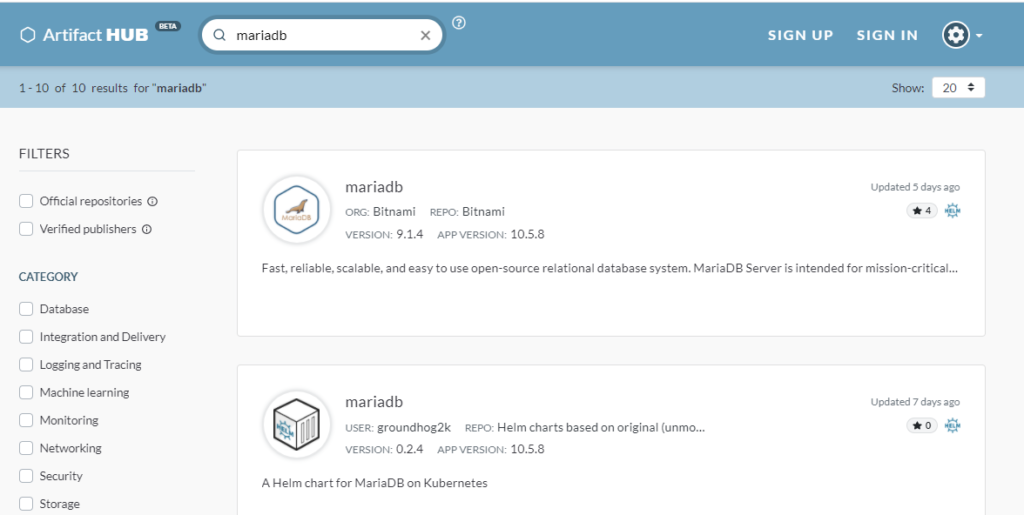
The first step in using helm is installing charts on your local system. The Artifacts hub contains hundreds of public chart repositories that you can install locally on your system. Artifacts Hub is an opensource project that that contains thousands of Kubernetes packages.

To install a chart from Artifacts hub, search for the chart name in the text field provided. In this example, we are searching for MariaDB chart.

Search-MariaDB-Helm-Chart

When you hit ENTER, you will be provided with a list of charts to choose from.

Choose-Charts-Helm-Kubernetes

Select your preferred chart and a list of instructions on how to install it will be provided

Adding a chart repository

Before installing a chart, you first need to add a chart repository. To achieve this, use the syntax:

$ helm repo add [chart_repo] [chart URL]

For example, to install the MariaDB chart, execute:

$ helm repo add bitnami https://charts.bitnami.com/bitnami

Add-Helm-Repo-Command-Line

The output will confirm that the chart repository has been successfully added to your system.

Installing a chart

Once the chart repository has been added, you can install the chart using the syntax:

$ helm install [release-name] [chart_repo]/[chart-name]

For example, to install the MariaDB chart with a name my-release run:

$ helm install my-release bitnami/mariadb

Installing-MariaDB-Using-Helm

The helm client prints a list of the resources created and additional configuration steps that you can take.

Once done, you can list the chart installed using the command:

$ helm ls

Helm-List-Kubernetes

To re-read the configuration information, execute:

$ helm status release-name

In this case:

$ helm status my-release

Helm-Status-Kubernetes

Creating your own chart

You can also create your own chart using the command:

$ helm create chart-name

For example, to create a chart called my-chart execute:

$ helm create my-chart

You can check the directory structure of the chart using the tree command shown:

$ tree my-chart/

Helm-Chart-Tree-Kubernetes

Removing a chart

To uninstall a chart, use the syntax

$ helm delete release-name

For example, to delete the currently installed chart, the command will be:

$ helm delete my-release

Getting help

To get more options on using helm CLI, run the command below

$ helm get -h

Conclusion:

For more information about helm and its commands, please check out the helm documentation

Also ReadHow to Setup NGINX Ingress Controller in Kubernetes

The post How to Install and Use Helm in Kubernetes first appeared on LinuxTechi.

How to Launch AWS EC2 Instance Using Terraform

$
0
0

Terraform is an open source ‘infrastructure as code’ command line tool used to manage infrastructure in the cloud. With terraform you define declarative configuration file called HashiCorp Configuration Language (HCL) and provision your infrastructure. For instance, you need a Virtual machine, you just define resources like memory, storage, computing in the form of code and push in cloud. You will get the virtual machine or virtual instanace.Terraform is supported in all major cloud provider like Amazon cloud, Google cloud, Alibaba cloud and Microsoft Azure cloud.

This article will cover installation Terraform on Ubuntu 20.04 LTS system and launching AWS EC2 instance (Centos 8 stream) using terraform.

Installation of Terraform on Ubuntu 20.04 LTS

Download the latest version of Terraform  from URL https://www.terraform.io/downloads.html . At the time of writing article, the latest version is 0.14.3.

To Download terraform from command, run following wget command

$ wget https://releases.hashicorp.com/terraform/0.14.3/terraform_0.14.3_linux_amd64.zip

Now, unzip the downloaded file.

$ sudo apt install zip -y
$ sudo unzip  terraform_0.14.3_linux_amd64.zip

This will output you a terraform file just move it to /usr/local/bin/ to execute the command.

$ sudo mv terraform /usr/local/bin/

Check the version

$ terraform version

This should provide you output similar to below

ubuntu@linuxtechi:~$ terraform version
Terraform v0.14.3
ubuntu@linuxtechi:~$

Prefect, above output confirm that Terraform has been installed.

Launching AWS EC2 Instance Using Terraform

Let’s make a directory and configure Terraform inside it. Run following commands

$ mkdir terraform
$ cd terraform

Now, make a configuration file. I am giving here the name as config.tf . You can give name as per your choice but remember the extension must be ‘tf’.

$ vi config.tf

Add the following terms provider AWS, your access key, secret key and region where you are going to launch ec2 instance. Here, I am going to use my favorite Singapore region.

On the second block of the code define resource as ‘aws_instance’, ami  (I have picked ami from Centos AMI <https://wiki.centos.org/Cloud/AWS>). Give a instance type and also a tag of your choice.

provider "aws" {
access_key = "YOUR-ACCESS-kEY"
secret_key = "YOUR-SECRET-KEY"
region = "ap-southeast-1"
}

resource "aws_instance" "instance1" {
ami = "ami-05930ce55ebfd2930"
instance_type = "t2.micro"
tags = {
Name = "Centos-8-Stream"
}
}

Save & close the file.

Now, initialize your configuration by executing beneath terraform command

$ terraform init

Once Terraform has initialized, see what is going to happen by executing command,

$ terraform plan

If everything goes fine, then you should see following output.

terraform-plan

Now, execute your terraform code,

$ terraform apply

Type ‘yes’ and press enter for the confirmation.

enter-yes-terraform-apply

On the success of the executing you should be able to see output as below:

success-terrafrom-apply

Log-in to your AWS account and go to ec2 service you should find a ec2 instance with the tag you defined above.

ec2-in-aws-console

It’s simple and easy to provision infrastructure in cloud using the terraform. Hope you like the article. If you found any difficulty, please do comment us.

The post How to Launch AWS EC2 Instance Using Terraform first appeared on LinuxTechi.

How to Install GitLab on Debian 10 (Buster)

$
0
0

GitLab is a free and opensource front-end Git repository that features a Wiki and an issue tracking feature. It allows you to host Git repositories on your own server and setup DevOps platform. In this guide, we are going to install GitLab CE (Community Edition) on Debian 10 (Buster) system.

Prerequisites

Before getting started, ensure that you have the following in place:

  • An instance of Debian 10 server with SSH access.
  • Minimum of 8 GB RAM
  •  20GB of hard disk space
  • A valid domain name pointed to the IP address of the server.
  • User with sudo rights

Let’s get started with installing GitLab on Debian 10 (Buster).

Step 1) Update the System

To get started, access your Debian server using SSH as a sudo user and invoke the following command to update the package lists on your system.

$ sudo apt update

Step 2) Install GitLab dependencies

Once the update is done, install the prerequisites required as shown below.

$ sudo apt install ca-certificates curl openssh-server postfix

Install-Postfix-Debian10-Gitlab

For the Postfix mail server, ensure that you select ‘Internet Site’ as the option for mail configuration.

Choose-Internet-Site-Postfix-Configuration-Gitlab

Next, provide the system mail name as shown and hit ENTER on the keyboard.

Mail-Name-Postfix-Gitlab-Debian10

Thereafter, the system will automatically complete installing all the packages and their dependencies.

Step 3) Install Gitlab CE

Up until this point, we are done with installing all the prerequisites needed to install GitLab. In this step we will proceed to install GitLab CE.

To, achieve this, first download the repository script from GitLab to the /tmp directory as shown.

$ cd /tmp
$ wget https://packages.gitlab.com/install/repositories/gitlab/gitlab-ce/script.deb.sh

Once the script is downloaded, you need to execute it as shown.

$ sudo bash script.deb.sh

This will setup the GitLab repository ready for the installation of GitLab.

Run-Gitlab-Bash-Script-Debian10

Once you are done setting up the repository, install GitLab CE as shown.

$ sudo apt install gitlab-ce

Install-Gitlab-CE-apt-command

When prompted, press ‘Y’ and press ENTER on the keyboard to continue with the installation.

During the installation, you will get a notification that GitLab has not yet been configured. Additionally, the output will notify you that you have not yet configured a valid hostname for your instance.

Gitlab-CE-Installation-Message

We will go a step further and make the necessary configurations.

Step 4)  Configure Gitlab

To tune our GitLab installation, you need to edit the github.rb file. Here we will use the vim editor to open the file.

$ sudo vim /etc/gitlab/gitlab.rb

Search and locate the external_url parameter. Update the field to correspond to your domain as follows:

external_url ‘http://domain.com’

Using our test domain, this will be:

external_url 'http://crazytechgeek.info'

External-URL-Gitlab-CE-Debian10

Next, locate the letsencrypt[‘contact_emails’] field and update it to include an email address that will be used to alert the user when Let’s Encrypt SSL certificate near its expiration date.

letsencrypt['contact_emails'] = ['admin@linuxtechi.com']

Email-Contact-Gitlab-CE-Debain10

Finally, save the file and reconfigure GitLab installation as shown.

$ sudo gitlab-ctl reconfigure

Gitlab-CE-Reconfiguration-Command-Debain10

The reconfiguration takes about 5 minutes to complete. Once done, you should get the notification ‘GitLab Reconfigured!

Successfull-Gitlab-Reconfiguration-Message-Debain10

Step 5) Access Gitlab

All the configurations are now done. The only thing remaining is to access GitLab on the front-end. To achieve this, browse your domain from a web browser as shown.

http://domain.com

On your first attempt, you will be presented with the login page below. Log in using root user credentials.

Access-Gitlab-Portal-Debain10

You will be asked to change your password.

Change-Root-Password-Gitlab-Debain10

Once done, click on ‘change your password’ option and hit ENTER. This ushers you to the GitLab dashboard as shown.

Gitlab-CE-Dashboard-Debain10

Step 6) Secure Gitlab using Let’s Encrypt SSL Certificate

Let’s Encrypt is a free security certificate by Lets Encrypt authority that allows you to secure your website. GitLab configuration supports Let’s Encrypt and, in this step, we will configure our Gitlab instance to use Let’s Encrypt SSL for secure connections.

Head back to the gitlab.rb file

 $ sudo vim /etc/gitlab/gitlab.rb

Edit the following parameters as shown.

letsencrypt['enable'] = true
letsencrypt['auto_renew'] = true

The first line allows Let’s Encrypt to be configured and the second line sets the renewal of the certificate to be automatic.

Along with that, you can define the auto renewal hour and day of the month as follows:

letsencrypt['auto_renew_hour'] = 5
letsencrypt['auto_renew_day_of_month'] = "*/6"

Also, set the URL to use HTTPS protocol instead of HTTP.

external_url 'https://crazytechgeek.info'

Save the changes and exit the config file.  To make above changes into the effect, once again run the below command .

$ sudo gitlab-ctl reconfigure

To verify that everything went according to plan, invoke the command:

$ sudo gitlab-rake gitlab:check

Gitlab-rake-command-Debian10

Reload the browser and notice that the URL to your server’s instance is now secured using Let’s Encrypt SSL certificates.

SSL-Certificates-Gitlab-Portal-Debian10

This wraps up our guide for today. In this guide, we showed you how to install and configure GitLab on Debian 10.

The post How to Install GitLab on Debian 10 (Buster) first appeared on LinuxTechi.

How to Install and Use Fail2ban on RHEL 8 / CentOS 8

$
0
0

Top on the list of every IT operation team is ensuring that servers are secure from unauthorized users or malicious scripts. There are a number of solutions that you can apply to ward off attacks and breaches. Among them is the implementation of the Fail2ban software tool.

Fail2ban is an open-source intrusion detection measure that mitigates brute-force attacks that target various services such as SSH, and VSFTPD to mention a few. It comes with an array of filters – including SSH – that you can customize to update the firewall rules and block unauthorized SSH login attempts.

The fail2ban utility monitors the server’s log files for any intrusion attempts and blocks the IP address of the user after a predefined number of failed attempts for a specified duration. The user’s IP is placed in a ‘jail’ which can be set, enabled, or disabled in the /etc/fail2ban/jail.conf configuration file. This way, it helps to secure your Linux server from unauthorized access, and more specifically from botnets and malicious scripts.

What comprises a jail? A jail is made up of the following key elements:

  • The log file to be analyzed.
  • Filters to be applied on the log file.
  • The action to be taken when the filter matches
  • Additional parameters to elaborate on the type of matches. For instance, maxtry (maximum try) and bantime (ban time) etc.

In this tutorial, we will walk you through the installation and configuration of Fail2ban on RHEL 8 / CentOS 8.

Step 1) Install EPEL Repository

First up, log in to your server and install the EPEL (Extra Package for Enterprise Linux) package as follows.

For CentOS 8

$ sudo dnf install -y epel-release

For RHEL 8

$ sudo dnf install https://dl.fedoraproject.org/pub/epel/epel-release-latest-8.noarch.rpm -y

Step 2) Install Fail2ban

To install Fail2ban, run the simple command below:

$ sudo dnf install -y fail2ban

Step 3) Configuring Fail2ban

By design, fail2ban parses the log files and attempts to match the failregex that is specified in the filters. Filters pick up failed authentication attempts for a specific service, for example, SSH login attempts using regular expressions – regex. When the maximum number of ‘maxtry’ times is achieved in the log entries, an action is triggered.

By default, this happens after 3 failed authentication attempts, and the user is banned or put into a ‘jail’ for 10 minutes. These parameters can easily be configured in the /etc/fail2ban/jail.conf file which is the global configuration file.

All the important configuration files are located under /etc/fail2ban/ directory.

Fail2ban-directory-content-rhel8

Filters are stored under the /etc/fail2ban/filter.d directory. There are dozens of filters for various services including SSH, Webmin, postfix and so much more.

/etc/fail2ban/jail.conf is the main configuration file. However, it’s not recommended to directly modify this file, because as the file spells it out, the configurations are likely to be overwritten or improved at a later distribution update.

Jail-conf-fail2ban-rhel8

A workaround is to create a  jail.local file in the /etc/fail2ban/jail.d directory and add your custom configurations for the desired services that you want to secure.

NOTE: Parameters defined in the jail.local file will override the jail.conf file. Which makes it even more preferable to leave the main configuration file intact.

For demonstration purposes, we are going to create a jail file that will secure SSH connections.

$ sudo vim /etc/fail2ban/jail.local

Here’s the sample configuration file.

[DEFAULT]
ignoreip = 192.168.2.105
bantime  = 86400
findtime  = 300
maxretry = 3
banaction = iptables-multiport
backend = systemd
[sshd]
enabled = true

Let’s breakdown the parameters and see what they stand for.

  • ignoreip –  Defines a list of IP addresses or domain names that are not to be banned.
  • bantime – As the name suggests, this specifies the duration of time that a remote host gets banned in seconds.
  • maxretry – This is the number of failed login attempts before the host is blocked/banned.
  • findtime – Time duration in seconds during which a host will be blocked after achieving the maxtry attempts.
  • banaction – The banning action.
  • backend – The system used to fetch log files

Our configuration implies the following:

When an IP address records 3 failed authentication attempts within the last 5 minutes, then it will be banned for 24 hours with the exception of a host with IP 192.168.2.105.

Save and exit the configuration file.

Step 4)  Start and enable Fail2ban

With the configuration of the jail file for SSH done, we are going to start and enable fail2ban on boot. Usually, the service is not running upon installation

To start and enable fail2ban, run the command:

$ sudo systemctl start fail2ban
$ sudo systemctl enable fail2ban

To reveal the status of fail2ban, invoke the command below:

$ sudo systemctl status fail2ban

This time around, we can observe that fail2ban is running as expected.

fail2ban-service-status-rhel8

Now let us proceed and see how Fail2ban works.

Step 4) Fail2ban in action

Let’s now go a step further and see Fail2ban in action. To keep an eye on banned IP addresses, the fail2ban-client utility comes in handy. For example, to get the status of ssh jail, run the command:

$ sudo fail2ban-client status sshd

fail2ban-client-ssh-status-rhel8

At the moment, there are no banned IP entries because we have not logged in remotely to the server yet.

We are going to attempt to log in from putty SSH client from a Windows PC with an IP different from the one specified in jail.local configuration file.

Ssh-Access-Linux-Machine-Putty

From the output, we can clearly see that we cannot get access to the server. When we check the status again, we find that one IP has been banned as shown.

Banned-IP-List-fail2ban-client-rhel8

To remove the IP from the banned list, unban it as follows.

$ sudo fail2ban-client unban 192.168.2.101

To gather more information about fail2ban rules and policies, visit the jail.conf manpages as shown

$ man jail.conf

Man-Jail-Conf-REHL8

Any comment or feedback? Feel free to reach out and we’ll get back to you.

Also Read: 12 IP Command Examples for Linux Users

The post How to Install and Use Fail2ban on RHEL 8 / CentOS 8 first appeared on LinuxTechi.

How to Setup Local APT Repository Server on Ubuntu 20.04

$
0
0

One of the reasons why you may consider setting up a local apt repository server is to minimize the bandwidth required if you have multiple instances of Ubuntu to update. Take for instance a situation where you have 20 or so servers that all need to be updated twice a week. You could save a great deal of bandwidth because all you need to do is to updates all your systems over a LAN from your local repository server.

In this guide, you will learn how to set up a local apt repository server on Ubuntu 20.04 LTS.

Prerequisites

  • Ubuntu 20.04 LTS system
  • Apache Web Server
  • Minimum of 170 GB free disk space on /var/www/html file system
  • Stable internet connection

Step 1) Create a local Apache Web Server

First off, log in to your Ubuntu 20.04 and set up the Apache web server as shown.

$ sudo apt install -y apache2

Enable Apache2 service so that it will be persistent across the reboot . Run following command

$ sudo systemctl enable apache2

Apache’s default document root directory is located in the /var/www/html path. We are later going to create a repository directory in this path that will contain the required packages needed.

Step 2) Create a package repository directory

Next, we will create a local repository directory called ubuntu in the /var/www/html path.

$ sudo mkdir -p /var/www/html/ubuntu

Set the required permissions on above created directory.

$ sudo chown www-data:www-data /var/www/html/ubuntu

Step 3) Install apt-mirror

The next step is to install apt-mirror package, after installing this package we will get apt-mirror command or tool which will download and sync the remote debian packages to local repository on our server. So to install it, run following

$ sudo apt update
$ sudo apt install -y apt-mirror

Step 4) Configure repositories to mirror or sync

Once apt-mirror is installed then its configuration ‘/etc/apt/mirrror.list’ is created automatically. This file contains list of repositories that will be downloaded or sync in local folder of our Ubuntu server. In our case local folder is ‘/var/www/html/ubuntu/’. Before making changes to this file let’s backup first.

$ sudo cp /etc/apt/mirror.list /etc/apt/mirror.list-bak

Now edit the file using vi editor and update base_path and repositories as shown below.

$ sudo vi /etc/apt/mirror.list

############# config ###################
set base_path    /var/www/html/ubuntu
set nthreads     20
set _tilde 0
############# end config ##############
deb http://archive.ubuntu.com/ubuntu focal main restricted universe \
 multiverse
deb http://archive.ubuntu.com/ubuntu focal-security main restricted \
universe multiverse
deb http://archive.ubuntu.com/ubuntu focal-updates main restricted \
universe multiverse
clean http://archive.ubuntu.com/ubuntu

Save and exit the file.

APT-Mirror-List-File-Ubuntu-Server

In case you might have noticed that I have used Ubuntu 20.04 LTS package repositories and have comment out the src package repositories as I don’t have enough space on my system. If you wish to download or sync src packages too then uncomment the lines which starts with ‘deb-src’.

Step 5) Start mirroring the remote repositories to local folder

Before start mirroring or syncing, first the copy the postmirror.sh script to folder /var/www/html/ubuntu/var using below cp command.

$ sudo mkdir -p /var/www/html/ubuntu/var
$ sudo cp /var/spool/apt-mirror/var/postmirror.sh /var/www/html/ubuntu/var

Now, it’s time to start mirroring the packages from remote repositories to our system’s local folder. Execute below:

$ sudo apt-mirror

APT-Mirror-Command-Output-Ubuntu-Server

Above command can also be started in the background using below nohup command,

$ nohup sudo apt-mirror &

To monitor the mirroring progress use below,

$ tail nohup.out

In Ubuntu 20.04 LTS, apt-mirror does sync CNF directory and its files, so we have to manually download and copy the folder and its files. So to avoid manually downloading CNF directory, create a shell script with below contents,

$ vi cnf.sh
#!/bin/bash
for p in "${1:-focal}"{,-{security,updates}}\
/{main,restricted,universe,multiverse};do >&2 echo "${p}"
wget -q -c -r -np -R "index.html*"\
 "http://archive.ubuntu.com/ubuntu/dists/${p}/cnf/Commands-amd64.xz"
wget -q -c -r -np -R "index.html*"\
 "http://archive.ubuntu.com/ubuntu/dists/${p}/cnf/Commands-i386.xz"
done

save and close the script.

Execute the script to download CNF directory and its files.

$ chmod +x cnf.sh
$ bash  cnf.sh

This script will create a folder with name ‘archive.ubuntu.com’ in the present working directory. Copy this folder to mirror folder,

$ sudo cp -av archive.ubuntu.com  /var/www/html/ubuntu/mirror/

Note : If we don’t sync cnf directory then on client machines we will get following errors, so to resolve these errors we have to create and execute above script.

E: Failed to fetch http://x.x.x.x/ubuntu/mirror/archive.ubuntu.com/ubuntu/dists/\
focal/restricted/cnf/Commands-amd64  404  Not Found [IP:169.144.104.219 80]
E: Failed to fetch http://x.x.x.x/ubuntu/mirror/archive.ubuntu.com/ubuntu/dists/\
focal-updates/main/cnf/Commands-amd64  404  Not Found [IP:169.144.104.219 80]
E: Failed to fetch http://x.x.x.x/ubuntu/mirror/archive.ubuntu.com/ubuntu/dists/\
focal-security/main/cnf/Commands-amd64  404  Not Found [IP:169.144.104.219 80]

Scheduling Automatic Repositories Sync Up

Configure a cron job to automatically update our local apt repositories. It is recommended to setup this cron job in the night daily.

Run ‘crontab -e’ and add following command to be executed daily at 1:00 AM in the night.

$ sudo crontab -e

00  01  *  *  *  /usr/bin/apt-mirror

Save and close.

Note: In case Firewall is running on Ubuntu Server then allow port 80 using following command

$ sudo ufw allow 80

Step 6) Accessing Local APT repository via web browser

To Access our locally configured apt repository via web browser type the following URL:

http://<Server-IP>/ubuntu/mirror/archive.ubuntu.com/ubuntu/dists/

Local-Apt-Repository-Web-Ubuntu

Step 7) Configure Ubuntu 20.04 client to use local apt repository server

To test and verify whether our apt repository server is working fine or not, I have another Ubuntu 20.04 lts system where I will update /etc/apt/sources.list file so that apt command points to local repositories instead of remote.

So, login to the system, change the following in the sources.list

http://archive.ubuntu.com/ubuntu
to
http://169.144.104.219/ubuntu/mirror/archive.ubuntu.com/ubuntu

Here ‘169.144.104.219’ is the IP Address of my apt repository server, replace this ip address that suits to your environment.

Also make sure comment out all other repositories which are not mirrored on our apt repository server. So, after making the changes in sources.list file, it would look like below:

Ubuntu-Client-Sources-list

Now Run ‘apt update’ command to verify that client machine is getting update from our local apt repository server,

$ sudo apt update

Apt-Update-Ubuntu-Client

Perfect, above output confirms that client machine is successfully able to connect to our repository for fetching the packages and updates. That’s all from this article, I hope this guide helps you to setup local apt repository server on Ubuntu 20.04 system.

Also Read : 14 Useful ‘ls’ Command Examples in Linux

The post How to Setup Local APT Repository Server on Ubuntu 20.04 first appeared on LinuxTechi.

How to Install NFS Server on Debian 10 (Buster)

$
0
0

NFS (Network File system) is a client-server file system protocol which allows multiple system or user to access the same shared folder or file.  The latest is NFS version 4. The shared file will be like if they were stored locally. It provides central management which can be secured with a firewall and Kerberos authentication.

This article will guide you to install the NFS server in Debian 10 and mount it on a client machine.

Lab environment

  • NFS server : 192.168.122.126 (Debian 10)
  • NFS Client :  192.168.122.173 (Any Linux system)

NFS Server Installation

Before proceeding to install the NFS server, first make sure your system is up to date. Run below command

$ sudo apt-get update

Install nfs package using the following command,

$ sudo apt install nfs-kernel-server

Make a directory to share files and folders over NFS server.

$ sudo mkdir –p /mnt/nfsshare

As NFS share will be used by any user in the client, the permission is set to user ‘nobody‘ and group ‘nogroup‘.

$ sudo chown nobody:nogroup /mnt/nfsshare

Make user shared folder has sufficient permission to read and write the files inside it. However, you can set it as per your requirement.

$ sudo chmod 755 /mnt/nfsshare

Add the export information in /etc/exports file

$ sudo vi /etc/exports

Add the following entry at the end of the file.

/mnt/nfsshare 192.168.122.173(rw,sync,no_subtree_check)

Your /etc/export file should look like,

export-file-debian10

Here,

  • rw: read and write operations
  • sync: write any change to the disc before applying it
  • no_subtree_check: disables subtree checking

Now, export the shared directory.

$ sudo exportfs –a

This shouldn’t show any error. Meaning, your configuration is correct.

If you are running a firewall on your Debian, allow the client to connect to NFS by using the following command,

$ sudo ufw allow from 192.168.122.173/32 to any port nfs

NFS Client Mount

Now, let’s mount our NFS share in the client machine. Install NFS common package,

For Ubuntu Debian / Ubuntu

$ sudo apt install nfs-common

Make a directory to access the shared folder from the server.

$ sudo mkdir -p /mnt/shared_nfs

For permanent mount add the following entry in /etc/fstab file. Open the file using any of your favorite editors.

$ sudo vi /etc/fstab

Add following line at the end of the file,

192.168.122.126:/mnt/nfsshare  /mnt/shared_nfs  nfs4 defaults,user,exec  0 0

Your file should look like,

fstab-file

where,

  • 192.168.122.110:/mnt/nfsshare = shared folder coming from nfs server
  • /mnt/shared_nfs = mount directory in client machine
  • nfs4 = signifies nfs version 4
  • defaults,user,exec = Permit any user to mount the file system also allow them to exec binaries

Mount the NFS file system using command mount as follows.

$ sudo mount -a

You can test the connection by creating a file in /mnt/shared_nfs on the client machine.

Use ‘df -h’ command to see the mount point as shown below,

disk-info-in-debian

Let’s try to create a file with touch command on a NFS share,

$ cd /mnt/shared_nfs
$ touch testFile.txt

If this doesn’t show any error your configuration is fine and you are ready to use NFS share system.

That’s all.  This tutorial guides you to install NFS share on a server and mount in a client. Thank you for reading the article.

Read Also : How to Install GitLab on Debian 10 (Buster)

The post How to Install NFS Server on Debian 10 (Buster) first appeared on LinuxTechi.
Viewing all 452 articles
Browse latest View live