Quantcast
Channel: How To
Viewing all 454 articles
Browse latest View live

How to Install Docker and Docker-Compose on Rocky Linux 8

$
0
0

As we all know that Docker Container is the highly demanded technology in IT world.  With help of Docker containers, developers and infra admins can package their application and its dependencies and can run it in one computing setup to another.

In this guide, we will cover how to install Docker and Docker Compose on Rocky Linux 8 step by step.

Minimum requirements for Docker

  • 2 GB RAM or higher
  • 2 vCPU / CPU (64-bit Processor)
  • Minimal Rocky Linux 8
  • Sudo User with privileges
  • 20 GB Free Space on /var
  • 1 Nic Card
  • Stable Internet Connection

Let’s dive on Docker Installation steps,

Step 1) Install updates and reboot

Login to Rocky Linux and install all the available updates and then reboot the system once.

$ sudo dnf update -y
$ reboot

Step 2) Configure Docker Package Repository & Install Docker

To install latest and stable version of docker, configure its official package repository using the following command,

$ sudo dnf config-manager --add-repo=https://download.docker.com/linux/centos/docker-ce.repo

Now run following dnf command to install docker,

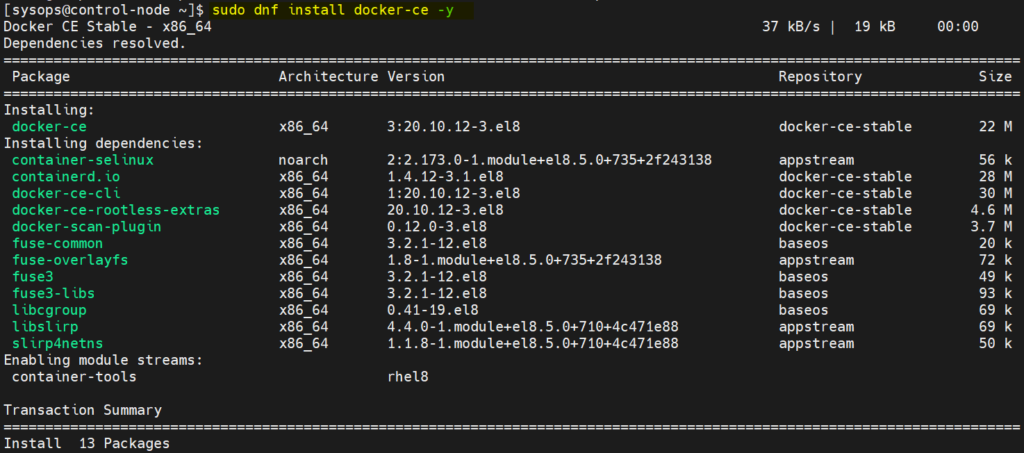
$ sudo dnf install -y docker-ce

Output of commands would like below:

Docker-Install-dnf-command-rocky-linux

Note: In case you are getting container.io error while installing docker-ce package then run following command,

$ sudo dnf install docker-ce --allowerassing -y

Step 3) Start and enable docker Service

Once docker is installed then start and enable its service using following systemctl commands,

$ sudo systemctl start docker
$ sudo systemctl enable docker

To verify the status of docker run,

$ sudo systemctl status docker

Docker-Service-Status-Rocky-Linux

Perfect, above output confirms that docker service is up and running.

If you wish local user to mange and run docker commands, then add the user to docker group using beneath command.

$ sudo usermod -aG docker $USER

After executing the above command, log out and log in once so that docker group is associated to user and user can run docker commands without sudo.

[sysadm@rocky-linux ~]$ docker --version
Docker version 20.10.7, build f0df350
[sysadm@rocky-linux ~]$

Let’s verify the docker installation in the next step.

Step 4) Test docker Installation

To test docker installation, run hello-world container using following docker command,

$ docker run hello-world

Output,

Test-Docker-Installation-Rocky-Linux

Above output confirms that container ‘hello-world’ has been launched successfully and it also confirms that docker is installed successfully.

Step 5) Install Docker-Compose

Docker Compose command allows to spin up multiple containers in one go. So, to install it run the following commands one after the another.

$ dnf install -y curl
$ sudo curl -L "https://github.com/docker/compose/releases/download/1.29.2/docker-compose-$(uname -s)-$(uname -m)" -o /usr/local/bin/docker-compose
$ sudo chmod +x /usr/local/bin/docker-compose
$ docker-compose --version
docker-compose version 1.29.2, build 5becea4c
$

Above output shows that docker-compose of version 1.29.2 is installed successfully. That’s all from guide. I hope you have found it informative. Please do share your feedback and queries in below comments section.

The post How to Install Docker and Docker-Compose on Rocky Linux 8 first appeared on LinuxTechi.

How to Repair Corrupted XFS Filesystem with xfs_repair

$
0
0

Originally created by Silicon Graphics, the XFS file system is a robust and high-performance journaling filesystem that was first included in the Linux kernel in 2001. Since then, the popularity of the filesystem has grown exponentially, and by 2014, the XFS filesystem found its way into major Linux distributions. As a matter of fact, XFS is the default filesystem in Red Hat- based distributions such as RHEL, CentOS, and Rocky Linux. The filesystem works incredibly well with huge files and is popularly known for its speed and robustness.

As robust as the XFS filesystem is, it is not immune to suffering filesystem corruption. Common causes of filesystem errors or corruption include un-procedural or ungraceful shutdowns, NFS write errors, sudden power outages and hardware failure such as  bad blocks on the drive. Corruption of the filesystem can cause grave problems such as corruption of regular files and can even render your system unable to boot when boot files are affected.

A few tools are useful in checking filesystem errors. One of them is the fsck command (Filesystem Check). The fsck system utility tool verifies the overall health of a filesystem. It checks the filesystem for potential and existing errors and repairs them alongside generating a report. The fsck command comes pre-installled in most Linux distributions and no installation is required.  Another useful system utility used for rectifying errors in a filesystem is the xfs_repair utility. The utility is highly scalable and is tailored to scan and repair huge filesystems with several inodes with the highest possible efficiency.

In this guide, we walk you through how to repair corrupted XFS filesystem using the xfs_repair utility.

Step 1) Simulate File corruption

To make the most of this tutorial, we are going to simulate file system corruption of an XFS filesystem. Here we are going to use an 8GB external USB drive as our block volume. This is indicated as /dev/sdb1 as shown in the command below.

$ lsblk | grep sd

linux-lsblk-command

The first step is to format it to xfs filesystem using the mkfs command.

$ sudo mkfs.xfs -f /dev/sdb1

This displays the output shown

format-partition-with-xfs-filesystem

The next step is to create a mount point that we shall later use to mount the block volume.

$ sudo mkdir /mnt/data

Next, mount the partition using the  mount command.

$ sudo mount /dev/sdb1  /mnt/data

You can verify if the partition was correctly mounted as shown.

$ sudo mount | grep /dev/sdb1

Mount-xfs-filesystem-linux

Our partition is now successfully mounted as an xfs partition. Next, we are going to simulate filesystem corruption by trashing random filesystem metadata blocks using the xfs_db command.

But before that, we need to unmount the partition.

$ sudo umount /dev/sdb1

Next, corrupt the filesystem by running the command below to trash random filesystem metadata blocks.

$ sudo xfs_db -x -c blockget -c "blocktrash -s 512109 -n 1000" /dev/sdb1

bad-sectors-xfs-filesystem-linux

Step 2) Repair the XFS filesystem using xfs_repair

To repair the file system using the command, use the syntax:

$ sudo xfs_repair /dev/device

But before we embark on repairing the filesystem, we can perform a dry run using the -n flag as shown. A dry run provides a peek into the actions that will be performed by the command when is it executed.

$ sudo xfs_repair -n /dev/device

For our case, this translates to:

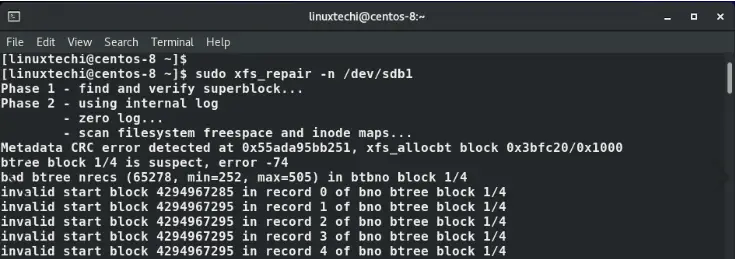
$ sudo xfs_repair -n /dev/sdb1

Dry-run-xfs-repair-linux

From the output, we can see some metadata errors and inode inconsistencies. The command terminates with a brief summary of the steps the actual command would have carried out. The corrective measures that would have been applied in steps 6 and 7 have been skipped.

xfs-repair-command-output

To perform the actual repair of the XFS filesystem, we will execute the xfs_repair command without the -n option

$ sudo xfs_repair /dev/sdb1

The command detects the errors and inconsistencies in the filesystem.

xfs-repair-filesystem-linux

And performs remediation measures to the inodes and rectifies any other errors. The output provided shows that the command completes its tasks successfully.

Fixing-xfs-filesystem-errors

For more xfs_repair options visit the man page.

$ man xfs_repair

man-xfs-repair-command-linux

Conclusion

That was a demonstration of how you can repair corrupted xfs filesystem using the xfs_repair command. We hope that you are now confident in fixing the corrupted xfs filesystem in Linux.

Read Also : How to Monitor Linux System with Glances Command

The post How to Repair Corrupted XFS Filesystem with xfs_repair first appeared on LinuxTechi.

How to Create Backup with tar Command in Linux

$
0
0

Hello Linux Geeks, if you are looking for free command line backup tools on Linux systems then tar command is the solution for you. Tar command can create backup of your application, configurations files and folders of the system.

Tar stands for ‘tape archive’ and can archive multiple files and directories into a tar file. This tar can also be compressed using gzip and bzip2 compression utility. Once we have a tar backup ready then we can easily transfer it to remote backup server using scp or rsync commands.

In this post, we will demonstrate how to create backup with tar command in Linux.

How to create tar backup file?

To create a tar backup file, first identify the files and folders that would be part of your backup. Let’s assume we want to take backup of /home/linuxtechi, /etc and /opt folder. Run following tar command,

$ tar <options>  {tar-backup-filename}  {files-folders-to-be-backed-up}

$ sudo tar -cvpf  system-back.tar  /home/linuxtechi /etc /opt

This will create a tar ball in the present working directory. In above tar command, we have used following options

  • c – Create new archive
  • v – display verbose output while creating tar file
  • f – archive file name
  • p – preserve permissions

As you have seen that we have not used any compression options to compress tar file. So, to compress the tar backup file during the archive use -z ( gzip compression) or -j (bzip2 compression)

Creating tar backup along with gzip compression

Use ‘z’ in tar command to use gzip compression. This time tar backup file will have extension either .tgz or .tar.gz

$ sudo tar -zcvpf system-back.tgz /home/linuxtechi /etc /opt

Creating tar backup along with bzip compression

Use ‘j’ option in tar command to use bzip2 compression, this time tar backup file will have extension either .tbz2 or .tar.bz2

$ sudo tar -jcvpf system-back.tbz2 /home/linuxtechi /etc /opt

How to append a file to tar backup?

To append a file to the existing tar backup file, use ‘-r’ option, complete command would like below:

Syntax: $ tar -rvf  {tar-backup}  {new-file-to-be-appended}

Let’s assume we want to append /root/app.yaml file to system-backup.tar, run

$ sudo tar -rvf system-back.tar /root/app.yaml

Note: We can not append files or folders to compressed tar backup as it is not supported.

How to exclude file while creating tar backup?

To exclude a file while creating tar backup, use ‘-X’ option followed by the exclude file. To use exclude feature we must create a exclude file which will have file name to be excluded.

$ cat exclude.txt
/etc/debconf.conf
/etc/hosts
$

Run following command to exclude files mentioned in exclude.txt while creating tar backup of /etc

$ sudo tar -X exclude.txt -zcpvf etc-backup.tgz /etc

How to view the contents of tar backup?

To view the contents of tar backup, use ‘-t’ option, complete options would be ‘-tvf’. Example is shown below:

$ sudo tar -tvf system-back.tgz | grep -i etc/fstab
-rw-rw-r-- root/root    665 2021-07-07 04:57 etc/fstab
$

How to extract tar backup?

Use ‘-x’ option in tar command to extract tar backup, complete option would be ‘-xpvf’. Example is shown below

$ sudo tar -xpvf system-back.tgz

This command will extract system-back.tgz in the current working directory. In case you want extract it in a particular folder then use ‘-C’ option followed by the folder path. In the following example we are extracting system-back.tgz in /var/tmp folder.

$ sudo tar -xpvf system-back.tgz -C /var/tmp/
$ ls -l /var/tmp/

Extract-tar-backup-in-specific-folder

How to verify tar backup integrity?

For tar ball, use ‘-tf’ option and redirect the output to /dev/null file,

$ tar -tf system-back.tar > /dev/null

If above command does not generate any output on the screen then we can say that there is no corruption.

In case of corruption, we will get the output something like below,

Verify-Tar-Integrity-Linux

To verify the integrity of compressed tar backup, use following

For .tgz / .tar.gz

$ gunzip -c system-back.tgz | tar -t > /dev/null

For .tbz2 / .tar.bz2

$ tar -tvf system-back.tbz2 > /dev/null

Above commands should not produce any output on the screen. In case, there is an output then we can say that there might be some corruption in compressed tar backup.

That’s all from this post, I hope you have found it informative. Please do share share your feedback and queries in below comments section below.

The post How to Create Backup with tar Command in Linux first appeared on LinuxTechi.

How to Install Ansible (Automation Tool) on Rocky Linux 8

$
0
0

Ansible is free and open-source automation tool sponsored by Red Hat. Using ansible we can manage and configure Linux and Windows system without any agent installation on them. It basically works on ssh protocol and can configure hundred plus servers at a time.  In ansible terminology, system on which Ansible is installed is called control host /node  and the systems which are managed by ansible are called managed hosts.

In this post, we will discuss how to install latest version of Ansible on Rocky Linux 8.  Following is my Ansible lab setup details:

  • Control Node – 192.168.1.170 – Minimal Rocky Linux 8
  • Managed Host 1 – 192.168.1.121 – Ubuntu 20.04 LTS
  • Managed Host 2 – 192.168.1.122 – Rocky Linux 8
  • sysops user with admin rights

Install Ansible via dnf command

1) Update the system

To update rocky linux 8, run beneath dnf command.

$ sudo dnf update -y

Once all the updates are installed reboot your system once.

$ sudo reboot

2) Configure EPEL repository

Ansible package and its dependencies are not available in the default Rocky Linux 8 package repositories. So, to install ansible via dnf , we must configure EPEL repository first.

Run following commands,

$ sudo dnf install -y epel-release

3) Install Ansible with dnf command

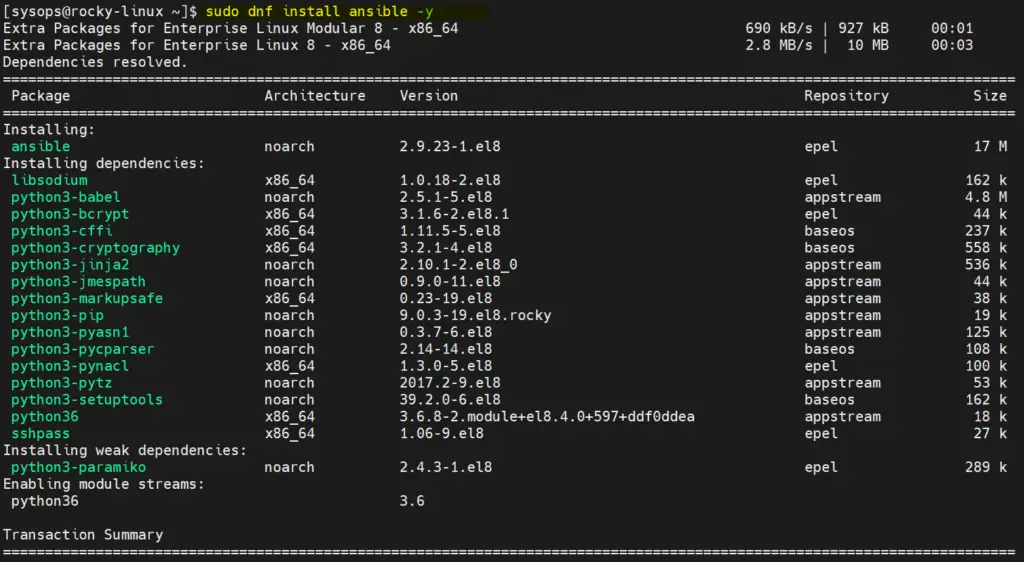
Now we are all set to install ansible with dnf command, run

$ sudo dnf install ansible -y

Install-Ansible-with-dnf-command-rocky-linux

Once ansible and its dependencies are installed successfully. Verify its version by running following command,

$ ansible --version

Ansible-Version-Check-Rocky-Linux8

Ansible Installation with pip

If you are looking for the latest version of Ansible then install ansible with pip. Refer the following steps.

Note: At the time of writing this post, ansible 4.3.0 is available

1) Install all updates

Install all the available updates using the beneath command,

$ sudo dnf update -y

Reboot the system once after installing the updates,

$ reboot

2) Install python 3.8 and other dependencies

Run following commands to install python 3.8 and other dependencies

$ sudo  dnf module -y install python38
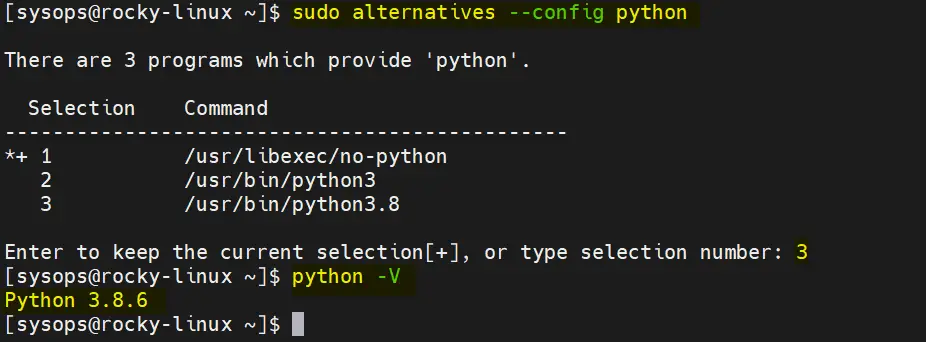
$ sudo alternatives --config python

Type 3 and hit enter

Alternative-Python-Rocky-Linux8

3) Install latest version of Ansible with pip

Run the following commands one after the another to install ansible,

$ sudo pip3 install setuptools-rust wheel
$ sudo pip3 install --upgrade pip
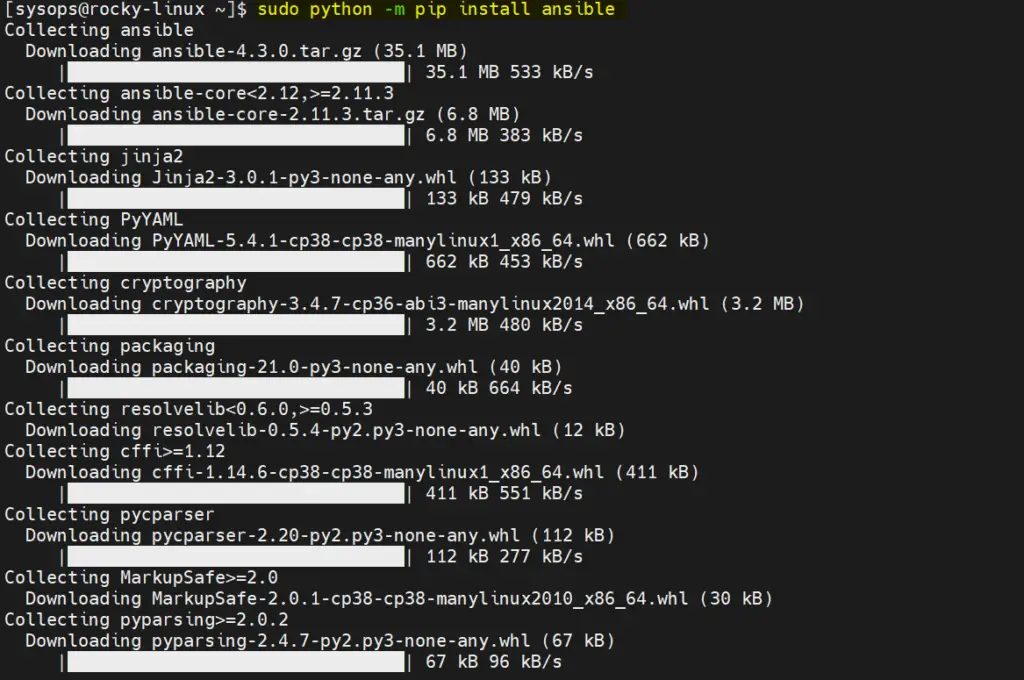
$ sudo python -m pip install ansible

Output of above python command would like below:

Install-Ansible-with-pip-command

Successful-Ansible-Installation-Rocky-Linux8

Above output confirms that Ansible has been installed successfully. Let’s verify Ansible version using following ansible command,

$ ansible --version

Verify-Ansible-Version-Rocky-Linux

Verify Ansible Installation

Whenever Ansible is installed with dnf or yum command then it’s default configuration file ‘ansible.cfg’ is created automatically under ‘/etc/ansible’ folder. But when we install it with pip then we have to create its configuration file manually.

It is recommended to create ansible.cfg for each project. For the demonstration purpose, I am creating an automation project. Run following mkdir command,

$ mkdir automation
$ cd automation

Create the ansible.cfg file with the following content,

$ vi ansible.cfg
[defaults]
inventory      = /home/sysops/auotmation/inventory
remote_user = sysops
host_key_checking = False

[privilege_escalation]
become=True
become_method=sudo
become_user=root
become_ask_pass=False

Save and quit the file.

Now create a inventory file under automation project (folder) with the following content.

$ vi inventory
[prod]
192.168.1.121

[test]
192.168.1.122

Save & close the file.

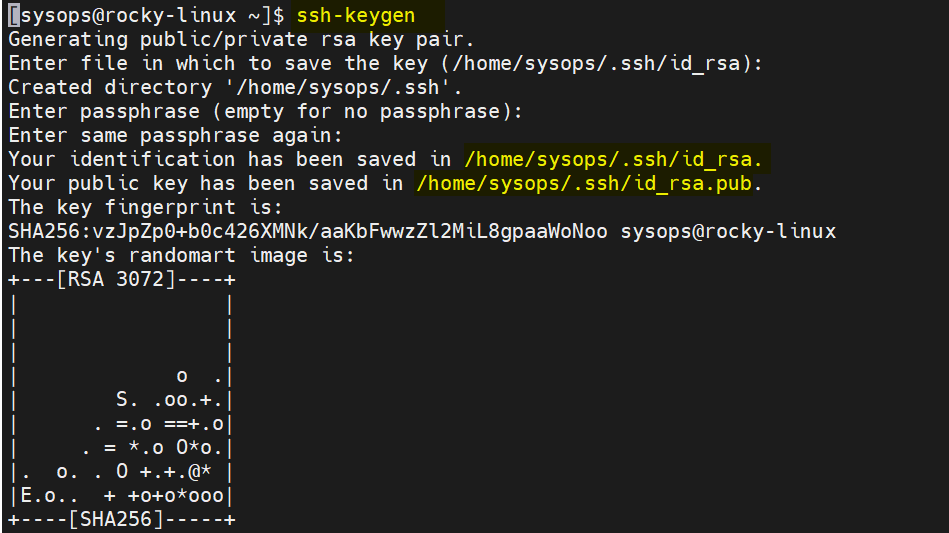
If you noticed carefully ansible.cfg file, I have used remote_user as ‘sysops’. So let’s create ssh keys for sysops user and share it among the managed hosts.

$ ssh-keygen

ssh-keygen-rocky-linux8

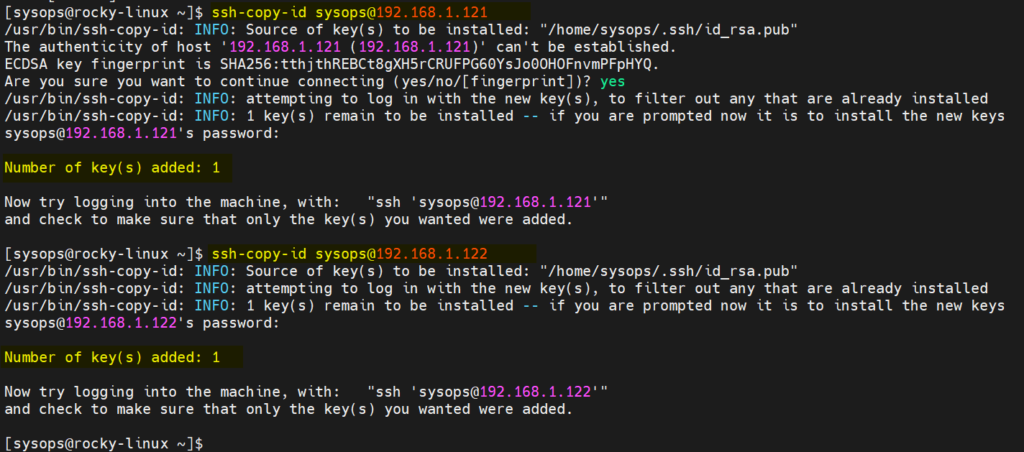
Share the SSH keys using ssh-copy-id command,

$ ssh-copy-id sysops@192.168.1.121
$ ssh-copy-id sysops@192.168.1.122

ssh-copy-id-command-rocky-linux

Note: Run following command on each managed host to run all the command without prompting password,

# echo "sysops ALL=(ALL) NOPASSWD:ALL" > /etc/sudoers.d/sysops

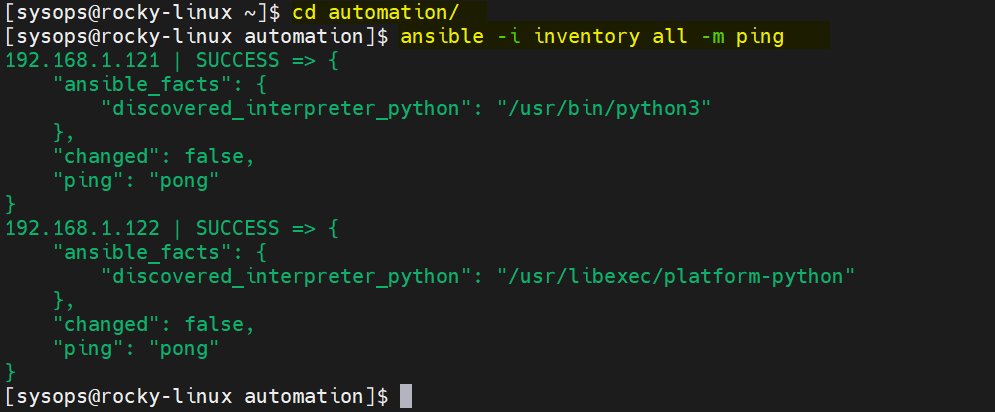
Verify the connectivity from control node to managed hosts using ping module,

$ cd automation/
$ ansible -i inventory all -m ping

Ping-pong-ansible-managed-hosts

Let’s create a sample playbook (web.yaml) to install nginx and php on managed hosts,

$ vi web.yaml
---
- name: Play to Packages
  hosts:
    - test
    - prod
  tasks:
  - name: Install php and nginx
    package:
      name:
        - php
        - nginx
      state: present

Save and close the file.

Run the playbook using beneath ansible-playbook command,

$ ansible-playbook -i inventory web.yaml

Output of above command would like below

Run-Ansible-Playbook-Rocky-Linux8

Great, above output confirms that playbook has been executed successfully and it also confirms that Ansible is installed correctly.

That’s all from this post. I believe this post helps you install and use Ansible on Rocky Linux 8. Please do share your feedback and queries in below comments section.

Recommended Read:  How to Use Handlers in Ansible Playbook

The post How to Install Ansible (Automation Tool) on Rocky Linux 8 first appeared on LinuxTechi.

How to Create and Manage KVM Virtual Machines via Command Line

$
0
0

KVM (Kernel based Virtual Machine) is an opensource virtualization technology built for Linux machines. It comprises a kernel module – kvm.ko which provides the core virtualization platform and a processor-specific module ( kvm-intel.ko for Intel processors or kvm-amd.ko for AMD processors ).

There are two ways of creating virtual machines using KVM. You can leverage the virt-manager tool which is an X11 server that provides a GUI interface for creating virtual machines. Additionally, you can use the command line to create a virtual machine by defining various parameters associated with the virtual machine you want to deploy.

We already have an elaborate guide on how to install KVM virtual machines using GUI on Ubuntu. In this guide, we take a different approach and demonstrate how you can create a KVM virtual machine from the command line interface. We are using Ubuntu 18.04, but this should work across all Linux distributions.

Step 1) Check whether Virtualization is enabled

As we get started out, we need to check if your system supports Virtualization technology. To achieve this, run the following command.

$ egrep -c '(vmx|svm)' /proc/cpuinfo

If your system supports virtualization technology, you should get an output greater than 0.

Virtualiztion-Support-Check-Ubuntu

Next, confirm if your system can run KVM virtual machines.

$ kvm-ok

KVM-OK-Command-Output

If you get an error on the screen, it implies that the kvm-ok utility is not yet installed. Therefore, install the following command to install the kvm-ok utility.

$ sudo apt install -y cpu-checker

Now run the kvm-ok command to confirm whether KVM virtualization is supported.

Step 2) Install KVM, Qemu, virt-manager & libvirtd daemon

The next step is to install KVM and associated packages. So, run the command:

$ sudo apt install -y qemu qemu-kvm libvirt-daemon libvirt-clients bridge-utils virt-manager

The command installs the following packages.

  • qemu-kvm –  This is the main KVM package that provides virtualization support.
  • libvirt – Includes the libvirtd daemon which supports creation and management of virtual machines.
  • libvirt-client – This package provides the virsh utility used for interacting with virtual machines.
  • virt-install – A utility that helps you to create virtual machines and install OS on those virtual machines from command line.
  • virt-viewer – A utility that displays the graphical view for the virtual machine.

Once installed, we need to confirm if the required kvm modules are loaded. Therefore, run the command:

$ lsmod | grep kvm

lsmod-kvm-Command-output

Additionally, confirm that the libvirtd daemon is running as follows.

$ sudo systemctl status libvirtd.service

libvirtd-service-status-kvm-ubuntu

Perfect! All the prerequisites are in place. Let’s now proceed and install a virtual machine.

Step 3)  Create a virtual machine from the command line

We are going to install a Debian virtual machine using a Debian 11 iso image located in the Downloads folder in the home directory.

To create the new virtual machine, we will run the following command.

$ sudo virt-install --name=debian-vm \
--os-type=Linux \
--os-variant=debian9 \
--vcpu=2 \
--ram=2048 \
--disk path=/var/lib/libvirt/images/Debian.img,size=15 \
--graphics spice \
--location=/home/james/Downloads/debian-11.1.0-amd64-DVD-1.iso \
--network bridge:virbr0

Let’s take a minute and analyze this command:

  • The –name attribute denotes the name of the virtual machine. Feel free to give it an arbitrary name.
  • The  –os-type directive specifies the type of Operating system – in this case Linux.
  • The  –os-variant option specifies the operating system releases.

NOTE:   KVM provides predefined  –os-variant options and you just cannot make up your own. To check the various variants that are supported, run the osinfo-query os command. This lists all the possible Operating systems and the supported variants. Also, note that the variants my not coincide with your latest Linux release. In this case, I’m using  debian9 instead of debian11 since the latter is not provided by KVM as one of the variant options.

  • Moving on, the –vcpu parameter specifies the number of CPU cores to be allocated to the virtual machine.
  • The –ram option specifies the amount of RAM in Megabytes to be allocated.
  • The –disk path option defines the path of the virtual machine image. The –disk directive is the disk space of the VM in Gigabytes.
  • The –graphics option specifies the graphical tool for interactive installation, in this example, we are using spice.
  • The –location option points to the location of the ISO image
  • Lastly, the –network bridge directive specifies the interface to be used by the virtual machine.

Virt-Install-Command-output-Ubuntu-Linux

If all goes well, you should get some output as indicated in the image above followed by a virt viewer pop-up of the virtual machine awaiting installation.

Virt-Viewer-Ubuntu-Linux

In our case, we are installing Debian 11 and this is the initial installation screen. We proceeded with the installation until the very end.

Step 4) Interacting with virtual machines

The virsh utility is a component that is used to interact with virtual machines on the command-line. For instance, to view the currently running virtual machines, execute the command:

$ virsh list

Virsh-List-Command-Ubuntu

To list all the virtual machines including those that are powered off, append the –all option.

$ virsh list --all

Virsh-List-All-Command-Ubuntu

To shut down a virtual machine use the syntax:

$ sudo virsh shutdown vm_name

For example, to turn off our virtual machine, the command will be:

$ sudo virsh shutdown debian-vm

Virsh-Shutdown-KVM-VM-Ubuntu

To start or power on the virtual machine, run:

$ sudo virsh start debian-vm

Virsh-Start-KVM-VM-Ubuntu

To reboot the machine, run the command:

$ sudo virsh reboot debian-vm

Virsh-Reboot-KVM-VM-Ubuntu

To destroy or forcefully power off virtual machine, run:

$ sudo virsh destroy debian-vm

To delete or removing virtual machine along with its disk file, run

a)   First shutdown the virtual machine

b)   Delete the virtual machine along with its associated storage file, run

$ sudo virsh undefine –domain <Virtual-Machine-Name> –remove-all-storage

Example:

$ sudo virsh undefine --domain debian-vm --remove-all-storage

Closing Thoughts :

This was a guide on how to install a virtual machine using KVM  on the command line. We have highlighted some of the salient options to specify to ensure the successful deployment of the virtual machine. We also went a step further and demonstrated how to interact with the virtual machine on command-line using the virsh utility. Those were just a few options, there are quite several of them.

The post How to Create and Manage KVM Virtual Machines via Command Line first appeared on LinuxTechi.

How to Manage KVM Virtual Machines with Cockpit Web Console

$
0
0

In a previous topic, we walked you through how create and manage KVM machines on command line. For command-line enthusiasts, this is an ideal way of creating and keeping tabs on virtual machines. For those who prefer using a graphical display, the Cockpit utility comes very much in handy.

Cockpit is a free and opensource web-based GUI that allows you to easily monitor and administer various aspects of your Linux server. It is lightweight, and resource-friendly and does not gobble up resources and neither does it reinvent subsystems or add its own tooling layer. It’s purely an on-demand service and uses your normal system login credentials.

Cockpit allows you to perform a subset of operations including:

  • Configuring a firewall.
  • Creating and managing user accounts.
  • Configuring network settings.
  • Creating and managing virtual machines.
  • Updating / Upgrading software packages.
  • Downloading and running containers.
  • Inspecting system logs.
  • Monitoring the server’s performance.

The primary focus of this guide is to manage kvm virtual machines using cockpit web console.

Prerequisites

Before you proceed any further, ensure that KVM and all of its associated packages are installed on your server. If you are running Ubuntu 20.04, check out how to install KVM on Ubuntu 20.04.

For CentOS 8 users, we also have a guide on how to install KVM on CentOS 8.x and RHEL 8.x.

Additionally, ensure that Cockpit is installed. Check out how to install Cockpit on Ubuntu 20.04 and how to install Cockpit on CentOS 8.

In this guide, we will be managing KVM Virtual machines on Ubuntu 20.04 system.

Step 1)  Install additional dependencies

To manage virtual machines, we first need to install the cockpit-machines package. This is the Cockpit user interface for virtual machines. The package communicates with the libvirt virtualization API which handles platform virtualization.

To install the cockpit-machines package on Ubuntu / Debian, run the command:

$ sudo apt install cockpit-machines

For CentOS 8.x, RHEL 8.x and Rocky Linux 8, execute the command:

$ sudo dnf  install cockpit-machines

Once installed, restart the Cockpit utility.

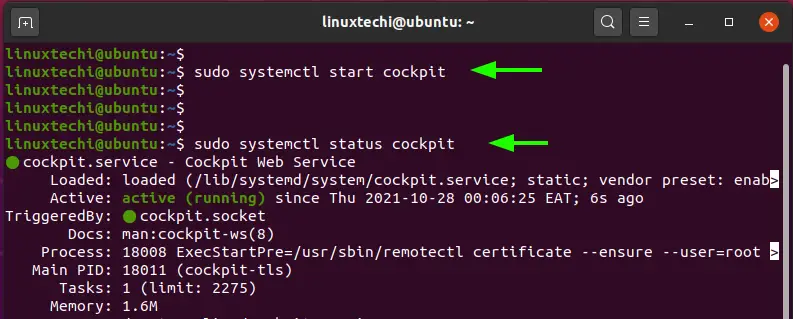
$ sudo systemctl restart cockpit

And check to confirm whether is it running:

$ sudo systemctl status cockpit

Cockpit-Service-Status-Ubuntu

Step 2) Access the cockpit web console

To access Cockpit, launch your browser and browse the link shown below.

https://server-IP:9090

If you are having any trouble accessing the Cockpit web console, you need to open port  9090 on the firewall. This is the port that Cockpit listens on. If you are running a UFW firewall, execute the command:

$ sudo ufw allow 9090/tcp
$ sudo ufw reload

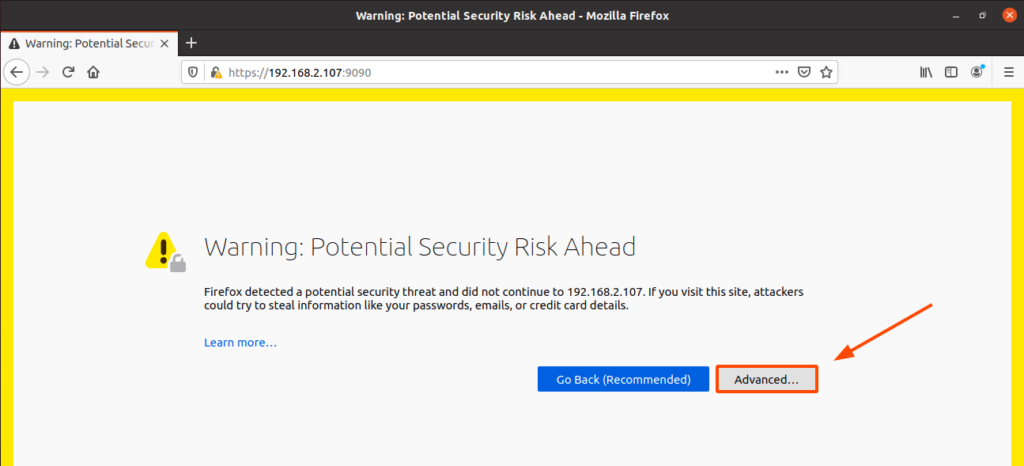
If it is your first time logging in, you will find a warning that you are about to browse a risky site. But worry not. The reason you are getting such a ‘warning’ is that Cockpit is encrypted using a self-signed SSL certificate which is not recognized by CA (Certificate Authority ).

To get around this restriction, click the ‘Advanced’ button.

Cockpit-Access-URL-Ubuntu

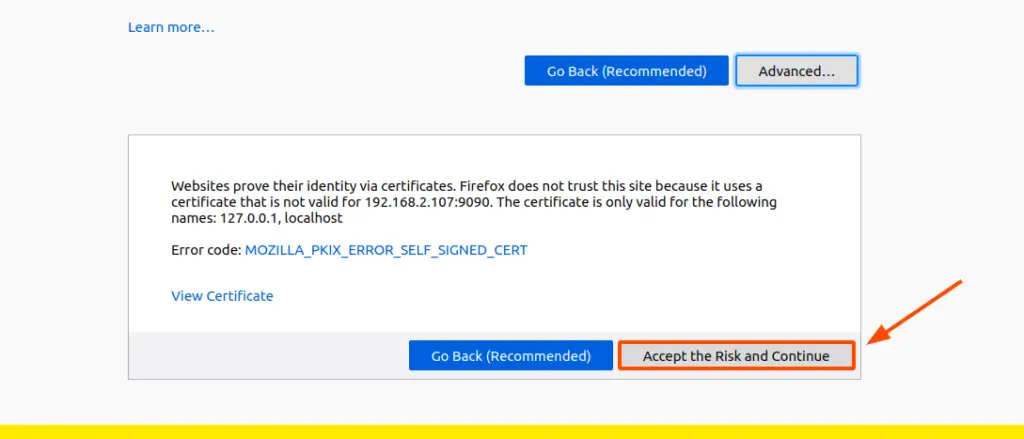
Next, click on ‘Accept the Risk and Continue’ to proceed to the Cockpit  login  page.

Accept-Cockpit-Self-Sign-Certs

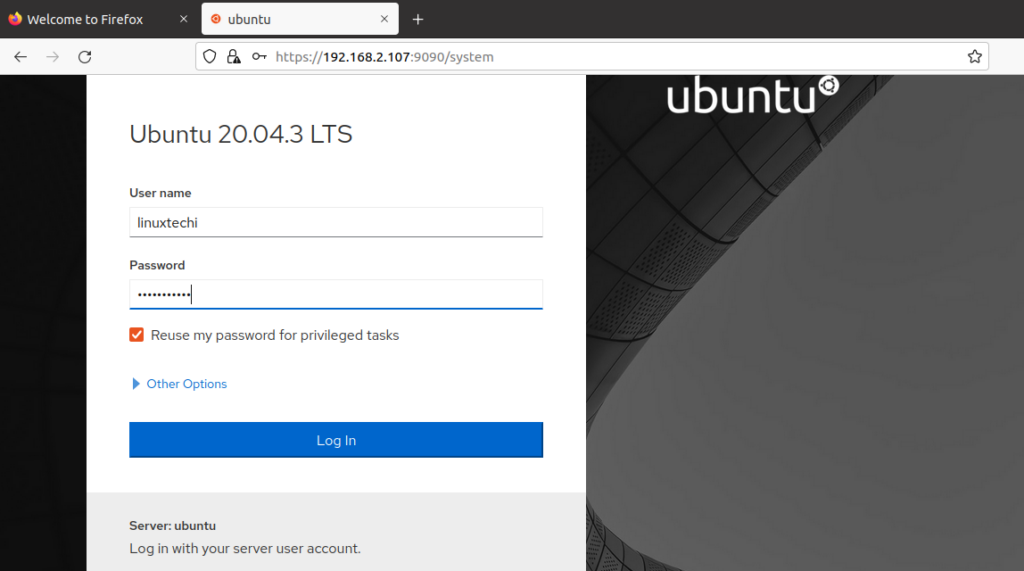
At the login screen, provide your username and password and click ‘Login’ to access the cockpit dashboard.

Cockpit-Login-Screen-Ubuntu

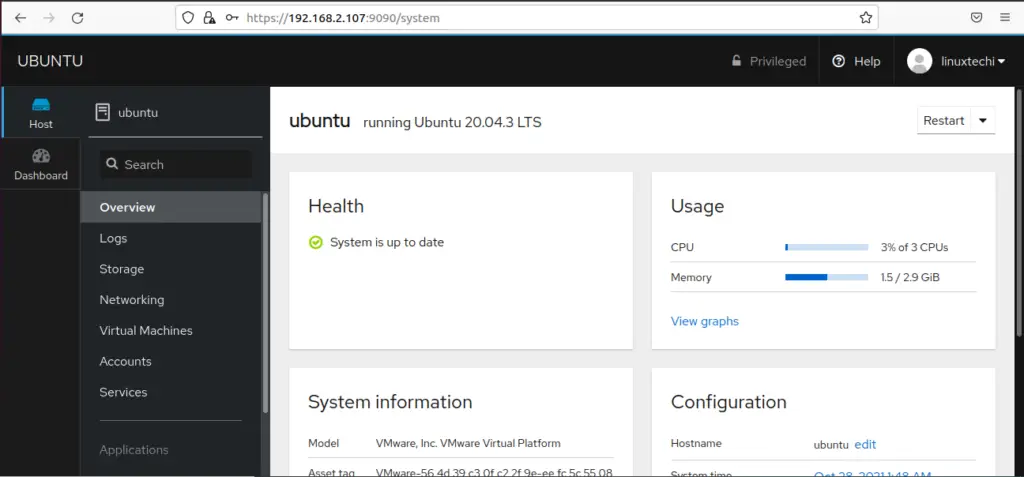
This lands you on this ‘Overview’ section that gives you a glance at your system’s performance metrics.

Cockpit-Dashboard-Ubuntu

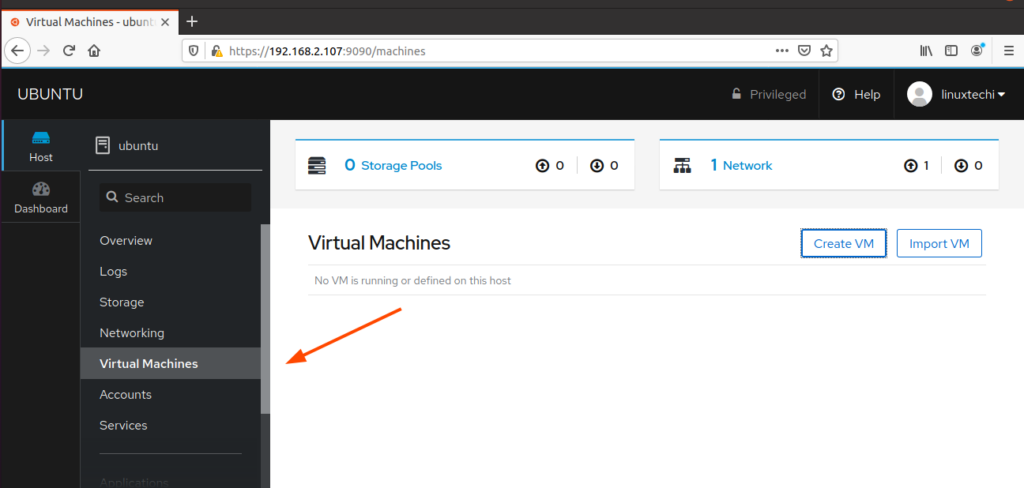
Since our interest is in creating and managing virtual machines, click on the ‘Virtual machines’ option on the left sidebar as shown.

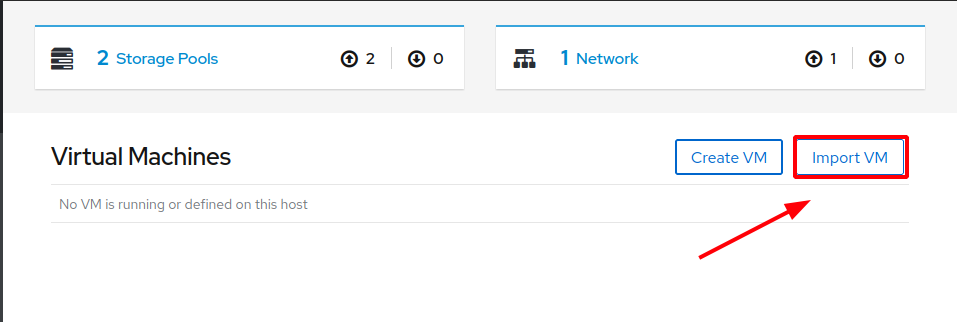
Existing virtual machines will be listed. However, since we are starting from scratch our Virtual machines section is blank. At the far right we are presented with two options ‘Create VM’ and ‘Import VM’.

How to create a new virtual machine

To create a new Virtual machine, click on the ‘Create VM’ button.

Create-VM-Option-Cockpit

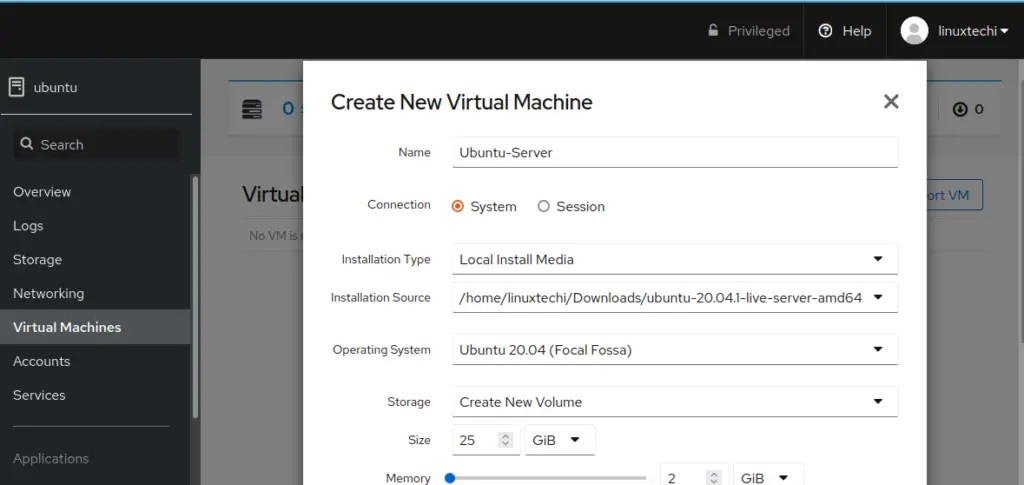
Fill out the virtual machine details including the Name of the VM, installation type, installation source, OS type, disk, and memory capacity.Create-New-Virtual-Machine-Cockpit

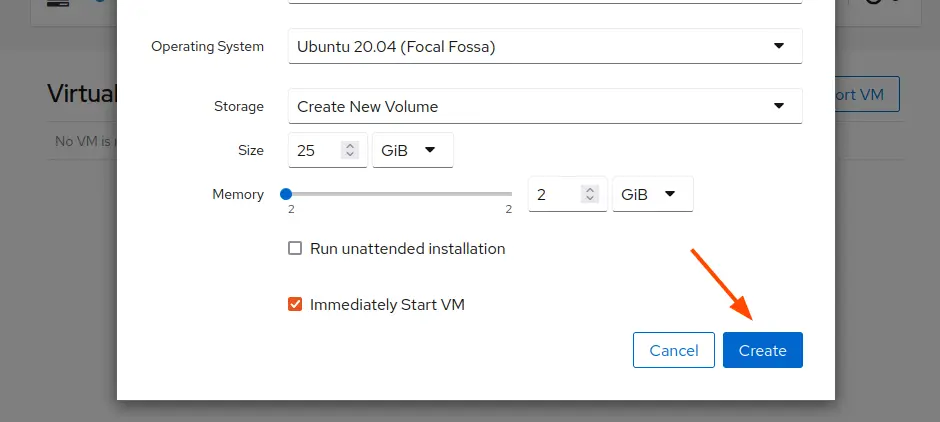
Once you have selected all the options, click the ‘Create’ button to create the virtual machine.

Click-Create-option-Cockpit

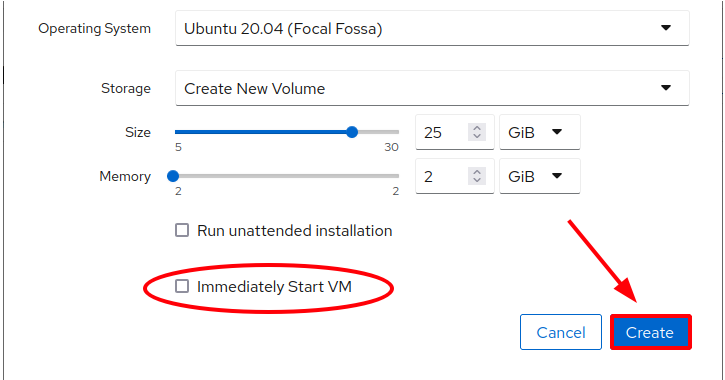
NOTE: By default, the ‘Immediately Start VM’ option is checked. This option causes the Virtual machine to be immediately launched once you click the ‘Create’ button. If you wish to review the settings before launching your virtual machine, uncheck it and hit the ‘Create’ button.

Uncheck-Immediately-start-vm-cockpit

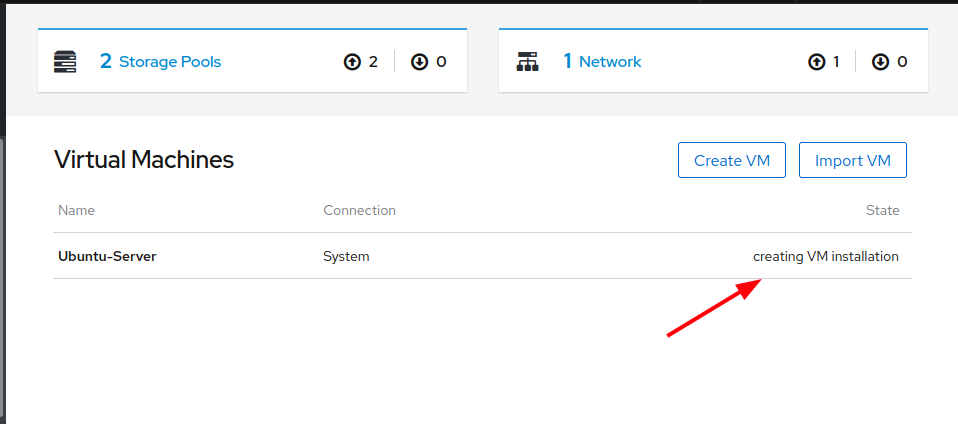
Thereafter, cockpit will start creating the virtual machine.

Creating-VM-Installation-Cockpit

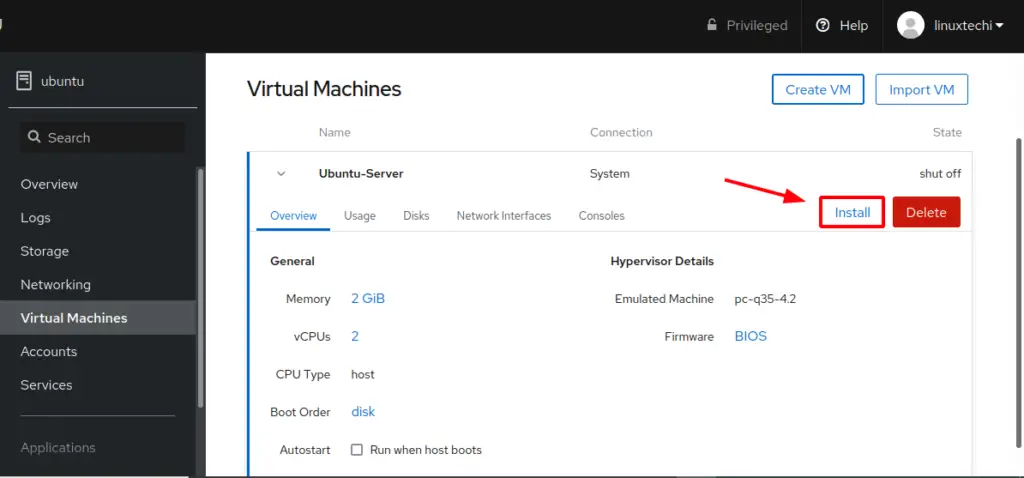
Once the creation of the VM is complete, you will get an overview of the Virtual machine details as shown. Other sections that you can navigate include Usage, Disks, Network Interfaces, and Consoles.

If you are ready, simply click the ‘Install’ button as shown.

NOTE:

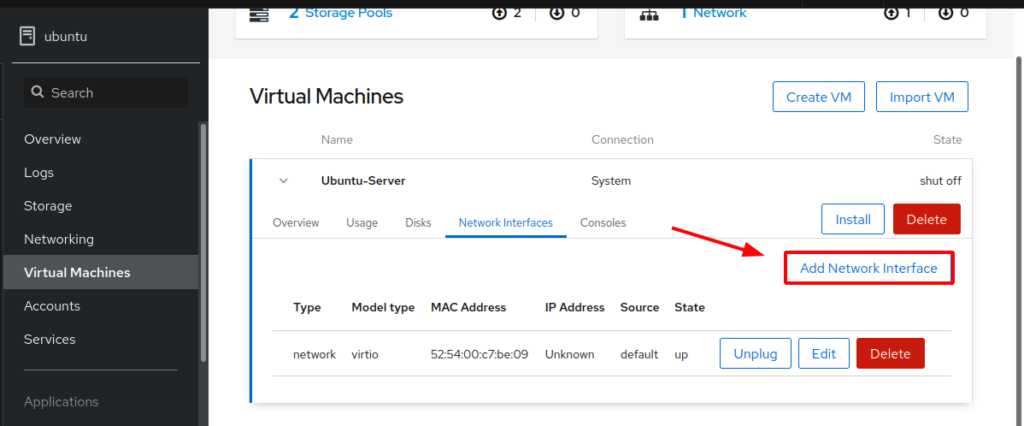
Before you proceed, one setting you might want to configure before installing the VM is the network interface. You can configure this to allow the VM to be accessible by other users within the network.

So, head over to the ‘Network Interfaces’ section and click on the ‘Add network Interface’ button.

Add-Network-Interface-KVM-VM-Cockpit

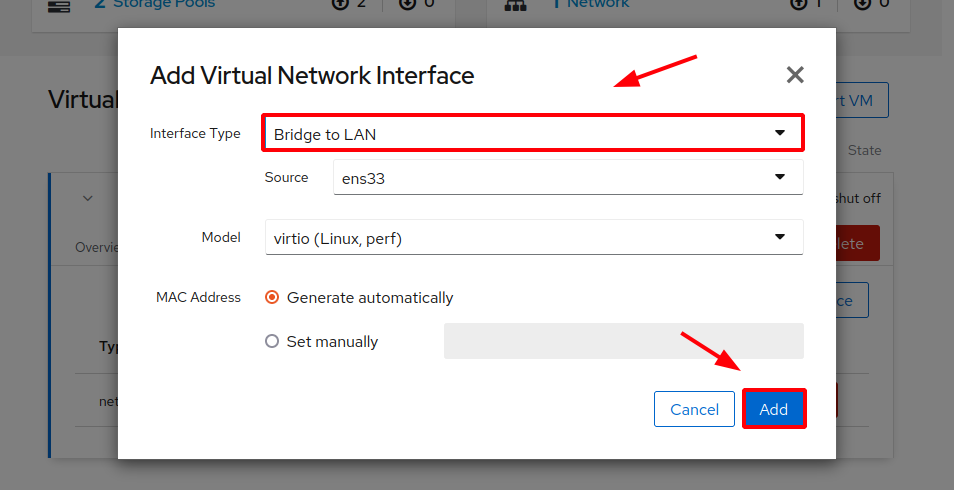
Specify ‘Bridge to LAN’ and point the source to the active network interface on your PC and click on the ‘Add’ button.

Add-Virtual-Network-Interface-VM-cockpit

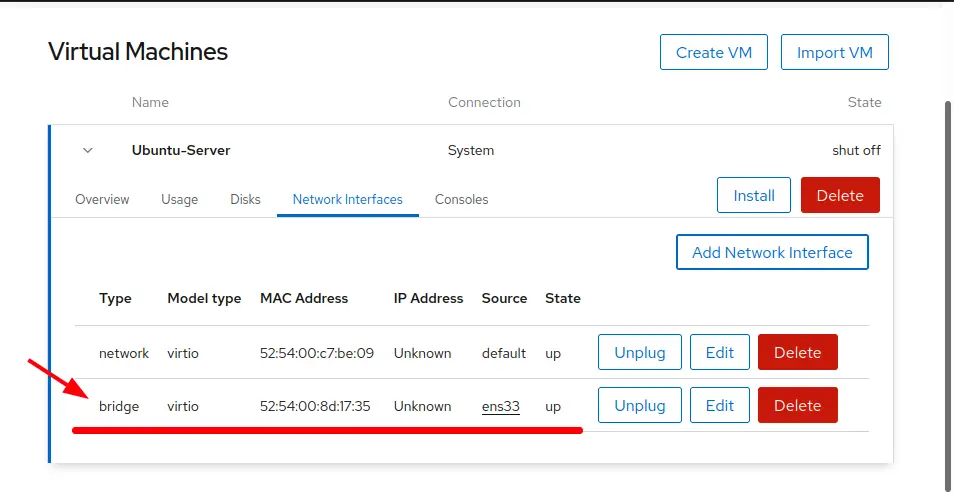
The bridged network will be listed below the default network that Cockpit creates for the VM.

Network-List-VM-Cockpit

Finally, click the ‘install’ button to begin the installation of your operating system.

Start-Install-KVM-VM-Cockpit

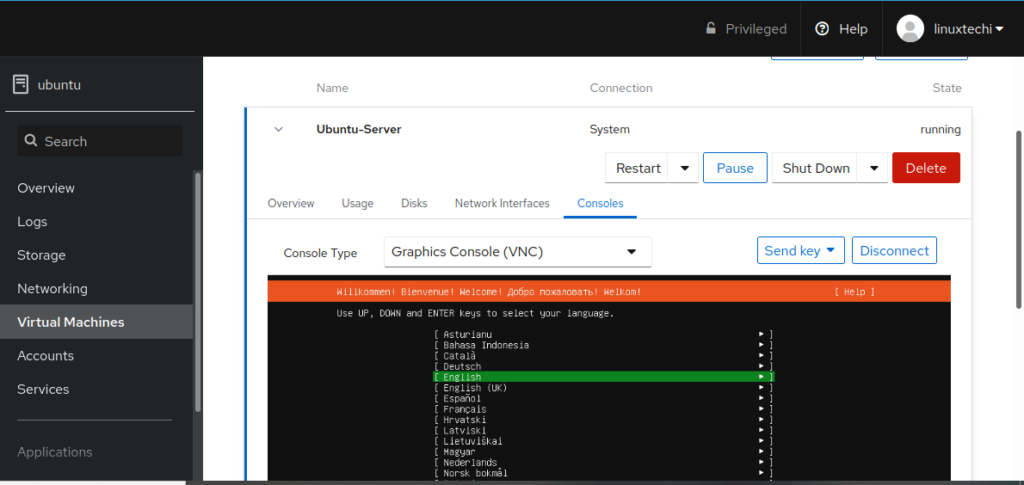
This will take you to the ‘Console’ section where you have an option of selecting the Console type. The default selection is VNC.

VNC-Console-VM-Cockpit

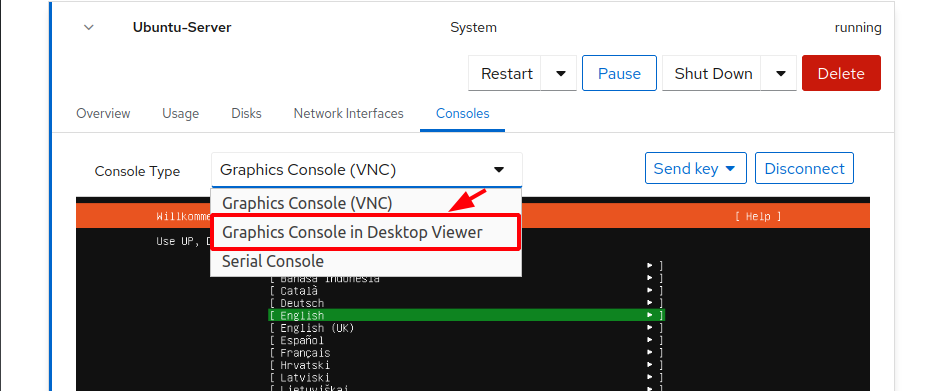
You have the luxury of also selecting between Desktop Viewer and Serial Console. I’d recommend selecting the Desktop viewer which is more user-friendly and easier to use to access the VM graphically.

Graphics-Console-Desktop-viewer-Cockpit

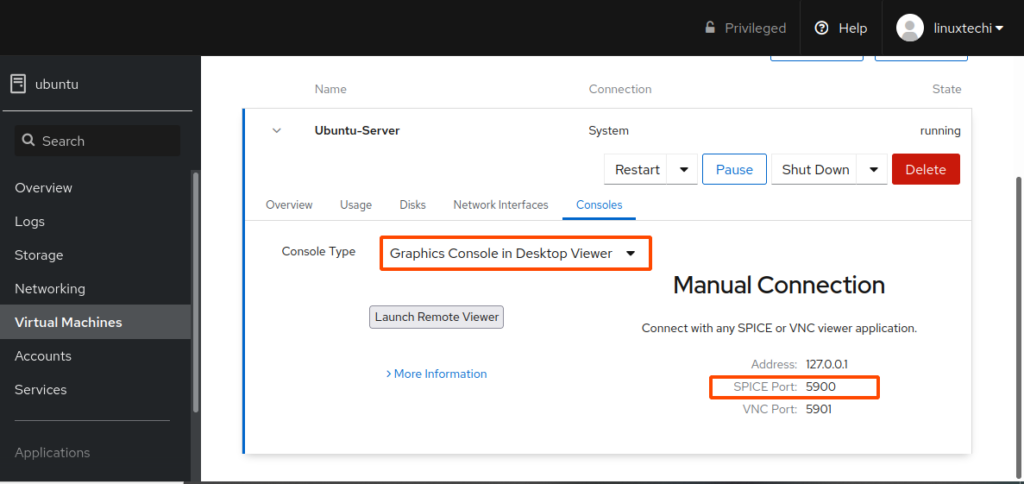
Once you have selected the ‘Desktop Viewer’ option, you will get some details on the IP and the port to use. Desktop Viewer uses the Spice GUI connection.

Spice-port-vm-cockpit

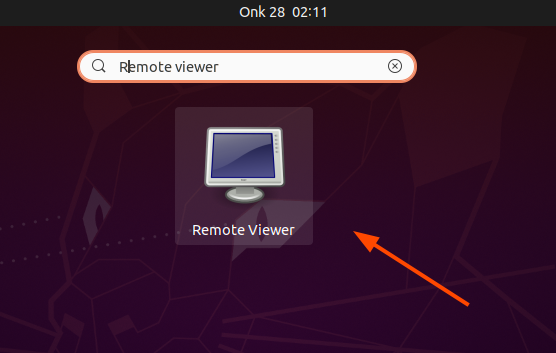
To make a connection, search for and launch the remote viewer which is provided by virt-viewer package.

Remote-viewer-Ubuntu

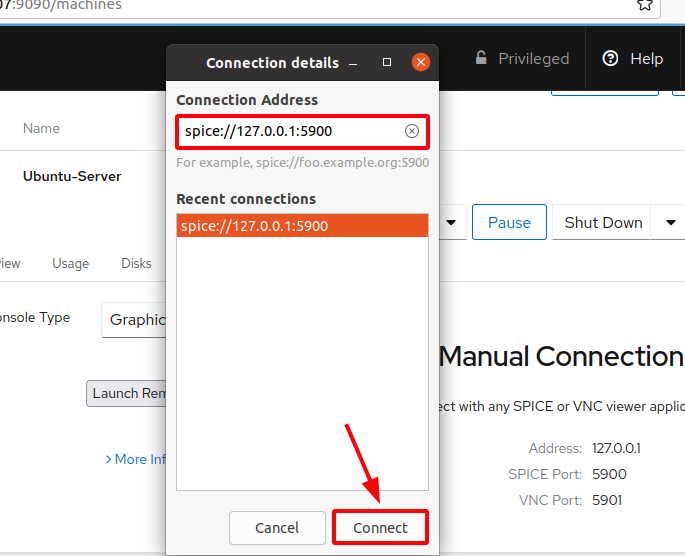
Once launched, enter the URL as provided and click connect.

Connection-Remote-Viewer-Cockpirt-VM

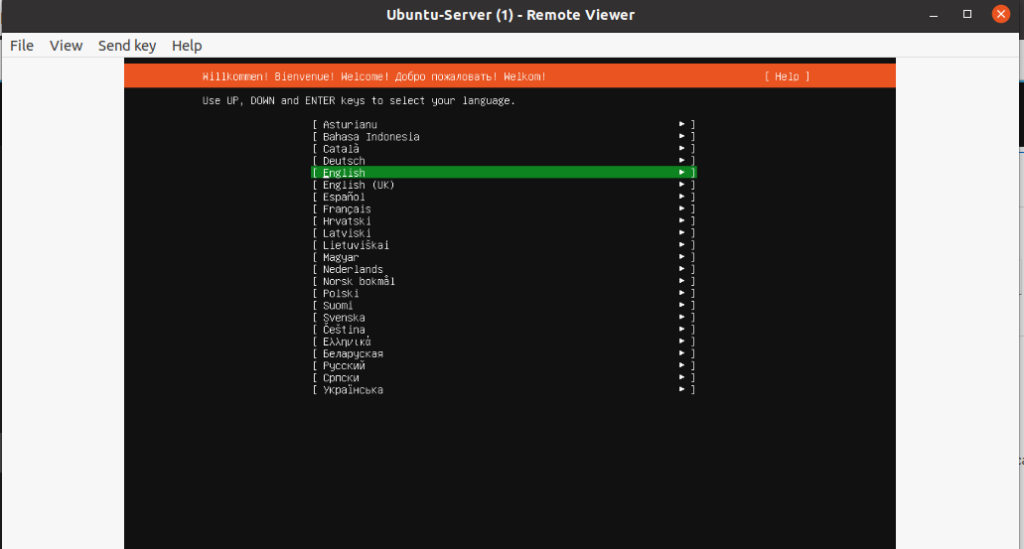
The Remote viewer will open the Virtual machine and from here, you can proceed with the installation of your operating system.

Remote-Viewer-KVM-VM-Ubuntu

Import a Virtual machine

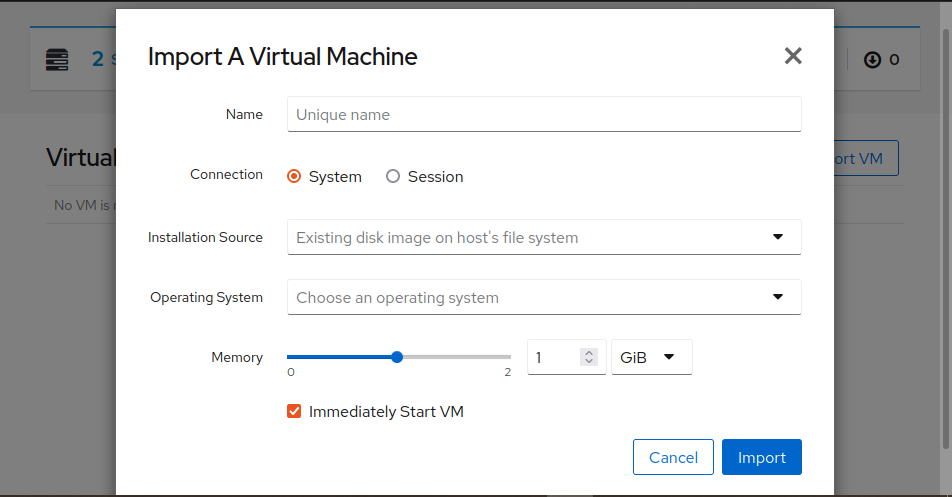
To import a VM, simply click the ‘Import VM’ tab. On the pop-up GUI that appears, be sure to fill in the name of the VM, select the existing disk image location, OS type, and memory capacity. Finally hit the ‘Import’ Button.

Import-VM-Option-cockpit

Fill out the details such as the name of the VM, Installation source, OS, and memory, and click ‘Import’.

Import-VM-Details-Cockpit

Configure KVM Storage Pools

A storage pool is simply a directory or storage device that is managed by the libvirtd daemon. Storage pools comprise storage volumes that either accommodate virtual machine images or are directly connected to VMs as additional block storage.

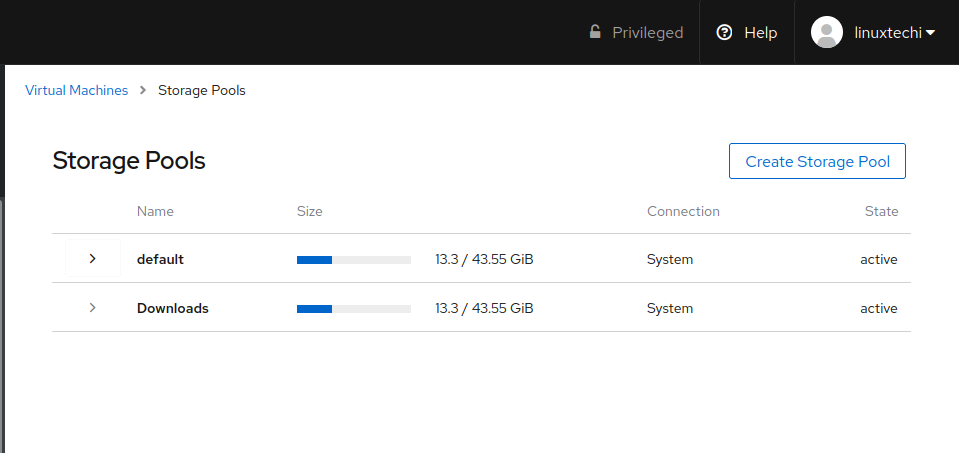
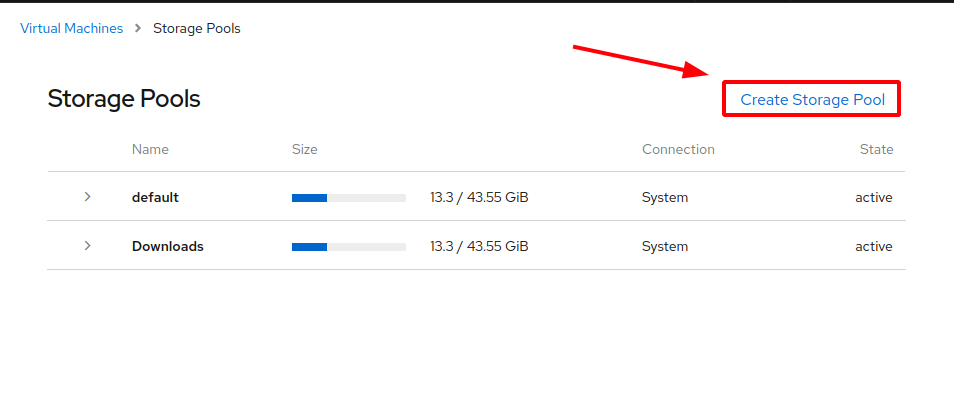
By default, there are two storage pools listed when you create a VM. To list them, click on the ‘Storage Pools’ tab.

Storage-Pool-KVM-VM-Cockpit

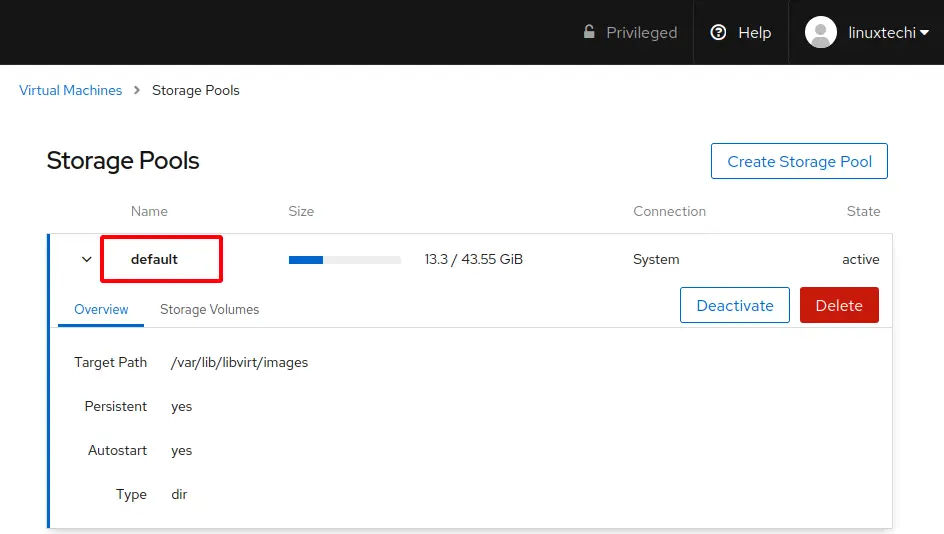
The ‘default’ storage pool stores all virtual machine images in the /var/lib/libvirt/images directory.

Storage-Pools-VM-cockpit

Click on the ‘default’ storage pool, to reveal detailed information such as the Target path.

Default-Storage-Pool-VM-Cockpit

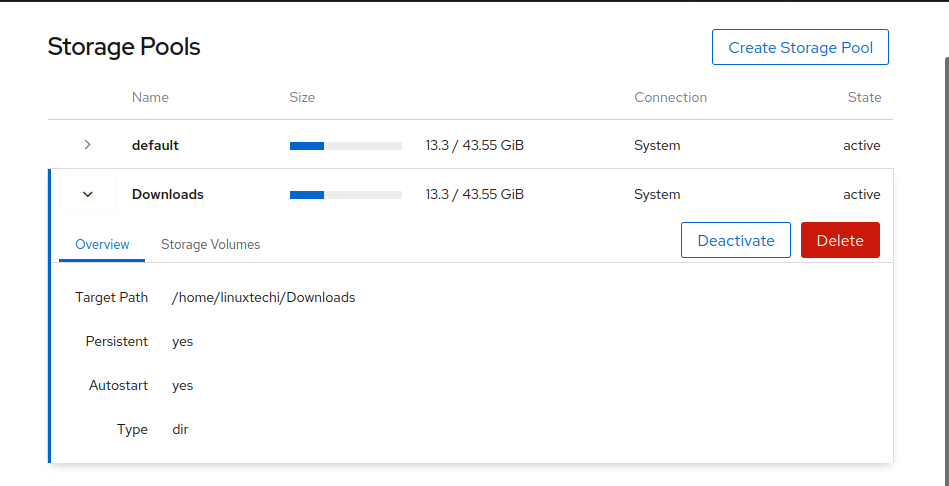
The other storage pool points to the location of the disk image that you used to create the VM. In my case, this is the ‘Downloads’ directory in my home directory.

Downloads-Storage-Pool-VM-Cockpit

To create a new storage pool click on ‘Create Storage Pool’.

Create-Storage-Pool-Cockpit

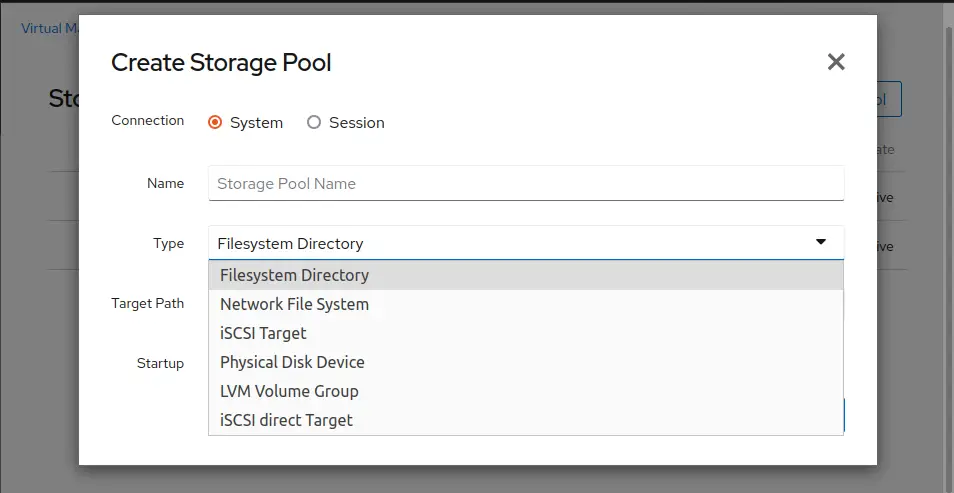
Next, fill in all the essential details. A storage pool can take various  forms such as:

  • Filesystem directory
  • Network file system
  • iSCSI target / iSCSI directory target
  • Physical disk device
  • LVM volume group

Storage-Pool-type-vm-cockpit

Configure KVM Networking

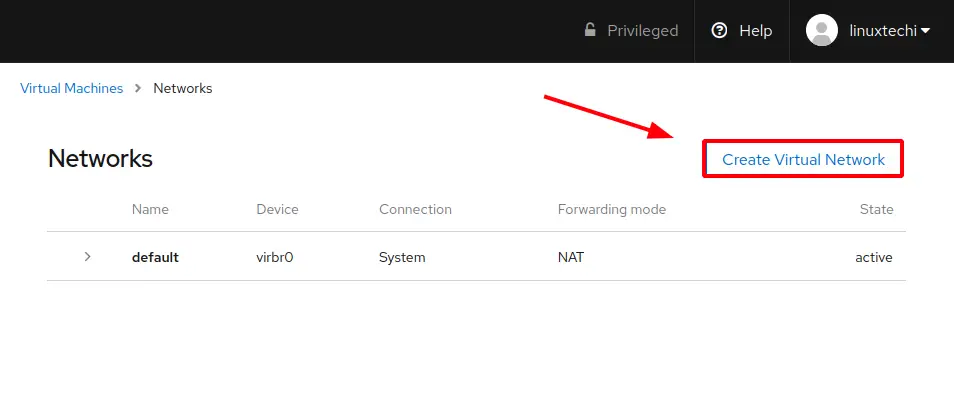
In addition, you can create virtual networks in KVM. Simply click on the ‘Network’ option.

KVM-VM-Network-Cockpit

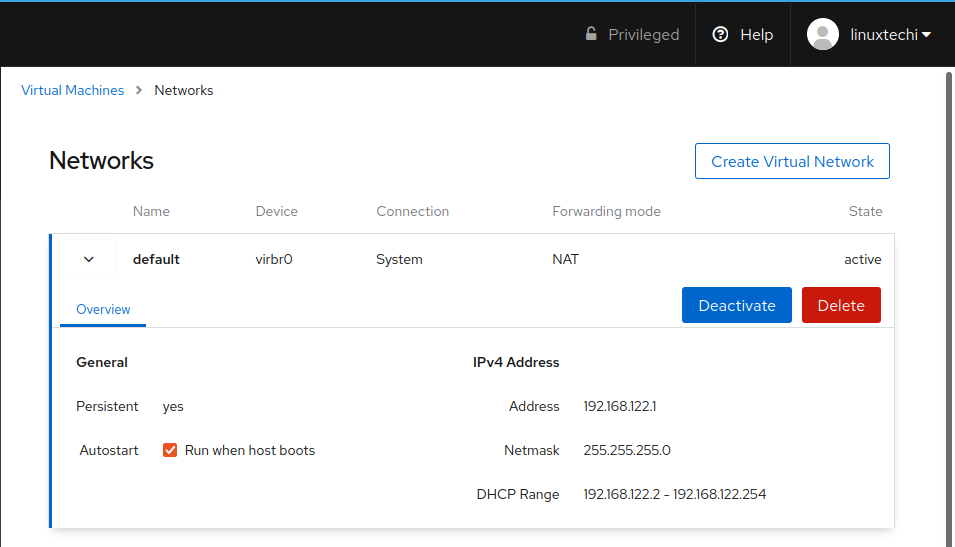
This will list all the available virtual networks. By default, KVM creates a default virtual network called virbr0 which lets virtual machines communicate with each other.

Create-Virtual-Network-VM-Cockpit

The default Virtual network provides it’s own subnet, and DHCP IP range as shown. You can add as many virtual network as per your preference. Other options in network management include deactivating and deleting a network.

Default-Networks-VM-Cockpit

Restart / Pause / Shutdown a virtual machine

Lastly, you can control the running state of your virtual machines. You can restart, Pause, Shutdown and even delete your virtual machine.

Pause-VM-via-cockpit

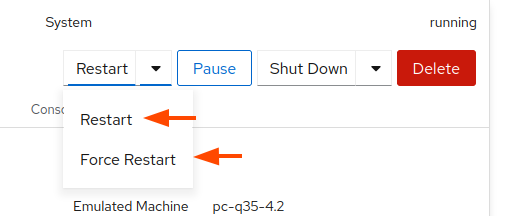
Under the ‘Restart’ option, you get 2  other sub-options:

  • Restart
  • Force Restart

The ‘Restart’ option performs the usual restart of the VM while the ‘Force Restart’ immediately restarts the VM.

Restart-VM-via-Cockpit

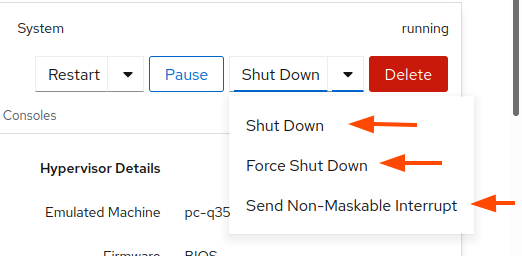
Under the ‘Shutdown’ option, you get 3 sub-options:

  • Shut Down
  • Force Shut Down
  • Send Non-Maskable interrupt

Shutdown-VM-via-Cockpit

The ‘Shut Down’ option performs a graceful shutdown while the  ‘Force Shut Down’ option instantly powers off the virtual machine without giving it time to gracefully shutdown.

A Non-Maskable Interrupt ( NMI ) is a signal sent to a vm which it cannot ignore. It comes in handy when the VM is not responsive to a Shutdown, or restart signal. The NMI causes the VM’s kernel to panic and generate a memory dump which is then used for debugging.

Closing Thoughts:

As you have seen, creating and managing virtual machines using cockpit is a walk in the part. You simply rely on the graphical interface to perform all operations, and not once will you be required to run any commands on the console. Cockpit provides you with the relevant tools and features to easily manage various aspects of your virtual machine.

We hope that this guide was beneficial as you get started in managing virtual machines using Cockpit.

The post How to Manage KVM Virtual Machines with Cockpit Web Console first appeared on LinuxTechi.

How to Install OpenShift 4.9 on Bare Metal (UPI)

$
0
0

Hello Techies, as you know Openshift provides container platform and can installed either on onprem or in public cloud using different methods like IPI (Installer Provisioned Installer), UPI (User Provisioned Infrastructure) and Assisted Bare Metal installer.

In this post, we will demonstrate how to install Openshift 4.9 on bare metal nodes with UPI approach.

For the demonstration purpose, I am using KVM virtual machines. Following are my lab setup details,

Total Virtual Machines: 7

Bastion Node:  

  • OS – Rocky Linux 8 / CentOS 8,
  • RAM- 4GB, vPCU-4,
  • Disk- 120 GB
  • Network: Management N/w – (169.144.104.228), ocp internal n/w – (192.168.110.115)

Bootstrap Node:

  • OS : Core OS
  • RAM : 8GB
  • vCPU: 4
  • Disk: 40 GB
  • Network: OCP Internal Network (192.168.110.116)

Control Plane 1 Node:

  • OS : Core OS
  • RAM : 10GB
  • vCPU: 6
  • Disk: 60 GB
  • Network: OCP Internal Network (192.168.110.117)

Control Plane 2 Node:

  • OS : Core OS
  • RAM : 10GB
  • vCPU: 6
  • Disk: 60 GB
  • Network: OCP Internal Network (192.168.110.118)

Control Plane 3 Node:

  • OS : Core OS
  • RAM : 10GB
  • vCPU: 6
  • Disk: 60 GB
  • Network: OCP Internal Network (192.168.110.119)

Worker Node 1:

  • OS : Core OS
  • RAM : 12GB
  • vCPU: 8
  • Disk: 60 GB
  • Network: OCP Internal Network (192.168.110.120)

Worker Node 2:

  • OS : Core OS
  • RAM : 12GB
  • vCPU: 8
  • Disk: 60 GB
  • Network: OCP Internal Network (192.168.110.121)

Note: In KVM hypervisor, we have created host only network for ocp-internal.

Use the following file and commands to create host only network in KVM,

$ cat hostonly.xml
<network>
  <name>hostnet</name>
  <bridge name='virbr2' stp='on' delay='0'/>
  <ip address='192.168.110.1' netmask='255.255.255.0'>
      <range start='192.168.110.10' end='192.168.110.254'/>
  </ip>
</network>
$ sudo virsh net-define hostonly.xml
$ virsh net-start hostnet
$ virsh net-autostart hostnet
$ sudo systemctl restart libvirtd

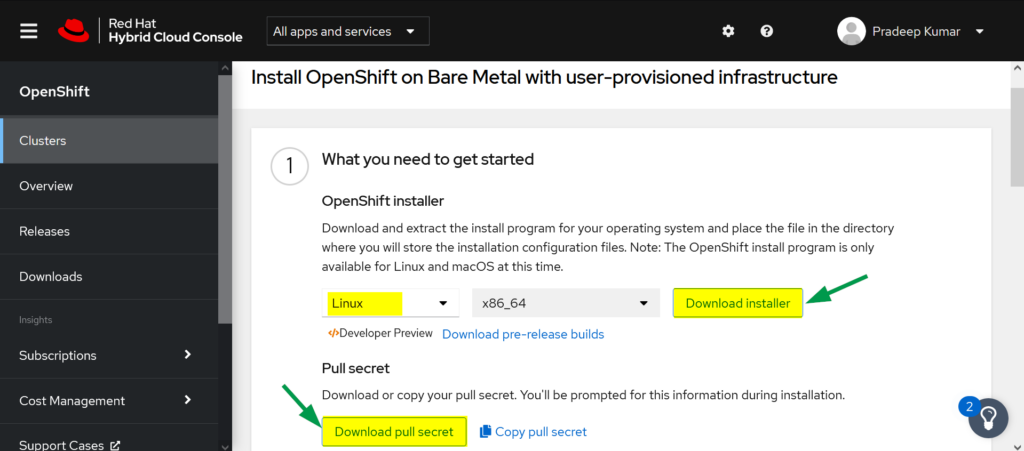
Download Openshift Software from Red Hat portal

a)    Login to Red Hat Portal using following URL:

https://cloud.redhat.com/openshift

b)    Click on Create Cluster

c)     Choose Datacenter Tab –> Click on BareMetal

d)    Select the Installation Type as ‘UPI’ (User-provisioned infrastructure)

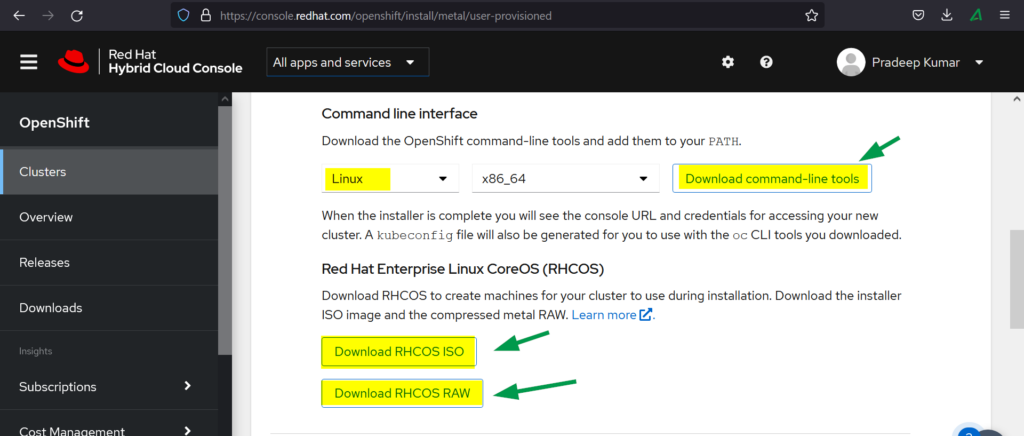
e)    Download the followings

  • OpenShift Installer
  • Pull Secret
  • Command Line Interface
  • RHCOS ISO
  • RHCOS RAW

Download-OpenShift-Software

Download-OCP-RHCOS-ISO-RAW

Let’s now jump into the installation steps of OpenShift

Step 1) Prepare Bastion Node

Create a virtual machine with resources mentioned above for bastion, you can install OS either Rocky Linux 8 or CentOS 8.  Assign the ip address from management and ocp internal network.

Similarly create bootstrap, control plane VMs and Worker VMs and attach OCP network (hostnet) to interface and note down their mac address. So, in my case following are the MAC addresses,

  • Bootstrap:  52:54:00:bf:60:a3
  • ocp-cp1: 52:54:00:98:49:40
  • ocp-cp2: 52:54:00:fe:8a:7c
  • ocp-cp3: 52:54:00:58:d3:31
  • ocp-w1: 52:54:00:38:8c:dd
  • ocp-w2: 52:54:00:b8:84:40

Step 2) Configure Services on bastion node

Transfer the downloaded Openshift software including the secret to bastion node under the root folder.

OpenShift-Software-Required

Extract openshift client tar file using following tar command,

# tar xvf openshift-client-linux.tar.gz
# mv oc kubectl /usr/local/bin

Confirm openshift client tool installation and its version by running,

# oc version
# kubectl version

Output of above command would look like below:

Openshift-Client-Version

Extract Openshift Installer tar file,

# tar xpvf openshift-install-linux.tar.gz
README.md
openshift-install
#

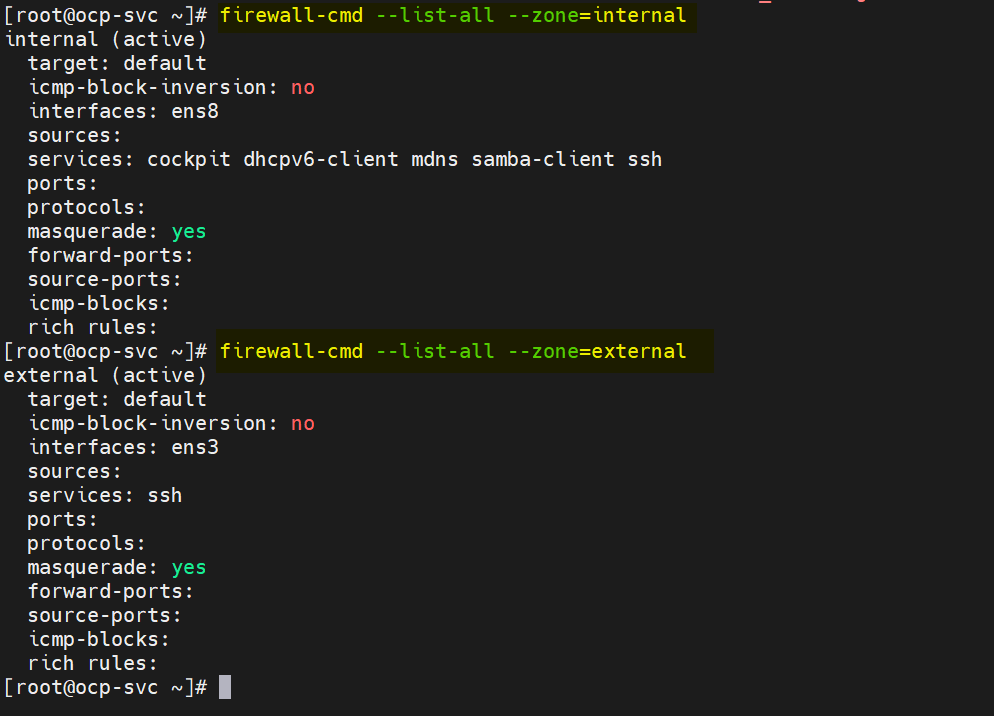
Configure Zones and masquerading (SNAT)

In my bastion node, I have two lan cards, ens3 and ens8. On ens3 , external or management network is configured and on ens8, ocp internal network is configured. So, define the following zones and enable masquerading on both the zones.

# nmcli connection modify ens8 connection.zone internal
# nmcli connection modify ens3 connection.zone external
# firewall-cmd --get-active-zones
# firewall-cmd --zone=external --add-masquerade --permanent
# firewall-cmd --zone=internal --add-masquerade --permanent
# firewall-cmd --reload

Verify the zone settings by running following firewall-cmd commands,

# firewall-cmd --list-all --zone=internal
# firewall-cmd --list-all --zone=external

Zone-Settings-firewall-cmd

Now let’s configure DNS, DHCP, Apache, HAProxy and NFS Service.

Note: For the demonstration purpose, I am using ‘linuxtechi.lan’ as the base domain.

Configure DNS Server

To install DNS server and its dependencies, run following dnf command

# dnf install bind bind-utils -y

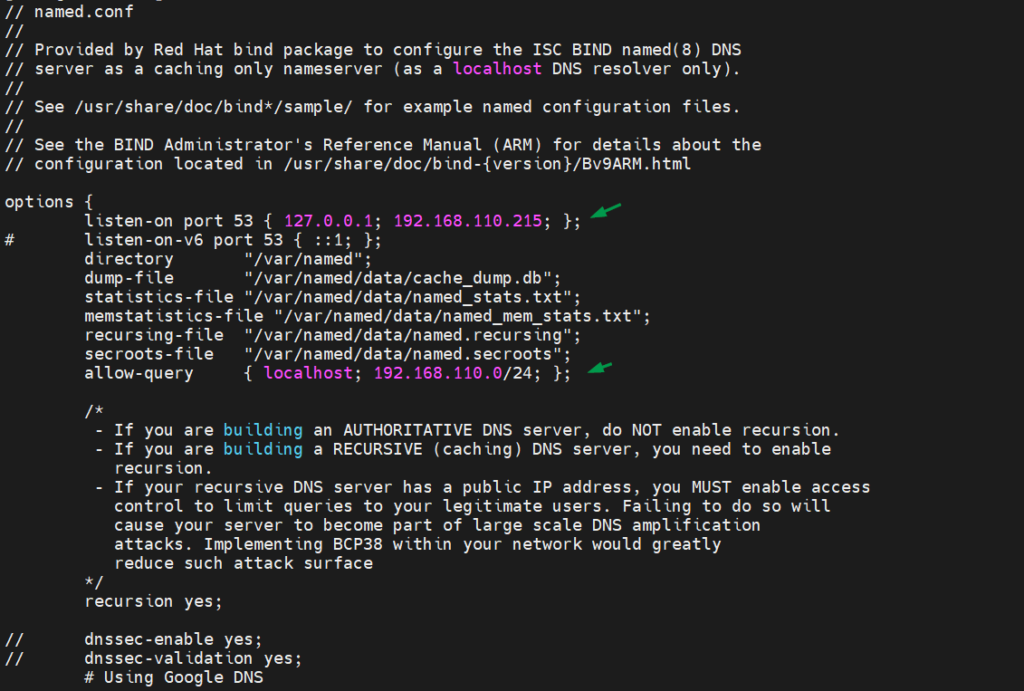
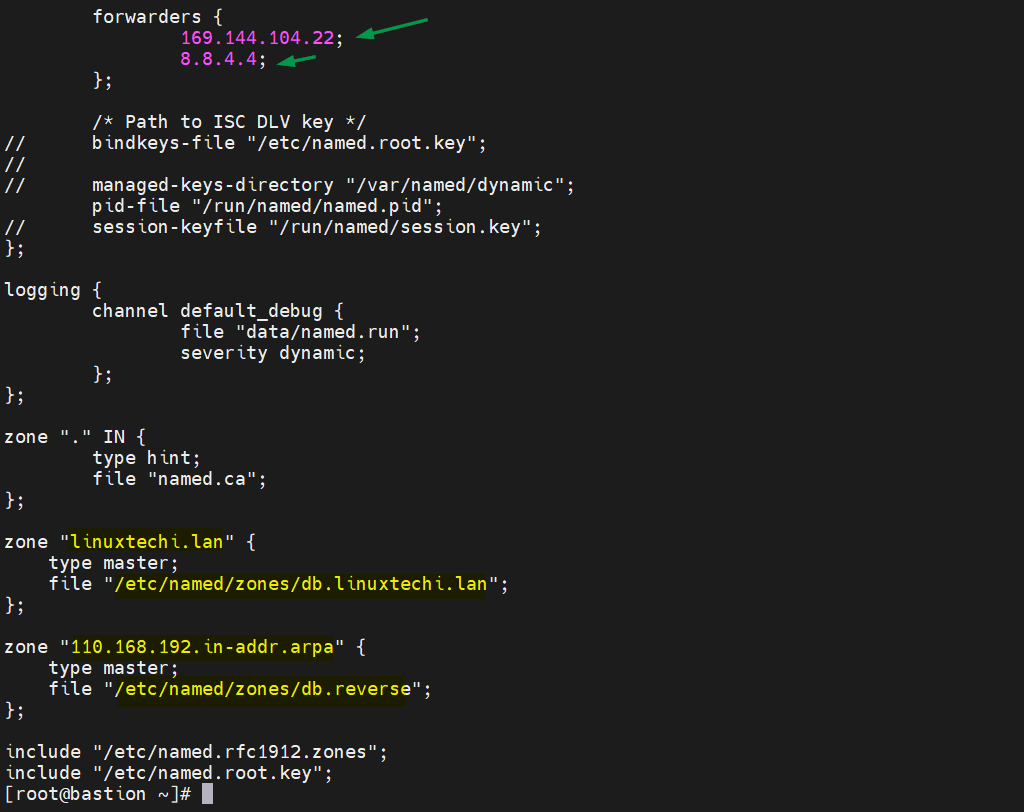
Edit /etc/named.conf and make sure file has the following contents,

# vi /etc/named.conf

ocp-dns-linux

ocp-dns-domain-zone

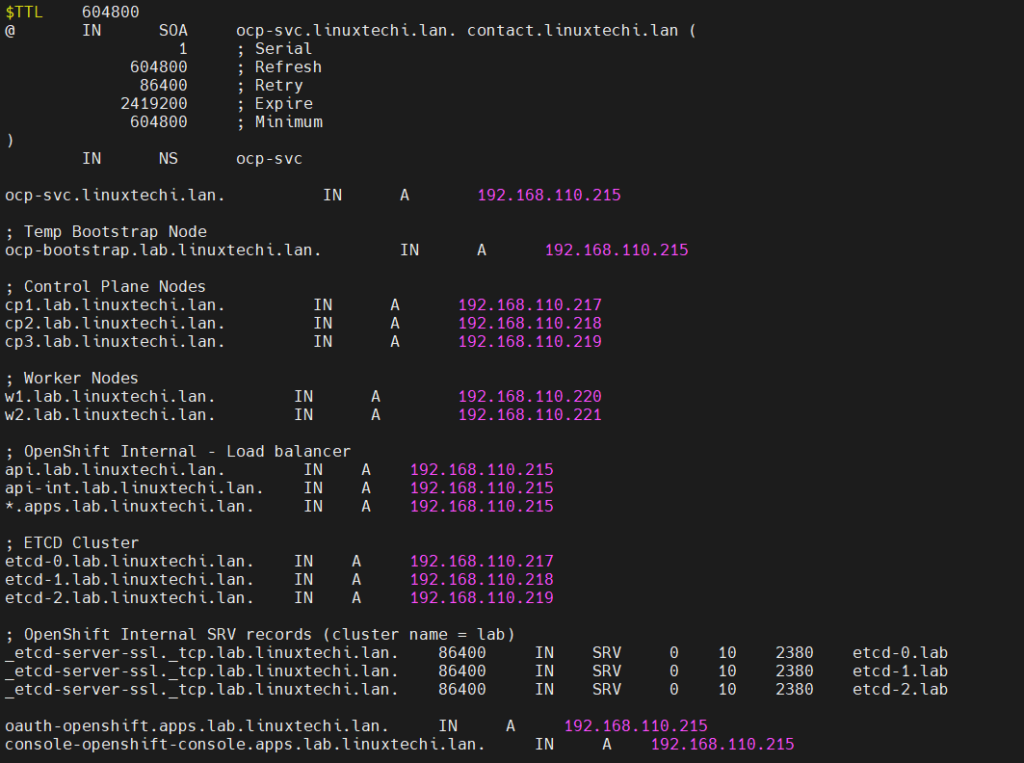
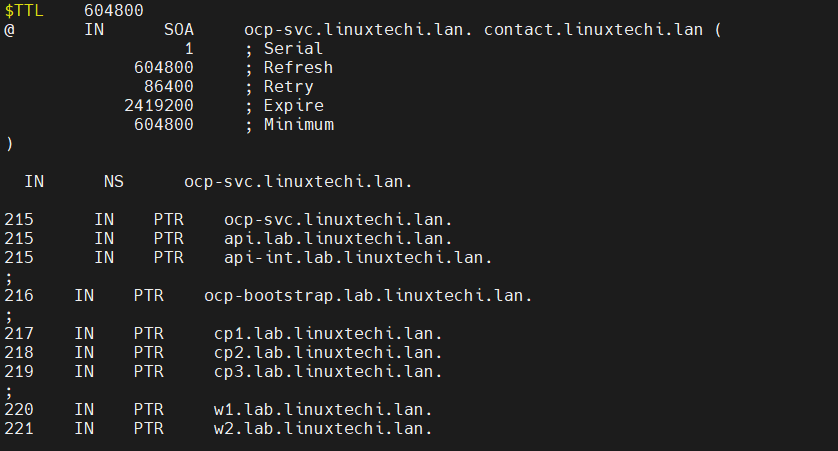
Now create forward and reverse zone file,

# mkdir /etc/named/zones
# vi /etc/named/zones/db.linuxtechi.lan

DNS-Records-Zone-File

Save and exit the file.

Create reverse zone file with following entries,

# vi /etc/named/zones/db.reverse

reverse-zone-dns-records

Save and close the file and then start & enable dns service

# systemctl start named
# systemctl enable named

Allow the DNS port in firewall, run

# firewall-cmd --add-port=53/udp --zone=internal --permanent
# firewall-cmd --reload

Configure DHCP Server 

Install and configure the dhcp server, bind the mac address of bootstrap, control planes and worker nodes to their respective IPs. Run below command to install dhcp package,

# dnf install -y dhcp-server

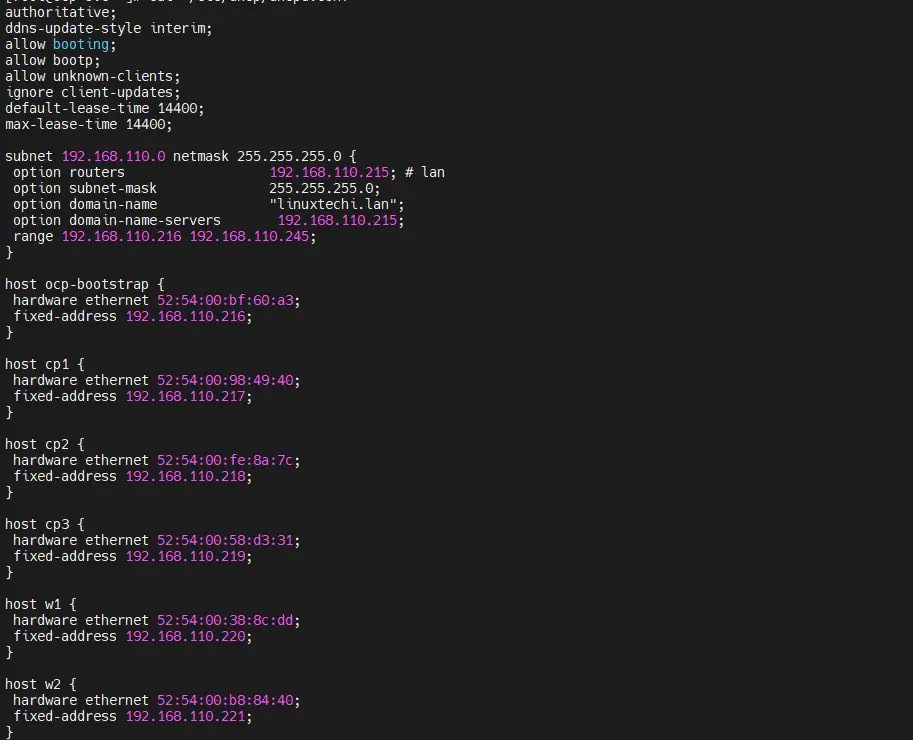
Edit the /etc/dhcp/dhcpd.conf file and add the following contents, use the mac addresses that we have collected in step1 and specify the IP address of nodes according the DNS entries. So in my case, content of file will look like below,

[root@ocp-svc ~]# vi /etc/dhcp/dhcpd.conf
authoritative;
ddns-update-style interim;
allow booting;
allow bootp;
allow unknown-clients;
ignore client-updates;
default-lease-time 14400;
max-lease-time 14400;
subnet 192.168.110.0 netmask 255.255.255.0 {
 option routers                  192.168.110.215; # lan
 option subnet-mask              255.255.255.0;
 option domain-name              "linuxtechi.lan";
 option domain-name-servers       192.168.110.215;
 range 192.168.110.216 192.168.110.245;
}

host ocp-bootstrap {
 hardware ethernet 52:54:00:bf:60:a3;
 fixed-address 192.168.110.216;
}

host cp1 {
 hardware ethernet 52:54:00:98:49:40;
 fixed-address 192.168.110.217;
}

host cp2 {
 hardware ethernet 52:54:00:fe:8a:7c;
 fixed-address 192.168.110.218;
}

host cp3 {
 hardware ethernet 52:54:00:58:d3:31;
 fixed-address 192.168.110.219;
}

host w1 {
 hardware ethernet 52:54:00:38:8c:dd;
 fixed-address 192.168.110.220;
}

host w2 {
 hardware ethernet 52:54:00:b8:84:40;
 fixed-address 192.168.110.221;
}

DHCP-file-Contents

Save and close the file.

Start DHCP service and allow dhcp service for internal zone in firewall, run

[root@ocp-svc ~]# systemctl start dhcpd
[root@ocp-svc ~]# systemctl enable dhcpd
[root@ocp-svc ~]# firewall-cmd --add-service=dhcp --zone=internal --permanent
success
[root@ocp-svc ~]# firewall-cmd --reload
success
[root@ocp-svc ~]#

Configure Apache Web Server

We need apache to serve ignition and rhcos file, so let’s first install it using below command,

[root@ocp-svc ~]# dnf install -y  httpd

Change the default apache listening port from 80 to 8080 by running beneath sed command

[root@ocp-svc ~]# sed -i 's/Listen 80/Listen 0.0.0.0:8080/' /etc/httpd/conf/httpd.conf

Start and enable apache service via below command,

[root@ocp-svc ~]# systemctl start httpd
[root@ocp-svc ~]# systemctl enable httpd

Allow Apache service port (8080) for internal zone,

[root@ocp-svc ~]# firewall-cmd --add-port=8080/tcp --zone=internal --permanent
[root@ocp-svc ~]# firewall-cmd --reload

Configure HAProxy

We will use haproxy to load balance the Openshift services like ectd, ingress http & ingress https and apps like openshift console.

So, let’s first install haproxy by running following dnf command,

[root@ocp-svc ~]#  dnf install -y haproxy

Edit haproxy confile and add the following contents to it

[root@ocp-svc ~]# vi /etc/haproxy/haproxy.cfg
# Global settings
#---------------------------------------------------------------------
global
    maxconn     20000
    log         /dev/log local0 info
    chroot      /var/lib/haproxy
    pidfile     /var/run/haproxy.pid
    user        haproxy
    group       haproxy
    daemon
    # turn on stats unix socket
    stats socket /var/lib/haproxy/stats
#---------------------------------------------------------------------
# common defaults that all the 'listen' and 'backend' sections will
# use if not designated in their block
#---------------------------------------------------------------------
defaults
    log                     global
    mode                    http
    option                  httplog
    option                  dontlognull
    option http-server-close
    option redispatch
    option forwardfor       except 127.0.0.0/8
    retries                 3
    maxconn                 20000
    timeout http-request    10000ms
    timeout http-keep-alive 10000ms
    timeout check           10000ms
    timeout connect         40000ms
    timeout client          300000ms
    timeout server          300000ms
    timeout queue           50000ms

# Enable HAProxy stats
listen stats
    bind :9000
    stats uri /stats
    stats refresh 10000ms

# Kube API Server
frontend k8s_api_frontend
    bind :6443
    default_backend k8s_api_backend
    mode tcp

backend k8s_api_backend
    mode tcp
    balance source
    server      ocp-bootstrap 192.168.110.216:6443 check
    server      cp1 192.168.110.217:6443 check
    server      cp2 192.168.110.218:6443 check
    server      cp3 192.168.110.219:6443 check

# OCP Machine Config Server
frontend ocp_machine_config_server_frontend
    mode tcp
    bind :22623
    default_backend ocp_machine_config_server_backend

backend ocp_machine_config_server_backend
    mode tcp
    balance source
    server      ocp-bootstrap 192.168.110.216:22623 check
    server      cp1 192.168.110.217:22623 check
    server      cp2 192.168.110.218:22623 check
    server      cp3 192.168.110.219:22623 check

# OCP Ingress - layer 4 tcp mode for each. Ingress Controller will handle layer 7.
frontend ocp_http_ingress_frontend
    bind :80
    default_backend ocp_http_ingress_backend
    mode tcp

backend ocp_http_ingress_backend
    balance source
    mode tcp
    server cp1 192.168.110.217:80 check
    server cp2 192.168.110.218:80 check
    server cp3 192.168.110.219:80 check
    server w1 192.168.110.220:80 check
    server w2 192.168.110.221:80 check

frontend ocp_https_ingress_frontend
    bind *:443
    default_backend ocp_https_ingress_backend
    mode tcp

backend ocp_https_ingress_backend
    mode tcp
    balance source
    server cp1 192.168.110.217:443 check
    server cp2 192.168.110.218:443 check
    server cp3 192.168.110.219:443 check
    server w1 192.168.110.220:443 check
    server w2 192.168.110.221:443 check

save and exit the file.

Start and enable haproxy to make above changes into the effect

[root@ocp-svc ~]# setsebool -P haproxy_connect_any 1
[root@ocp-svc ~]# systemctl start haproxy
[root@ocp-svc ~]# systemctl enable haproxy

Allow HAProxy ports that we have defined in its configuration file in OS firewall. Run beneath commands,

[root@ocp-svc ~]# firewall-cmd --add-port=6443/tcp --zone=internal --permanent
[root@ocp-svc ~]# firewall-cmd --add-port=6443/tcp --zone=external --permanent
[root@ocp-svc ~]# firewall-cmd --add-port=22623/tcp --zone=internal --permanent
[root@ocp-svc ~]# firewall-cmd --add-service=http --zone=internal --permanent
[root@ocp-svc ~]# firewall-cmd --add-service=http --zone=external --permanent
[root@ocp-svc ~]# firewall-cmd --add-service=https --zone=internal --permanent
[root@ocp-svc ~]# firewall-cmd --add-service=https --zone=external --permanent
[root@ocp-svc ~]# firewall-cmd --add-port=9000/tcp --zone=external --permanent
[root@ocp-svc ~]# firewall-cmd --reload
[root@ocp-svc ~]#

Configure NFS Server

We need NFS server to provide the persistent storage to OpenShift registry.

Run following command to install nfs server,

[root@ocp-svc ~]# dnf install nfs-utils -y

Create following directory and set the required permissions.  This directory will be exported as NFS share,

[root@ocp-svc ~]# mkdir -p /shares/registry
[root@ocp-svc ~]# chown -R nobody:nobody /shares/registry
[root@ocp-svc ~]# chmod -R 777 /shares/registry

Now export the share by adding the following line to /etc/exports file.

[root@ocp-svc ~]# vi /etc/exports
/shares/registry  192.168.110.0/24(rw,sync,root_squash,no_subtree_check,no_wdelay)

Save and close the file and run ‘exportfs -rv’ to export the directory

[root@ocp-svc ~]# exportfs -rv
exporting 192.168.110.0/24:/shares/registry
[root@ocp-svc ~]#

Start and enable NFS service

[root@ocp-svc ~]# systemctl start nfs-server rpcbind nfs-mountd
[root@ocp-svc ~]# systemctl enable nfs-server rpcbind

Allow NFS service in OS firewall, run following commands,

[root@ocp-svc ~]# firewall-cmd --zone=internal --add-service mountd --permanent
[root@ocp-svc ~]# firewall-cmd --zone=internal --add-service rpc-bind --permanent
[root@ocp-svc ~]# firewall-cmd --zone=internal --add-service nfs --permanent
[root@ocp-svc ~]# firewall-cmd --reload

Step 3) Generate Manifests and Ignition files

To generate ignition files for bootstrap, control plane and worker nodes, refer the following steps

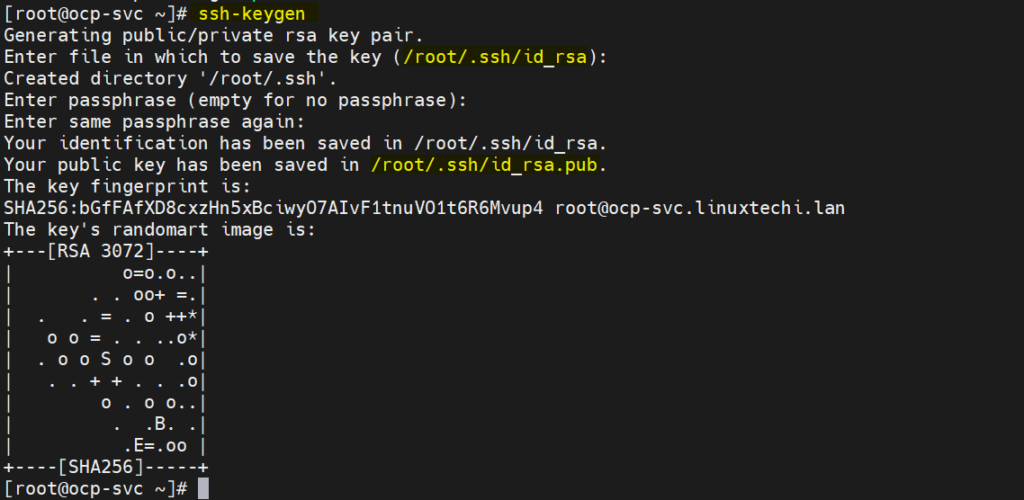
a)    Generate SSH keys

[root@ocp-svc ~]# ssh-keygen

Generate-ssh-keys-linux

These ssh keys will be used to remotely access the bootstrap, control plane and worker nodes.

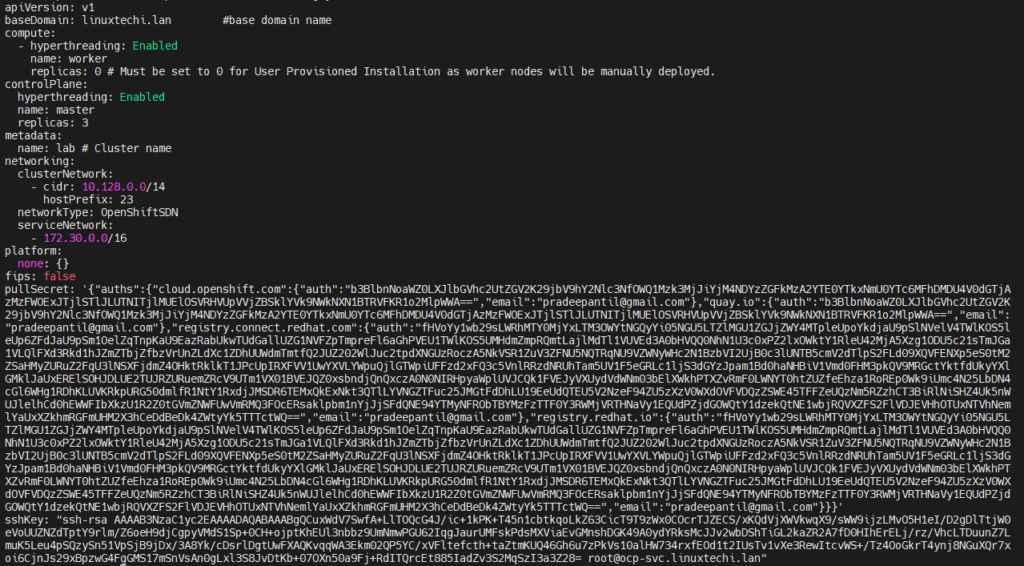
b)    Create install-config.yaml file with following contents

[root@ocp-svc ~]# vi /ocp-install/install-config.yaml
apiVersion: v1
baseDomain: linuxtechi.lan        #base domain name
compute:
  - hyperthreading: Enabled
    name: worker
    replicas: 0 # Must be set to 0 for User Provisioned Installation as worker nodes will be manually deployed.
controlPlane:
  hyperthreading: Enabled
  name: master
  replicas: 3
metadata:
  name: lab # Cluster name
networking:
  clusterNetwork:
    - cidr: 10.128.0.0/14
     hostPrefix: 23
  networkType: OpenShiftSDN
  serviceNetwork:
    - 172.30.0.0/16

platform:
  none: {}
fips: false
pullSecret: '{"auths": ...}'           # Copy the pullsecret here
sshKey: "ssh-ed25519 AAAA..."          # Copy ssh public key here

In Line 23 and 24 copy contents of pull secret and public key that we generated above.

After making the changes file will look like below:

OpenShift-Install-Config-yaml-file

c)   Generate manifests file

Run following openshift-install command,

[root@ocp-svc ~]# ~/openshift-install create manifests --dir ~/ocp-install

create -k8s-manifests-file-openshift

Above warning message says that master nodes are schedulable, it means we can have workload on control planes (control planes will also work as worker nodes). If you wish to disable this then run following sed command,

# sed -i 's/mastersSchedulable: true/mastersSchedulable: false/' ~/ocp-install/manifests/cluster-scheduler-02-config.yml

Note: In my case, I am not disabling it.

d)    Generate Ignition and auth file

Run beneath openshift-install command,

[root@ocp-svc ~]# ~/openshift-install create ignition-configs --dir ~/ocp-install/

Output,

Ignition-auth-files-openshift

e)    Serve Manifests, ignition and core OS image file via web server

Create /var/www/html/ocp4 directory and copy all the files from ‘/root/ocp-install’ to ocp4.

[root@ocp-svc ~]# mkdir /var/www/html/ocp4
[root@ocp-svc ~]# cp -R ~/ocp-install/* /var/www/html/ocp4
[root@ocp-svc ~]# mv ~/rhcos-metal.x86_64.raw.gz /var/www/html/ocp4/rhcos

Set the required permissions on ocp4 directory

[root@ocp-svc ~]# chcon -R -t httpd_sys_content_t /var/www/html/ocp4/
[root@ocp-svc ~]# chown -R apache: /var/www/html/ocp4/
[root@ocp-svc ~]# chmod 755 /var/www/html/ocp4/

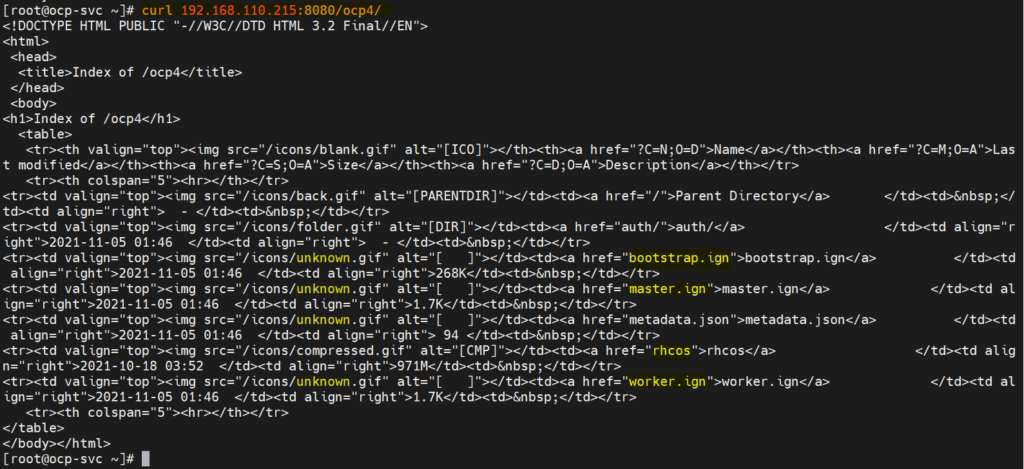
Verify whether these files are accessible or not via curl command

[root@ocp-svc ~]# curl 192.168.110.215:8080/ocp4/

Output should look like below

ocp4-curl-command-verify

Perfect, now we are ready to start deployment.

Step 4) Start OpenShift deployment

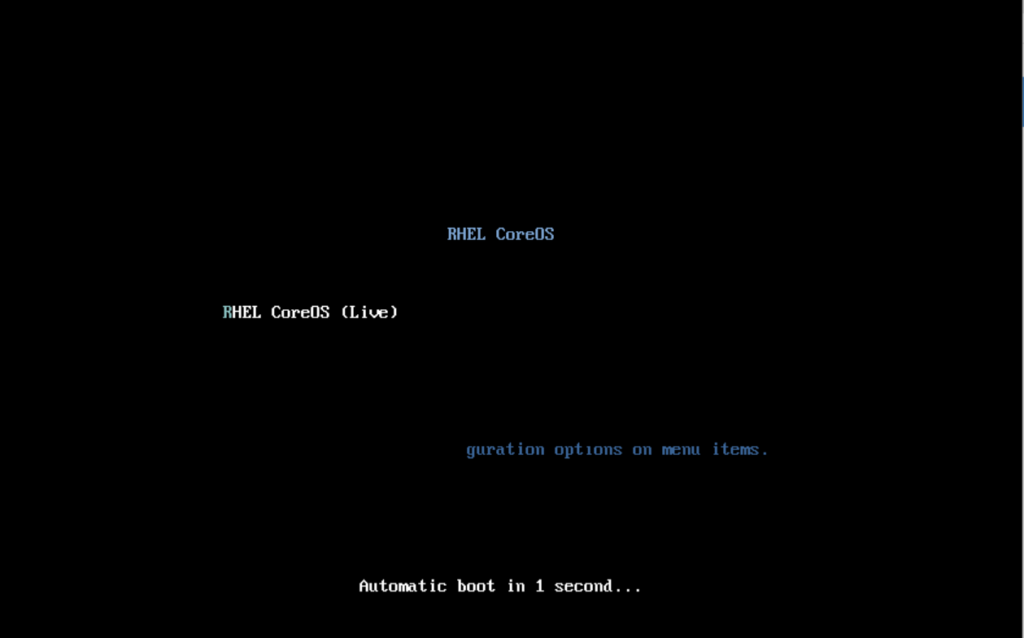
Boot the bootstrap VM with rhcos-live ISO file. We will get the following screen

RHEL-Core-OS-Screen

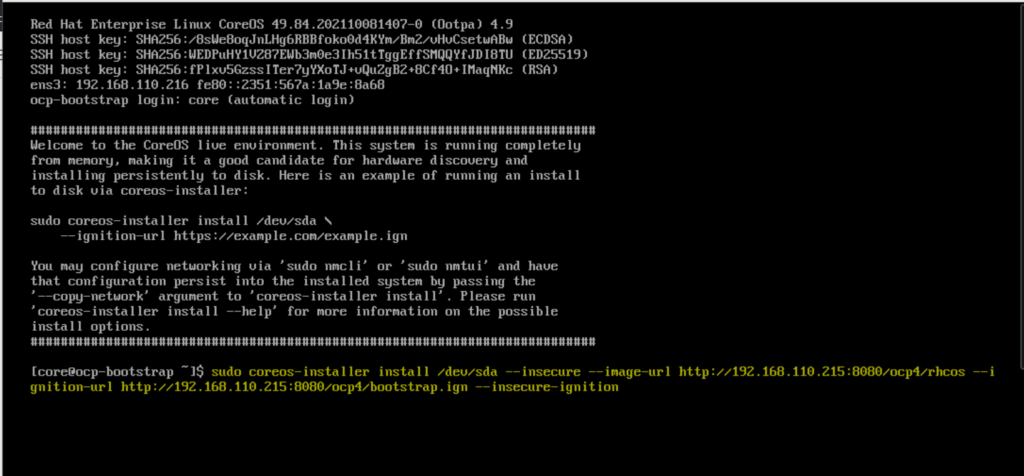
When it boots up with the ISO file, we will get the following screen,

Coreos-installer-bootstrap-openshift

Type coreos-installer command and hit enter

$ sudo coreos-installer install /dev/sda --insecure --image-url http://192.168.110.215:8080/ocp4/rhcos  --ignition-url http://192.168.110.215:8080/ocp4/bootstrap.ign --insecure-ignition

Once the installation is completed, we will get the following screen,

Download-rhcos-bootstrap-deployment

Reboot the bootstrap node so that it boots up with hard disk this time.

$ sudo reboot

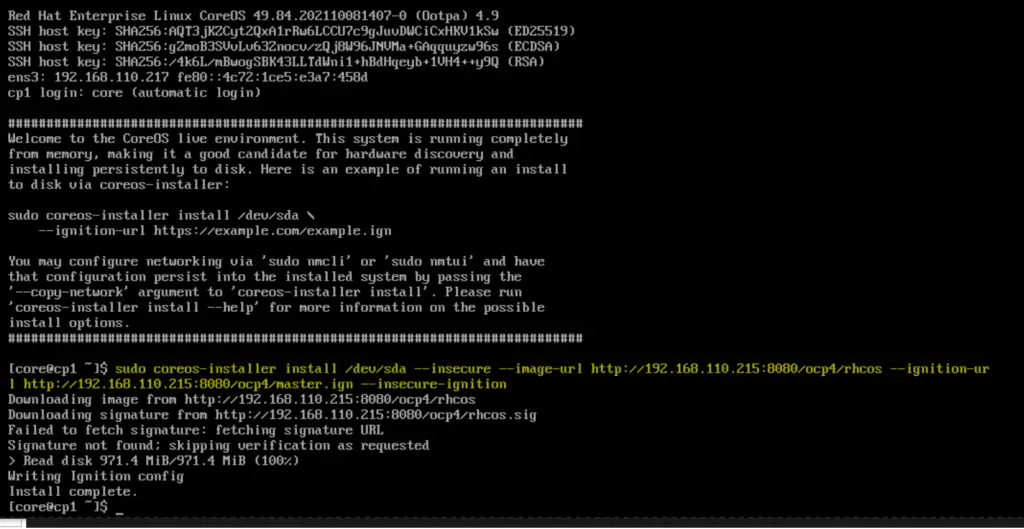
Similarly boot all three-control plane nodes with RHEL Core OS (rhcos) ISO file. Once control nodes boot up then run the following command and hit enter

$ sudo coreos-installer install /dev/sda --insecure --image-url http://192.168.110.215:8080/ocp4/rhcos  --ignition-url http://192.168.110.215:8080/ocp4/master.ign --insecure-ignition

Coreos-installer-master-openshift

Reboot the control plane and boot it with hard disk.

Repeat this procedure for rest of control planes and monitor bootstrap process using following command.

[root@ocp-svc ~]# ~/openshift-install --dir ~/ocp-install wait-for bootstrap-complete --log-level=debug

Now, boot both the worker nodes with Core OS ISO file and once it boots up then run following command on the nodes

$ sudo coreos-installer install /dev/sda --insecure --image-url http://192.168.110.215:8080/ocp4/rhcos  --ignition-url http://192.168.110.215:8080/ocp4/worker.ign --insecure-ignition

Bootstrap process for control planes and worker nodes may take 10 to 15 minutes depending on your infrastructure. Check status of nodes by using following commands

[root@ocp-svc ~]# export KUBECONFIG=~/ocp-install/auth/kubeconfig
[root@ocp-svc ~]# oc get nodes
NAME                     STATUS   ROLES           AGE   VERSION
cp1.lab.linuxtechi.lan   Ready    master,worker   69m   v1.22.0-rc.0+894a78b
cp2.lab.linuxtechi.lan   Ready    master,worker   66m   v1.22.0-rc.0+894a78b
cp3.lab.linuxtechi.lan   Ready    master,worker   68m   v1.22.0-rc.0+894a78b
[root@ocp-svc ~]#

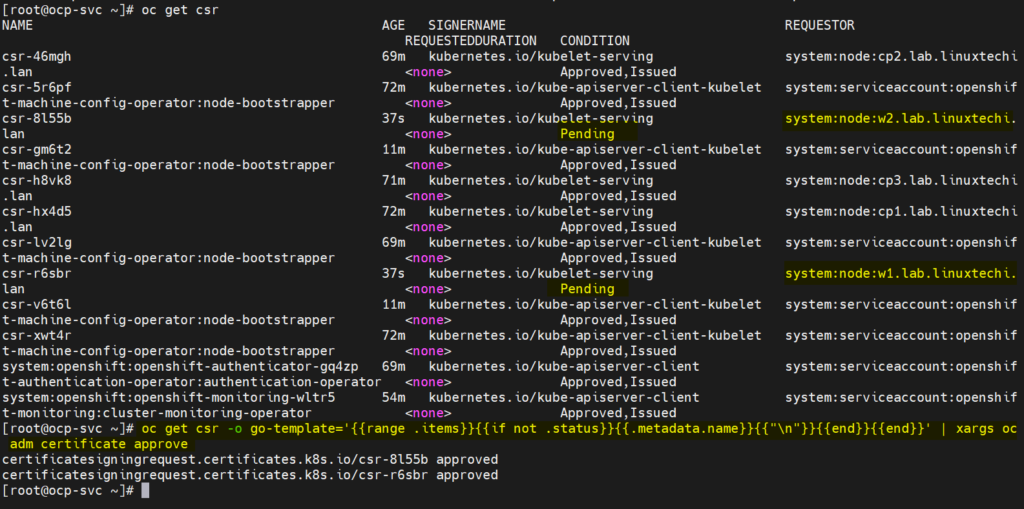
Now approve all the pending CSR for the worker nodes so that they can join cluster and become ready. Run following oc command to view pending CSR

[root@ocp-svc ~]# oc get csr

Run following oc command to approve the pending CSRs

[root@ocp-svc ~]# oc get csr -o go-template='{{range .items}}{{if not .status}}{{.metadata.name}}{{"\n"}}{{end}}{{end}}' | xargs oc adm certificate approve

Output of above two commands would look like below:

Approve-Pending-CSR-Oc-Command

After couple of minutes, worker nodes should join the cluster and should be in ready state, run beneath commands to confirm the same.

[root@ocp-svc ~]# oc get nodes

OC-Nodes-Status-OpenShift-Cluster

Great, above confirms that both worker nodes join the cluster and are in ready state.

Also check the status of bootstrap and in the output we should get the following,

[root@ocp-svc ~]# ~/openshift-install --dir ~/ocp-install wait-for bootstrap-complete --log-level=debug

Bootstrap-Status-OpenShift

Above confirms that bootstrap process is also completed, and we are good to stop and delete bootstrap VM resources and bootstrap entries from haproxy file.

This conclude the article; I hope you find it informative. Please do share your feedback and comments.

Also Read : How to Setup Single Node OpenShift Cluster on RHEL 8

The post How to Install OpenShift 4.9 on Bare Metal (UPI) first appeared on LinuxTechi.

How to Run Linux Shell Command / Script in Background

$
0
0

The usual style of executing a command on a Linux terminal is to simply run it and wait for it to gracefully exit. Once the command exits, you can then proceed to execute other commands in succession. This is what is known as running commands in the foreground. As the word suggests, you can visually see the output of the command on the terminal.

Sometimes, however, running commands in the foreground can present a set of challenges. The command can take too long to exit causing you to waste precious time and other times, it can be totally attached to the shell session leaving you stuck.

In such cases, running a command in the background is your best bet. You can send a command(s) to the background as you concurrently execute other commands in the foreground. This improves the efficiency of working on the terminal and saves you time.

In this guide, we focus on how you can run Linux shell command or script in the background.

Running shell command in background using (&) sign 

To run a command or a script to the background, terminate it with an ampersand sign (&) at the end as shown.

$ command &

NOTE: Ending the command with the ampersand sign does not detach the command from you. It merely sends it to the background of the current shell that you are using, the command will still print the output to STDOUT or STDERR which will prevent you from executing other commands on the terminal.

linux-ping-command-background

A better approach is to redirect the command to /dev/null and later append the ampersand sign at the end as shown

$ command &>/dev/null &

To confirm that the command was sent to the background, run the jobs command.

linux-shell-command-dev-null

To terminate the background process, run the kill command followed by the PID of the process as follows. The -9 option terminates the process immediately.

$ kill -9 138314

kill-linux-background-command

Running shell command or script in background using nohup command

Another way you can run a command in the background is using the nohup command. The nohup command, short for no hang up, is a command that keeps a process running even after exiting the shell.

It does this by blocking the processes from receiving a SIGHUP (Signal Hang UP) signal which is a signal that is typically sent to a process when it exits the terminal.

To send a command or script in the background and keep it running, use the syntax:

$ nohup command &>/dev/null &

$ nohup shell-script.sh &>/dev/null &

For example,

$ nohup ping google.com &>/dev/null &

Again, you can verify that the command is running in the background using the command:

$ jobs

nohup-linux-shell-command

Conclusion

In this guide, we have covered two ways of running commands or shell scripts in the background. We have seen how you can run commands in the background using the & sign and the nohup command.

Read Also : Linux Zip and Unzip Command with Examples

The post How to Run Linux Shell Command / Script in Background first appeared on LinuxTechi.

How to Run Containers as Systemd Service with Podman

$
0
0

As we know podman is an open-source daemon-less tool which provides environment to build, run and manage containers. Running containers as systemd service means that containers will automatically start when the system gets rebooted.

In this post, we will learn how to run containers as systemd service with podman on RHEL based distributions like RHEL 8, CentOS 8 and Rocky Linux 8.

Prerequisites :

  • Minimal RHEL based OS Installation.
  • Stable Internet Connection
  • Sudo User with root privileges

In this demonstration, I am using minimal RHEL 8.5, but these steps are also applicable for CentOS 8 and Rocky Linux 8.  Let’s jump into the steps,

Step 1) Install Podman

To install podman on RHEL 8 , run

$ sudo dnf install @container-tools -y

For CentOS 8 / Rocky Linux 8, run

$ sudo dnf install -y podman

Verify podman installation

To check whether podman is installed successfully or not, try to spin ‘hello-world’ container using beneath podman command.

$ podman -v
podman version 3.3.1
$
$ podman run 'hello-world'

Note: When we run podman first time then it prompt us to choose the registry where you want to download the container image.

Output of above command would like below:

podman-installation-verification-rhel8

Prefect above confirms that podman is installed successfully. Let’s move to the next step.

Step 2) Generate Systemd Service of a container

Let’s assume we want to generate systemd service for rsyslog container. First spin up rsyslog container using following podman commands,

$ podman run -d --name <Container-Name>  <Image-Name>

Note : If you wish to download rsyslog container image from a specific registry then use following syntax:

$ podman run -d --name container-name  <registry-URL>/<image-name>

In this demonstration, I have used Red hat registry. So first login to registry

$ podman login registry.access.redhat.com
Username: <Specify-User-Name>
Password: <Enter-Password>
Login Succeeded!
$

Now try to spin container using following podman command,

$ podman run -d --name rsyslog-server registry.access.redhat.com/rhel7/rsyslog
$ podman ps

podman-run-rsyslog-container-linux

Now create systemd service for rsyslog-server container, run the following commands

$ mkdir -p .config/systemd/user
$ cd .config/systemd/user/
$ podman generate systemd --name rsyslog-server --files --new
/home/sysops/.config/systemd/user/container-rsyslog-server.service
$

As we can above that systemd service is created.

For more details on ‘podman generate systemd‘ command, refer it’s help page

$ podman generate systemd --help

podman-generate-systemd-command

Step 3) Start and Enable Container Systemd Service

Run following systemctl command to start and enable systemd service for rsyslog-server container.

$ cd .config/systemd/user/
$ systemctl --user daemon-reload
$ systemctl --user enable container-rsyslog-server.service
$ systemctl --user restart container-rsyslog-server.service

Now verify the systemd service status and container status, run

$ systemctl --user status container-rsyslog-server.service
$ podman ps

Now, When the system is rebooted, container will automatically be started via its systemd service. So let’s reboot it once and verify the container service.

$ sudo reboot

Once the system is back online, then login to system and verify the container service

$ podman ps
$ cd .config/systemd/user/
$ systemctl --user status container-rsyslog-server.service

container-status-post-reboot

Great, this confirms that rsyslog-server container is started automatically post reboot via it’s systemd service.

That’s all from this post, I hope you have found it informative. Please do share your feedback and queries.

Also Read: How to Run Jenkins Container as Systemd Service with Docker

The post How to Run Containers as Systemd Service with Podman first appeared on LinuxTechi.

How to Recover Deleted Files in Linux

$
0
0

Losing data is one of the most unsettling and harrowing experiences that any user can go through. The prospect of not ever finding precious data once it is deleted or lost is what usually inspires anxiety and leaves users helpless. Thankfully, there are a couple of tools that you can use to recover deleted files on your Linux machines. We have tried out a few data recovery tools that can help you get back your deleted files and one that stood out among the rest. This is the TestDisk data recovery tool.

TestDisk is an opensource and powerful data recovery tool that, apart from recovering your data, rebuilds and recovers boot partitions and fixes partition tables. It recovers deleted files from filesystems such as FAT, exFAT ext3, ext4, and  NTFS to mention just a few, and copies them to another location. TestDisk is a command-line data recovery tool, and this is one of the attributes that sets it apart from other data recovery tools.

In this guide, we will demonstrate how you can recover deleted files in Linux using the Test disk utility tool. We will demonstrate how TestDisk can recover deleted data from a removable USB drive in Ubuntu 20.04.

Step 1) Installing the TestDisk utility tool

The first step is to install TestDisk. To do so on Debian/Ubuntu distributions, update the package lists and install TestDisk as follows.

$ sudo apt update
$ sudo apt install testdisk

install-testdisk-ubuntu-linux

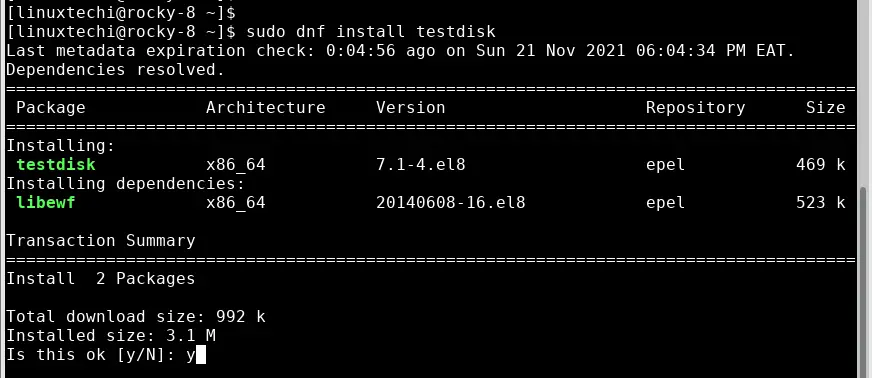
If you are running CentOS 8, RHEL 8, Rocky Linux 8, AlmaLinux 8, you need to , first , install EPEL repository.

$ sudo dnf install https://dl.fedoraproject.org/pub/epel/epel-release-latest-8.noarch.rpm

Next, update the system and install Test disk as follows.

$ sudo dnf update
$ sudo dnf install testdisk

install-testdisk-rhel-distributions

Once installed, you can verify that Testdisk is installed by checking the version of TestDisk as follows.

$ testdisk --version

testdisk-version-linux

From the output, you can see that we have installed TestDisk 7.1 Now, let’s simulate how you can recover deleted files from a drive.

Step 2) Recover deleted files using TestDisk

To demonstrate how you can recover files deleted from a Disk, we have deleted two files from a USB drive. The files are not even in the trash bin and our objective is to recover them.

You can have a similar setup where you have deleted a few files on your pendrive/ usb drive. To recover them, follow along.

On your terminal, run the following command to launch TestDisk

$ testdisk

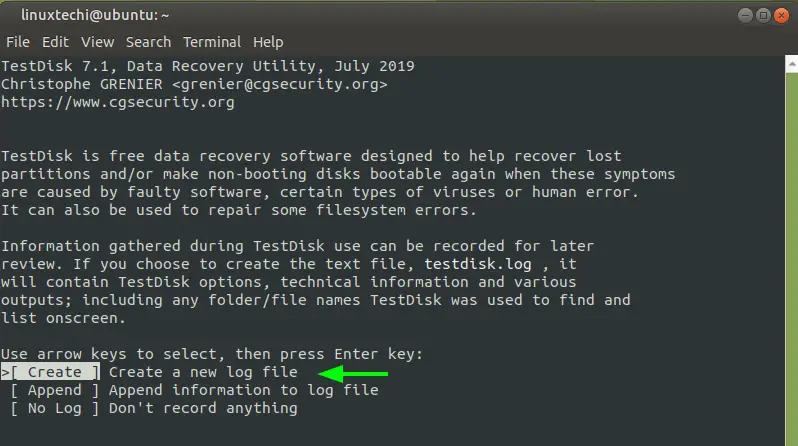
Being a command-line tool, TestDisk provides a list of options as shown. By default, it highlights the most logical option to take as you get started out. So, press ENTER on the ‘create’ option.

testdisk-create-option-linux

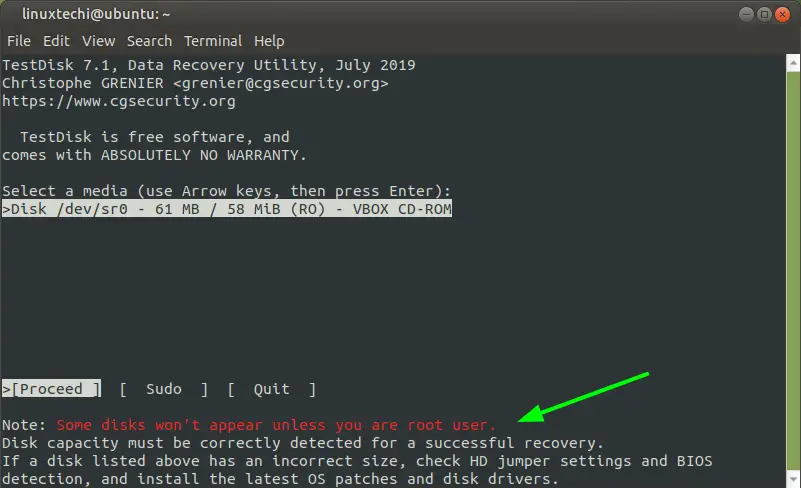
The next screen presents you with the mounted volumes. However, to view all the disks and partitions, you need sudo permissions.

Choose-mounted-volume-testdisk-linux

Therefore, using the arrow forward key, select ‘sudo’ and press ENTER.

NOTE: To avoid the hassle, you can simply run testdisk utility as a sudo user from the terminal.

$ sudo testdisk

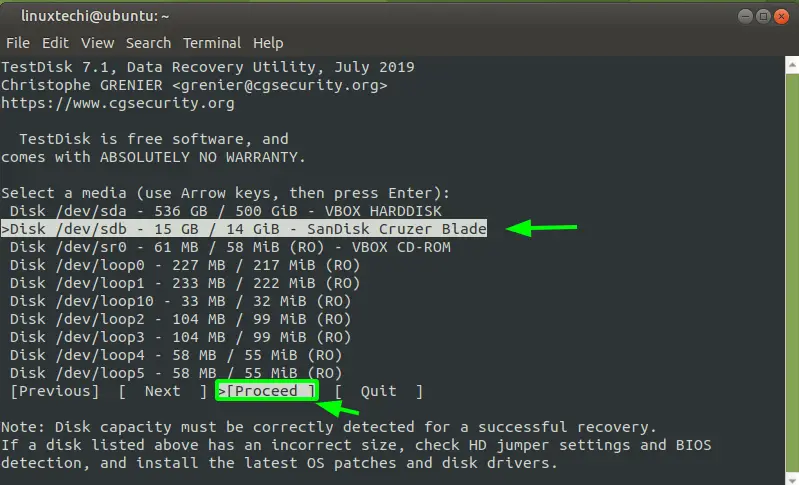
Now, this time around, all the mounted partitions will be displayed. Select your preferred drive. In our case, we have selected out removable USB drive. Using the arrow forward key, select ‘Proceed’ and press ENTER.

Choose-disk-for-testdisk-testing

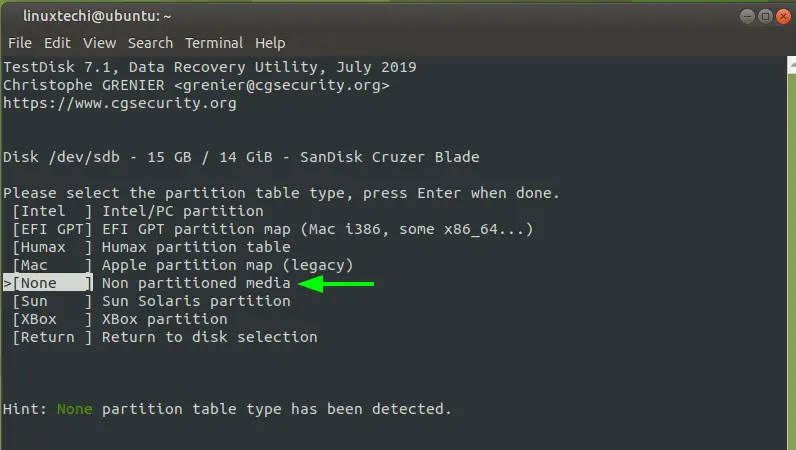
TestDisk automatically detects the partition table type. For non-partitioned disks such as USB drives, a non-partitioned media type will be detected. So, press ENTER.

Non-Partitioned-Media-Testdisk-Tool

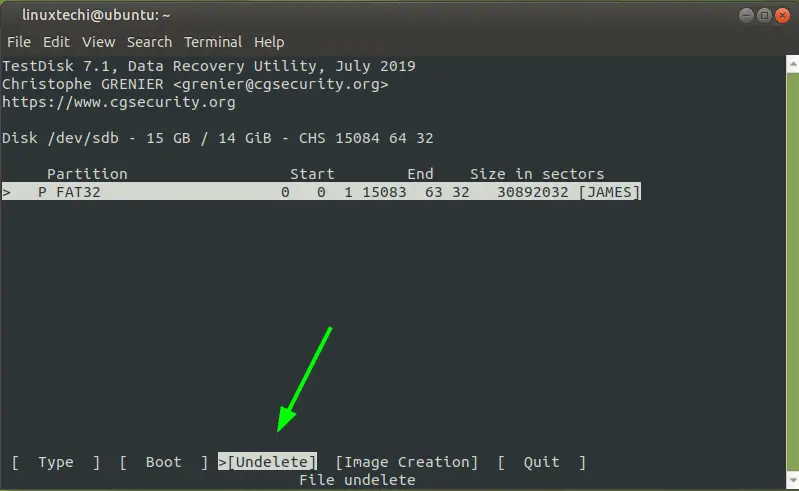
Your removable drive’s partition table will be listed as indicated. At the bottom, select ‘Undelete

Undelete-Option-testdisk-linux

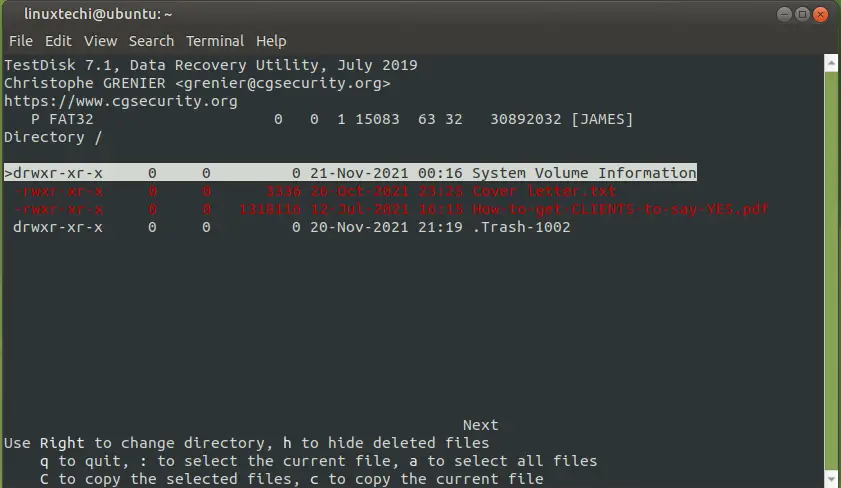
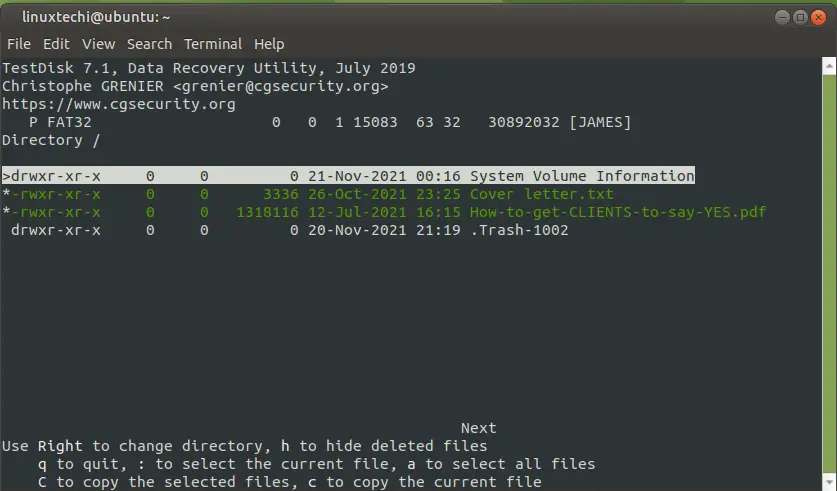
TestDisk scans your drive for undeleted files and highlights them in red.

Deleted-Files-scan-testdisk-linux

To recover these files, you need to select them first. So, scroll down and type a full colon (:) for each selection. You will discover that each file is highlighted in green.

Choose-Files-to-be-recovered-testdisk

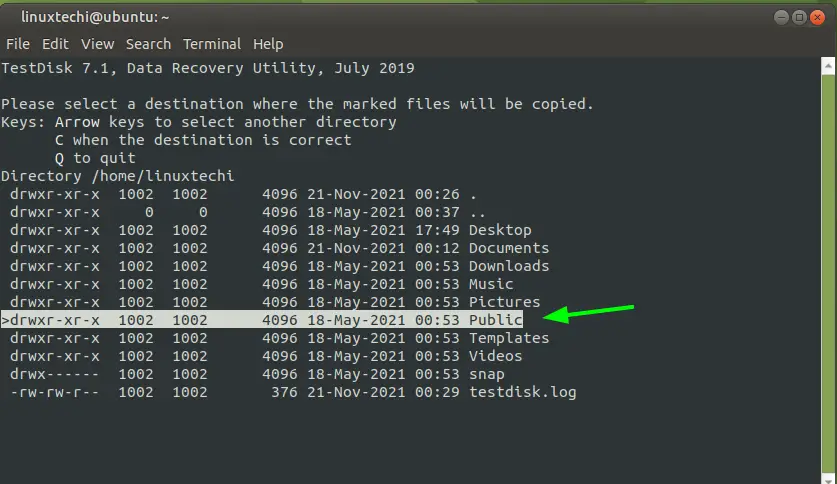
Now press SHIFT + C   for capital ‘C’ to copy the files. You will be prompted to select your preferred destination to save the files. In this example, we have chosen to save the files in the ‘Public’ directory. Once you have selected your directory, press ENTER.

Path-where-to-recover-deleted-files-testdsik-linux

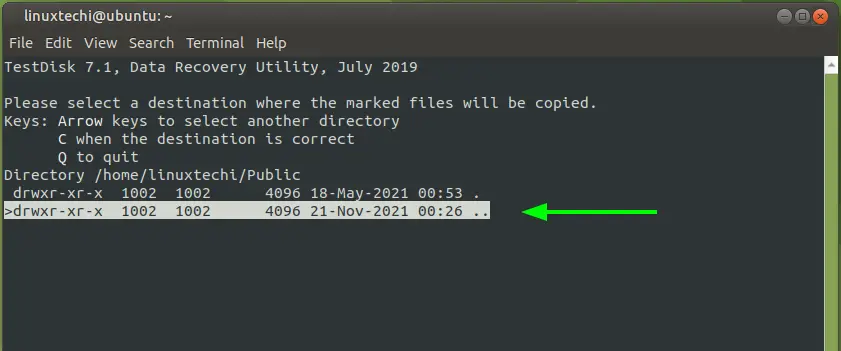
The modification dates of the target directory will be displayed. You can choose any option, and once again, press ENTER.

Modification-date-targeted-directory-testdisk-linux

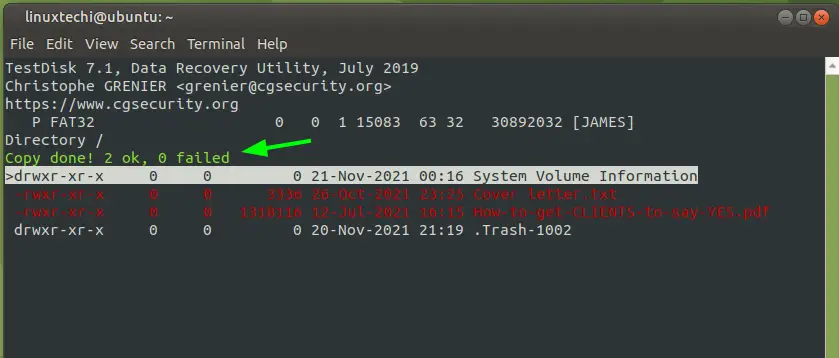
TestDisk will notify you that the files have been successfully copied.

Testdisk-notification-recovery-successful-linux

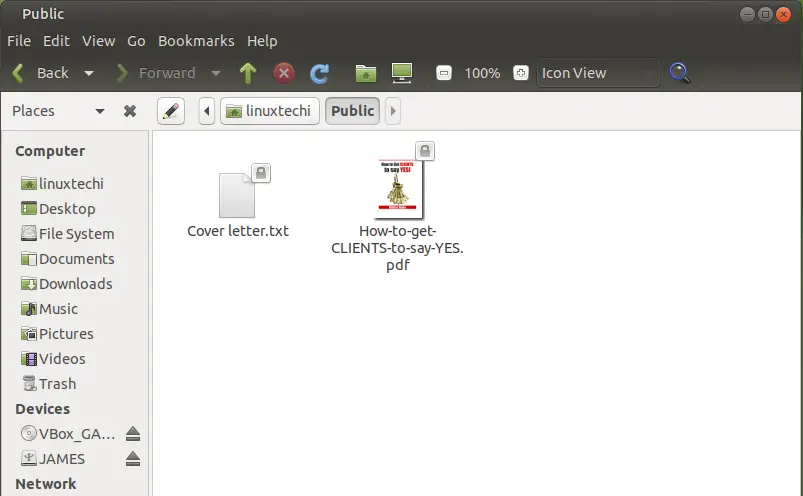
To confirm that the files have been copied, head over to the destination directory and confirm that the files exist.

View-Recovered-deleted-files-testdisk-linux

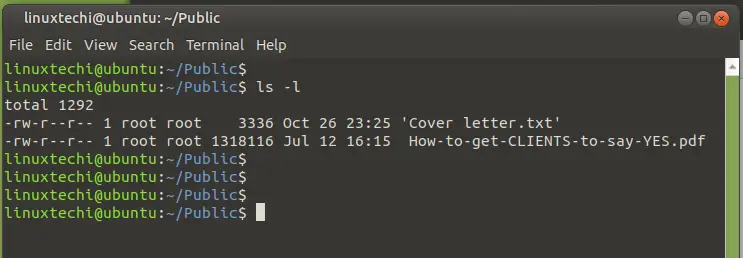
The recovered files are saved with root permissions and ownership. You can change the permissions with chown command.

List-recovered-deleted-files-cli-testdisk

$ sudo chown linuxtechi 'Cover letter.txt' 'How-to-get-CLIENTS-to-say-YES.pdf'

To exit TestDisk, press ‘q’ repeatedly until your finally go back to your bash shell.

Conclusion

That was a demonstration of how you can recover deleted files in Linux using the TestDisk utility. In case you have a hard disk that you want to recover files from or cannot boot entirely, simply remove the hard disk, and attach it to a USB adapter and plug it in a Linux system with TestDisk installed. We hope you have found this guide useful. We look forward to having your feedback.

Also Read: Top 6 Screenshot Tools for Ubuntu / Linux Mint / Debian

The post How to Recover Deleted Files in Linux first appeared on LinuxTechi.

How to get started with BusyBox on Linux

$
0
0

BusyBox is a handy utility tool that provides a collection of several stripped-down UNIX shell command-line tools and tiny Linux programs in a single executable file of approximately 2 MB. It runs in multiple environments such as Android, Linux, FreeBSD, and so many others. BusyBox was specifically created for embedded devices with very limited memory and storage space.

BusyBox is dubbed a Swiss Army knife tool and provides minimalistic replacements for shell utilities that you would find in GNU shellutils, fileutils, and coreutils. It can also be found in Linux distributions with a small footprint such as Alpine Linux.

In this guide, we will help you get started with Busybox on Linux. We will also learn how to install and use it effectively.

How to Install BusyBox on Linux

There are a number of ways of installing BusyBox on a Linux system. Starting with Debian / Ubuntu-based distributions, you can use the APT package manager as follows.

$ sudo apt update
$ sudo apt install busybox

install-busybox-apt-command

For Other distributions such as ArchLinux, Fedora, RHEL, CentOS , Rocky and AlmaLinux, you will have to install it from a  prebuilt binary file. So, first, download the Busybox 64-bit binary file as follows.

$ wget https://busybox.net/downloads/binaries/1.31.0-defconfig-multiarch-musl/busybox-x86_64

Next, give it a simpler name. In my case, I renamed it to  busybox

$ mv busybox-x86_64  busybox

Then assign it execute permissions using the chmod command.

$ chmod +x busybox

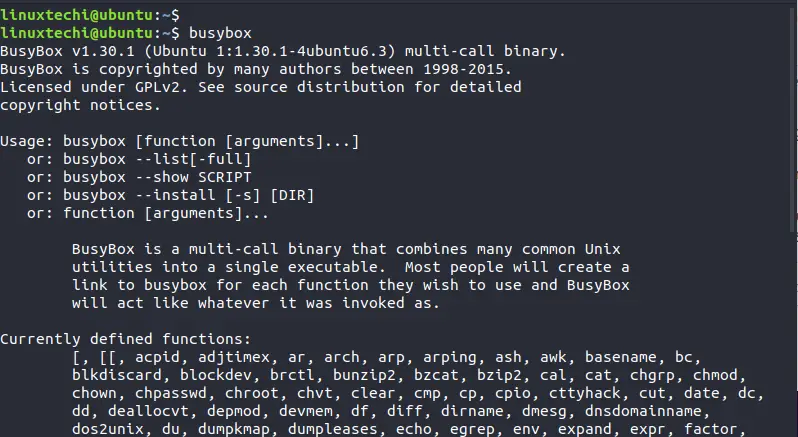
To run BusyBox and check out the version , usage and currently supported functions, run the command:

$ busybox

busybox-command-ubuntu

BusyBox is also available as a Docker container image. But first, ensure that you have already installed Docker.

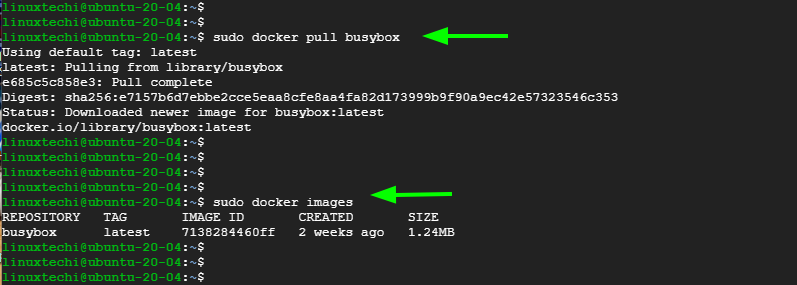
To pull the BusyBox image, run the command:

$ sudo docker pull busybox

To confirm the existence of the image, execute:

$ sudo docker images

busybox-docker-container-image

Accessing BusyBox shell

To access the BusyBox shell from the BusyBox container image, simply run the command as follows.

$ sudo docker run -it --rm busybox

From here, you can start running basic Linux commands as you would normally do on a Linux terminal.

busybox-container-shell

Alternatively, if you installed BusyBox from the binary file or using the APT package manager (In case of Debian and Ubuntu ) you can gain access to the shell as follows.

$ busybox sh

busybox-console-ubuntu-debian

Trying out BusyBox

To start using BusyBox’s tools or applets you need to precede the commands with the busybox keyword while in the BusyBox shell. The syntax is:

$ busybox command

There are about 400 commands and programs that are available for use: You can check that using the command:

$ busybox --list | wc -l

busybox-list-command

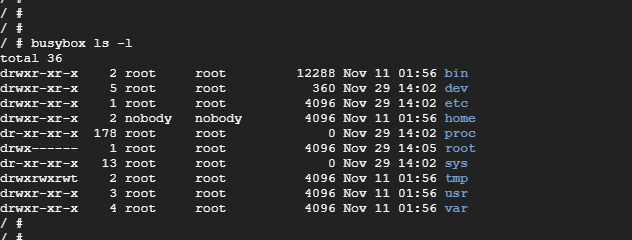
To list the files and folders in the current directory path, simple run:

$ busybox ls -l

busybox-ls-command

Also, you can try pinging a domain name such as google.com

$ busybox ping -c google.com

busybox-ping-command

Use HTTPD webserver on BusyBox

One of the tiny Linux programs that BusyBox provides is the httpd webserver. You can confirm this by running the command:

$ busybox --list | grep httpd

busybox-httpd-server

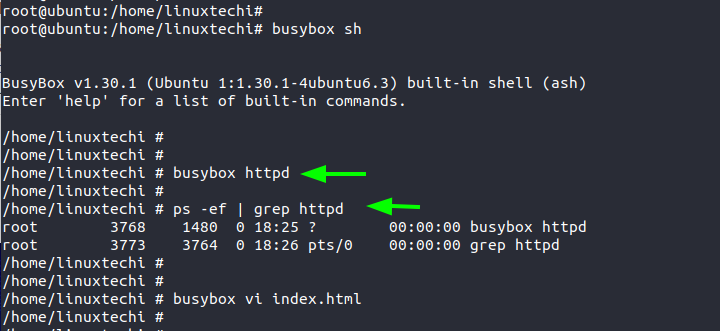
To spin up a quick webserver, access the Busybox shell as the root user:

# busybox sh

And activate the webserver as shown.

# busybox httpd

You can confirm that the webserver process is running:

# ps -ef | grep httpd

busybox-start-httpd-server

Next, we are going to create a simple HTML file that we will use to test the webserver.

# busybox vi index.html
<!DOCTYPE html>
<html>
<body>
Welcome to BusyBox !
</body>
</html>

Now, open your browser and browse your server’s localhost address. This is what you will get.

busybox-httpd-server-web-page

Conclusion

There’s so much more you can do with BusyBox.  Hopefully, we have given you the basic knowledge that you need to get started out with BusyBox. We look forward to your feedback and queries.

Read Also: How to Create Backup with tar Command in Linux

The post How to get started with BusyBox on Linux first appeared on LinuxTechi.

How to Set Custom $PATH Environment Variable in Linux

$
0
0

Sometimes, you might want to define your own custom $PATH variable which, in most cases, is not provided by your operating system. Doing this will enable you to invoke your variable from any location in the Linux shell without specifying the full path to the variable or command. In this tutorial, we will walk you through how you can set your custom $PATH variable in Linux. This works across all Linux distributions, so don’t worry about the distribution you are using. It will work just fine.

Set Custom $PATH Variables in Linux

When you type and run a command on the Linux shell, you are basically telling the shell to run the program. This includes even the basic of commands such as the mkdir, pwd, ls, mv and so many more. Now, your operating system doesn’t shuttle to and fro multiple directories looking to see if there’s a program or executable by that name. These programs are part of an environment variable called $PATH.

The $PATH environment variable tells the shell which directories to find the executable files or programs in response to the commands run by the user. Simple commands such as cp, rm, mkdir, and ls are small programs that have their executable in the /usr/bin directory.

To find the location of the executable program of a shell command, simply run the which command as follows:

$ which command

For instance, to identify the location of the cp command, for example,  execute the command:

$ which cp

Other locations where you can find executable programs include /usr/sbin, /usr/local/bin and /usr/local/sbin

To check what is in your $PATH, run the following echo command:

$ echo $PATH

This displays a list of all the directories – separated by a colon – that store the executable programs, some of which we have just mentioned a while ago.

Echo-path-command-output

Now, we are going to add a custom directory to the $PATH variable.

Setting your own PATH

In this example, we have a shell script called myscript.sh in the scripts directory located in the home directory as shown. This is just a simple script that prints out a greeting when invoked.

ls-command-output-script-folder

To add the script to PATH so that we can call it or execute it no matter which directory we are in, we will use the syntax:

$ export PATH=$PATH:/path/to/directory

Here, we will execute the command:

$ export PATH=$PATH:/home/linuxtechi/scripts

Add-custom-path-export-command

Now, we can execute or run the script from whichever directory on the system simply by typing its name without including the full path to the script.

In the snippet shown, we are running the script in different directory location by simply invoking the script name alone.

Execute-Script-custom-path-linux

Setting custom PATH permanently

When you reboot your system, or start a new terminal, the path you added does not persist. For this reason, it’s best if you set the PATH permanently so that it remains even after restarting the system.

To achieve this, you need to add the export PATH line to the ~/.bashrc  or ~/.bash_profile file.

So, open any of the two files.

$ sudo vim ~/.bashrc

Then add the line shown. Of course, this will vary according to your own individual PATH.

export PATH=$PATH:/home/linuxtechi/scripts

Add-Custom-path-bashrc-linux

Save the file and exit. Then reload the changes using the source command.

$ source ~/.bashrc

Source-bashrc-file-linux

At this point, we have successfully set custom $PATH on Linux. That’s all from this tutorial, your feedback and queries on this is highly welcome.

The post How to Set Custom $PATH Environment Variable in Linux first appeared on LinuxTechi.

How to Create Sudo User on RHEL | Rocky Linux | AlmaLinux

$
0
0

Sudo user is the regular user in Linux which has admin or root privileges to perform administrative tasks. But, by default all regular users in Linux are not sudo users, root user has to manually assign sudo rights to the user by adding it to wheel group.

In RHEL distributions like Red Hat Enterprise Linux, Rocky Linux and AlmaLinux, a group with name ‘wheel’ is created during the installation and its entry is already defined in system’s sudoers file.

# grep -i "^[%wheel]" /etc/sudoers
%wheel  ALL=(ALL)       ALL
#

When any regular user is added to this wheel group then that user will get sudo rights and can run all admin commands by using ‘sudo’ in front of the commands. In this post, we will learn how to create a new sudo user on RHEL, Rocky Linux and AlmaLinux OS step by step.

1) Login to system as root

Login to your system as root user or if you have logged-in as regular user switch to root user, use following command

$ su - root

2) Create regular user with useradd command

While creating a new regular user, specify ‘wheel’ as secondary group.

Syntax:

# useradd -G wheel <User_Name>

Let’s assume we want to create a user with name ‘sysadm’, run following useradd command

# useradd -G wheel sysadm

Assign the password to above newly created user with beneath passwd command,

# echo "P@##DW0$Ds" | passwd sysadm --stdin

Note: Replace the password string with the password that you want to set for the user.

Use following command to add an existing regular user to wheel group,

# usermod -aG wheel  <User_Name>

Run beneath command to verify whether user is part of wheel group or not.

# id sysadm
uid=1000(sysadm) gid=1000(sysadm) groups=1000(sysadm),10(wheel)
#

3) Test Sudo User

To confirm whether newly created user has sudo rights or not, run couple of admin commands and don’t forget to type sudo in front of commands.

First switch to regular user or login with regular user and run following commands,

# su - sysadm
$ sudo whoami
[sudo] password for sysadm:
root
$
$ sudo dnf install -y net-tools

Output of above command would like below:

Sudo-Command-Usage-RHEL

Above confirms that user has sudo rights and can run admin commands. If you have noticed carefully, we must specify password for executing admin commands via sudo. In case, you want to run sudo commands without password, then edit the sudoer files, comment out the line “%wheel  ALL=(ALL)       ALL” and uncomment “# %wheel        ALL=(ALL)       NOPASSWD: ALL

# vi /etc/sudoers

Edit-Sudoers-File-RHEL

Save and exit the file.

Alternate way to run sudo commands without password is that create a separate file with name like ‘sysadm’ under the directory ‘/etc/sudoers.d’ and add the following entry.

User_Name ALL=(ALL) NOPASSWD: ALL

Run beneath echo command to complete above task,

$ su -
# echo -e "sysadm\tALL=(ALL)\tNOPASSWD: ALL" > /etc/sudoers.d/sysadm
# cat /etc/sudoers.d/sysadm
sysadm  ALL=(ALL)       NOPASSWD: ALL
#

Now, if we run admin commands via sudo then it will not prompt for the password.

Sudo-Without-Password

Great, that’s all from this post. Please do post your queries and feedback in below comments sections.

Also Read: 10 Quick Tips About sudo command for Linux systems

The post How to Create Sudo User on RHEL | Rocky Linux | AlmaLinux first appeared on LinuxTechi.

How to Create and Use MacVLAN Network in Docker

$
0
0

In Docker, a common question that usually comes up is “How do I expose my containers directly to my local physical network?”  This is especially so when you are running monitoring applications that are collecting network statistics and want to connect container to legacy applications. A possible solution to this question is to create and implement the macvlan network type.

Macvlan networks are special virtual networks that allow you to create “clones” of the physical network interface attached to your Linux servers and attach containers directly your LAN. To ensure this happens, simple designate a physical network interface on your server to a macvlan network which has its own subnet and gateway.

In this guide, we will demonstrate how you can create and use mavlan networks in Docker. But before you get started, here are a few things that you should keep in mind:

NOTE:

  • Macvlan networks are usually blocked by most Cloud service providers. Hence, you need physical access to your server.
  • The macvlan network driver only works on Linux hosts. It is not supported on Windows or mac devices.
  • You need to be running on Linux kernel 4.0 and later.

In this guide, we will use Ubuntu 20.04 to demonstrate how to create and use macvlan networks. As a prerequisite, we have Docker installed. We have a guide on how to install Docker on Ubuntu 20.04.

Creating a macvlan network

A macvlan network can be created either in bridge mode and or 802.1q trunk mode.

In bridge mode, the macvlan traffic is channeled through the physical interface on the Linux host.

In the 802.1q trunk bridge mode, traffic passes through an 802.1q sub-interface which is created by Docker. This allows for controlled routing and filtering at a granular level.

With that out of the way, let us now see how you can create each of the macvlan networks.

1)  Bridge mode

In our example, we have a physical network interface enp0s3 on the 192.168.2.0/24 network and the default gateway of 192.168.2.1.The default gateway is the IP address of the router.

ifconfig-command-output-ubuntu

Now, we will create a macvlan network called demo-macvlan-net with the following configuration.

$ docker network create -d macvlan \
    --subnet=192.168.2.0/24 \
    --gateway=192.168.2.1  \
    -o parent=enp0s3 \
     demo-macvlan-net

Demo-macvlan-create-docker-network

NOTE:

  • The subnet & gateway values need to match those of the Docker host network interface. Simply put, the subnet and default gateway  for your macvlan network should mirror that of your Docker host. Here, the –subnet= option specifies the subnet and the  –gateway option defines the gateway which is the router’s IP. Modify these values to accommodate your environment.
  • The -d option specifies the driver name. In our case, the -d option specifies the macvlan driver.
  • The -o parent option specifies the parent interface which is your NIC interface. In our case, the parent interface is enp0s3.
  • Finally, we have specified the name of our macvlan network which is demo-macvlan-net.

To confirm that the newly added macvlan network is present, run the command:

$ docker network ls

Docker-network-list-linux

Next, we will create a container image and attach is to the macvlan network using the –network option. The -itd option  allows you to run the container in the background and also to attach to it. The –rm option removes the container once it is stopped. We have also assigned the IP 192.168.2.110 to our container.  Be sure to specify an IP that is not within your DHCP IP range to avoid instances of an IP conflict.

$ docker run --rm -itd \
--network=demo-macvlan-net \
--ip=192.168.2.110 \
  alpine:latest \
  /bin/sh

Run-docker-Container-macvlan-network

To verify that the container is running, execute the command:

$ docker ps

Docker-ps-command-output

Additionally, you can view finer details about the container using the docker inspect command as follows:

$ docker container inspect e9b71d094e48

Let us now create a second container as follows. In this case, the container will automatically be assigned an IP by Docker.

$ docker run  --rm -itd \
--network=demo-macvlan-net \
  alpine:latest \
  /bin/sh

Docker-Container2-macvlan-network

Once again, let us confirm that we have two containers.

$ docker ps

Docker-ps2-command-output

Next, we will try and establish if the containers can ping each other. In this case, we are testing connectivity of the first container from the second container.

You can achieve this using a single command as follows.

$ docker exec -it daa09a330b36 ping 192.168.2.110 -4

Alternatively, you can access the shell of the container and run the ping command.

$ docker exec -it daa09a330b36 /bin/sh

Login-to-docker-container

Try the same command from the other container and you will find out that at this point, the containers can communicate with each other.

However, the Docker host cannot communicate with the containers and vice-versa. If you try pinging the host from the container or the other way round, you will find out that that host and the containers cannot communicate with each other.

From the output shown, we cannot reach one of the containers using the ping command.

$ ping 192.168.2.110 -c 4

Ping-Connectivity-Check-Ubuntu-Linux

Likewise, we cannot also establish communication from the container to the host.

$ docker exec -it e9b71d094e48 /bin/sh

Ping-connectivity-from-container-to-host

For the containers to communicate with the host, we need to create a macvlan interface on the Docker host and configure a route to the macvlan interface.

Create new macvlan interface on the host

Next, we are going to create a macvlan interface using ip command.In this example, we have created an interface called mycool-net. Feel free to give it any name you deem fit.

$ sudo ip link add mycool-net link enp0s3 type macvlan mode bridge

Then assign a unique IP to the interface. Ensure to reserve this IP on your router.

$ sudo ip addr add 192.168.2.50/32 dev mycool-net

Bring up the macvlan interface.

$ sudo ip link set mycool-net up

The last step is to instruct our Docker host to use the interface in order to communicate with the containers. For this, we will add a route to the macvlan network.

$ sudo ip route add 192.168.2.0/24 dev mycool-net

Now, with the route in place, the host and the containers can communicate with each other. You can verify the routes using the ip route command.

$ ip route

IP-route-Command-output-Linux

In the example below, I’m able to ping the host from the one container.

Ping-from-docker-container

I can also well ping the host from the second container.

Ping-from-second-docker-container

I can also ping one of the containers from the host.

Ping-from-docker-host

2) 802.1q Trunk bridge mode

When it comes to the 802.1q trunk bridge example, traffic flows through a sub-interface of enp0s3 called enp0s3.50 (Vlan tagged Interface). Docker will route traffic to the container using its MAC address.

In this example, we are creating a 802.1q trunk macvlan network called demo-macvlan50-net attached to the enp0s3.50 sub-interface. Be sure to modify the subnet, gateway, and parent parameters to match your network.

$ docker network create -d macvlan \
  --subnet=192.168.50.0/24 \
  --gateway=192.168.50.1 \
  -o parent=enp0s3.50 \
  demo-macvlan50-net

Docker-trunk-mode-network

You can run the docker network ls and docker network inspect demo-macvlan50-net to confirm that the network exists

$ docker network ls

Docker-network-ls-trunk-mode

$ docker network inspect demo-macvlan50-net

Docker-network-inspect

From here, you can run and attach a container to the trunk bridge network.

$ docker run --rm -itd \
--network=demo-macvlan50-net \
  alpine:latest \
  /bin/sh

Removing macvlan networks

To remove macvlan networks, first stop and remove containers which are using macvlan network. In our above examples, we have used ‘–rm’ option while launching a container, so when we stop them then they will get deleted automatically.

$ docker network rm demo-macvlan-net
$ docker network rm demo-macvlan50-net

Remove-docker-network

Conclusion

In this guide, we have demonstrated how you can create macvlan networks – specifically macvlan bridge  mode and 802.1q trunk bridge.

The post How to Create and Use MacVLAN Network in Docker first appeared on LinuxTechi.

How to Build Docker Image with Dockerfile (Step by Step)

$
0
0

Hello Techies, in our previous articles we have learned how to Install Docker on CentOS 8 / RHEL 8 and Docker on Ubuntu 20.04.There are thousand of docker images available on docker hub registry which we can easily pull and spin up container using those images.

But there are some circumstances and use cases that we want to make some configuration or changes in the docker image and those changes should be present whenever we run container. This can be achieved by building a docker image with Dockerfile.

Dockerfile is a text file which contains keywords and set of Linux commands which are executed automatically whenever we build the Docker Image. Creating docker image using Dockerfile is similar to template concept of virtualization world.

In this post, we will cover how to build docker image from a Dockerfile step by step. Let’s assume we want to build Jboss EAP docker image. Some of the Keywords which are generally used in a Dockerfile are listed below:

FROM

From keyword specify the name of image that will be used as base image while building the Docker Image, Docker command will search this image locally and if it is not found in local registry then it will try to fetch it from docker hub registry.

Example:

FROM  jboss-eap:7

MAINTAINER

Name of the community or owner who maintains docker image is specified under MAINTAINER Keyword.

Example:

MAINTAINER  Linuxtechi Team <info@linuxtechi.com>

RUN

Commands mentioned after RUN keyword will be executed during creation of Docker image

Example :

RUN  apt-get update
RUN apt-get install apache2 -y
RUN echo 'Web site Hosted inside a container' > /var/ww/html/index.html
RUN echo 'apache2ctl start' >> /root/.bashrc

WORKDIR

WORKDIR is used to defined working directory of a container for executing COPY, ADD, RUN, CMD and ENTRYPOINT instructions.

Example:

WORKDIR /opt

CMD

Commands mentioned after CMD keyword will executed when a container is launched (run) from a docker image

Example:

CMD /bin/bash
CMD wget {url}

Whenever we use multiple CMD keywords then the latest one will get the preference. If you have noticed when we run a container we get a bash shell, because of CMD keyword (CMD /bin/bash).

ENTRYPOINT

ENTRYPOINT is similar to CMD, Commands after entrypoint will take arguments from CMD or in other words we can say that CMD is the argument for ENTRYPOINT. Commands in ENTRYPOINT will always be executed.

Example:

ENTRYPIONT ["curl"]
CMD ["www.google.com"]

ENV

With ENV keyword we can set the environmental or shell variables as per requirement, let’s suppose I want build Docker image where I will install java and need to set JAVA path, this can be achieved by using ENV keyword.

Example:

ENV JAVA_HOME= /usr/jdk/jdk{version}

VOLUME

With VOLUME keyword we can attach a folder from Docker host to a container.

Example:

VOLUME  /opt/storage  /data

EXPOSE

With EXPOSE keyword we can expose application port from a container

Example:

EXPOSE 8080

COPY

Using COPY keyword we can copy the files from docker dost to a container.

Example:

COPY jboss-eap-7.2.0.zip   /opt

ADD

Functionality of ADD keyword is almost similar to COPY. ADD supports two additional features like we can use URL instead of local file or directory and tar file can extracted from source directly into the destination.

Example :

ADD ./jdk-10.0.2.1-linux-x64_bin.tar.gz /usr/local/

Note: To view the keywords and command that are being used for building docker image use “docker history” command. Let’s see the keywords and commands of a docker image mariadb:latest

$ docker history mariadb:latest


Docker-History-MariaDB-Image

In the above output if keyword is not mentioned in the commands then these commands will be executed in RUN keyword.

Let’s jump into the steps for building a docker image with Dockerfile. As we have stated above we would be building Jboss-eap docker image.

1) Create a Dockerfile

Let’s first create a folder with the name mycode under user’s home directory and then create Dockerfile.

$ mkdir mycode
$ cd mycode/
$ touch Dockerfile

Note : Name of docker file must be “Dockerfile”, if we don’t follow this convention our docker build command will not work.

2) Add Keywords and Commands to Dockerfile

Open the Dockerfile with vi editor and add the following keywords

$ vi Dockerfile

FROM jboss-eap:7
RUN mkdir -p /opt/jboss
COPY ./jboss-eap-7.2.0.zip /opt/jboss/
ENV JBOSS_HOME=/opt/jboss/jboss-eap-7.2
WORKDIR /opt/jboss/
RUN unzip -qq jboss-eap-7.2.0.zip
RUN $JBOSS_HOME/bin/add-user.sh admin Jobss@123# --silent
EXPOSE 8080 9990 9999
ENTRYPOINT ["/opt/jboss/jboss-eap-7.2/bin/standalone.sh", "-b", "0.0.0.0", "-bmanagement", "0.0.0.0"]

DockerFile-Build-Example-Linux

Save and exit the file.

Note: Don’t forget to place ‘jboss-eap-7.2.0.zip’ in mycode directory. This zip can be downloaded from below url:

https://developers.redhat.com/content-gateway/file/jboss-eap-7.2.0.zip

3) Build  image with ‘docker build’ command

From mycode folder, run the beneath docker build command, -t option is used to set tag name of docker image. In example below,I am setting tag as “jboss-eap:v1

$ docker build -t jboss-eap:v1 .

Docker-Build-Jboss-eap

Great, above output confirms that docker image has been build successfully. In next step, try top run jboss container using newly build docker image.

4) Verify and Test Docker Image

Let’s first see whether newly build docker image is available in local image repository, run following command

$ docker images


docker-Images-Command-Output-Linux

Now run a container using docker image ‘jboss-eap:v1’


$ docker run -d -it --name=jboss-eap -P jboss-eap:v1
$ docker ps

Docker-Run-docker-ps-Command-output

Now access jboss application using the following url:

http://<Docker-Host-IPAddress>:49154

Jboss-Docker-Container-Login-Page

Use the same user name and its that we define in Dockerfile while building docker image.

Jboss-Docker-Container-Application-Dashboard

That’s all from this post. I hope you have found it informative. Please  do share your queries and feedback in below comments section.

The post How to Build Docker Image with Dockerfile (Step by Step) first appeared on LinuxTechi.
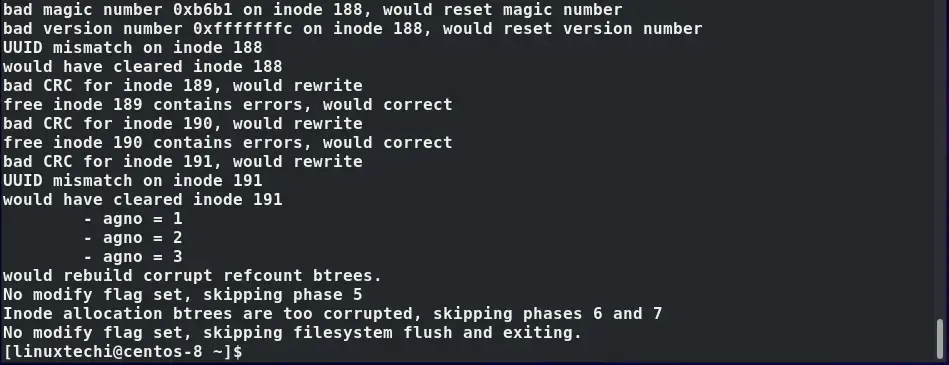
How to Use Debug Module in Ansible Playbook

$
0
0

Ansible provides hundreds of modules which are reusable standalone scripts that get executed by Ansible on your behalf. The Ansible debug module is a handy module that prints statements during playbook execution. Additionally, it can be used to debug expressions and variables without interfering with the playbook execution.

In this guide, we are going to demonstrate how to use debug module in ansible playbook with examples.

Print a Simple Statement Using Debug Module

The most basic use of the debug module in Ansible is to prints simple statements to stdout (Standard Output). Consider a playbook that contains the following content.

---
- name: Ansible debug module in action
  hosts: all
  tasks:
          - name: Print a simple statement
            debug:
              msg: "Hello World! Welcome to Linuxtechi"

Debug-Simple-Print-Statement

When executed, the playbook prints the statement “Hello World! Welcome to Linuxtechi” to the terminal.

$ sudo ansible-playbook /etc/ansible/print-simple-stamement.yml

Simple-Debug-Print-Ansible-Playbook-Execution

Print Variables Using Debug module

Apart from just printing simple statements to the terminal, the debug module also captures and prints the values of variables using the msg parameter.

Consider the playbook below. We have specified two variables: greetings and site using the vars keyword.

---
- name: Ansible debug module in action
  hosts: all
  vars:
          greetings: Hello World!
          site: Linuxtechi
  tasks:
          - name: Print the value of a variable
            debug:
              msg: "{{ greetings }}, Welcome to {{ site }}."

Debug-Variables-Ansible-Playbook

During playbook runtime, the debug module retrieves the values stored in the variables and prints them to stdout using the msg parameter.

$ sudo ansible-playbook /etc/ansible/print-variable.yml

Execute-Debug-Variables-Ansible-Playbook

Use Debug Module with Shell & Register Modules

The debug command can also be used alongside other Ansible modules such as shell and register modules. Consider the playbook file shown.

The Playbook checks how long the remote node has been running using the uptime -p shell command. The output of the command is captured by the register module and saved in the system_uptime variable.

The register module then prints out the value of the variable which contains the command output to stdout.

---
- name: Ansible debug module in action
  hosts: all
  tasks:
          - name: Print system uptime
            shell: uptime -p
            register: system_uptime
          - name: Print uptime of managed node
            debug:
              msg: "{{ system_uptime }}"

Debug-Shell-Register-Ansible-Playbook

When the playbook is executed, you get a bunch of information printed to stdout. At the bottom, be sure to find the output on the system uptime as defined in the Playbook.

$ sudo ansible-playbook /etc/ansible/print-system-uptime.yml

Execute-Debug-Shell-Register-Playbook

Conclusion

In general, the Ansible debug module is a handy module that prints statements to the output. These can be simple strings or command output which is stored in variables. In most cases, it is used with shell and register modules to streamline capturing and printing command output.

Also Read : How to Use Ansible Vault to Secure Sensitive Data

The post How to Use Debug Module in Ansible Playbook first appeared on LinuxTechi.
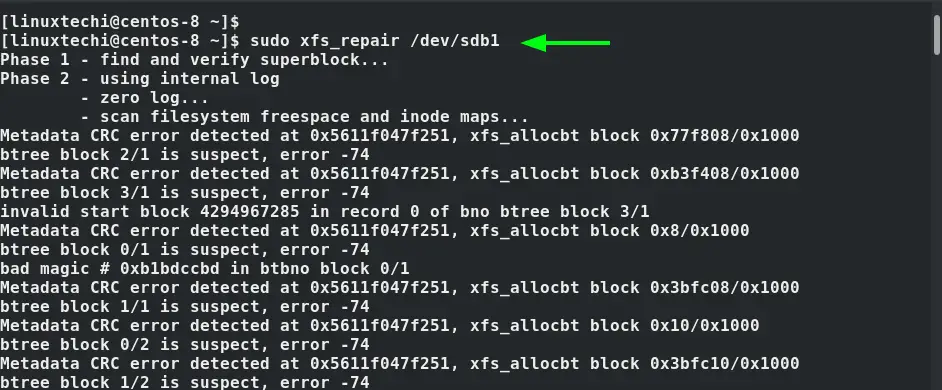
How to Install Kubernetes Cluster on Rocky Linux 8

$
0
0

Hello techies, as we know Kubernetes (k8s) is a free and open-source container orchestration system. It is used for automating deployment and management of containerized applications. In this guide, we will cover how to install kubernetes cluster on Rocky Linux 8 with kubeadm step by step.

Minimum System Requirement for Kubernetes

  • 2 vCPUs or more
  • 2 GB RAM or more
  • Swap disabled
  • At least NIC card
  • Stable Internet Connection
  • One regular user with sudo privileges.

For demonstration, I am using following systems

  • Once Master Node / Control Plane (2 GB RAM, 2vCPU, 1 NIC Card, Minimal Rocky Linux 8 OS)
  • Two Worker Nodes (2GB RAM, 2vCPU, 1 NIC Card, Minimal Rocky Linux 8 OS)
  • Hostname of Master Node – control-node (192.168.1.240)
  • Hostname of Work Nodes – worker-node1(192.168.1.241), worker-node2(192.168.1.242)

Without further ado, let’s deep dive into Kubernetes installation steps.

Note: These steps are also applicable for RHEL 8 and AlmaLinux OS.

Step 1) Set Hostname and update hosts file

Use hostnamectl command to set the hostname on control node and workers node.

Run beneath command on control node

$ sudo hostnamectl set-hostname "control-node"
$ exec bash

Execute following command on worker node1

$ sudo hostnamectl set-hostname "worker-node1"
$ exec bash

Worker  node 2

$ sudo hostnamectl set-hostname "worker-node2"
$ exec bash

Add the following entries in /etc/hosts file on control and worker nodes respectively.

192.168.1.240   control-node
192.168.1.241   worker-node1
192.168.1.242   worker-node2

Step 2) Disable Swap and Set SELinux in permissive mode

Disable swap, so that kubelet can work properly. Run below commands on all the nodes to disable it,

$ sudo swapoff -a
$ sudo sed -i '/ swap / s/^\(.*\)$/#\1/g' /etc/fstab

Run beneath sed command on all the nodes to set SELinux in permissive mode

$ sudo setenforce 0
$ sudo sed -i 's/^SELINUX=enforcing$/SELINUX=permissive/' /etc/selinux/config

Step 3) Configure Firewall Rules on Master and Worker Nodes

On control plane, following ports must be allowed in firewall.

Control-Plane-Firewall-Ports

To allow above ports in control plane, run

$ sudo firewall-cmd --permanent --add-port=6443/tcp
$ sudo firewall-cmd --permanent --add-port=2379-2380/tcp
$ sudo firewall-cmd --permanent --add-port=10250/tcp
$ sudo firewall-cmd --permanent --add-port=10251/tcp
$ sudo firewall-cmd --permanent --add-port=10252/tcp
$ sudo firewall-cmd --reload
$ sudo modprobe br_netfilter
$ sudo sh -c "echo '1' > /proc/sys/net/bridge/bridge-nf-call-iptables"
$ sudo sh -c "echo '1' > /proc/sys/net/ipv4/ip_forward"

On worker Nodes, following ports must be allowed in firewall

Worker-Nodes-firewall-Ports

$ sudo firewall-cmd --permanent --add-port=10250/tcp
$ sudo firewall-cmd --permanent --add-port=30000-32767/tcp                                                  
$ sudo firewall-cmd --reload
$ sudo modprobe br_netfilter
$ sudo sh -c "echo '1' > /proc/sys/net/bridge/bridge-nf-call-iptables"
$ sudo sh -c "echo '1' > /proc/sys/net/ipv4/ip_forward"

Step 4) Install Docker on Master and Worker Nodes

Install Docker on master and worker nodes. Here docker will provide container run time (CRI). To install latest docker, first we need to enable its repository by running following commands.

$ sudo dnf config-manager --add-repo=https://download.docker.com/linux/centos/docker-ce.repo

Now, run below dnf command on all the nodes to install docker-ce (docker community edition)

$ sudo dnf install docker-ce -y

Output

Dnf-install-docker-rockylinux

Once docker and its dependencies are installed then start and enable its service by running following commands

$ sudo systemctl start docker
$ sudo systemctl enable docker

Step 5) Install kubelet, Kubeadm and kubectl

Kubeadm is the utility through which we will install Kubernetes cluster. Kubectl is the command line utility used to interact with Kubernetes cluster. Kubelet is the component which will run all the nodes and will preform task like starting and stopping pods or containers.

To Install kubelet, Kubeadm and kubectl on all the nodes, first we need to enable Kubernetes repository.

Perform beneath commands on master and worker nodes.

$ cat <<EOF | sudo tee /etc/yum.repos.d/kubernetes.repo
[kubernetes]
name=Kubernetes
baseurl=https://packages.cloud.google.com/yum/repos/kubernetes-el7-\$basearch
enabled=1
gpgcheck=1
repo_gpgcheck=1
gpgkey=https://packages.cloud.google.com/yum/doc/yum-key.gpg https://packages.cloud.google.com/yum/doc/rpm-package-key.gpg
exclude=kubelet kubeadm kubectl
EOF

$ sudo dnf install -y kubelet kubeadm kubectl --disableexcludes=kubernetes

After installing above packages, enable kubelet service on all the nodes (control and worker nodes), run

$ sudo systemctl enable --now kubelet

Step 6) Install Kubernetes Cluster with Kubeadm

While installing Kubernetes cluster we should make sure that cgroup of container run time (CRI) matches with cgroup of kubelet. Typically, in Docker, cgroup is cgroupfs, so we must instruct Kubeadm to use cgroupfs as cgoup of kubelet. This can be done by passing a yaml in Kubeadm command,

Create kubeadm-config.yaml file on control plane with following content

$ vi kubeadm-config.yaml
# kubeadm-config.yaml
kind: ClusterConfiguration
apiVersion: kubeadm.k8s.io/v1beta3
kubernetesVersion: v1.23.4
--
kind: KubeletConfiguration
apiVersion: kubelet.config.k8s.io/v1beta1
cgroupDriver: cgroupfs

Note: Replace the Kubernetes version as per your setup.

Now, we are all set to install (or initialize the cluster), run below Kubeadm command from control node,

$ sudo kubeadm init --config kubeadm-config.yaml

Output of above command would look like below,

Kubeadm-init-Command-Output

Above output confirms that cluster has been initialized successfully.

Execute following commands to allow regular user to interact with cluster, these commands are already there in output.

$ mkdir -p $HOME/.kube
$ sudo cp -i /etc/kubernetes/admin.conf $HOME/.kube/config
$ sudo chown $(id -u):$(id -g) $HOME/.kube/config
$ kubectl get nodes

Kubectl-get-nodes-rocky-linux

To make nodes in ready state and to enable cluster dns service (coredns) , install pod network ad-on (CNI – Container Network Interface).  Pods will start communicating each other once pod network ad-on is installed.  In this guide, I am installing calico as network ad-on. Run beneath kubectl command from control-plane.

$ kubectl apply -f https://docs.projectcalico.org/v3.22/manifests/calico.yaml

Output

Install-Calico-network-ad-on-k8s-rocky-linux

After the successful installation of calico network ad-on, control node and pods in kube-system namespace will be come ready and available respectively.

Pods-Kube-system-namespace

Now, next step is to join worker nodes to the cluster.

Step 7) Join Worker Nodes to Cluster

After the successful initialization of Kubernetes cluster, command to join any worker node to cluster is shown in output. So, copy that command and past it on worker nodes. So, in my case command is,

$ sudo kubeadm join 192.168.1.240:6443 --token jecxxg.ac3d3rpd4a7xbxx4 --discovery-token-ca-cert-hash sha256:1e4fbed060aafc564df75bc776c18f6787ab91685859e74d43449cf5a5d91d86

Run above commands on both the worker nodes.

Kubeadm-join-worker-node1

Kubeadm-join-worker-node2

Verify the status of both worker nodes from control-plane, run

[sysops@control-node ~]$ kubectl get nodes
NAME           STATUS   ROLES                  AGE     VERSION
control-node   Ready    control-plane,master   49m     v1.23.4
worker-node1   Ready    <none>                 5m18s   v1.23.4
worker-node2   Ready    <none>                 3m57s   v1.23.4
[sysops@control-node ~]$

Great, above output confirms that worker nodes have joined the cluster. That’s all from this guide, I hope you have found this guide informative. Please do share your queries and feedback in below comments section.

Also Read: How to Create Sudo User on RHEL | Rocky Linux | AlmaLinux

The post How to Install Kubernetes Cluster on Rocky Linux 8 first appeared on LinuxTechi.

How to Secure Apache Web Server with Let’s Encrypt on RHEL 8

$
0
0

In an online world that is constantly awash with security threats, securing your web server should be foremost in one’s mind. One of the ways of securing your web server is implementing the HTTPS protocol on your site using an SSL/TLS certificate. An SSL/TLS certificate not only secures your site by encrypting information exchanged between the web server and users’ browsers but also helps in Google ranking.

In this guide, you will learn how to secure Apache (http) web server with Let’s Encrypt SSL/TLS on RHEL 8.

Prerequisites

Here is what you need before proceeding:

  • An instance of RHEL 8 server with a sudo user configured.
  • A Fully Qualified Domain Name (FQDN) pointing to your server’s Public IP address. Throughout this guide, we will use the domain name linuxtechgeek.info.

Step 1) Install Apache on RHEL 8

The first step is to install the Apache web server. Since Apache already exists in Red Hat’s AppStream repository, you can install it using the DNF package manager as follows.

$ sudo dnf install -y httpd

Once installed, start the Apache web server and enable it to start on boot time.

$ sudo systemctl start httpd
$ sudo systemctl enable httpd

To verify that Apache is running, execute the command:

$ sudo systemctl status httpd

Apache-Server-Status-RHEL

Note: In case, firewall is running then allow following Apache ports in firewall, run

$ sudo firewall-cmd --add-port=80/tcp --permanent
$ sudo firewall-cmd --add-port=443/tcp –permanent
$ sudo firewall-cmd --realod

Now, you can head over to your web browser and browse your domain in the URL bar.

Default-Apache-Web-Page-rhel8

Step 2) Install Certbot

Certbot is an easy-to-use opensource client that is maintained by EFF (Electronic Frontier Foundation). It fetches the TLS certificate from Lets Encrypt and deploys it to the web server. By doing so, it eliminates the hassle and pain of implementing the HTTPS protocol using the TLS certificate.

To install Certbot and associated packages, first enable EPEL (Extra Packages for Enterprise Linux).

$ sudo dnf install https://dl.fedoraproject.org/pub/epel/epel-release-latest-8.noarch.rpm -y

Next, install certbot and mod_ssl package as follows.

$ sudo dnf install certbot python3-certbot-apache mod_ssl

Install-certbot-python2-package-rhel8

Step 3) Create an Apache virtual host file

Virtual hosts make it possible to host multiple domains on a single web server.

The first step is to create a directory inside the Document root where all the website files will go into.

$ sudo mkdir -p /var/www/linuxtechgeek.info/html

Set the directory ownership to the Apache user.

$ sudo chown -R apache:apache /var/www/linuxtechgeek.info/html

Be sure to set the directory permissions as shown.

$ sudo chmod -R 755 /var/www

With the domain’s directory in place with all the ownership and permissions set, we will create a virtual host file in the /etc/httpd/conf.d/ directory.

$ sudo vi /etc/httpd/conf.d/linuxtechgeek.info.conf

Paste the following lines and be cautious to use your own domain name.

<virtualhost *:80>
ServerName linuxtechgeek.info
ServerAlias www.linuxtechgeek.info
DocumentRoot /var/www/linuxtechgeek.info/html
ErrorLog /var/log/httpd/linuxtechgeek.info-error.log
CustomLog /var/log/httpd/linuxtechgeek.info-access.log combined
</virtualhost>

Save and exit the virtualhost file.

To test if the virtual host is working, we will create a sample HTML file in the website directory.

$ sudo vi /var/www/linuxtechgeek.info/html/index.html

Paste the following sample content. Feel free to modify it to your preference.

<!DOCTYPE html>
<html>
     <body>
         <h1> Welcome to Linuxtechi virtualhost </h1>
      </body>
</html>

Save and exit the HTML file. To save all the changes made, restart the Apache web server.

$ sudo systemctl restart httpd

Now, browse your domain once more, and this time around, instead of the default Apache welcome page, you should see the custom HTML page that you just configured. This is proof that the virtual host file is working.

Custom-Apache-WebPage-RHEL8

Step 4) Secure Apache with Let’s Encrypt Certificate

The last step is to fetch and deploy the Let’s Encrypt certificate. To do this, simply run the command:

$ sudo certbot --apache

When the command is executed, certbot will walk you through a series of prompts. You will be prompted for your email address and be required to agree to the Terms and conditions. You will also be asked whether you would like to receive periodic emails about EFF news, and campaigns about digital freedom.

Certbot-Apache-Command-Output-RHEL

When prompted about the names to activate HTTPS for, just press ENTER to apply the certificate to all the provided domains. 

Certbot will proceed to fetch the TLS certificate from Let’s Encrypt and implement it on your web server. Certbot will then print the path where the certificate and key have been saved as well as the deployment path of the certificate for your domains.

Lets-encrypt-ssl-certs-certbot-apache

To verify that Let’s encrypt was successfully deployed, refresh your browser. This time around, you will notice a padlock icon at the start of the URL bar indicating that the site has been successfully encrypted.

Access-Apache-over-ssl-rhel

You can click on the padlock icon for additional details

Apache-WebPage-Domain-Info

Additionally, you can carry out a ssl test on ssl labs  to digitally verify your certificate. If all went well, you should get an A grade.

Test-Apache-SSL-Certs-On-SSL-Labs

Step 5) Let’s Encrypt Certificate Renewal

The Let’s Encrypt certificate is valid for only 90 days. A few weeks before expiry, you will usually get a notification from EFF about the impending certificate expiry and the need to renew your certificate.

You can manually renew the certificate by running the command:

$ sudo certbot renew

To simulate certificate renewal, run the command:

$ sudo certbot renew --dry-run

This merely mimics the actual certificate renewal and does not perform any action.

Renew-Apache-Certbot-SSL-Certs

To automate certificate renewal, open the crontab file

$ crontab -e

Specify the cron job below which will run every midnight.

0 0 * * * /usr/bin/certbot renew > /dev/null 2>&1

Conclusion

We hope that you can now seamlessly deploy Let’s Encrypt certificate on RHEL to secure Apache web server.

Read Also : How to Harden and Secure NGINX Web Server in Linux

The post How to Secure Apache Web Server with Let’s Encrypt on RHEL 8 first appeared on LinuxTechi.

How to Install Kubernetes (k8s) Cluster on RHEL 8

$
0
0

Also known as k8s, Kubernetes is an opensource, and portable container orchestration platform for automating the deployment and management of containerized applications. Kubernetes was originally created by Google in the Go programming language. Currently, it is maintained by Cloud Native Computing Foundation.

In this guide, we will walk you step-by-step on how you can install a Kubernetes cluster on RHEL 8. We will demonstrate this using one Master one and one worker node which we will add to our cluster.

Lab setup

  • Master node:        master-node-k8        10.128.15.228
  • Worker node:      worker-node-1-k8     10.128.15.230

NOTE: Steps 1 to 6 should be applied to both the Master and the worker node.

Step 1) Disable swap space

For best performance, Kubernetes requires that swap is disabled on the host system. This is because memory swapping can significantly lead to instability and performance degradation.

To disable swap space, run the command:

$ sudo swapoff -a

To make the changes persistent, edit the /etc/fstab file and remove or comment out the line with the swap entry and save the changes.

Step 2) Disable SELinux

Additionally, we need to disable SELinux and set it to ‘permissive’ in order to allow smooth communication between the nodes and the pods.

To achieve this, open the SELinux configuration file.

$ sudo vi /etc/selinux/config

Change the SELINUX value from enforcing to permissive.

SELINUX=permissive

Alternatively, you use the sed command as follows.

$ sudo sed -i 's/^SELINUX=enforcing$/SELINUX=permissive/' /etc/selinux/config

Step 3) Configure networking in master and worker node

Some additional network configuration is required for your master and worker nodes to communicate effectively. On each node, edit the  /etc/hosts file.

$ sudo vi /etc/hosts

Next, update the entries as shown

10.128.15.228 master-node-k8          // For the Master node
10.128.15.230 worker-node-1-k8       //  For the Worker node

Save and exit the configuration file. Next, install the traffic control utility package:

$ sudo dnf install -y iproute-tc

Step 4) Allow firewall rules for k8s

For seamless communication between the Master and worker node, you need to configure the firewall and allow some pertinent ports and services as outlined below.

On Master node, allow following ports,

$ sudo firewall-cmd --permanent --add-port=6443/tcp
$ sudo firewall-cmd --permanent --add-port=2379-2380/tcp
$ sudo firewall-cmd --permanent --add-port=10250/tcp
$ sudo firewall-cmd --permanent --add-port=10251/tcp
$ sudo firewall-cmd --permanent --add-port=10252/tcp
$ sudo firewall-cmd --reload

On Worker node, allow following ports,

$ sudo firewall-cmd --permanent --add-port=10250/tcp
$ sudo firewall-cmd --permanent --add-port=30000-32767/tcp                                                 
$ sudo firewall-cmd --reload

Step 5) Install CRI-O container runtime

Kubernetes requires a container runtime for pods to run. Kubernetes 1.23 and later versions require that you install a container runtime that confirms with the Container Runtime Interface.

A Container Runtime is an application that supports running containers. Kubernetes supports the following Container Runtime:

  • Containerd
  • CRI-O
  • Docker Engine
  • Mirantis Container Runtime

In this guide, we will install CRI-O which is a high-level container runtime. To do so, we need to enable two crucial kernel modules – overlay and br_netfilter modules.

To achieve this, we need to configure the prerequisites as follows:

First, create a modules configuration file for Kubernetes.

$ sudo vi /etc/modules-load.d/k8s.conf

Add these lines and save the changes

overlay
br_netfilter

Then load both modules using the modprobe command.

$ sudo modprobe overlay
$ sudo modprobe br_netfilter

Next, configure the required sysctl parameters as follows

$ sudo vi /etc/sysctl.d/k8s.conf

Add the following lines:

net.bridge.bridge-nf-call-iptables  = 1
net.ipv4.ip_forward                 = 1
net.bridge.bridge-nf-call-ip6tables = 1

Save the changes and exit. To confirm the changes have been applied, run the command:

$ sudo sysctl --system

To install CRI-O, set the $VERSION environment variable to match your CRI-O version. For instance, to install CRI-O version 1.21 set the $VERSION as shown:

$ export VERSION=1.21

Next, run the following commands:

$ sudo curl -L -o /etc/yum.repos.d/devel:kubic:libcontainers:stable.repo https://download.opensuse.org/repositories/devel:/kubic:/libcontainers:/stable/CentOS_8/devel:kubic:libcontainers:stable.repo
$ sudo curl -L -o /etc/yum.repos.d/devel:kubic:libcontainers:stable:cri-o:$VERSION.repo https://download.opensuse.org/repositories/devel:kubic:libcontainers:stable:cri-o:$VERSION/CentOS_8/devel:kubic:libcontainers:stable:cri-o:$VERSION.repo

Then use the DNF package manager to install CRI-O:

$ sudo dnf install cri-o

Install-Crio-RHEL-DNF-Command

Next, enable CRI-O on boot time and start it:

$ sudo systemctl enable cri-o
$ sudo systemctl start cri-o

Step 6)  Install Kubernetes Packages

With everything required for Kubernetes to work installed, let us go ahead and install Kubernetes packages like kubelet, kubeadm and kubectl. Create a Kubernetes repository file.

$ sudo vi /etc/yum.repos.d/kubernetes.repo

And add the following lines.

[kubernetes]
name=Kubernetes
baseurl=https://packages.cloud.google.com/yum/repos/kubernetes-el7-x86_64
enabled=1
gpgcheck=1
repo_gpgcheck=1
gpgkey=https://packages.cloud.google.com/yum/doc/yum-key.gpg https://packages.cloud.google.com/yum/doc/rpm-package-key.gpg
exclude=kubelet kubeadm kubectl

Save the changes and exit. Finally, install k8s package as follows.

$ sudo dnf install -y kubelet kubeadm kubectl --disableexcludes=kubernetes

Once installed, be sure to enable and start Kubelet service.

$ sudo systemctl enable kubelet
$ sudo systemctl start kubelet

At this juncture, we are all set to install Kubernetes cluster.

Step 7)  Create a Kubernetes cluster

We are going to initialize a Kubernetes cluster using the kubeadm command as follows. This initializes a control plane in the master node.

$ sudo kubeadm init --pod-network-cidr=192.168.10.0/16

Once the control plane is created, you will be required to carry out some additional commands to start using the cluster.

k8s-control-plane-initialize-success-rhel

Therefore, run the commands, sequentially.

$ mkdir -p $HOME/.kube
$ sudo cp -i /etc/kubernetes/admin.conf $HOME/.kube/config
$ sudo chown $(id -u):$(id -g) $HOME/.kube/config

At the very end of the output, you will be given the command to run on worker nodes to join the cluster. We will come to that later in the next step.

Also, be sure to remove taints from the master node:

$ kubectl taint nodes –all node-role.kubernetes.io/master-

Step 8)  Install Calico Pod Network Add-on

The next step is to install Calico CNI (Container Network Interface). It is an opensource project used to provide container networking and security. After Installing Calico CNI, nodes state will change to Ready state, DNS service inside the cluster would be functional and containers can start communicating with each other.

Calico provides scalability, high performance, and interoperability with existing Kubernetes workloads. It can be deployed on-premises and on popular cloud technologies such as Google Cloud, AWS and Azure.

To install Calico CNI, run the following command from the master node

$ kubectl create -f https://docs.projectcalico.org/manifests/tigera-operator.yaml

Once complete, execute this one.

$ kubectl create -f https://docs.projectcalico.org/manifests/custom-resources.yaml

To confirm if the pods have started, run the command:

$ watch kubectl get pods -n calico-system

You should see that each pod is ‘READY’ and has the ‘RUNNING’ status as shown in the third column.

Pods-in-Calico-System-RHEL

To verify the master node’s availability in the cluster, run the command:

$ kubectl get nodes

kubectl-get-nodes-rhel8

In addition, you can retrieve more information using the -o wide options.

$ kubectl get nodes -o wide

Kubectl-get-nodes-wide-rhel

The above output confirms that the master node is ready. Additionally, you can check the pod namespaces:

$ kubectl get pods --all-namespaces

kubecel-get-namespace-rhel8

Step 9) Adding worker node to the cluster

To add the worker node to the Kubernetes cluster, follow step 1 up until Step 6.  Once you are done, run the command generated by the master node for joining a worker node to the cluster. In our case, this will be:

$ sudo kubeadm join 10.128.15.228:6443 --token cqb8vy.iicmmqrb1m8u9cob --discovery-token-ca-cert-hash sha256:79748a56f603e6cc57f67bf90b7db5aebe090107d540d6cc8a8f65b785de7543

If all goes well, you should get the notification that the node has joined the cluster. Repeat the same procedure for other nodes in case you have multiple worker nodes

Join-worker-node-k8s-cluster-rhel8

Now, head back to the master node and, once again, verify the nodes in your cluster. This time around, the worker node will appear in the list on nodes in the cluster,

$ kubectl get nodes

kubectl-get-nodes-after-joining-cluster-rhel

Conclusion

That was a walk through of how you can install a Kubernetes Cluster on RHEL 8. Your feedback on this guide is welcome.

The post How to Install Kubernetes (k8s) Cluster on RHEL 8 first appeared on LinuxTechi.

How to Install Docker on Ubuntu 22.04 / 20.04 LTS

$
0
0

Docker is a free and open source tool designed to build, deploy, and run applications inside containers. Host on which docker is installed is known docker engine. Docker uses the OS level virtualization and providers container run time environment. In other words, Docker can also defined as PaaS (platform as service) tool.

As docker is a daemon based service, so make sure docker service is up and running. When you launch an application which needs multiple containers to spin up and there is dependency among the containers then in such scenarios, docker compose is the solution.

In this guide, we will cover how to install Docker on Ubuntu 22.04 and 20.04 step by step and will also cover docker compose installation and its usage.

Prerequisites

  • Ubuntu 22.04 / 20.04 along with ssh access
  • sudo user with privilege rights
  • Stable Internet Connection

Let’s deep dive into Docker installation steps on Ubuntu 22.04 / 20.04. Installation steps of docker on these two LTS Ubuntu versions are identical.

Step 1) Install docker dependencies

Login to Ubuntu 22.04 /20.04 system and run the following apt commands to install docker dependencies,

$ sudo apt update
$ sudo apt install -y ca-certificates curl gnupg lsb-release

Step 2) Setup docker official repository

Though the docker packages are available in default package repositories but it is recommended to use docker official repository. To enable docker repository run below commands,

$ curl -fsSL https://download.docker.com/linux/ubuntu/gpg | sudo gpg --dearmor -o /usr/share/keyrings/docker-archive-keyring.gpg
$ echo "deb [arch=$(dpkg --print-architecture) signed-by=/usr/share/keyrings/docker-archive-keyring.gpg] https://download.docker.com/linux/ubuntu $(lsb_release -cs) stable" | sudo tee /etc/apt/sources.list.d/docker.list > /dev/null

Step 3) Install docker with apt command

Now, we are all set to install latest and stable version of docker from its official repository. Run the beneath to install it

$ sudo apt-get update
$ sudo apt install docker-ce docker-ce-cli containerd.io -y

Once the docker package is installed, add your local user to docker group so that local user can run docker commands with sudo. Run,

$ sudo usermod -aG docker $USER
$ newgrp docker

Note: Make sure logout and login again after adding local user to docker group

Verify the Docker version by executing following,

$ docker version

Output of above command would be:

Check-Docker-Version-Ubuntu

Verify whether docker daemon service is running or not by executing below systemctl command,

$ sudo systemctl status docker

docker-service-status-ubuntu

Above output confirms that docker daemon service is up and running.

Step 4) Verify docker Installation

To test and verify docker installation, spin up a ‘hello-world’ container using below docker command.

$ docker run hello-world

Above docker command will download ‘hello-world’ container image and then will spin up a container. If container displays the informational message, then we can say docker installation is successful.  Output of above ‘docker run’ would look like below.

docker-run-hello-world-container-ubuntu

Installation of Docker Compose on Ubuntu 22.04 / 20.04

To install docker compose on Ubuntu Linux, execute the following commands one after the another

$ sudo curl -L "https://github.com/docker/compose/releases/download/1.29.2/docker-compose-$(uname -s)-$(uname -m)" -o /usr/local/bin/docker-compose
$ sudo chmod +x /usr/local/bin/docker-compose

Check the docker-compose version by running following command,

$ docker-compose --version
docker-compose version 1.29.2, build cabd5cfb
$

Perfect, above output confirms that docker compose of version 1.29.2 is installed.

Test Docker Compose Installation

To test docker compose, let’s try to deploy WordPress using compose file. Create a project directory ‘wordpress’ using mkdir command.

$ mkdir wordpress ; cd wordpress

Create a docker-compose.yaml file with following contents.

$ vi docker-compose.yaml
version: '3.3'

services:
   db:
     image: mysql:latest
     volumes:
       - db_data:/var/lib/mysql
     restart: always
     environment:
       MYSQL_ROOT_PASSWORD: sqlpass@123#
       MYSQL_DATABASE: wordpress_db
       MYSQL_USER: dbuser
       MYSQL_PASSWORD: dbpass@123#
   wordpress:
     depends_on:
       - db
     image: wordpress:latest
     ports:
       - "8000:80"
     restart: always
     environment:
       WORDPRESS_DB_HOST: db:3306
       WORDPRESS_DB_USER: dbuser
       WORDPRESS_DB_PASSWORD: dbpass@123#
       WORDPRESS_DB_NAME: wordpress_db
volumes:
    db_data: {}

Save and close the file.

docker-compose-file-wordpress

As we can see, we have used two containers one for WordPress web and other one is for Database. We are also creating the persistent volume for DB container and WordPress GUI is exposed on ‘8000’ port.

To deploy the WordPress, run the below command from your project’s directory

$ docker-compose up -d

Output of above command would like below:

docker-compose-wordpress-ubuntu

Above confirms that two containers are created successfully. Now try to access WordPress from the Web Browser by typing URL:

http://<Server-IP-Address>:8000

Wordpress-installation-via-docker-compose-ubuntu

Great, above confirms that WordPress installation is started via docker-compose. Click on Continue and follow screen instructions to finish the installation.

That’s all from this guide. I hope you found this guide informative, please don’t hesitate to share your feedback and comments.

For more documentation on docker please refer : Docker Documentation

Also Read : How to Setup Local APT Repository Server on Ubuntu 20.04

Also Read : How to Setup Traefik for Docker Containers on Ubuntu 20.04

The post How to Install Docker on Ubuntu 22.04 / 20.04 LTS first appeared on LinuxTechi.
Viewing all 454 articles
Browse latest View live